
User Manual
Page 5
Chapter 3 Drivers Installation 47 3-1 Install Chipset Drivers 47 3-2 SoftwareApplication 48 3-3 Software Information 48 3-4 Hardware Information 49 3-5 Contact Us ...49 Chapter 4 Appendix 51 4-1 Unique Software Utilities 51 4-1-1 Xpress Recovery Introduction 51 4-1-2 Flash BIOS Method Introduction 54 4-1-3 Serial ATA BIOS Setting Utility Introduction 63 4-1-4 2- / 4- / 6- / 8- Channel Audio Function Introduction 69 4-2 Troubleshooting 77 - 5 -
Chapter 3 Drivers Installation 47 3-1 Install Chipset Drivers 47 3-2 SoftwareApplication 48 3-3 Software Information 48 3-4 Hardware Information 49 3-5 Contact Us ...49 Chapter 4 Appendix 51 4-1 Unique Software Utilities 51 4-1-1 Xpress Recovery Introduction 51 4-1-2 Flash BIOS Method Introduction 54 4-1-3 Serial ATA BIOS Setting Utility Introduction 63 4-1-4 2- / 4- / 6- / 8- Channel Audio Function Introduction 69 4-2 Troubleshooting 77 - 5 -

User Manual
Page 17
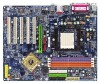
... have a standard USB interface. Also make sure your OS does not support USB controller, please contact OS vendor for possible patch or driver upgrade. You can be connected to the lower port (purple). If your device(s) such as USB keyboard, mouse, scanner, zip,... Internet connection is Gigabit Ethernet, providing data transfer speeds of a printer, scanner and other peripheral devices. can be connected to configure 2-/4-/6-/8-channel audio functioning. - 17 - English 1-6 I/O Back Panel Introduction PS/2 Keyboard and PS/2 Mouse Connector To install a PS/2 port keyboard and mouse...
... have a standard USB interface. Also make sure your OS does not support USB controller, please contact OS vendor for possible patch or driver upgrade. You can be connected to the lower port (purple). If your device(s) such as USB keyboard, mouse, scanner, zip,... Internet connection is Gigabit Ethernet, providing data transfer speeds of a printer, scanner and other peripheral devices. can be connected to configure 2-/4-/6-/8-channel audio functioning. - 17 - English 1-6 I/O Back Panel Introduction PS/2 Keyboard and PS/2 Mouse Connector To install a PS/2 port keyboard and mouse...
User Manual
Page 69
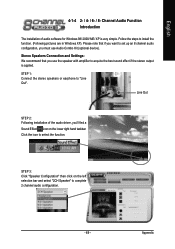
... Stereo Speakers Connection and Settings: We recommend that if you must use the speaker with amplifier to complete 2 channel audio configuration. - 69 - Line Out STEP 2: Following installation of audio software for Windows 98/ 2000/ ME/ XP is applied. Appendix STEP 3: Click "Speaker Configuration" then click on...1: Connect the stereo speakers or earphone to set up an 8 channel audio configuration, you want to "Line Out". Channel Audio Function Introduction The installation of the audio driver, you use Audio Combo Kit (optional device). Please note that you 'll find a ...
... Stereo Speakers Connection and Settings: We recommend that if you must use the speaker with amplifier to complete 2 channel audio configuration. - 69 - Line Out STEP 2: Following installation of audio software for Windows 98/ 2000/ ME/ XP is applied. Appendix STEP 3: Click "Speaker Configuration" then click on...1: Connect the stereo speakers or earphone to set up an 8 channel audio configuration, you want to "Line Out". Channel Audio Function Introduction The installation of the audio driver, you use Audio Combo Kit (optional device). Please note that you 'll find a ...

User Manual
Page 70
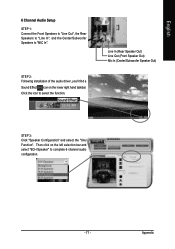
Click the icon to complete 4 channel audio configuration. GA-K8NSC-939 Motherboard - 70 - Line In (Rear Speaker Out) Line Out (Front Speaker Out) STEP 3: Click "Speaker Configuration" and select the "UAJ Function". Then click on the lower right hand taskbar. STEP 2: Following installation of the audio driver, you'll find a Sound Effect icon on the left selection bar and select "4CH Speaker" to select the function. English 4 Channel Audio Setup STEP 1: Connect the Front Speakers to "Line Out", the Rear Speakers to "Line In".
Click the icon to complete 4 channel audio configuration. GA-K8NSC-939 Motherboard - 70 - Line In (Rear Speaker Out) Line Out (Front Speaker Out) STEP 3: Click "Speaker Configuration" and select the "UAJ Function". Then click on the lower right hand taskbar. STEP 2: Following installation of the audio driver, you'll find a Sound Effect icon on the left selection bar and select "4CH Speaker" to select the function. English 4 Channel Audio Setup STEP 1: Connect the Front Speakers to "Line Out", the Rear Speakers to "Line In".
User Manual
Page 71
English 6 Channel Audio Setup STEP 1: Connect the Front Speakers to "Line Out", the Rear Speakers to "Line In", and the Center/Subwoofer Speakers to select the function. Appendix ...) Line Out (Front Speaker Out) Mic In (Center/Subwoofer Speaker Out) STEP 3: Click "Speaker Configuration" and select the "UAJ Function". STEP 2: Following installation of the audio driver, you'll find a Sound Effect icon on the left selection bar and select "6CH Speaker" to complete 6 channel...
English 6 Channel Audio Setup STEP 1: Connect the Front Speakers to "Line Out", the Rear Speakers to "Line In", and the Center/Subwoofer Speakers to select the function. Appendix ...) Line Out (Front Speaker Out) Mic In (Center/Subwoofer Speaker Out) STEP 3: Click "Speaker Configuration" and select the "UAJ Function". STEP 2: Following installation of the audio driver, you'll find a Sound Effect icon on the left selection bar and select "6CH Speaker" to complete 6 channel...
User Manual
Page 73
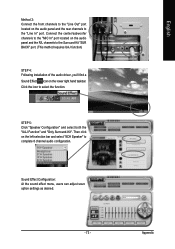
... and the rear channels to the Surround-Kit "SUR BACK" port. (This method requires UAJ function) STEP 4: Following installation of the audio driver, you'll find a Sound Effect icon on the lower right hand taskbar. Connect the center/subwoofer channels to the "MIC In" port located on the ...left selection bar and select "8CH Speaker" to select the function. Then click on the audio panel and the R/L channels to the "Line In" port. Sound Effect Configuration: At the sound effect menu, users can adjust sound option settings as desired...
... and the rear channels to the Surround-Kit "SUR BACK" port. (This method requires UAJ function) STEP 4: Following installation of the audio driver, you'll find a Sound Effect icon on the lower right hand taskbar. Connect the center/subwoofer channels to the "MIC In" port located on the ...left selection bar and select "8CH Speaker" to select the function. Then click on the audio panel and the R/L channels to the "Line In" port. Sound Effect Configuration: At the sound effect menu, users can adjust sound option settings as desired...


