Manual
Page 3
...instructions on how to assist in the use of this manual is protected by copyright laws and is 1.0. Documentation Classifications In order to use GIGABYTE's unique features, read or download the information on/from the Support&Downloads\Motherboard\Technology Guide page on your motherboard revision before updating motherboard BIOS... respective owners. For example, "REV: 1.0" means the revision of the motherboard is the property of this manual are legally registered to the specifications and features in any form or by GIGABYTE without GIGABYTE's prior written permission.
...instructions on how to assist in the use of this manual is protected by copyright laws and is 1.0. Documentation Classifications In order to use GIGABYTE's unique features, read or download the information on/from the Support&Downloads\Motherboard\Technology Guide page on your motherboard revision before updating motherboard BIOS... respective owners. For example, "REV: 1.0" means the revision of the motherboard is the property of this manual are legally registered to the specifications and features in any form or by GIGABYTE without GIGABYTE's prior written permission.
Manual
Page 4
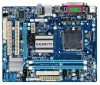
Table of Contents GA-G41MT-D3/GA-G41MT-ES2L Motherboard Layout 5 Chapter 1 Hardware Installation 6 1-1 Installation Precautions 6 1-2 Product Specifications 7 1-3 Installing the CPU and CPU Cooler 9 1-3-1 Installing the CPU...9 1-4 Installing the Memory 10 1-4-1 Dual Channel Memory Configuration 10 1-5 Installing an Expansion Card 10 1-6 Back Panel ...
Table of Contents GA-G41MT-D3/GA-G41MT-ES2L Motherboard Layout 5 Chapter 1 Hardware Installation 6 1-1 Installation Precautions 6 1-2 Product Specifications 7 1-3 Installing the CPU and CPU Cooler 9 1-3-1 Installing the CPU...9 1-4 Installing the Memory 10 1-4-1 Dual Channel Memory Configuration 10 1-5 Installing an Expansion Card 10 1-6 Back Panel ...
Manual
Page 7
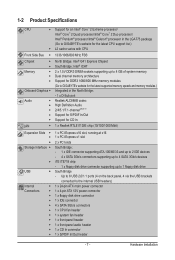
...8 USB 2.0/1.1 ports (4 on the back panel, 4 via the USB brackets connected to 1 floppy disk drive USB South Bridge - 1-2 Product Specifications CPU w w Support for an Intel® Core™ 2 Extreme processor/ Intel® Core™ 2 Quad processor/Intel® Core™ ...2 Duo processor/ Intel® Pentium® processor/Intel® Celeron® processor in the LGA775 package (Go to GIGABYTE's website for the latest CPU support list.) L2 cache varies with CPU Front Side Bus w 1333/1066/800 MHz FSB Chipset w w Memory ...
...8 USB 2.0/1.1 ports (4 on the back panel, 4 via the USB brackets connected to 1 floppy disk drive USB South Bridge - 1-2 Product Specifications CPU w w Support for an Intel® Core™ 2 Extreme processor/ Intel® Core™ 2 Quad processor/Intel® Core™ ...2 Duo processor/ Intel® Pentium® processor/Intel® Celeron® processor in the LGA775 package (Go to GIGABYTE's website for the latest CPU support list.) L2 cache varies with CPU Front Side Bus w 1333/1066/800 MHz FSB Chipset w w Memory ...
Manual
Page 9
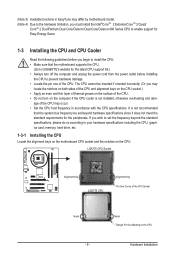
...8226; Make sure that the system bus frequency be inserted if oriented incorrectly. (Or you wish to set beyond the standard specifications, please do so according to GIGABYTE's website for the peripherals. If you may differ by motherboard model. (Note 4) Due to the hardware limitation, you must...and the notches on the CPU. It is not installed, otherwise overheating and dam- The CPU cannot be set the frequency beyond hardware specifications since it does not meet the standard requirements for the latest CPU support list.) • Always turn on the CPU Hardware Installation ...
...8226; Make sure that the system bus frequency be inserted if oriented incorrectly. (Or you wish to set beyond the standard specifications, please do so according to GIGABYTE's website for the peripherals. If you may differ by motherboard model. (Note 4) Due to the hardware limitation, you must...and the notches on the CPU. It is not installed, otherwise overheating and dam- The CPU cannot be set the frequency beyond hardware specifications since it does not meet the standard requirements for the latest CPU support list.) • Always turn on the CPU Hardware Installation ...
Manual
Page 10
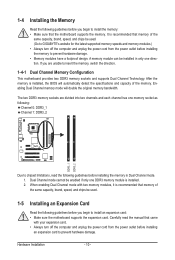
Enabling Dual Channel memory mode will automatically detect the specifications and capacity of the memory. If you are divided into two channels and each channel has one memory socket as following: Channel 0: DDR3_1 Channel 1: DDR3_2 ... installing the memory in only one DDR3 memory module is recommended that memory of the same capacity, brand, speed, and chips be used . (Go to GIGABYTE's website for the latest supported memory speeds and memory modules.) • Always turn off the computer and unplug the power cord from the power outlet...
Enabling Dual Channel memory mode will automatically detect the specifications and capacity of the memory. If you are divided into two channels and each channel has one memory socket as following: Channel 0: DDR3_1 Channel 1: DDR3_2 ... installing the memory in only one DDR3 memory module is recommended that memory of the same capacity, brand, speed, and chips be used . (Go to GIGABYTE's website for the latest supported memory speeds and memory modules.) • Always turn off the computer and unplug the power cord from the power outlet...

Manual
Page 11
... a back panel connector, first remove the cable from your device and then remove it from the connector. USB 2.0/1.1 Port The USB port supports the USB 2.0/1.1 specification. The following describes the states of HD Audio standard via front panel and enable the multi-channel audio feature through the audio driver. • When...
... a back panel connector, first remove the cable from your device and then remove it from the connector. USB 2.0/1.1 Port The USB port supports the USB 2.0/1.1 specification. The following describes the states of HD Audio standard via front panel and enable the multi-channel audio feature through the audio driver. • When...
Manual
Page 18
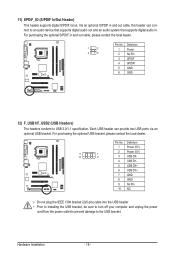
... installing the USB bracket, be sure to turn off your computer and unplug the power cord from the power outlet to prevent damage to USB 2.0/1.1 specification.
... installing the USB bracket, be sure to turn off your computer and unplug the power cord from the power outlet to prevent damage to USB 2.0/1.1 specification.
Manual
Page 24
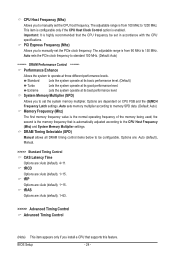
... at three different performance levels. DRAM Timing Selectable (SPD) Manual allows all DRAM timing control items below to manually set in accordance with the CPU specifications. Options are : Auto (default), 1~63. >>>>> Advanced Timing Control Advanced Timing Control (Note) This item appears only if you to 1200 MHz. tRAS Options are dependent...
... at three different performance levels. DRAM Timing Selectable (SPD) Manual allows all DRAM timing control items below to manually set in accordance with the CPU specifications. Options are : Auto (default), 1~63. >>>>> Advanced Timing Control Advanced Timing Control (Note) This item appears only if you to 1200 MHz. tRAS Options are dependent...
Manual
Page 28
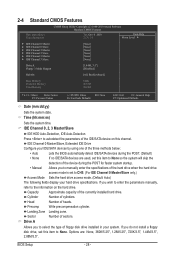
... so the system will skip the detection of the device during the POST for faster system startup. • Manual Allows you to manually enter the specifications of the IDE/SATA device on the hard drive. BIOS Setup - 28 - Cylinder Number of the currently installed hard drive. Head Number of sectors. Sector... the hard drive access mode is set this channel. Drive A Allows you to select the type of floppy disk drive installed in your hard drive specifications.
... so the system will skip the detection of the device during the POST for faster system startup. • Manual Allows you to manually enter the specifications of the IDE/SATA device on the hard drive. BIOS Setup - 28 - Cylinder Number of the currently installed hard drive. Head Number of sectors. Sector... the hard drive access mode is set this channel. Drive A Allows you to select the type of floppy disk drive installed in your hard drive specifications.
Manual
Page 35
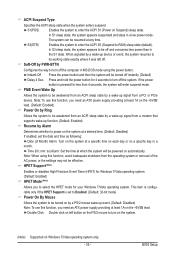
... operating system or removal of Month) Alarm: Turn on left off. Instant-Off Press the power button and then the system will be resumed at a specific time on each day or on the +5VSB lead. If the power button is set the date and time as following: Date (of the AC...) Resume by a PS/2 mouse wake-up event. (Default: Disabled) Note: To use this function, you need an ATX power supply providing at least 1A on a specific day in the S1 state. In S1 sleep state, the system appears suspended and stays in MS-DOS mode using this function, avoid inadequate shutdown...
... operating system or removal of Month) Alarm: Turn on left off. Instant-Off Press the power button and then the system will be resumed at a specific time on each day or on the +5VSB lead. If the power button is set the date and time as following: Date (of the AC...) Resume by a PS/2 mouse wake-up event. (Default: Disabled) Note: To use this function, you need an ATX power supply providing at least 1A on a specific day in the S1 state. In S1 sleep state, the system appears suspended and stays in MS-DOS mode using this function, avoid inadequate shutdown...