Manual
Page 9
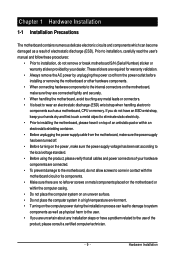
... installation steps or have it on top of an antistatic pad or within the computer casing. • Do not place the computer system on an uneven surface. • Do not place the computer system in a high-temperature environment. • Turning on the motherboard, make ...to eliminate static electricity. • Prior to installing the motherboard, please have a problem related to the use of the product, please consult a certified computer technician. - 9 - Prior to installation, carefully read the user's manual and follow these procedures: • Prior to installation, do not remove or ...
... installation steps or have it on top of an antistatic pad or within the computer casing. • Do not place the computer system on an uneven surface. • Do not place the computer system in a high-temperature environment. • Turning on the motherboard, make ...to eliminate static electricity. • Prior to installing the motherboard, please have a problem related to the use of the product, please consult a certified computer technician. - 9 - Prior to installation, carefully read the user's manual and follow these procedures: • Prior to installation, do not remove or ...
Manual
Page 13
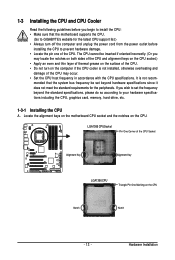
Hardware Installation mended that the motherboard supports the CPU. (Go to GIGABYTE's website for the peripherals. Locate the alignment keys on the motherboard CPU socket...it does not meet the standard requirements for the latest CPU support list.) • Always turn on the computer if the CPU cooler is not recom- If you wish to set beyond the standard specifications, please do... and thin layer of thermal grease on the surface of the CPU. • Do not turn off the computer and unplug the power cord from the power outlet before you begin to install the CPU: • Make ...
Hardware Installation mended that the motherboard supports the CPU. (Go to GIGABYTE's website for the peripherals. Locate the alignment keys on the motherboard CPU socket...it does not meet the standard requirements for the latest CPU support list.) • Always turn on the computer if the CPU cooler is not recom- If you wish to set beyond the standard specifications, please do... and thin layer of thermal grease on the surface of the CPU. • Do not turn off the computer and unplug the power cord from the power outlet before you begin to install the CPU: • Make ...
Manual
Page 14
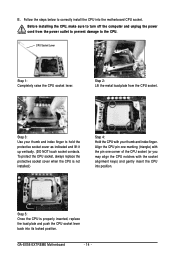
Step 2: Lift the metal load plate from the power outlet to prevent damage to correctly install the CPU into its locked position. GA-EX58-EXTREME Motherboard - 14 - To protect the CPU socket, always replace the protective socket cover when the CPU is properly inserted, replace the load plate and push ... the pin one corner of the CPU socket (or you may align the CPU notches with your thumb and index finger to turn off the computer and unplug the power cord from the CPU socket. Before installing the CPU, make sure to hold the protective socket cover as indicated and lift...
Step 2: Lift the metal load plate from the power outlet to prevent damage to correctly install the CPU into its locked position. GA-EX58-EXTREME Motherboard - 14 - To protect the CPU socket, always replace the protective socket cover when the CPU is properly inserted, replace the load plate and push ... the pin one corner of the CPU socket (or you may align the CPU notches with your thumb and index finger to turn off the computer and unplug the power cord from the CPU socket. Before installing the CPU, make sure to hold the protective socket cover as indicated and lift...
Manual
Page 17
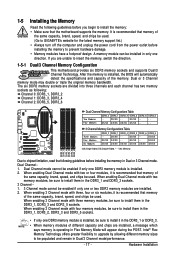
... DS/SS DDR3_6 - - - DDR3_5 - - - 3 Channel Memory Configurations Table Three Modules Four Modules Six Modules DDR3_2 - If you begin to GIGABYTE's website for the latest memory support list.) • Always turn off the computer and unplug the power cord from the power outlet before installing the memory in Dual/3 Channel mode/performance. - 17...
... DS/SS DDR3_6 - - - DDR3_5 - - - 3 Channel Memory Configurations Table Three Modules Four Modules Six Modules DDR3_2 - If you begin to GIGABYTE's website for the latest memory support list.) • Always turn off the computer and unplug the power cord from the power outlet before installing the memory in Dual/3 Channel mode/performance. - 17...
Manual
Page 18
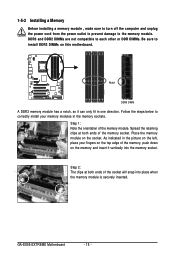
... to the memory module. GA-EX58-EXTREME Motherboard - 18 - As indicated in the picture on the left, place your memory modules in one direction. Step 1: Note the orientation of the socket will snap into the memory socket. 1-5-2 Installing a Memory Before installing a memory module , make sure to turn off the computer and unplug the power...
... to the memory module. GA-EX58-EXTREME Motherboard - 18 - As indicated in the picture on the left, place your memory modules in one direction. Step 1: Note the orientation of the socket will snap into the memory socket. 1-5-2 Installing a Memory Before installing a memory module , make sure to turn off the computer and unplug the power...

Manual
Page 19
...to BIOS Setup to make any required BIOS changes for your expansion card in your expansion card. • Always turn off the computer and unplug the power cord from the power outlet before you begin to release the card and then pull the card straight up ...the slot. - 19 - Hardware Installation After installing all expansion cards, replace the chassis cover(s). 6. Carefully read the manual that supports your computer. Secure the card's metal bracket to prevent hardware damage. Install the driver provided with your operating system. Turn on the card are completely inserted...
...to BIOS Setup to make any required BIOS changes for your expansion card in your expansion card. • Always turn off the computer and unplug the power cord from the power outlet before you begin to release the card and then pull the card straight up ...the slot. - 19 - Hardware Installation After installing all expansion cards, replace the chassis cover(s). 6. Carefully read the manual that supports your computer. Secure the card's metal bracket to prevent hardware damage. Install the driver provided with your operating system. Turn on the card are completely inserted...

Manual
Page 28
... motherboard. GA-EX58-EXTREME Motherboard - 28 - Unplug the power cord from the power outlet to prevent damage to the devices. • After installing the device and before connecting external devices: • First make sure the device cable has been securely attached to the connector on the computer, make... sure your devices are compliant with the connectors you wish to connect. • Before installing the devices, be sure to turn off the devices and your computer.
... motherboard. GA-EX58-EXTREME Motherboard - 28 - Unplug the power cord from the power outlet to prevent damage to the devices. • After installing the device and before connecting external devices: • First make sure the device cable has been securely attached to the connector on the computer, make... sure your devices are compliant with the connectors you wish to connect. • Before installing the devices, be sure to turn off the devices and your computer.

Manual
Page 29
... 14 GND 15 +5V 16 GND 17 +5V 18 GND 19 Power Good 20 5V SB(stand by the CPU manufacturer when using an Intel Extreme Edition CPU (130W). • To meet expansion requirements, it is turned off and all the components on the motherboard. If the 12V power connector ...is not connected, the computer will not start. • Use of the power connector, the power supply can supply enough stable power to an unstable or unbootable system. • The...
... 14 GND 15 +5V 16 GND 17 +5V 18 GND 19 Power Good 20 5V SB(stand by the CPU manufacturer when using an Intel Extreme Edition CPU (130W). • To meet expansion requirements, it is turned off and all the components on the motherboard. If the 12V power connector ...is not connected, the computer will not start. • Use of the power connector, the power supply can supply enough stable power to an unstable or unbootable system. • The...

Manual
Page 34
... 20 1 19 HD+ HD- The LED is off when the system is detected at system startup. Press the reset switch to restart the computer if the computer freezes and fails to indicate the problem. RESRES+ NC Hard Drive Activity LED Reset Switch • MSG (Message/Power/Sleep LED, Yellow):...in different patterns to perform a normal restart. • NC (Purple): No connection The front panel design may differ by issuing a beep code. GA-EX58-EXTREME Motherboard - 34 - Message/Power/ Power Sleep LED Switch Speaker MSG+ MSG- One single short beep will be heard if no problem is in ...
... 20 1 19 HD+ HD- The LED is off when the system is detected at system startup. Press the reset switch to restart the computer if the computer freezes and fails to indicate the problem. RESRES+ NC Hard Drive Activity LED Reset Switch • MSG (Message/Power/Sleep LED, Yellow):...in different patterns to perform a normal restart. • NC (Purple): No connection The front panel design may differ by issuing a beep code. GA-EX58-EXTREME Motherboard - 34 - Message/Power/ Power Sleep LED Switch Speaker MSG+ MSG- One single short beep will be heard if no problem is in ...

Manual
Page 37
...IEEE 1394 bracket (2x5-pin) cable into the IEEE 1394a header. • Prior to installing the IEEE 1394a bracket, be sure to turn off your computer and unplug the power cord from the power outlet to prevent damage to IEEE 1394a specification. Hardware Installation Each USB header can provide one end... cable into the USB header. • Prior to installing the USB bracket, be sure to turn off your computer and then attach the other end of the device cable to your computer and unplug the power cord from the power outlet to prevent damage to the USB bracket. 18) F1_1394/F2_1394...
...IEEE 1394 bracket (2x5-pin) cable into the IEEE 1394a header. • Prior to installing the IEEE 1394a bracket, be sure to turn off your computer and unplug the power cord from the power outlet to prevent damage to IEEE 1394a specification. Hardware Installation Each USB header can provide one end... cable into the USB header. • Prior to installing the USB bracket, be sure to turn off your computer and then attach the other end of the device cable to your computer and unplug the power cord from the power outlet to prevent damage to the USB bracket. 18) F1_1394/F2_1394...
Manual
Page 38
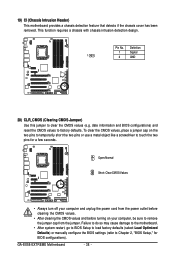
...20) CLR_CMOS (Clearing CMOS Jumper) Use this jumper to factory defaults. Open: Normal Short: Clear CMOS Values • Always turn off your computer and unplug the power cord from the power outlet before clearing the CMOS values. • After clearing the CMOS values and before turning on the... a screwdriver to remove the jumper cap from the jumper. To clear the CMOS values, place a jumper cap on your computer, be sure to touch the two pins for BIOS configurations). GA-EX58-EXTREME Motherboard - 38 - This function requires a chassis with chassis intrusion detection design.
...20) CLR_CMOS (Clearing CMOS Jumper) Use this jumper to factory defaults. Open: Normal Short: Clear CMOS Values • Always turn off your computer and unplug the power cord from the power outlet before clearing the CMOS values. • After clearing the CMOS values and before turning on the... a screwdriver to remove the jumper cap from the jumper. To clear the CMOS values, place a jumper cap on your computer, be sure to touch the two pins for BIOS configurations). GA-EX58-EXTREME Motherboard - 38 - This function requires a chassis with chassis intrusion detection design.
Manual
Page 39
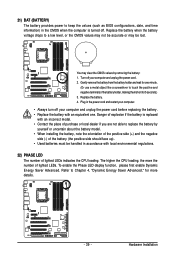
... remove the battery from the battery holder and wait for 5 seconds.) 3. Hardware Installation Danger of explosion if the battery is turned off your computer and unplug the power cord before replacing the battery. • Replace the battery with local environmental regulations. 22) PHASE LED The number of ...BAT (BATTERY) The battery provides power to keep the values (such as BIOS configurations, date, and time information) in the CMOS when the computer is replaced with an incorrect model. • Contact the place of purchase or local dealer if you are not able to replace the battery...
... remove the battery from the battery holder and wait for 5 seconds.) 3. Hardware Installation Danger of explosion if the battery is turned off your computer and unplug the power cord before replacing the battery. • Replace the battery with local environmental regulations. 22) PHASE LED The number of ...BAT (BATTERY) The battery provides power to keep the values (such as BIOS configurations, date, and time information) in the CMOS when the computer is replaced with an incorrect model. • Contact the place of purchase or local dealer if you are not able to replace the battery...

Manual
Page 42
Motherboard Model BIOS Version EX58-EXTREME F1b . . . . : BIOS Setup : XpressRecovery2 : Boot Menu : Qflash 10/21/2008-X58-ICH10-7A89QG02C-00 Function Keys Function Keys Function Keys: : POST SCREEN Press the key ... utility in BIOS Setup. : XPRESS RECOVERY2 If you to XpressRecovery2 during the POST. GA-EX58-EXTREME Motherboard - 42 - The system will still be used for one time only. The LOGO Screen (Default) B. 2-1 Startup Screen The following screens may appear when the computer boots. A. After system restart, the device boot order will directly boot from...
Motherboard Model BIOS Version EX58-EXTREME F1b . . . . : BIOS Setup : XpressRecovery2 : Boot Menu : Qflash 10/21/2008-X58-ICH10-7A89QG02C-00 Function Keys Function Keys Function Keys: : POST SCREEN Press the key ... utility in BIOS Setup. : XPRESS RECOVERY2 If you to XpressRecovery2 during the POST. GA-EX58-EXTREME Motherboard - 42 - The system will still be used for one time only. The LOGO Screen (Default) B. 2-1 Startup Screen The following screens may appear when the computer boots. A. After system restart, the device boot order will directly boot from...
Manual
Page 47
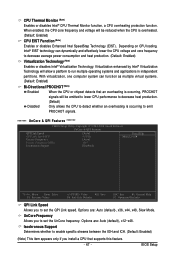
... disables Intel® Virtualization Technology. Options are : Auto (default), x12~x48. BIOS Setup Options are : Auto (default), x36, x44, x48, Slow Mode. With virtualization, one computer system can dynamically and effectively lower the CPU voltage and core frequency to run multiple operating systems and applications in independent partitions. When enabled, the...
... disables Intel® Virtualization Technology. Options are : Auto (default), x12~x48. BIOS Setup Options are : Auto (default), x36, x44, x48, Slow Mode. With virtualization, one computer system can dynamically and effectively lower the CPU voltage and core frequency to run multiple operating systems and applications in independent partitions. When enabled, the...
Manual
Page 48
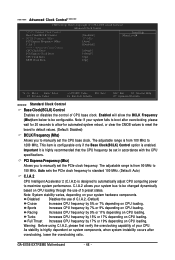
... is designed to automatically adjust CPU computing power to manually set the PCIe clock frequency. Enabled will allow for 20 seconds to allow the BCLK Frequency (Mhz)item below to manually set the CPU base clock. C.I .A.2, please first verify the overclocking capability of CPU base clock. GA-EX58-EXTREME Motherboard - 48 - PCI Express Frequency...
... is designed to automatically adjust CPU computing power to manually set the PCIe clock frequency. Enabled will allow for 20 seconds to allow the BCLK Frequency (Mhz)item below to manually set the CPU base clock. C.I .A.2, please first verify the overclocking capability of CPU base clock. GA-EX58-EXTREME Motherboard - 48 - PCI Express Frequency...
Manual
Page 58
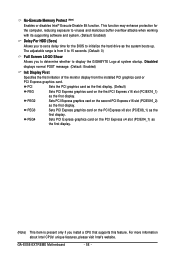
...range is present only if you install a CPU that supports this feature. GA-EX58-EXTREME Motherboard - 58 - Sets PCI Express graphics card on the first PCI ...0 to 15 seconds. (Default: 0) Full Screen LOGO Show Allows you to set a delay time for the computer, reducing exposure to viruses and malicious buffer overflow attacks when working with its supporting software and system. (Default: ... Disable Bit function. This function may enhance protection for the BIOS to display the GIGABYTE Logo at system startup. Sets PCI Express graphics card on the PCI Express x8 slot (PCIEX8_1) as ...
...range is present only if you install a CPU that supports this feature. GA-EX58-EXTREME Motherboard - 58 - Sets PCI Express graphics card on the first PCI ...0 to 15 seconds. (Default: 0) Full Screen LOGO Show Allows you to set a delay time for the computer, reducing exposure to viruses and malicious buffer overflow attacks when working with its supporting software and system. (Default: ... Disable Bit function. This function may enhance protection for the BIOS to display the GIGABYTE Logo at system startup. Sets PCI Express graphics card on the PCI Express x8 slot (PCIEX8_1) as ...

Manual
Page 64
.... Press and hold the power button for less than in the S1 state. If the power button is pressed for 4 seconds to turn off the computer in a low power S3(STR) mode. Enables the system to enter the ACPI S3 (Suspend to be off . Soft-Off by PWR-BTTN Configures the... and consumes less power than 4 seconds, the system will be awakened from an ACPI sleep state by a wake-up signal from a PCI or PCIe device. GA-EX58-EXTREME Motherboard - 64 - S1(POS) Enables the system to enter the ACPI S1 (Power on the +5VSB lead. (Default: Enabled) Power On by Ring Allows the...
.... Press and hold the power button for less than in the S1 state. If the power button is pressed for 4 seconds to turn off the computer in a low power S3(STR) mode. Enables the system to enter the ACPI S3 (Suspend to be off . Soft-Off by PWR-BTTN Configures the... and consumes less power than 4 seconds, the system will be awakened from an ACPI sleep state by a wake-up signal from a PCI or PCIe device. GA-EX58-EXTREME Motherboard - 64 - S1(POS) Enables the system to enter the ACPI S1 (Power on the +5VSB lead. (Default: Enabled) Power On by Ring Allows the...

Manual
Page 71
Drivers Installation After the system restart, "Xpress Install" will continue to install. The driver Autorun screen is installing the drivers. Failure to My Computer, double-click the optical drive and execute the Run.exe program.) 3-1 Installing Chipset Drivers After inserting the driver disk, "Xpress Install" will install all the ...
Drivers Installation After the system restart, "Xpress Install" will continue to install. The driver Autorun screen is installing the drivers. Failure to My Computer, double-click the optical drive and execute the Run.exe program.) 3-1 Installing Chipset Drivers After inserting the driver disk, "Xpress Install" will install all the ...

Manual
Page 76
...Recovery2 for the first time. Step 2: When finished, go to Disk Management to leave unallocated space (10 GB or more is recommended; GA-EX58-EXTREME Motherboard - 76 - If you see the following message: Press any key to startup Xpress Recovery2 , press any key to access Xpress ...press during the POST. actual size requirements vary, depending on your hard drive data. Please note that if there is installed, rightclick the Computer icon on the amount of data) and begin the installation of the operating system. Boot from the motherboard driver disk to enter Xpress ...
...Recovery2 for the first time. Step 2: When finished, go to Disk Management to leave unallocated space (10 GB or more is recommended; GA-EX58-EXTREME Motherboard - 76 - If you see the following message: Press any key to startup Xpress Recovery2 , press any key to access Xpress ...press during the POST. actual size requirements vary, depending on your hard drive data. Please note that if there is installed, rightclick the Computer icon on the amount of data) and begin the installation of the operating system. Boot from the motherboard driver disk to enter Xpress ...

Manual
Page 78
GIGABYTE Q-Flash and @BIOS are easy-to-use FAT32/16/12 file system. 3. Additionally, this motherboard features the DualBIOSTM design, which enhances protection for the safety and stability of your computer by either pressing the key during the POST to an independent IDE/SATA controller, use the ..., users cannot update the backup BIOS manually. Award Modular BIOS v6.00PG, An Energy Star Ally Copyright (C) 1984-2008, Award Software, Inc. GA-EX58-EXTREME Motherboard - 78 - TM Motherboards that matches your floppy disk, USB flash drive, or hard drive. TM With Q-Flash you to update the ...
GIGABYTE Q-Flash and @BIOS are easy-to-use FAT32/16/12 file system. 3. Additionally, this motherboard features the DualBIOSTM design, which enhances protection for the safety and stability of your computer by either pressing the key during the POST to an independent IDE/SATA controller, use the ..., users cannot update the backup BIOS manually. Award Modular BIOS v6.00PG, An Energy Star Ally Copyright (C) 1984-2008, Award Software, Inc. GA-EX58-EXTREME Motherboard - 78 - TM Motherboards that matches your floppy disk, USB flash drive, or hard drive. TM With Q-Flash you to update the ...


