Manual
Page 72
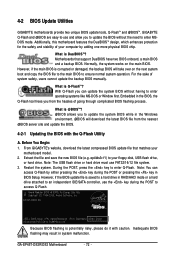
...MSDOS mode. TM With Q-Flash you from the nearest @BIOS server site and update the BIOS. 4-2-1 Updating the BIOS with caution. From GIGABYTE's website, download the latest compressed BIOS update file that support DualBIOS have two BIOS onboard, a main BIOS and a backup BIOS. Extract the...Flash tool frees you can access Q-Flash by adding one more physical BIOS chip. Restart the system. However, if the BIOS update file is corrupted or damaged, the backup BIOS will download the latest BIOS file from the hassles of going through complicated BIOS flashing process. GA-EP45T-DS3R/DS3 ...
...MSDOS mode. TM With Q-Flash you from the nearest @BIOS server site and update the BIOS. 4-2-1 Updating the BIOS with caution. From GIGABYTE's website, download the latest compressed BIOS update file that support DualBIOS have two BIOS onboard, a main BIOS and a backup BIOS. Extract the...Flash tool frees you can access Q-Flash by adding one more physical BIOS chip. Restart the system. However, if the BIOS update file is corrupted or damaged, the backup BIOS will download the latest BIOS file from the hassles of going through complicated BIOS flashing process. GA-EP45T-DS3R/DS3 ...
Manual
Page 79
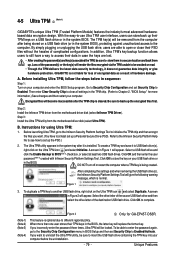
...use Ultra TPM user interface, users can store/back up their TPM keys on your computer. GIGABYTE is installed. A. Before launching Ultra TPM, go to store them up a Personal Secure Drive... (or in Figure 1 will appear. The TPM key(s) will be sure to Enabled/Activate. Instructions for GA-EP45T-DS3R. (Note 1) (Note 2) (Note 3) (Note 4) This feature is normal. Refer to the Infineon... the settings and when removing the USB flash drive(s), the Infineon Security Platform Settings Tool will replace the former key. When more information.) Save changes and then restart your...
...use Ultra TPM user interface, users can store/back up their TPM keys on your computer. GIGABYTE is installed. A. Before launching Ultra TPM, go to store them up a Personal Secure Drive... (or in Figure 1 will appear. The TPM key(s) will be sure to Enabled/Activate. Instructions for GA-EP45T-DS3R. (Note 1) (Note 2) (Note 3) (Note 4) This feature is normal. Refer to the Infineon... the settings and when removing the USB flash drive(s), the Infineon Security Platform Settings Tool will replace the former key. When more information.) Save changes and then restart your...
Manual
Page 80
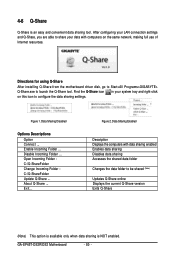
... the current Q-Share version Exits Q-Share (Note) This option is available only when data sharing is an easy and convenient data sharing tool. Data Sharing Disabled Options Descriptions Option Connect ... Enable Incoming Folder ... Figure 2. 4-6 Q-Share Q-Share is NOT enabled. Open Incoming Folder...on the same network, making full use of Internet resources. GA-EP45T-DS3R/DS3 Motherboard - 80 - Directions for using Q-Share After installing Q-Share from the motherboard driver disk, go to Start>All Programs>GIGABYTE> Q-Share.exe to configure the data sharing settings. Disable ...
... the current Q-Share version Exits Q-Share (Note) This option is available only when data sharing is an easy and convenient data sharing tool. Data Sharing Disabled Options Descriptions Option Connect ... Enable Incoming Folder ... Figure 2. 4-6 Q-Share Q-Share is NOT enabled. Open Incoming Folder...on the same network, making full use of Internet resources. GA-EP45T-DS3R/DS3 Motherboard - 80 - Directions for using Q-Share After installing Q-Share from the motherboard driver disk, go to Start>All Programs>GIGABYTE> Q-Share.exe to configure the data sharing settings. Disable ...

Manual
Page 99
... audio connections, but not both at the same time. - 99 - Step 3: Everytime you wish to connect an AC'97 front panel audio module, click the tool icon on the Sound Effect tab. Configuring AC'97 Audio: If you want to set up. B. Step 2: Click the Audio I /O tab On the Global Connector...
... audio connections, but not both at the same time. - 99 - Step 3: Everytime you wish to connect an AC'97 front panel audio module, click the tool icon on the Sound Effect tab. Configuring AC'97 Audio: If you want to set up. B. Step 2: Click the Audio I /O tab On the Global Connector...
Manual
Page 101
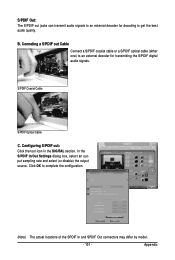
Click OK to get the best audio quality. Appendix Configuring S/PDIF out: Click the tool icon in the DIGITAL section. In the S/PDIF In/Out Settings dialog box, select an output sampling rate and select (or disable) the output source. S/...
Click OK to get the best audio quality. Appendix Configuring S/PDIF out: Click the tool icon in the DIGITAL section. In the S/PDIF In/Out Settings dialog box, select an output sampling rate and select (or disable) the output source. S/...