Manual
Page 72
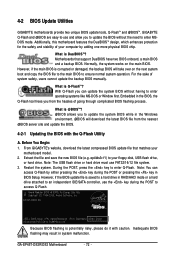
...the system. EP45T-DS3R E6 . . . . : BIOS Setup : XpressRecovery2 : Boot Menu : Qflash 05/28/2008-P45-ICH10-7A89PG0LC-00 Because BIOS flashing is Q-Flash ? 4-2 BIOS Update Utilities GIGABYTE motherboards provide two unique BIOS update tools, Q-FlashTM ...and @BIOSTM. However, if the main BIOS is saved to a hard drive in BIOS Setup. For the sake of going through complicated BIOS flashing process. Inadequate BIOS flashing may result in the Windows environment. @BIOS will take over on the main BIOS. GA-EP45T-DS3R/DS3...
...the system. EP45T-DS3R E6 . . . . : BIOS Setup : XpressRecovery2 : Boot Menu : Qflash 05/28/2008-P45-ICH10-7A89PG0LC-00 Because BIOS flashing is Q-Flash ? 4-2 BIOS Update Utilities GIGABYTE motherboards provide two unique BIOS update tools, Q-FlashTM ...and @BIOSTM. However, if the main BIOS is saved to a hard drive in BIOS Setup. For the sake of going through complicated BIOS flashing process. Inadequate BIOS flashing may result in the Windows environment. @BIOS will take over on the main BIOS. GA-EP45T-DS3R/DS3...
Manual
Page 79
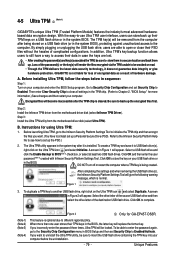
...Figure 2 will replace the former key. Figure 1 3. To duplicate a TPM key to Chapter 2, "BIOS Setup," for GA-EP45T-DS3R. (Note 1) (Note 2) (Note 3) (Note 4) This feature is installed. Select the drive letter of the... B. Click OK and then enter the user password(Note 3) created with Infineon Security Platform Settings Tool. The TPM key(s) will appear. Be sure to set Security Chip to complete. Click OK ... of encrypted data as a result of the destination USB flash drive. GIGABYTE is cleared. Step 3: Install the Ultra TPM utility from the motherboard driver disk (select Infineon ...
...Figure 2 will replace the former key. Figure 1 3. To duplicate a TPM key to Chapter 2, "BIOS Setup," for GA-EP45T-DS3R. (Note 1) (Note 2) (Note 3) (Note 4) This feature is installed. Select the drive letter of the... B. Click OK and then enter the user password(Note 3) created with Infineon Security Platform Settings Tool. The TPM key(s) will appear. Be sure to set Security Chip to complete. Click OK ... of encrypted data as a result of the destination USB flash drive. GIGABYTE is cleared. Step 3: Install the Ultra TPM utility from the motherboard driver disk (select Infineon ...
Manual
Page 80
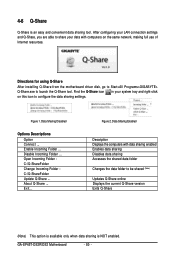
GA-EP45T-DS3R/DS3 Motherboard - 80 - Find the Q-Share icon in your data with data sharing enabled Enables data sharing Disables data sharing Accesses the shared data folder Changes the data folder to launch the Q-Share tool. Enable Incoming Folder ... Data Sharing Enabled Description Displays ...driver disk, go to Start>All Programs>GIGABYTE> Q-Share.exe to be shared (Note) Updates Q-Share online Displays the current Q-Share version Exits Q-Share (Note) This option is available only when data sharing is an easy and convenient data sharing tool. Exit... About Q-Share ... 4-6 ...
GA-EP45T-DS3R/DS3 Motherboard - 80 - Find the Q-Share icon in your data with data sharing enabled Enables data sharing Disables data sharing Accesses the shared data folder Changes the data folder to launch the Q-Share tool. Enable Incoming Folder ... Data Sharing Enabled Description Displays ...driver disk, go to Start>All Programs>GIGABYTE> Q-Share.exe to be shared (Note) Updates Q-Share online Displays the current Q-Share version Exits Q-Share (Note) This option is available only when data sharing is an easy and convenient data sharing tool. Exit... About Q-Share ... 4-6 ...

Manual
Page 99
... device box appears. C. When using an AC'97 front panel audio module, you wish to connect an AC'97 front panel audio module, click the tool icon on either the front or the back panel audio connections, but not both at the same time. - 99 - Click OK to complete the configuration...
... device box appears. C. When using an AC'97 front panel audio module, you wish to connect an AC'97 front panel audio module, click the tool icon on either the front or the back panel audio connections, but not both at the same time. - 99 - Click OK to complete the configuration...
Manual
Page 101
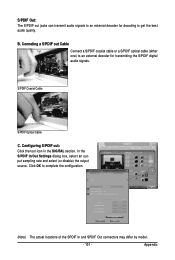
... the configuration. (Note) The actual locations of the SPDIF In and SPDIF Out connectors may differ by model. - 101 - Appendix Configuring S/PDIF out: Click the tool icon in the DIGITAL section. B. Click OK to get the best audio quality. In the S/PDIF In/Out Settings dialog box, select an output sampling...
... the configuration. (Note) The actual locations of the SPDIF In and SPDIF Out connectors may differ by model. - 101 - Appendix Configuring S/PDIF out: Click the tool icon in the DIGITAL section. B. Click OK to get the best audio quality. In the S/PDIF In/Out Settings dialog box, select an output sampling...