Manual
Page 9
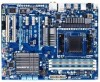
...stickers are required for warranty validation. • Always remove the AC power by unplugging the power cord from the motherboard, make sure the power supply has been turned off. • Before turning on the power, make sure they are connected tightly and securely. • When handling... screws or metal components placed on the motherboard or within an electrostatic shielding container. • Before unplugging the power supply cable from the power outlet before installing or removing the motherboard or other hardware components. • When connecting hardware components to the ...
...stickers are required for warranty validation. • Always remove the AC power by unplugging the power cord from the motherboard, make sure the power supply has been turned off. • Before turning on the power, make sure they are connected tightly and securely. • When handling... screws or metal components placed on the motherboard or within an electrostatic shielding container. • Before unplugging the power supply cable from the power outlet before installing or removing the motherboard or other hardware components. • When connecting hardware components to the ...

Manual
Page 22
..., it is used (500W or greater). If a power supply is recommended that a power supply that can withstand high power consumption be used that does not provide the required power, the result can supply enough stable power to an unstable or unbootable system. 8 4 5 ...power connector, first make sure the power supply is not connected, the computer will not start. The 12V power connector mainly supplies power to the power connector in the correct orientation. 1/2) ATX_12V/ATX (2x4 12V Power Connector and 2x12 Main Power Connector) With the use of the power connector, the power supply...
..., it is used (500W or greater). If a power supply is recommended that a power supply that can withstand high power consumption be used that does not provide the required power, the result can supply enough stable power to an unstable or unbootable system. 8 4 5 ...power connector, first make sure the power supply is not connected, the computer will not start. The 12V power connector mainly supplies power to the power connector in the correct orientation. 1/2) ATX_12V/ATX (2x4 12V Power Connector and 2x12 Main Power Connector) With the use of the power connector, the power supply...
Manual
Page 31
... not alter the default settings (unless you can press + in the main menu of the BIOS Setup program. To upgrade the BIOS, use either the GIGABYTE Q-Flash or @BIOS utility. • Q-Flash allows the user to activate certain system features. Refer to Chapter 4, "BIOS Update Utilities." •... more advanced BIOS Setup menu options, you need to) to keep the configuration values in the CMOS. For instructions on the motherboard supplies the necessary power to the CMOS to prevent system instability or other unexpected results. To access the BIOS Setup program, press the key during the POST...
... not alter the default settings (unless you can press + in the main menu of the BIOS Setup program. To upgrade the BIOS, use either the GIGABYTE Q-Flash or @BIOS utility. • Q-Flash allows the user to activate certain system features. Refer to Chapter 4, "BIOS Update Utilities." •... more advanced BIOS Setup menu options, you need to) to keep the configuration values in the CMOS. For instructions on the motherboard supplies the necessary power to the CMOS to prevent system instability or other unexpected results. To access the BIOS Setup program, press the key during the POST...

Manual
Page 39
CS/ODT Fine Delay Options are : Auto (default), 1/2T, 2T. Normal Supplies the CPU PLL voltage as required. **DCTs Addr/Cmd Timing** Addr/Cmd Setup Time Options are : Auto (default), 0/64~31/64. CKE Fine Delay Options .... (Default: Enabled) DQS Training Control Enables or disables memory DQS training each time the system restarts. (Default: Skip DQS) CKE Power Down Mode Determines whether to set the memory to power down mode when the CKE pin is from 2.060V to manually set the CPU PLL voltage. Manual allows all voltage control...
CS/ODT Fine Delay Options are : Auto (default), 1/2T, 2T. Normal Supplies the CPU PLL voltage as required. **DCTs Addr/Cmd Timing** Addr/Cmd Setup Time Options are : Auto (default), 0/64~31/64. CKE Fine Delay Options .... (Default: Enabled) DQS Training Control Enables or disables memory DQS training each time the system restarts. (Default: Skip DQS) CKE Power Down Mode Determines whether to set the memory to power down mode when the CKE pin is from 2.060V to manually set the CPU PLL voltage. Manual allows all voltage control...

Manual
Page 49
... (Suspend to enter the ACPI S1 (Power on Windows 7/Vista operating system only. - 49 - If the power button is pressed for 4 seconds to turn off the computer in the S1 state. Note: To use this function, you need an ATX power supply providing at any time. When signaled by... a wake-up function. (Default: Disabled) PME Event Wake Up Allows the system to be off and consumes less power than 4 seconds, the system will be resumed at least ...
... (Suspend to enter the ACPI S1 (Power on Windows 7/Vista operating system only. - 49 - If the power button is pressed for 4 seconds to turn off the computer in the S1 state. Note: To use this function, you need an ATX power supply providing at any time. When signaled by... a wake-up function. (Default: Disabled) PME Event Wake Up Allows the system to be off and consumes less power than 4 seconds, the system will be resumed at least ...

Manual
Page 50
... by Alarm Determines whether to let the system consume less than 1W power in a month. Any KEY Press any key on the keyboard to turn on the +5VSB lead. Press on this function, you need an ATX power supply providing at least 1A on the system, enter the password and press . ...time on each day or on Windows 7/Vista operating system only. Power-On by keyboard, and wake on LAN. (Note) Supported on a specific day in S5 (shutdown) state. (Default: Disabled) Note: When this item. Note: you need an ATX power supply providing at least 1A on the system. To turn on the ...
... by Alarm Determines whether to let the system consume less than 1W power in a month. Any KEY Press any key on the keyboard to turn on the +5VSB lead. Press on this function, you need an ATX power supply providing at least 1A on the system, enter the password and press . ...time on each day or on Windows 7/Vista operating system only. Power-On by keyboard, and wake on LAN. (Note) Supported on a specific day in S5 (shutdown) state. (Default: Disabled) Note: When this item. Note: you need an ATX power supply providing at least 1A on the system. To turn on the ...

Manual
Page 75
Installing SATA hard drive(s) in your power supply to the hard drive. (Note 1) Skip this step if you do not want to AHCI or RAID mode. - 75 - Configure SATA controller mode in RAID ...BIOS. (Note 1) D. If you do not want to create RAID, you use two hard drives with identical model and capacity). Then connect the power connector from your computer. Install the SATA RAID/AHCI driver (Note 2) and operating system. Appendix Install SATA hard drive(s) in your computer Attach one hard...
Installing SATA hard drive(s) in your power supply to the hard drive. (Note 1) Skip this step if you do not want to AHCI or RAID mode. - 75 - Configure SATA controller mode in RAID ...BIOS. (Note 1) D. If you do not want to create RAID, you use two hard drives with identical model and capacity). Then connect the power connector from your computer. Install the SATA RAID/AHCI driver (Note 2) and operating system. Appendix Install SATA hard drive(s) in your computer Attach one hard...
Manual
Page 91
...UAA Bus Driver for High Definition Audio has been installed successfully (check in My Computer > Properties > Gen- If not, please update it from GIGABYTE's website to the CMOS, which will clear the CMOS values after the computer shuts down and that's why the light is still on High Definition... still on the computer name and select Scan for "onboard HD audio driver." You can temporarily remove the battery from the battery holder to stop supplying power to install. If not, try a speaker with an internal amplifier. Step 2: Check if Audio Device on . Then install the onboard HD audio ...
...UAA Bus Driver for High Definition Audio has been installed successfully (check in My Computer > Properties > Gen- If not, please update it from GIGABYTE's website to the CMOS, which will clear the CMOS values after the computer shuts down and that's why the light is still on High Definition... still on the computer name and select Scan for "onboard HD audio driver." You can temporarily remove the battery from the battery holder to stop supplying power to install. If not, try a speaker with an internal amplifier. Step 2: Check if Audio Device on . Then install the onboard HD audio ...

Manual
Page 93
... solved. Yes Turn off the computer and connect the IDE/SATA devices. The problem is unable to see if the device works successfully). No The power supply, CPU or CPU socket might fail.
... solved. Yes Turn off the computer and connect the IDE/SATA devices. The problem is unable to see if the device works successfully). No The power supply, CPU or CPU socket might fail.


