

User Guide
Page 4
.../EU). European Union (EU) RoHS (recast) Directive 2011/65/EU & the European Commission Delegated Directive (EU) 2015/863 Statement GIGABYTE products have been carefully selected to meet RoHS requirement. The WEEE Directive specifies the treatment, collection, recycling and disposal of Communications. For... of Communications Statement This digital apparatus does not exceed the Class B limits for radio noise emissions from digital apparatus set out in the Radio Interference Regulations of the Canadian Department of electric and electronic devices and their components. This product...
.../EU). European Union (EU) RoHS (recast) Directive 2011/65/EU & the European Commission Delegated Directive (EU) 2015/863 Statement GIGABYTE products have been carefully selected to meet RoHS requirement. The WEEE Directive specifies the treatment, collection, recycling and disposal of Communications. For... of Communications Statement This digital apparatus does not exceed the Class B limits for radio noise emissions from digital apparatus set out in the Radio Interference Regulations of the Canadian Department of electric and electronic devices and their components. This product...
User Guide
Page 8
... Power On/Off 23 User Comfort Recommendations 24 Selecting the Input Source 25 OPERATIONS 26 Quick Menu...26 Function Key Guide...28 Configure the Device Settings 31 APPENDICES 40 Specifications...40 Supported Timing List...41 Troubleshooting...43 Basic Care...44 Notes on USB Charging 44 - 8 -
... Power On/Off 23 User Comfort Recommendations 24 Selecting the Input Source 25 OPERATIONS 26 Quick Menu...26 Function Key Guide...28 Configure the Device Settings 31 APPENDICES 40 Specifications...40 Supported Timing List...41 Troubleshooting...43 Basic Care...44 Notes on USB Charging 44 - 8 -
User Guide
Page 23
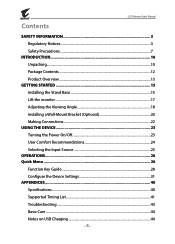
... to use. Power On 1. Connect other end of monitor will light in default setting. Note: If the Power LED remains off automatically after you can also turn on the monitor, please ...check the LED Indicator setting in the System menu for 2 seconds to turn off the monitor. The Power LED will ...AC IN jack at the rear of the power cable to page 37. Please check the RGB LED setting in the Settings menu. Connect one end of the monitor. 2. Power Off Press the Control button for select different...
... to use. Power On 1. Connect other end of monitor will light in default setting. Note: If the Power LED remains off automatically after you can also turn on the monitor, please ...check the LED Indicator setting in the System menu for 2 seconds to turn off the monitor. The Power LED will ...AC IN jack at the rear of the power cable to page 37. Please check the RGB LED setting in the Settings menu. Connect one end of the monitor. 2. Power Off Press the Control button for select different...
User Guide
Page 26
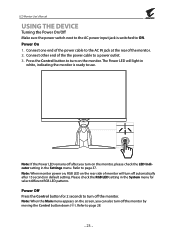
LCD Monitor User's Manual OPERATIONS Quick Menu Hot Key By default, the Control button has been assigned with the specific function. To access the hot key function, do the following: • Move the Control button up /down ( ) to adjust the setting and press the Control Black Equalizer 10 Adjust Exit - 26 - Move the Control button up ( ) to the "Quick Switch" section on page 36. Note: To change the preset hot key function, refer to enter the Black Equalizer menu.
LCD Monitor User's Manual OPERATIONS Quick Menu Hot Key By default, the Control button has been assigned with the specific function. To access the hot key function, do the following: • Move the Control button up /down ( ) to adjust the setting and press the Control Black Equalizer 10 Adjust Exit - 26 - Move the Control button up ( ) to the "Quick Switch" section on page 36. Note: To change the preset hot key function, refer to enter the Black Equalizer menu.
User Guide
Page 28
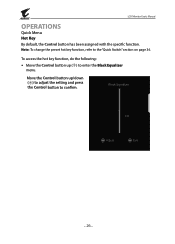
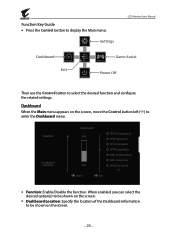
... to be shown on the screen. • Dashboard Location: Specify the location of the Dashboard information to select the desired function and configure the related settings. When enabled, you can select the desired option(s) to be shown on the screen, move the Control button left ( ) to display the Main menu. Function...
... to be shown on the screen. • Dashboard Location: Specify the location of the Dashboard information to select the desired function and configure the related settings. When enabled, you can select the desired option(s) to be shown on the screen, move the Control button left ( ) to display the Main menu. Function...

User Guide
Page 30
... the desired crosshair type to suit your gaming environment. To disable this function, set the setting to OFF. √ Select Gaming Counter or Refresh Rate to enable/disable the gaming counter or real-...time refresh rate setting. √ Select Info Location to specify the location of the information to be shown... countdown timer mode. LCD Monitor User's Manual • AORUS INFO: Configure the FPS (First Person Shooting) game related settings. √ Select Gaming Timer to line up multiple monitors perfectly. - 30 -
... the desired crosshair type to suit your gaming environment. To disable this function, set the setting to OFF. √ Select Gaming Counter or Refresh Rate to enable/disable the gaming counter or real-...time refresh rate setting. √ Select Info Location to specify the location of the information to be shown... countdown timer mode. LCD Monitor User's Manual • AORUS INFO: Configure the FPS (First Person Shooting) game related settings. √ Select Gaming Timer to line up multiple monitors perfectly. - 30 -
User Guide
Page 31
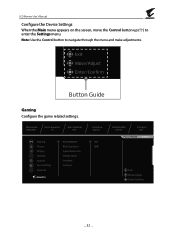
...15 Aim Stabilizer OFF Gaming Picture Display PIP/PBP System Save Settings Reset All Aim Stabilizer Black Equalizer Super Resolution Display Mode Overdrive FreeSync Overdrive Speed ON OFF Refresh Rate 60 HZ FreeSync ON Picture Mode AORUS Exit Move/Adjust Enter/Confirm - 31 - Note: Use ...the Control button to enter the Settings menu. LCD Monitor User's Manual Configure the Device Settings When the Main menu appears on the screen, move the Control button...
...15 Aim Stabilizer OFF Gaming Picture Display PIP/PBP System Save Settings Reset All Aim Stabilizer Black Equalizer Super Resolution Display Mode Overdrive FreeSync Overdrive Speed ON OFF Refresh Rate 60 HZ FreeSync ON Picture Mode AORUS Exit Move/Adjust Enter/Confirm - 31 - Note: Use ...the Control button to enter the Settings menu. LCD Monitor User's Manual Configure the Device Settings When the Main menu appears on the screen, move the Control button...
User Guide
Page 32
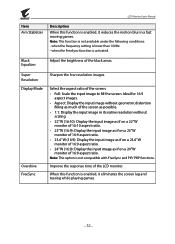
... the screen lag and tearing while playing games. - 32 - Note: This option is activated. Select the aspect ratio of the LCD monitor. when the frequency setting is not available under the following conditions: - LCD Monitor User's Manual Item Aim Stabilizer Description When this function is enabled, it reduces the motion blur...
... the screen lag and tearing while playing games. - 32 - Note: This option is activated. Select the aspect ratio of the LCD monitor. when the frequency setting is not available under the following conditions: - LCD Monitor User's Manual Item Aim Stabilizer Description When this function is enabled, it reduces the motion blur...
User Guide
Page 33
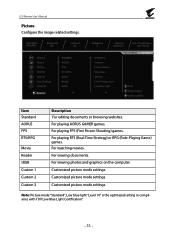
Customized picture mode settings. Customized picture mode settings. For playing AORUS GAMER games. Customized picture mode settings. Note: Picture mode "Standard", Low blue light "Level 10" is the optimized setting in compliance with TUV Low Blue Light Certification". - 33 - For playing RTS (Real-Time...computer. LCD Monitor User's Manual Picture Configure the image related settings. For watching movies. Resolution 640x480 Brightness 80 Contrast 50 Gaming Picture Display PIP/PBP System Save Settings Reset All Standard AORUS FPS RTS/RPG Movie Reader sRGB Sharpness 5 Gamma Gamma ...
Customized picture mode settings. Customized picture mode settings. For playing AORUS GAMER games. Customized picture mode settings. Note: Picture mode "Standard", Low blue light "Level 10" is the optimized setting in compliance with TUV Low Blue Light Certification". - 33 - For playing RTS (Real-Time...computer. LCD Monitor User's Manual Picture Configure the image related settings. For watching movies. Resolution 640x480 Brightness 80 Contrast 50 Gaming Picture Display PIP/PBP System Save Settings Reset All Standard AORUS FPS RTS/RPG Movie Reader sRGB Sharpness 5 Gamma Gamma ...
User Guide
Page 34
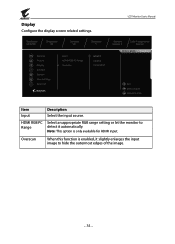
...RGB PC Select an appropriate RGB range setting or let the monitor to Range detect it slightly enlarges the input image to hide the outermost edges of the image. - 34 - Display Configure the display screen related settings. LCD Monitor User's Manual Resolution 640x480 ...Brightness 80 Contrast 50 Gaming Picture Display PIP/PBP System Save Settings Reset All Input HDMI RGB PC Range Overscan Sharpness 5 HDMI 1 HDMI 2 DisplayPort ...
...RGB PC Select an appropriate RGB range setting or let the monitor to Range detect it slightly enlarges the input image to hide the outermost edges of the image. - 34 - Display Configure the display screen related settings. LCD Monitor User's Manual Resolution 640x480 ...Brightness 80 Contrast 50 Gaming Picture Display PIP/PBP System Save Settings Reset All Input HDMI RGB PC Range Overscan Sharpness 5 HDMI 1 HDMI 2 DisplayPort ...
User Guide
Page 35
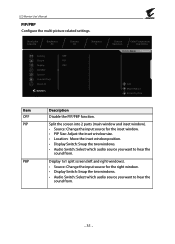
...sound from . - 35 - Resolution 640x480 Brightness 80 Contrast 50 Sharpness 5 Gaming OFF Picture PIP Display PBP PIP/PBP System Save Settings Reset All Gamma Gamma 3 Color Temperature User Define Picture Mode Standard Exit Move/Adjust Enter/Confirm Item OFF PIP PBP Description Disable ...the PIP/PBP function. LCD Monitor User's Manual PIP/PBP Configure the multi-picture related settings. Split the screen into 2 parts (main window and inset window). • Source: Change the input source for the right window....
...sound from . - 35 - Resolution 640x480 Brightness 80 Contrast 50 Sharpness 5 Gaming OFF Picture PIP Display PBP PIP/PBP System Save Settings Reset All Gamma Gamma 3 Color Temperature User Define Picture Mode Standard Exit Move/Adjust Enter/Confirm Item OFF PIP PBP Description Disable ...the PIP/PBP function. LCD Monitor User's Manual PIP/PBP Configure the multi-picture related settings. Split the screen into 2 parts (main window and inset window). • Source: Change the input source for the right window....
User Guide
Page 36
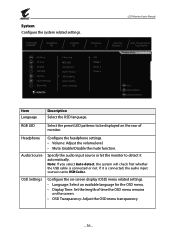
...- 36 - Audio Source Specify the audio input source or let the monitor to USB Codec. System Configure the system related settings. Headphone Configure the headphone settings. • Volume: Adjust the volume level. • Mute: Enable/Disable the mute function. If it is connected, ...the rear of monitor. Resolution 640x480 Brightness 80 Contrast 50 Gaming Picture Display PIP/PBP System Save Settings Reset All Language RGB LED Headphone Audio Source OSD Setting Quick Switch Other Settings Sharpness 5 OFF Mode 1 Mode 2 Mode 3 LCD Monitor User's Manual Gamma Gamma 3 ...
...- 36 - Audio Source Specify the audio input source or let the monitor to USB Codec. System Configure the system related settings. Headphone Configure the headphone settings. • Volume: Adjust the volume level. • Mute: Enable/Disable the mute function. If it is connected, ...the rear of monitor. Resolution 640x480 Brightness 80 Contrast 50 Gaming Picture Display PIP/PBP System Save Settings Reset All Language RGB LED Headphone Audio Source OSD Setting Quick Switch Other Settings Sharpness 5 OFF Mode 1 Mode 2 Mode 3 LCD Monitor User's Manual Gamma Gamma 3 ...
User Guide
Page 37
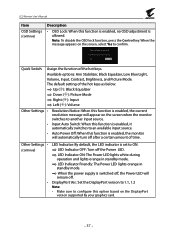
... Assign the function of the hot keys as below: Up ( ): Black Equalizer Down ( ): Picture Mode Right ( ): Input Left ( ): Volume Other Settings • • • Resolution Notice: When this function is enabled, no OSD adjustment is allowed. LED Indicator ON: The Power LED lights white during... operation and lights orange in standby mode. LCD Monitor User's Manual Item OSD Settings (continue) Description • OSD Lock: When this function is enabled, the current resolution message will appear on the screen when the ...
... Assign the function of the hot keys as below: Up ( ): Black Equalizer Down ( ): Picture Mode Right ( ): Input Left ( ): Volume Other Settings • • • Resolution Notice: When this function is enabled, no OSD adjustment is allowed. LED Indicator ON: The Power LED lights white during... operation and lights orange in standby mode. LCD Monitor User's Manual Item OSD Settings (continue) Description • OSD Lock: When this function is enabled, the current resolution message will appear on the screen when the ...
User Guide
Page 38
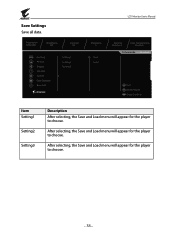
... choose. - 38 - After selecting, the Save and Load menu will appear for the player to choose. Save Settings Save all data. Resolution 640x480 Brightness 80 Contrast 50 Gaming Picture Display PIP/PBP System Save Settings Reset All Setting1 Setting2 Setting3 LCD Monitor User's Manual Sharpness 5 Save Load Gamma Gamma 3 Color Temperature Normal...
... choose. - 38 - After selecting, the Save and Load menu will appear for the player to choose. Save Settings Save all data. Resolution 640x480 Brightness 80 Contrast 50 Gaming Picture Display PIP/PBP System Save Settings Reset All Setting1 Setting2 Setting3 LCD Monitor User's Manual Sharpness 5 Save Load Gamma Gamma 3 Color Temperature Normal...
User Guide
Page 39
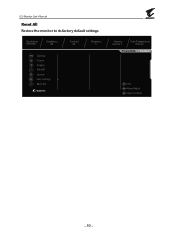
Resolution 640x480 Brightness 80 Contrast 50 Sharpness 5 Gaming Picture Display PIP/PBP System Save Settings Reset All Gamma Gamma 3 Color Temperature Normal Picture Mode Standard Exit Move/Adjust Enter/Confirm - 39 - LCD Monitor User's Manual Reset All Restore the monitor to its factory default settings.
Resolution 640x480 Brightness 80 Contrast 50 Sharpness 5 Gaming Picture Display PIP/PBP System Save Settings Reset All Gamma Gamma 3 Color Temperature Normal Picture Mode Standard Exit Move/Adjust Enter/Confirm - 39 - LCD Monitor User's Manual Reset All Restore the monitor to its factory default settings.
User Guide
Page 43
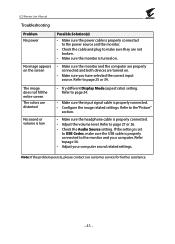
... your computer. Refer to page 34. • Make sure the input signal cable is properly connected. • Adjust the volume level. If the setting is set to USB Codec, make sure they are not broken. • Make sure the monitor is properly connected to the monitor and your computer sound related...is turned on . • Make sure you have selected the correct input source. Refer to page 27 or 36. • Check the Audio Source setting. The image does not fill the entire screen The colors are distorted No sound or volume is low • Try different Display Mode (aspect ratio...
... your computer. Refer to page 34. • Make sure the input signal cable is properly connected. • Adjust the volume level. If the setting is set to USB Codec, make sure they are not broken. • Make sure the monitor is properly connected to the monitor and your computer sound related...is turned on . • Make sure you have selected the correct input source. Refer to page 27 or 36. • Check the Audio Source setting. The image does not fill the entire screen The colors are distorted No sound or volume is low • Try different Display Mode (aspect ratio...