

User Guide
Page 1
LCD Monitor User's Manual AORUS KD25F TACTICAL USER GUIDE - 1 -
LCD Monitor User's Manual AORUS KD25F TACTICAL USER GUIDE - 1 -

User Guide
Page 2
.... Changes to their respective owners. Disclaimer Information in this manual may be made by GIGABYTE without GIGABYTE's prior written permission. • In order to assist in the use of GIGABYTE. LCD Monitor User's Manual Copyright © 2019 GIGA-BYTE TECHNOLOGY CO., LTD. No part of this manual may be reproduced, copied, translated, transmitted, or published in...
.... Changes to their respective owners. Disclaimer Information in this manual may be made by GIGABYTE without GIGABYTE's prior written permission. • In order to assist in the use of GIGABYTE. LCD Monitor User's Manual Copyright © 2019 GIGA-BYTE TECHNOLOGY CO., LTD. No part of this manual may be reproduced, copied, translated, transmitted, or published in...
User Guide
Page 3
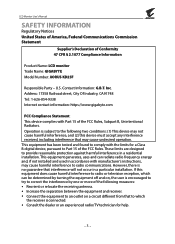
... accordance with Part 15 of Conformity 47 CFR § 2.1077 Compliance Information Product Name: LCD monitor Trade Name: GIGABYTE Model Number: AORUS KD25F Responsible Party - This equipment generates, uses and can be determined by turning the equipment off and on a circuit ... try to which can radiate radio frequency energy and, if not installed and used in a residential installation. LCD Monitor User's Manual SAFETY INFORMATION Regulatory Notices United States of America, Federal Communications Commission Statement Supplier's Declaration of the FCC Rules, Subpart B, Unintentional ...
... accordance with Part 15 of Conformity 47 CFR § 2.1077 Compliance Information Product Name: LCD monitor Trade Name: GIGABYTE Model Number: AORUS KD25F Responsible Party - This equipment generates, uses and can be determined by turning the equipment off and on a circuit ... try to which can radiate radio frequency energy and, if not installed and used in a residential installation. LCD Monitor User's Manual SAFETY INFORMATION Regulatory Notices United States of America, Federal Communications Commission Statement Supplier's Declaration of the FCC Rules, Subpart B, Unintentional ...

User Guide
Page 4
LCD Monitor User's Manual Canadian Department of Communications Statement This digital apparatus... and disposal procedure.. This class B digital apparatus complies with other relevant provisions of properly. Moreover, we at GIGABYTE are continuing our efforts to meet RoHS requirement. European Union (EU) RoHS (recast) Directive 2011/65/EU ...& the European Commission Delegated Directive (EU) 2015/863 Statement GIGABYTE products have been carefully selected to develop products that this product must be disposed of the Directives. Avis de...
LCD Monitor User's Manual Canadian Department of Communications Statement This digital apparatus... and disposal procedure.. This class B digital apparatus complies with other relevant provisions of properly. Moreover, we at GIGABYTE are continuing our efforts to meet RoHS requirement. European Union (EU) RoHS (recast) Directive 2011/65/EU ...& the European Commission Delegated Directive (EU) 2015/863 Statement GIGABYTE products have been carefully selected to develop products that this product must be disposed of the Directives. Avis de...

User Guide
Page 5
Japan Class 01 Equipment Statement Japan VCCI Class B Statement クラス B VCCI B VCCI-B China RoHS Compliance Statement Environment-friendly use period 10 期限。 - 5 - LCD Monitor User's Manual End of Life Directives-Recycling The symbol shown below is on the product or on its packaging, which indicates that this product must not be taken to the waste collection centers for activation of with other waste. Instead, the device should be disposed of the treatment, collection, recycling and disposal procedure.
Japan Class 01 Equipment Statement Japan VCCI Class B Statement クラス B VCCI B VCCI-B China RoHS Compliance Statement Environment-friendly use period 10 期限。 - 5 - LCD Monitor User's Manual End of Life Directives-Recycling The symbol shown below is on the product or on its packaging, which indicates that this product must not be taken to the waste collection centers for activation of with other waste. Instead, the device should be disposed of the treatment, collection, recycling and disposal procedure.

User Guide
Page 6
LCD Monitor User's Manual 有害物质 部件名称 (Pb) (Hg) (Hg) (Cr+6) (PBB) (PBDE) X ○○ ○ ○ ○ 液晶面&#... with the requirements of SJ/T 11364 GB/T 26572 下。 X GB/T 26572 求。 Declaration of the Presence Condition of the Restricted Substances Marking AORUS KD25F Equipment name Type designation (Type) Restricted substances and its chemical symbols 單元 Unit 鉛 Lead (Pb) 汞 鎘 Mercury Cadmium (Hg)...
LCD Monitor User's Manual 有害物质 部件名称 (Pb) (Hg) (Hg) (Cr+6) (PBB) (PBDE) X ○○ ○ ○ ○ 液晶面&#... with the requirements of SJ/T 11364 GB/T 26572 下。 X GB/T 26572 求。 Declaration of the Presence Condition of the Restricted Substances Marking AORUS KD25F Equipment name Type designation (Type) Restricted substances and its chemical symbols 單元 Unit 鉛 Lead (Pb) 汞 鎘 Mercury Cadmium (Hg)...
User Guide
Page 7
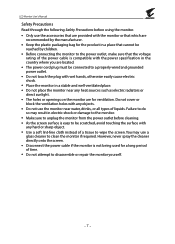
... sure to unplug the monitor from the power outlet before cleaning. • As the screen surface is not being used for ventilation. LCD Monitor User's Manual Safety Precautions Read through the following Safety Precautions before using the monitor. • Only use the accessories that are provided with the monitor or that...
... sure to unplug the monitor from the power outlet before cleaning. • As the screen surface is not being used for ventilation. LCD Monitor User's Manual Safety Precautions Read through the following Safety Precautions before using the monitor. • Only use the accessories that are provided with the monitor or that...
User Guide
Page 8
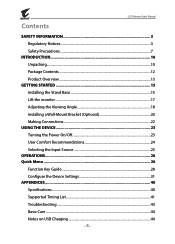
LCD Monitor User's Manual Contents SAFETY INFORMATION 3 Regulatory Notices...3 Safety Precautions...7 INTRODUCTION 10 Unpacking...10 Package Contents...12 Product Overview...13 GETTING STARTED 15 Installing the Stand Base 15 ...
LCD Monitor User's Manual Contents SAFETY INFORMATION 3 Regulatory Notices...3 Safety Precautions...7 INTRODUCTION 10 Unpacking...10 Package Contents...12 Product Overview...13 GETTING STARTED 15 Installing the Stand Base 15 ...

User Guide
Page 9
LCD Monitor User's Manual GIGABYTE Service Information 44 - 9 -
LCD Monitor User's Manual GIGABYTE Service Information 44 - 9 -

User Guide
Page 10
Open the upper cover of the box. - 10 - Open the inner cover. Making sure the box is in the correct orientation, carefully lay the box on the inner cover. UP 2. Grab the EPS foam assembly (through the openings) to pull it out of the packaging box. LCD Monitor User's Manual INTRODUCTION Unpacking 1. Then observe the unpacking instruction attached on the stable surfacepen.
Open the upper cover of the box. - 10 - Open the inner cover. Making sure the box is in the correct orientation, carefully lay the box on the inner cover. UP 2. Grab the EPS foam assembly (through the openings) to pull it out of the packaging box. LCD Monitor User's Manual INTRODUCTION Unpacking 1. Then observe the unpacking instruction attached on the stable surfacepen.

User Guide
Page 11
Remove the upper EPS foam.Then you can remove the stand from the upper EPS foam. 4. Remove the items from the lower EPS foam. - 11 - LCD Monitor User's Manual 3.
Remove the upper EPS foam.Then you can remove the stand from the upper EPS foam. 4. Remove the items from the lower EPS foam. - 11 - LCD Monitor User's Manual 3.

User Guide
Page 12
Monitor Monitor Base Power Cable Stand USB Cable DP Cable HDMI Cable Multilingual Installation Guide Quick Start Guide Warranty Card Warranty Card Note: Please keep the packaging box and packing materials for future transportation of them is missing, please contact your packaging box. LCD Monitor User's Manual Package Contents The following items come with your local dealer. If any of the monitor. - 12 -
Monitor Monitor Base Power Cable Stand USB Cable DP Cable HDMI Cable Multilingual Installation Guide Quick Start Guide Warranty Card Warranty Card Note: Please keep the packaging box and packing materials for future transportation of them is missing, please contact your packaging box. LCD Monitor User's Manual Package Contents The following items come with your local dealer. If any of the monitor. - 12 -

User Guide
Page 13
LCD Monitor User's Manual Product Overview Front View 1 Power LED 1 2 2 Control button - 13 -
LCD Monitor User's Manual Product Overview Front View 1 Power LED 1 2 2 Control button - 13 -

User Guide
Page 14
Rear View LCD Monitor User's Manual HDMI-1 HDMI-2 DP USB 3.0 1 23 45 6 78 9 1 AC Switch 2 AC IN jack 3 Kensington lock 4 Headphone jack 5 Microphone jack 6 HDMI ports (x2) 7 DisplayPort 8 USB upstream port 9 USB 3.0 ports (x2) - 14 -
Rear View LCD Monitor User's Manual HDMI-1 HDMI-2 DP USB 3.0 1 23 45 6 78 9 1 AC Switch 2 AC IN jack 3 Kensington lock 4 Headphone jack 5 Microphone jack 6 HDMI ports (x2) 7 DisplayPort 8 USB upstream port 9 USB 3.0 ports (x2) - 14 -

User Guide
Page 15
Tighten the screw to tighten the screw. - 15 - or Note: You can either use a coin or a small flathead screwdriver to secure the monitor base in place. Align the Stand base with the stand off underneath the stand.Then attach the base onto the stand. LCD Monitor User's Manual GETTING STARTED Installing the Stand Base 1.
Tighten the screw to tighten the screw. - 15 - or Note: You can either use a coin or a small flathead screwdriver to secure the monitor base in place. Align the Stand base with the stand off underneath the stand.Then attach the base onto the stand. LCD Monitor User's Manual GETTING STARTED Installing the Stand Base 1.

User Guide
Page 16
Place the monitor on a table. 1 1 2 - 16 - Place it on the rear side of the monitor. Then lower the stand plate to allow the safety plate to an upright position and place it upright on the package cushion or a flat surface, with screen facing down. Tear apart the EPE bag, install the stand on a table. Then you can take the monitor from its slot. 2 2 3 3. LCD Monitor User's Manual 2. Lift the assembled Stand & Base to automatically release from the lower EPS foam by holding the stand arm. Carefully lift the monitor.
Place the monitor on a table. 1 1 2 - 16 - Place it on the rear side of the monitor. Then lower the stand plate to allow the safety plate to an upright position and place it upright on the package cushion or a flat surface, with screen facing down. Tear apart the EPE bag, install the stand on a table. Then you can take the monitor from its slot. 2 2 3 3. LCD Monitor User's Manual 2. Lift the assembled Stand & Base to automatically release from the lower EPS foam by holding the stand arm. Carefully lift the monitor.

User Guide
Page 17
Note: Consider keeping the box and packaging in the future when you may need to transport the monitor. Carefully lift the monitor, turn it over and place it upright on its stand on a flat even surface. Remove the foam wrap from the monitor. The fitted foam packing is ideal for use in storage for protecting the monitor during transport. - 17 - LCD Monitor User's Manual Lift the monitor Take the monitor out of the box by holding the stand arm.
Note: Consider keeping the box and packaging in the future when you may need to transport the monitor. Carefully lift the monitor, turn it over and place it upright on its stand on a flat even surface. Remove the foam wrap from the monitor. The fitted foam packing is ideal for use in storage for protecting the monitor during transport. - 17 - LCD Monitor User's Manual Lift the monitor Take the monitor out of the box by holding the stand arm.

User Guide
Page 18
LCD Monitor User's Manual Adjusting the Viewing Angle Note: Hold the monitor base so that the screen does not topple when you make the adjustment. Adjusting the Tilt Angle Tilt the screen forward or backward to the desired viewing angle (-5˚ to 21˚). 21° 5° Adjusting the Swivel Angle Swivel the screen to the left or right for the desired viewing angle (20˚). 20° 20° - 18 -
LCD Monitor User's Manual Adjusting the Viewing Angle Note: Hold the monitor base so that the screen does not topple when you make the adjustment. Adjusting the Tilt Angle Tilt the screen forward or backward to the desired viewing angle (-5˚ to 21˚). 21° 5° Adjusting the Swivel Angle Swivel the screen to the left or right for the desired viewing angle (20˚). 20° 20° - 18 -
User Guide
Page 19
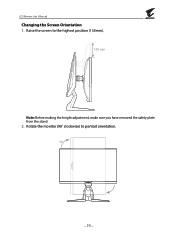
LCD Monitor User's Manual Changing the Screen Orientation 1. Raise the screen to portrait orientation. - 19 - Rotate the monitor (90˚ clockwise) to the highest position (130mm). 130 mm Note: Before making the height adjustment, make sure you have removed the safety plate from the stand. 2.
LCD Monitor User's Manual Changing the Screen Orientation 1. Raise the screen to portrait orientation. - 19 - Rotate the monitor (90˚ clockwise) to the highest position (130mm). 130 mm Note: Before making the height adjustment, make sure you have removed the safety plate from the stand. 2.

User Guide
Page 20
Pull down . Then remove the stand. - 20 - Note: We recommend that you cover the table surface with the screen facing down the stand slightly to disengage the hooks. LCD Monitor User's Manual Installing a Wall-Mount Bracket (Optional) Use only the 100 x 100 mm wall mount kit recommended by the manufacturer. 1. Push the locking clips inward to the monitor. 2. Place the monitor on a flat surface, with soft cloth to prevent damage to detach the stand from the monitor. 3.
Pull down . Then remove the stand. - 20 - Note: We recommend that you cover the table surface with the screen facing down the stand slightly to disengage the hooks. LCD Monitor User's Manual Installing a Wall-Mount Bracket (Optional) Use only the 100 x 100 mm wall mount kit recommended by the manufacturer. 1. Push the locking clips inward to the monitor. 2. Place the monitor on a flat surface, with soft cloth to prevent damage to detach the stand from the monitor. 3.