OSD Sidekick User Manual
Page 4
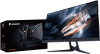
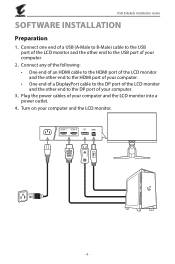
... the USB port of your computer. 3. Connect any of the following: • One end of an HDMI cable to the HDMI port of the LCD monitor and the other end to the HDMI port of your computer. • One end of a DisplayPort cable to the DP port of the LCD... monitor and the other end to the DP port of your computer and the LCD monitor into a power outlet. 4. HDMI-1 HDMI-2 DP - 4 - OSD Sidekick Installation Guide SOFTWARE INSTALLATION Preparation 1. Plug the power cables of...
... the USB port of your computer. 3. Connect any of the following: • One end of an HDMI cable to the HDMI port of the LCD monitor and the other end to the HDMI port of your computer. • One end of a DisplayPort cable to the DP port of the LCD... monitor and the other end to the DP port of your computer and the LCD monitor into a power outlet. 4. HDMI-1 HDMI-2 DP - 4 - OSD Sidekick Installation Guide SOFTWARE INSTALLATION Preparation 1. Plug the power cables of...
OSD Sidekick User Manual
Page 8
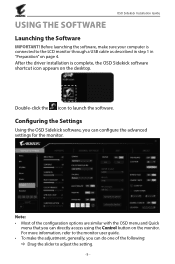
...OSD Sidekick software, you can directly access using the Control button on the monitor. Before launching the software, make the adjustment, generally, you can configure the advanced settings for the monitor. Double-click the icon to the monitor user guide. • To make sure your computer is complete, the OSD... options are similar with the OSD menu and Quick menu that you can do one of the following: DD Drag the slider to the LCD monitor through a USB cable as described in step 1 in "Preparation" on the desktop. For more information, refer to launch the software. USING THE...
...OSD Sidekick software, you can directly access using the Control button on the monitor. Before launching the software, make the adjustment, generally, you can configure the advanced settings for the monitor. Double-click the icon to the monitor user guide. • To make sure your computer is complete, the OSD... options are similar with the OSD menu and Quick menu that you can do one of the following: DD Drag the slider to the LCD monitor through a USB cable as described in step 1 in "Preparation" on the desktop. For more information, refer to launch the software. USING THE...

OSD Sidekick User Manual
Page 9
However, you can still do the following: - 9 - DISPLAY SETTING Configure the game, image, multi-picture, Dashboard, and Game Assist related settings. These profiles cannot be applied directly to enable or disable the function. Dashboard Gaming & Picture Picture Mode Crosshair PIP/PBP Game Assist Configuring the Picture Mode Profiles By default, there are 10 preset Picture Mode profiles. DD Click the q icon to select the available option. • All the changes will be deleted. OSD Sidekick Installation Guide DD Click the ON/OFF button to the monitor.
However, you can still do the following: - 9 - DISPLAY SETTING Configure the game, image, multi-picture, Dashboard, and Game Assist related settings. These profiles cannot be applied directly to enable or disable the function. Dashboard Gaming & Picture Picture Mode Crosshair PIP/PBP Game Assist Configuring the Picture Mode Profiles By default, there are 10 preset Picture Mode profiles. DD Click the q icon to select the available option. • All the changes will be deleted. OSD Sidekick Installation Guide DD Click the ON/OFF button to the monitor.

OSD Sidekick User Manual
Page 11
OSD Sidekick Installation Guide DD Click to export a profile to export the file. Note: The default Profile folder is located at the OSDsidekick installation path. Browse the location and enter the file name. Then click OK to the specified folder. DD Click to the monitor Custom 3. - 11 - Note: The user defined Picture Mode applies to delete the customized profile. Note: The customized profile settings cannot be reset. DD Click to reset the preset Picture Mode profile to rename the profile name. DD Click to its default settings.
OSD Sidekick Installation Guide DD Click to export a profile to export the file. Note: The default Profile folder is located at the OSDsidekick installation path. Browse the location and enter the file name. Then click OK to the specified folder. DD Click to the monitor Custom 3. - 11 - Note: The user defined Picture Mode applies to delete the customized profile. Note: The customized profile settings cannot be reset. DD Click to reset the preset Picture Mode profile to rename the profile name. DD Click to its default settings.
OSD Sidekick User Manual
Page 23
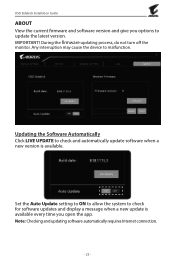
... a message when a new update is available. Updating the Software Automatically Click LIVE UPDATE to malfunction. During the firmware updating process, do not turn off the monitor. OSD Sidekick Installation Guide ABOUT View the current firmware and software version and give you open the app. Any interruption may cause the device to...
... a message when a new update is available. Updating the Software Automatically Click LIVE UPDATE to malfunction. During the firmware updating process, do not turn off the monitor. OSD Sidekick Installation Guide ABOUT View the current firmware and software version and give you open the app. Any interruption may cause the device to...

User Guide
Page 2
... mentioned in the use of this manual are legally registered to their respective owners. LCD Monitor User's Manual Copyright © 2018 GIGA-BYTE TECHNOLOGY CO., LTD. No part of GIGABYTE. All rights reserved. Changes to assist in this monitor, carefully read the User Guide. • For more information, check on our website at...
... mentioned in the use of this manual are legally registered to their respective owners. LCD Monitor User's Manual Copyright © 2018 GIGA-BYTE TECHNOLOGY CO., LTD. No part of GIGABYTE. All rights reserved. Changes to assist in this monitor, carefully read the User Guide. • For more information, check on our website at...
User Guide
Page 3
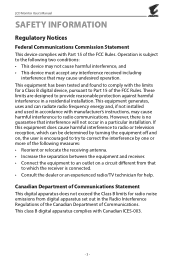
... and receiver. • Connect the equipment to an outlet on a circuit different from digital apparatus set out in accordance with Part 15 of Communications. LCD Monitor User's Manual SAFETY INFORMATION Regulatory Notices Federal Communications Commission Statement This device complies with manufacturer's instructions, may cause harmful interference to radio communications. However, there...
... and receiver. • Connect the equipment to an outlet on a circuit different from digital apparatus set out in accordance with Part 15 of Communications. LCD Monitor User's Manual SAFETY INFORMATION Regulatory Notices Federal Communications Commission Statement This device complies with manufacturer's instructions, may cause harmful interference to radio communications. However, there...

User Guide
Page 4
... product or on its packaging, which indicates that do not use internationally banned toxic chemicals. Moreover, we at GIGABYTE are continuing our efforts to develop products that this product must be taken to meet RoHS requirement. Under the ...the treatment, collection, recycling and disposal of electric and electronic devices and their components. LCD Monitor User's Manual European Community Restriction of Hazardous Substances (RoHS) Directive Statement GIGABYTE products have been carefully selected to the waste collection centers for details of environmentally safe recycling...
... product or on its packaging, which indicates that do not use internationally banned toxic chemicals. Moreover, we at GIGABYTE are continuing our efforts to develop products that this product must be taken to meet RoHS requirement. Under the ...the treatment, collection, recycling and disposal of electric and electronic devices and their components. LCD Monitor User's Manual European Community Restriction of Hazardous Substances (RoHS) Directive Statement GIGABYTE products have been carefully selected to the waste collection centers for details of environmentally safe recycling...
User Guide
Page 5
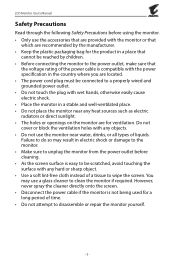
... water, drinks, or all types of liquids. However, never spray the cleaner directly onto the screen. • Disconnect the power cable if the monitor is easy to be connected to a properly wired and grounded power outlet. • Do not touch the plug with wet hands, otherwise easily cause ... by the manufacturer. • Keep the plastic packaging bag for the product in a place that cannot be reached by children. • Before connecting the monitor to the power outlet, make sure that the voltage rating of the power cable is compatible with the power specification in the country where you...
... water, drinks, or all types of liquids. However, never spray the cleaner directly onto the screen. • Disconnect the power cable if the monitor is easy to be connected to a properly wired and grounded power outlet. • Do not touch the plug with wet hands, otherwise easily cause ... by the manufacturer. • Keep the plastic packaging bag for the product in a place that cannot be reached by children. • Before connecting the monitor to the power outlet, make sure that the voltage rating of the power cable is compatible with the power specification in the country where you...
User Guide
Page 6
...'s Manual Safety Information...3 Regulatory Notices...3 Safety Precautions...5 Introduction...7 Unpacking...7 Package Contents...9 Product Overview...10 Getting Started...12 Installing the Monitor Base 12 Adjusting the Viewing Angle 14 Installing a Wall-Mount Bracket (Optional 16 Making Connections...18 Using the Device...19 Turning the Power On/Off ... Menu...22 Configure the Device Settings 27 Appendices...37 Specifications...37 Supported Timing List 38 Troubleshooting...39 Basic Care...40 Notes on USB Charging 40 GIGABYTE Service Information 40 - 6 -
...'s Manual Safety Information...3 Regulatory Notices...3 Safety Precautions...5 Introduction...7 Unpacking...7 Package Contents...9 Product Overview...10 Getting Started...12 Installing the Monitor Base 12 Adjusting the Viewing Angle 14 Installing a Wall-Mount Bracket (Optional 16 Making Connections...18 Using the Device...19 Turning the Power On/Off ... Menu...22 Configure the Device Settings 27 Appendices...37 Specifications...37 Supported Timing List 38 Troubleshooting...39 Basic Care...40 Notes on USB Charging 40 GIGABYTE Service Information 40 - 6 -

User Guide
Page 7
UP 3. Making sure the box is in the correct orientation, carefully lay the box on the inner cover. 2. Open the inner cover. Openings 4. LCD Monitor User's Manual INTRODUCTION Unpacking 1. Open the upper cover of the box. - 7 - Grab the EPS foam assembly (through the openings) to pull it out of the packaging box. Then observe the unpacking label attached on the stable surface.
UP 3. Making sure the box is in the correct orientation, carefully lay the box on the inner cover. 2. Open the inner cover. Openings 4. LCD Monitor User's Manual INTRODUCTION Unpacking 1. Open the upper cover of the box. - 7 - Grab the EPS foam assembly (through the openings) to pull it out of the packaging box. Then observe the unpacking label attached on the stable surface.

User Guide
Page 8
Remove the items from the lower EPS foam. - 8 - Then you can remove the monitor from the upper EPS foam. 5. LCD Monitor User's Manual 6. Remove the upper EPS foam.
Remove the items from the lower EPS foam. - 8 - Then you can remove the monitor from the upper EPS foam. 5. LCD Monitor User's Manual 6. Remove the upper EPS foam.
User Guide
Page 9
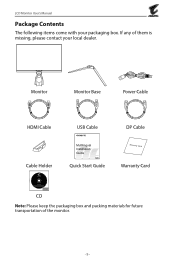
LCD Monitor User's Manual Package Contents The following items come with your local dealer. Monitor Monitor Base Power Cable HDMI Cable Cable Holder USB Cable Multilingual Installation Guide AORUS AD27QD Quick Start Guide DP Cable Warranty Card Warranty Card CD Note: Please keep the packaging box and packing materials for future transportation of them is missing, please contact your packaging box. If any of the monitor. - 9 -
LCD Monitor User's Manual Package Contents The following items come with your local dealer. Monitor Monitor Base Power Cable HDMI Cable Cable Holder USB Cable Multilingual Installation Guide AORUS AD27QD Quick Start Guide DP Cable Warranty Card Warranty Card CD Note: Please keep the packaging box and packing materials for future transportation of them is missing, please contact your packaging box. If any of the monitor. - 9 -

User Guide
Page 10
Product Overview Front View LCD Monitor User's Manual 1 Power LED 1 2 2 Control button - 10 -
Product Overview Front View LCD Monitor User's Manual 1 Power LED 1 2 2 Control button - 10 -

User Guide
Page 11
LCD Monitor User's Manual Rear View HDMI-1 HDMI-2 DP USB 3.0 HDMI-1 HDMI-2 DP USB 3.0 12 34 1 AC IN jack 2 Kensington lock 3 Headphone jack 4 Microphone jack 5 6 7 8 5 HDMI ports (x2) 6 DisplayPort 7 USB upstream port 8 USB 3.0 ports (x2) - 11 -
LCD Monitor User's Manual Rear View HDMI-1 HDMI-2 DP USB 3.0 HDMI-1 HDMI-2 DP USB 3.0 12 34 1 AC IN jack 2 Kensington lock 3 Headphone jack 4 Microphone jack 5 6 7 8 5 HDMI ports (x2) 6 DisplayPort 7 USB upstream port 8 USB 3.0 ports (x2) - 11 -

User Guide
Page 12
Align the monitor base with soft cloth to prevent damage to the monitor. 2. Note: You can either use a coin or a small flathead screwdriver to secure the monitor base in place. Then attach the base onto the stand. 3. Tighten the screw to tighten the screw. - 12 - Note: We recommend that you cover the table surface with the standoff underneath the stand. LCD Monitor User's Manual GETTING STARTED Installing the Monitor Base 1. Place the monitor on a flat surface, with the screen facing down.
Align the monitor base with soft cloth to prevent damage to the monitor. 2. Note: You can either use a coin or a small flathead screwdriver to secure the monitor base in place. Then attach the base onto the stand. 3. Tighten the screw to tighten the screw. - 12 - Note: We recommend that you cover the table surface with the standoff underneath the stand. LCD Monitor User's Manual GETTING STARTED Installing the Monitor Base 1. Place the monitor on a flat surface, with the screen facing down.

User Guide
Page 13
LCD Monitor User's Manual 4. Then lower the screen to allow the safety plate to an upright position and place it on a table. Lift the monitor to automatically release from its slot. - 13 -
LCD Monitor User's Manual 4. Then lower the screen to allow the safety plate to an upright position and place it on a table. Lift the monitor to automatically release from its slot. - 13 -

User Guide
Page 14
LCD Monitor User's Manual Adjusting the Viewing Angle Note: Hold the monitor base so that the screen does not topple when you make the adjustment. Adjusting the Tilt Angle Tilt the screen forward or backward to the desired viewing angle (-5˚ to 21˚). 21° 5° Adjusting the Swivel Angle Swivel the screen to the left or right for the desired viewing angle (20˚). 20° 20° - 14 -
LCD Monitor User's Manual Adjusting the Viewing Angle Note: Hold the monitor base so that the screen does not topple when you make the adjustment. Adjusting the Tilt Angle Tilt the screen forward or backward to the desired viewing angle (-5˚ to 21˚). 21° 5° Adjusting the Swivel Angle Swivel the screen to the left or right for the desired viewing angle (20˚). 20° 20° - 14 -
User Guide
Page 15
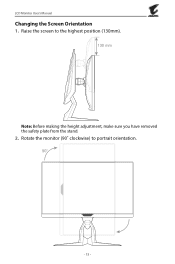
Rotate the monitor (90˚ clockwise) to the highest position (130mm). 130 mm Note: Before making the height adjustment, make sure you have removed the safety plate from the stand. 2. Raise the screen to portrait orientation. 90° - 15 - LCD Monitor User's Manual Changing the Screen Orientation 1.
Rotate the monitor (90˚ clockwise) to the highest position (130mm). 130 mm Note: Before making the height adjustment, make sure you have removed the safety plate from the stand. 2. Raise the screen to portrait orientation. 90° - 15 - LCD Monitor User's Manual Changing the Screen Orientation 1.

User Guide
Page 16
Place the monitor on a flat surface, with soft cloth to prevent damage to detach the stand from the monitor. 3. Note: We recommend that you cover the table surface with the screen facing down the stand slightly to disengage the hooks. Push the locking clips inward to the monitor. 2. Pull down . LCD Monitor User's Manual Installing a Wall-Mount Bracket (Optional) Use only the 100 x 100 mm wall mount kit recommended by the manufacturer. 1. Then remove the stand. - 16 -
Place the monitor on a flat surface, with soft cloth to prevent damage to detach the stand from the monitor. 3. Note: We recommend that you cover the table surface with the screen facing down the stand slightly to disengage the hooks. Push the locking clips inward to the monitor. 2. Pull down . LCD Monitor User's Manual Installing a Wall-Mount Bracket (Optional) Use only the 100 x 100 mm wall mount kit recommended by the manufacturer. 1. Then remove the stand. - 16 -

