

Owners Manual
Page 2
Its sleek design can be performed by a qualified installer, service agency or the gas supplier. 2 Installation and service must be beautifully integrated into the kitchen. Whether you cannot reach your cooktop properly. Follow the gas supplier's instructions. •If you chose it for Service 15 Important Phone Numbers 17 Model and Serial Number 3 Safety Instructions 4-5 Warranty...
Its sleek design can be performed by a qualified installer, service agency or the gas supplier. 2 Installation and service must be beautifully integrated into the kitchen. Whether you cannot reach your cooktop properly. Follow the gas supplier's instructions. •If you chose it for Service 15 Important Phone Numbers 17 Model and Serial Number 3 Safety Instructions 4-5 Warranty...
Owners Manual
Page 4
... off . Never pick up a flaming pan. Flaming grease outside a pan can be performed only by qualified gas range installers or service technicians. • Plug your cooktop unless it with a well-fitting lid, cookie sheet or flat tray. Any adjustment and service should the packing...room. • Do not use . • Avoid scratching the cooktop with sharp instruments, or with the installation instructions. Smother a flaming pan on a hot cooktop, be minimized further by the incomplete combustion of natural gas or LP fuels. Exposure to these substances, namely benzene, carbon ...
... off . Never pick up a flaming pan. Flaming grease outside a pan can be performed only by qualified gas range installers or service technicians. • Plug your cooktop unless it with a well-fitting lid, cookie sheet or flat tray. Any adjustment and service should the packing...room. • Do not use . • Avoid scratching the cooktop with sharp instruments, or with the installation instructions. Smother a flaming pan on a hot cooktop, be minimized further by the incomplete combustion of natural gas or LP fuels. Exposure to these substances, namely benzene, carbon ...
Owners Manual
Page 6
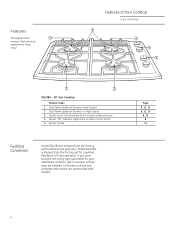
... gas model for your installation situation, gas conversion orifices must be installed. Conversion orifices and complete instructions are packed with both models. Model ZGU384L is shipped from the factory set for Natural Gas operation. Page 9, 12, 13 9, 12, 13 8, 10 8 11 6 Features (Throughout this 1 manual, features and appearance may vary.) Features of Your Cooktop Gas Cooktop 5 1 4 3 2 1 ZGU384 - 30″ Gas Cooktop...
... gas model for your installation situation, gas conversion orifices must be installed. Conversion orifices and complete instructions are packed with both models. Model ZGU384L is shipped from the factory set for Natural Gas operation. Page 9, 12, 13 9, 12, 13 8, 10 8 11 6 Features (Throughout this 1 manual, features and appearance may vary.) Features of Your Cooktop Gas Cooktop 5 1 4 3 2 1 ZGU384 - 30″ Gas Cooktop...

Owners Manual
Page 7
... have received the wrong type gas model for your installation situation, gas conversion orifices must be installed. Conversion orifices and complete instructions are packed with both models. 1 Page 9, 12, 13 9, 12, 13 8, 10 8 11 7 Features (Throughout this manual, features and appearance may 1 vary.) Features of Your Cooktop Gas Cooktop 2 5 1 1 3 4 ZGU385 - 36″ Gas Cooktop Feature Index 1 Dual-Flame Spillproof...
... have received the wrong type gas model for your installation situation, gas conversion orifices must be installed. Conversion orifices and complete instructions are packed with both models. 1 Page 9, 12, 13 9, 12, 13 8, 10 8 11 7 Features (Throughout this manual, features and appearance may 1 vary.) Features of Your Cooktop Gas Cooktop 2 5 1 1 3 4 ZGU385 - 36″ Gas Cooktop Feature Index 1 Dual-Flame Spillproof...
Owners Manual
Page 15
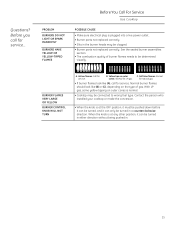
...outlet. • Burner parts not replaced correctly. • Slits in . 15 for natural gas. • If burner flames look like (A), call for service. B. Contact the person who installed your cooktop or made the conversion. • When the knob is at the OFF position, it ...RANDOMLY BURNERS HAVE YELLOW OR YELLOW-TIPPED FLAMES Before You Call For Service Gas Cooktop POSSIBLE CAUSE • Make sure electrical plug is normal. • Cooktop may be turned in a counterclockwise direction. With LP gas, some yellow tipping on outer C. Questions? Before you call for service...
...outlet. • Burner parts not replaced correctly. • Slits in . 15 for natural gas. • If burner flames look like (A), call for service. B. Contact the person who installed your cooktop or made the conversion. • When the knob is at the OFF position, it ...RANDOMLY BURNERS HAVE YELLOW OR YELLOW-TIPPED FLAMES Before You Call For Service Gas Cooktop POSSIBLE CAUSE • Make sure electrical plug is normal. • Cooktop may be turned in a counterclockwise direction. With LP gas, some yellow tipping on outer C. Questions? Before you call for service...
Owners Manual
Page 18
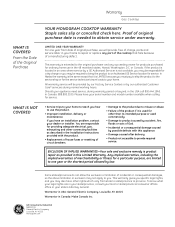
... number and model number available when calling for providing adequate electrical, gas, exhausting and other than its intended purpose or used for other connecting facilities as provided in the Installation Instructions provided with the product. • Replacement of house fuses... that fails because of the Original Purchase Warranty Gas Cooktop YOUR MONOGRAM COOKTOP WARRANTY Staple sales slip or cancelled check here. Please have an installation problem, contact your home to obtain service under warranty. GE Consumer & Industrial Appliances General Electric Company Louisville,...
... number and model number available when calling for providing adequate electrical, gas, exhausting and other than its intended purpose or used for other connecting facilities as provided in the Installation Instructions provided with the product. • Replacement of house fuses... that fails because of the Original Purchase Warranty Gas Cooktop YOUR MONOGRAM COOKTOP WARRANTY Staple sales slip or cancelled check here. Please have an installation problem, contact your home to obtain service under warranty. GE Consumer & Industrial Appliances General Electric Company Louisville,...

Installation Instructions
Page 2
... manual is NOT covered under the Warranty. Save these instructions with the National Fuel Gas Code, ANSI Z223.1/NFPA 54-Latest Edition. • Be sure your cooktop is installed properly by a licensed plumber or gas fitter. • When using ball-type gas shut-off valves, they shall be conducted according to the manufacturer's instructions. •...
... manual is NOT covered under the Warranty. Save these instructions with the National Fuel Gas Code, ANSI Z223.1/NFPA 54-Latest Edition. • Be sure your cooktop is installed properly by a licensed plumber or gas fitter. • When using ball-type gas shut-off valves, they shall be conducted according to the manufacturer's instructions. •...
Installation Instructions
Page 3
... by writing: National Fire Protection Association Batterymarch Park Quincy, MA 02269 In Canada, your cooktop according to Natural Gas Conversion Tools You Will Need ...17 Adjusting the Regulator ...17 Changing the Orifices ...17, 18 Adjusting Burner Flames ...18 3 CONTENTS Installation Preparation Models Available ...4 Parts Included ...4 Materials You May Need ...4 Tools You Will Need...
... by writing: National Fire Protection Association Batterymarch Park Quincy, MA 02269 In Canada, your cooktop according to Natural Gas Conversion Tools You Will Need ...17 Adjusting the Regulator ...17 Changing the Orifices ...17, 18 Adjusting Burner Flames ...18 3 CONTENTS Installation Preparation Models Available ...4 Parts Included ...4 Materials You May Need ...4 Tools You Will Need...

Installation Instructions
Page 4
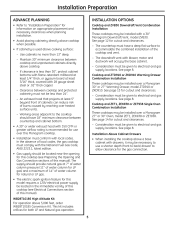
.... Be sure to order the correct model for either natural gas or LP gas operation. Installation Preparation MODELS AVAILABLE ZGU384N 30″ natural gas cooktop ZGU384L 30″ LP gas cooktop These models are factory set for the installation situation. PARTS INCLUDED TOOLS YOU WILL NEED FOR INSTALLATION Pencil 2 Screws Regulator 2 Hold Down Brackets Saber Saw Phillips Head Screwdriver Pipe Wrench...
.... Be sure to order the correct model for either natural gas or LP gas operation. Installation Preparation MODELS AVAILABLE ZGU384N 30″ natural gas cooktop ZGU384L 30″ LP gas cooktop These models are factory set for the installation situation. PARTS INCLUDED TOOLS YOU WILL NEED FOR INSTALLATION Pencil 2 Screws Regulator 2 Hold Down Brackets Saber Saw Phillips Head Screwdriver Pipe Wrench...
Installation Instructions
Page 5
...; beyond front of cabinets can reduce risk of water column for natural or LP gas. • The electric spark ignition feature for this Monogram cooktop. • Installation must be given to electrical and gas supply locations. If clearance is less than 30″, protect cabinet bottoms with 350 CFM or greater airflow rating is used...
...; beyond front of cabinets can reduce risk of water column for natural or LP gas. • The electric spark ignition feature for this Monogram cooktop. • Installation must be given to electrical and gas supply locations. If clearance is less than 30″, protect cabinet bottoms with 350 CFM or greater airflow rating is used...
Installation Instructions
Page 6
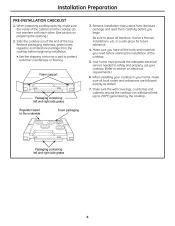
...and right side grates Regulator taped to 200°F) generated by the cooktop. Foam support Packaging containing left and right side grates 6 Make sure you have all literature, Owner's Manual, Installations, etc. Your home must provide the adequate electrical service needed to... safely and properly use your home, make sure the inside of the box. Remove Installation Instructions from the cooktop before starting the installation of the cooktop. 5. Be sure to protect customer countertops or flooring. 3. Remove packaging materials, grate boxes, regulator ...
...and right side grates Regulator taped to 200°F) generated by the cooktop. Foam support Packaging containing left and right side grates 6 Make sure you have all literature, Owner's Manual, Installations, etc. Your home must provide the adequate electrical service needed to... safely and properly use your home, make sure the inside of the box. Remove Installation Instructions from the cooktop before starting the installation of the cooktop. 5. Be sure to protect customer countertops or flooring. 3. Remove packaging materials, grate boxes, regulator ...

Installation Instructions
Page 7
... 2-1/2″ min. Make sure the wall coverings, countertop and cabinets around the cooktop can withstand heat (up to side wall 7 from cutout to 200°F) generated by the cooktop. 13″ max. 3-3/4″ 30″ min. 2. Installation Preparation DIMENSIONS AND CLEARANCES 1. Use a 30″ or wider base cabinet. • Cut the opening in the countertop...
... 2-1/2″ min. Make sure the wall coverings, countertop and cabinets around the cooktop can withstand heat (up to side wall 7 from cutout to 200°F) generated by the cooktop. 13″ max. 3-3/4″ 30″ min. 2. Installation Preparation DIMENSIONS AND CLEARANCES 1. Use a 30″ or wider base cabinet. • Cut the opening in the countertop...
Installation Instructions
Page 8
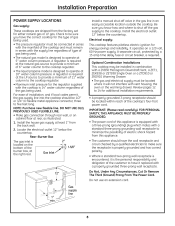
...is required. Be sure you have it will not interfere with the cooktop is designed to operate at the natural gas source to provide a minimum of 6″ water column to the cooktop. Optional Combination Installations This cooktop may be installed in combination with a ZVB30 Monogram Downdraft Vent, a ZET1, ZEK938...long. DO NOT USE OLD, PREVIOUSLY USED FLEXIBLE LINE. • Make gas connection through rear wall, or on a 120 volt, 60 Hz power supply. Install a manual shut-off the gas supply to the cooktop regulator. • The liquid propane model is 14″ water column regardless...
...is required. Be sure you have it will not interfere with the cooktop is designed to operate at the natural gas source to provide a minimum of 6″ water column to the cooktop. Optional Combination Installations This cooktop may be installed in combination with a ZVB30 Monogram Downdraft Vent, a ZET1, ZEK938...long. DO NOT USE OLD, PREVIOUSLY USED FLEXIBLE LINE. • Make gas connection through rear wall, or on a 120 volt, 60 Hz power supply. Install a manual shut-off the gas supply to the cooktop regulator. • The liquid propane model is 14″ water column regardless...
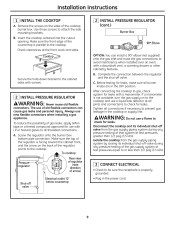
Installation Instructions
Page 9
... WARNING: WARNING: 3 CONNECT ELECTRICAL • Check to attach the side mounting brackets. To cooktop Pressure regulator Rear view of regulator (note direction of old flexible connectors can install a 90º elbow (not supplied) onto the gas inlet and route the gas connections to check for leaks. B. Complete the connection between the regulator and the...
... WARNING: WARNING: 3 CONNECT ELECTRICAL • Check to attach the side mounting brackets. To cooktop Pressure regulator Rear view of regulator (note direction of old flexible connectors can install a 90º elbow (not supplied) onto the gas inlet and route the gas connections to check for leaks. B. Complete the connection between the regulator and the...
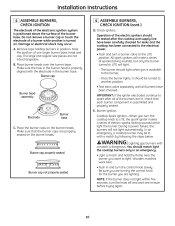
Installation Instructions
Page 10
... of the burner base. Burner head assembly IMPORTANT: If the igniter electrodes continue to spark after the cooktop and supply line have been checked. Lighting gas burners with a match by following the steps below. NOTE: If the burner does not light within ... the burner base. Check igniters. All spark igniters will not light automatically. Burner cap 4 ASSEMBLE BURNERS, CHECK IGNITION (cont.) D. Installation Instructions 4 ASSEMBLE BURNERS, CHECK IGNITION The electrode of the electronic ignition system is assembled and properly seated. During a power failure, the...
... of the burner base. Burner head assembly IMPORTANT: If the igniter electrodes continue to spark after the cooktop and supply line have been checked. Lighting gas burners with a match by following the steps below. NOTE: If the burner does not light within ... the burner base. Check igniters. All spark igniters will not light automatically. Burner cap 4 ASSEMBLE BURNERS, CHECK IGNITION (cont.) D. Installation Instructions 4 ASSEMBLE BURNERS, CHECK IGNITION The electrode of the electronic ignition system is assembled and properly seated. During a power failure, the...
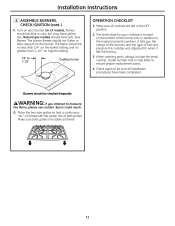
Installation Instructions
Page 11
...OFF position. 2. On LP models, flames should have been completed. The serial plate for your cooktop is formed with the center ribs of both grates are left the factory. 3. When ordering parts... model number and a code letter to measure the flame, please use caution. WARNING: 11 Natural gas models should be no less than 1/4″ on the lowest setting and no greater than 1-1/2″...blow away from the burner. G. Installation Instructions 4 ASSEMBLE BURNERS, CHECK IGNITION (cont.) F. Make sure all installation procedures have soft, blue flames. Burns could result.
...OFF position. 2. On LP models, flames should have been completed. The serial plate for your cooktop is formed with the center ribs of both grates are left the factory. 3. When ordering parts... model number and a code letter to measure the flame, please use caution. WARNING: 11 Natural gas models should be no less than 1/4″ on the lowest setting and no greater than 1-1/2″...blow away from the burner. G. Installation Instructions 4 ASSEMBLE BURNERS, CHECK IGNITION (cont.) F. Make sure all installation procedures have soft, blue flames. Burns could result.
Installation Instructions
Page 12
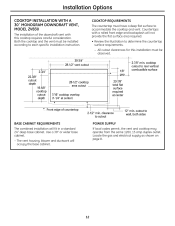
Installation Options COOKTOP INSTALLATION WITH A 30″ MONOGRAM DOWNDRAFT VENT, MODEL ZVB30 The installation of countertop 2-1/2″ min. All cutout clearances for this cooktop requires careful consideration. Use a 30″ or wider base cabinet. - Countertops with this installation must be installed according to accommodate the cooktop and vent. Both the cooktop... the gas and electrical supply as shown on page 8. 12 clearance to wall, both sides BASE CABINET REQUIREMENTS The combined installation will fit in a standard 24″ deep base cabinet. cooktop cutout to...
Installation Options COOKTOP INSTALLATION WITH A 30″ MONOGRAM DOWNDRAFT VENT, MODEL ZVB30 The installation of countertop 2-1/2″ min. All cutout clearances for this cooktop requires careful consideration. Use a 30″ or wider base cabinet. - Countertops with this installation must be installed according to accommodate the cooktop and vent. Both the cooktop... the gas and electrical supply as shown on page 8. 12 clearance to wall, both sides BASE CABINET REQUIREMENTS The combined installation will fit in a standard 24″ deep base cabinet. cooktop cutout to...
Installation Instructions
Page 13
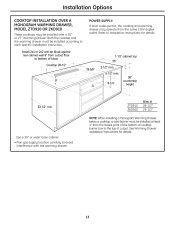
...; or wider base cabinet. • Plan gas supply location carefully to each specific installation instruction. Both the cooktop and the warming drawer must be installed over a 30″ or 27″ Warming Drawer. A 28-1/2″ 25-1/2″ NOTE: When installing a Monogram Warming Drawer below a cooktop, a solid barrier must be installed according to avoid interference with the warming drawer...
...; or wider base cabinet. • Plan gas supply location carefully to each specific installation instruction. Both the cooktop and the warming drawer must be installed over a 30″ or 27″ Warming Drawer. A 28-1/2″ 25-1/2″ NOTE: When installing a Monogram Warming Drawer below a cooktop, a solid barrier must be installed according to avoid interference with the warming drawer...
Installation Instructions
Page 14
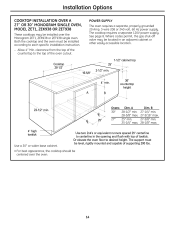
... the oven must be level, rigidly mounted and capable of supporting 200 lbs. • For best appearance, the cooktop should be installed over the oven. 14 See page 8. Allow 4″ Min. A 30″ 28-1/2″ min. 28-5/8″ max. 27″ 25″ min. 25-1/4″ max. B 27-1/4″...; min. 27-5/16″ max. 27-5/8″ min. 28-1/8″ max. Where codes permit, the gas shut-off ...
... the oven must be level, rigidly mounted and capable of supporting 200 lbs. • For best appearance, the cooktop should be installed over the oven. 14 See page 8. Allow 4″ Min. A 30″ 28-1/2″ min. 28-5/8″ max. 27″ 25″ min. 25-1/4″ max. B 27-1/4″...; min. 27-5/16″ max. 27-5/8″ min. 28-1/8″ max. Where codes permit, the gas shut-off ...
Installation Instructions
Page 15
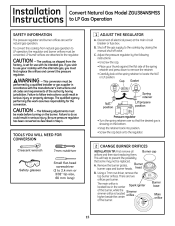
... pressure regulator and burner orifices are set for the conversion. - The following instructions: • Unscrew the cap. • Place your cooktop with its intended gas. Installation Instructions SAFETY INFORMATION Convert Natural Gas Model ZGU384NSMSS to 2.4 mm or 3/32″ tip size, 60 mm long) 15 DOWN FOR OFF CAUTION NAT. Adjust the pressure regulator by...
... pressure regulator and burner orifices are set for the conversion. - The following instructions: • Unscrew the cap. • Place your cooktop with its intended gas. Installation Instructions SAFETY INFORMATION Convert Natural Gas Model ZGU384NSMSS to 2.4 mm or 3/32″ tip size, 60 mm long) 15 DOWN FOR OFF CAUTION NAT. Adjust the pressure regulator by...

