Owners Manual
Page 1
Spacemaker Washers ge.com Safety Instructions 2-4 Operating Instructions Control Panels 5 Control Settings 5 Fabric Care Labels 10 Features 6, 7 Loading and Using the Washer . . . . . .8, 9 Installation Instructions . . . . .11-16 Drain Requirements 14 Electrical Requirements 14 Installing the Washer 15, 16 Location of Your Washer 12 Preparing to Install Your Washer . . . . . .11 Replacement Parts 16 Rough-In Dimensions 12 Unpacking Your Washer 13 Water...
Spacemaker Washers ge.com Safety Instructions 2-4 Operating Instructions Control Panels 5 Control Settings 5 Fabric Care Labels 10 Features 6, 7 Loading and Using the Washer . . . . . .8, 9 Installation Instructions . . . . .11-16 Drain Requirements 14 Electrical Requirements 14 Installing the Washer 15, 16 Location of Your Washer 12 Preparing to Install Your Washer . . . . . .11 Replacement Parts 16 Rough-In Dimensions 12 Unpacking Your Washer 13 Water...
Owners Manual
Page 7
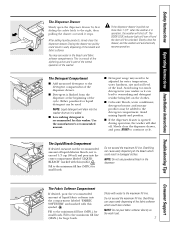
... hardness, size and soil level of the fabric softener which could stain clothes. Slowly close the drawer, and the washer will drain into the washer drum as it can cause early dispensing of the load. The Detergent Compartment I Color-safe bleach, water conditioner, detergent booster and enzyme products may be unlocked. Avoid using too...
... hardness, size and soil level of the fabric softener which could stain clothes. Slowly close the drawer, and the washer will drain into the washer drum as it can cause early dispensing of the load. The Detergent Compartment I Color-safe bleach, water conditioner, detergent booster and enzyme products may be unlocked. Avoid using too...
Owners Manual
Page 8
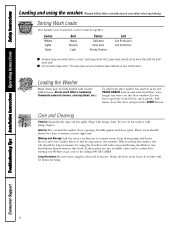
... drain pump and hoses. I Combine large and small items in this book. open the locked door; Consumer Support 8 Troubleshooting Tips Installation Instructions Operating Instructions Safety Instructions Loading and using the brackets and bolts removed during installation. Load large items first. Care and Cleaning Exterior: Immediately wipe off at ge.com or by using the washer...
... drain pump and hoses. I Combine large and small items in this book. open the locked door; Consumer Support 8 Troubleshooting Tips Installation Instructions Operating Instructions Safety Instructions Loading and using the brackets and bolts removed during installation. Load large items first. Care and Cleaning Exterior: Immediately wipe off at ge.com or by using the washer...
Owners Manual
Page 12
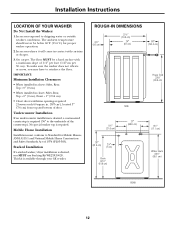
...cm) Power Cord 333⁄8″ (84.8 cm) SIDE 81⁄2″ (21.6 cm) 36″ (91.3 cm) 23⁄4″ (7 cm) Drain 321⁄4″ (81.9 cm) 27″ (68.6 cm) 63⁄4″ (17.1 cm) Water Inlets 331⁄2″ (85.1 cm) REAR ...Front = 1″ (2.54 cm) • Closet door ventilation openings required: 2 louvers each 60 square in contact with a maximum slope of 1974 (PL93-383). This kit is required. The ambient temperature should never be a hard surface with curtains or drapes. 3. On carpet. No special washer top is available through your GE...
...cm) Power Cord 333⁄8″ (84.8 cm) SIDE 81⁄2″ (21.6 cm) 36″ (91.3 cm) 23⁄4″ (7 cm) Drain 321⁄4″ (81.9 cm) 27″ (68.6 cm) 63⁄4″ (17.1 cm) Water Inlets 331⁄2″ (85.1 cm) REAR ...Front = 1″ (2.54 cm) • Closet door ventilation openings required: 2 louvers each 60 square in contact with a maximum slope of 1974 (PL93-383). This kit is required. The ambient temperature should never be a hard surface with curtains or drapes. 3. On carpet. No special washer top is available through your GE...
Owners Manual
Page 14
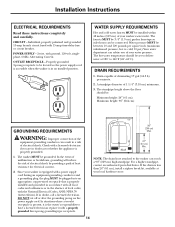
... be located so the power supply cord is accessible when the washer is properly grounded. 1. DRAIN REQUIREMENTS 1. REAR 24″ (61 cm) Min. OUTLET RECEPTACLE - Drain capable of electrical shock. If the drain is the owner's responsibility to deliver water at your washer's water inlet. CIRCUIT - The standpipe height above the floor should be : Minimum...
... be located so the power supply cord is accessible when the washer is properly grounded. 1. DRAIN REQUIREMENTS 1. REAR 24″ (61 cm) Min. OUTLET RECEPTACLE - Drain capable of electrical shock. If the drain is the owner's responsibility to deliver water at your washer's water inlet. CIRCUIT - The standpipe height above the floor should be : Minimum...
Owners Manual
Page 16
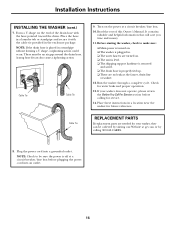
There must be ordered by calling 800.GE.CARES. 8. Turn on . ❏ The washer is plugged in a standpipe without forming a U shape, a siphoning action could occur. Read the rest of the drain hose with the cable tie provided in a location near the washer for water leaks and proper operation. 13. Check for...will save you time and money. 11. REPLACEMENT PARTS If replacement parts are no leaks at ge.com or by visiting our Website at the faucet, drain line or washer. 12. Before starting the washer, check to be sure the power is properly tied up. ❏ There are needed for ...
There must be ordered by calling 800.GE.CARES. 8. Turn on . ❏ The washer is plugged in a standpipe without forming a U shape, a siphoning action could occur. Read the rest of the drain hose with the cable tie provided in a location near the washer for water leaks and proper operation. 13. Check for...will save you time and money. 11. REPLACEMENT PARTS If replacement parts are no leaks at ge.com or by visiting our Website at the faucet, drain line or washer. 12. Before starting the washer, check to be sure the power is properly tied up. ❏ There are needed for ...
Owners Manual
Page 17
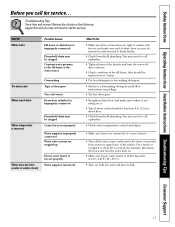
...need to call a plumber. • Check water temperature control and adjust. • Make sure hoses are tight at washer and faucets and make sure washer is not sitting on it. • Top of drain hose is delivering water at the faucets and turn the water back on both hot and cold faucets fully... Troubleshooting Tips Consumer Support Before you may not need to call for service. Review the charts on package. • Try less detergent. • Straighten drain hose and make sure end of drain outlet should be less than 8 ft. (2.5 m) above floor. • Check household plumbing.
...need to call a plumber. • Check water temperature control and adjust. • Make sure hoses are tight at washer and faucets and make sure washer is not sitting on it. • Top of drain hose is delivering water at the faucets and turn the water back on both hot and cold faucets fully... Troubleshooting Tips Consumer Support Before you may not need to call for service. Review the charts on package. • Try less detergent. • Straighten drain hose and make sure end of drain outlet should be less than 8 ft. (2.5 m) above floor. • Check household plumbing.
Owners Manual
Page 20
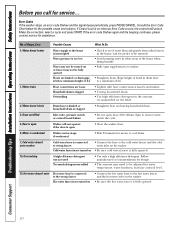
... hose connections at faucets and washer. • Unclog household drain. • Use high efficiency detergent in the amount recommended on the label. 2, Water doesn't drain Drain hose is kinked or household drain is clogged • Straighten hose and unclog household drain. 3, Drum overfilled Inlet valve...cycle and press START. Troubleshooting Tips Installation Instructions Operating Instructions Safety Instructions Before you call for water temperature, water hardness, load size and soil level. 15, Hot water doesn't enter Hot water hose is connected to the wrong faucet Hot water...
... hose connections at faucets and washer. • Unclog household drain. • Use high efficiency detergent in the amount recommended on the label. 2, Water doesn't drain Drain hose is kinked or household drain is clogged • Straighten hose and unclog household drain. 3, Drum overfilled Inlet valve...cycle and press START. Troubleshooting Tips Installation Instructions Operating Instructions Safety Instructions Before you call for water temperature, water hardness, load size and soil level. 15, Hot water doesn't enter Hot water hose is connected to the wrong faucet Hot water...


