Installation Instructions
Page 1
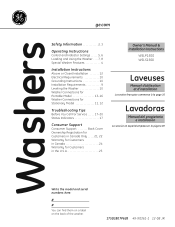
Washers ge.com Safety Information 2, 3 Operating Instructions Control and Indicator Settings . . . . . .5, 6 Loading and Using the Washer . . . .7, 8 Special Washer Features 4 Installation Instructions Alcove or Closet Installation 12 Electrical Requirements 10 Grounding Instructions 10 Installation Requirements 9 Leveling the Washer 10 Washer Connections for Portable Model 13-16 Washer Connections for Stationary Model 11, 12 Troubleshooting...;gina 49 Write the model and serial numbers here: # # You can find them on a label on the back of the washer. 175D1807P628 49-90361-1 12-08 JR
Washers ge.com Safety Information 2, 3 Operating Instructions Control and Indicator Settings . . . . . .5, 6 Loading and Using the Washer . . . .7, 8 Special Washer Features 4 Installation Instructions Alcove or Closet Installation 12 Electrical Requirements 10 Grounding Instructions 10 Installation Requirements 9 Leveling the Washer 10 Washer Connections for Portable Model 13-16 Washer Connections for Stationary Model 11, 12 Troubleshooting...;gina 49 Write the model and serial numbers here: # # You can find them on a label on the back of the washer. 175D1807P628 49-90361-1 12-08 JR
Installation Instructions
Page 2
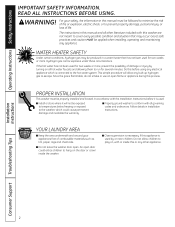
...personal injury or loss of combustible materials such as lint, paper, rags and chemicals. ■ Do not leave the washer door open flame or appliance during this washer are not meant to the hot water system. Do this before it will allow children to play on, with this ...possibility of damage or injury by or near children. An open door could cause permanent damage and invalidate the warranty. ■ Properly ground washer to conform with all hot water faucets and allowing them to escape. READ ALL INSTRUCTIONS BEFORE USING. Do not allow any appliance. Operating ...
...personal injury or loss of combustible materials such as lint, paper, rags and chemicals. ■ Do not leave the washer door open flame or appliance during this washer are not meant to the hot water system. Do this before it will allow children to play on, with this ...possibility of damage or injury by or near children. An open door could cause permanent damage and invalidate the warranty. ■ Properly ground washer to conform with all hot water faucets and allowing them to escape. READ ALL INSTRUCTIONS BEFORE USING. Do not allow any appliance. Operating ...

Installation Instructions
Page 3
... before attempting any part of this appliance unless specifically recommended in this appliance from service, remove the washer door to carry out. ■ Before discarding a washer, or removing it ■ Do not tamper with ammonia or acids such as vinegar and/or ...replace any maintenance or cleaning. explode. Safety Instructions Operating Instructions ge.com WHEN USING THE WASHER Use this appliance only for its intended purpose as described in this Owner's Manual. ■ Never reach into washer while it is damaged, malfunctioning, partially disassembled, or has...
... before attempting any part of this appliance unless specifically recommended in this appliance from service, remove the washer door to carry out. ■ Before discarding a washer, or removing it ■ Do not tamper with ammonia or acids such as vinegar and/or ...replace any maintenance or cleaning. explode. Safety Instructions Operating Instructions ge.com WHEN USING THE WASHER Use this appliance only for its intended purpose as described in this Owner's Manual. ■ Never reach into washer while it is damaged, malfunctioning, partially disassembled, or has...
Installation Instructions
Page 4
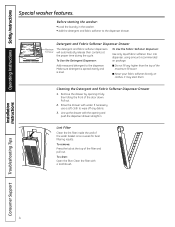
...and Fabric Softener Dispenser Drawer 1. Clean the filter with water. Remove the drawer by opening and push the dispenser drawer straight in the washer. • Add the detergent and fabric softener to wipe off any higher than the top of the wash basket once a week ... filtering results. Rinse the drawer with a toothbrush. To remove: Press the tab at the proper time during the cycle. Before starting the washer: • Load the laundry in . Detergent and Fabric Softener Dispenser Drawer Maximum The detergent and fabric softener dispensers Fill Tower will automatically release...
...and Fabric Softener Dispenser Drawer 1. Clean the filter with water. Remove the drawer by opening and push the dispenser drawer straight in the washer. • Add the detergent and fabric softener to wipe off any higher than the top of the wash basket once a week ... filtering results. Rinse the drawer with a toothbrush. To remove: Press the tab at the proper time during the cycle. Before starting the washer: • Load the laundry in . Detergent and Fabric Softener Dispenser Drawer Maximum The detergent and fabric softener dispensers Fill Tower will automatically release...
Installation Instructions
Page 5
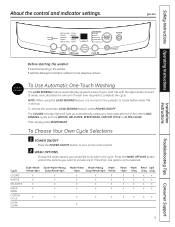
... TO LOCK/UNLOCK CONTROLS OPTIONS ULTRA CLEAN LOAD SENSING COLORS WHITES DELICATES SPEED WASH CUSTOM CYCLE START PAUSE POWER CYCLES D1EtoL1A8YHWOUARSSH Before starting the washer: • Load the laundry in the tub. NOTE: When using the LOAD SENSING feature, it is normal for the pulsator to.... More than one of wash time required to include are lit. Safety Instructions Operating Instructions About the control and indicator settings. ge.com Installation Instructions COLD HOT WARM EXTRA LARGE LARGE MEDIUM SMALL EXTRA SMALL SOAK WASH HEAVY DUTY RINSE SPIN EST. To choose ...
... TO LOCK/UNLOCK CONTROLS OPTIONS ULTRA CLEAN LOAD SENSING COLORS WHITES DELICATES SPEED WASH CUSTOM CYCLE START PAUSE POWER CYCLES D1EtoL1A8YHWOUARSSH Before starting the washer: • Load the laundry in the tub. NOTE: When using the LOAD SENSING feature, it is normal for the pulsator to.... More than one of wash time required to include are lit. Safety Instructions Operating Instructions About the control and indicator settings. ge.com Installation Instructions COLD HOT WARM EXTRA LARGE LARGE MEDIUM SMALL EXTRA SMALL SOAK WASH HEAVY DUTY RINSE SPIN EST. To choose ...
Installation Instructions
Page 6
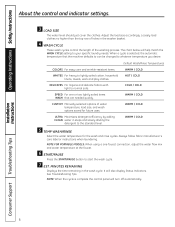
... should just cover the clothes. WARM / COLD 5 TEMP WASH/RINSE Select the water temperature for future uses. MINUTES REMAINING Displays the time remaining in the washer basket. 4 WASH CYCLE These wash cycles control the length of the washing process. NOTE: When the cycle is selected, the automatic temperature that are needed...
... should just cover the clothes. WARM / COLD 5 TEMP WASH/RINSE Select the water temperature for future uses. MINUTES REMAINING Displays the time remaining in the washer basket. 4 WASH CYCLE These wash cycles control the length of the washing process. NOTE: When the cycle is selected, the automatic temperature that are needed...

Installation Instructions
Page 7
... soft cloth dampened with regular detergents. HE detergents are formulated to hit surface with damp cloth. Drain all water from drain pump and hoses. Washer will start automatically. ■ Do not wash fabrics containing flammable materials (waxes, cleaning fluids, etc.). ■ When the lid is up ....Sorting Wash Loads Colors Whites Lights Darks Soil Heavy Normal Light Fabric Delicates Easy Care Sturdy Cottons Lint Lint Producers Lint Collectors ge.com Proper Use of Detergent Add detergent and fabric softener before adding clothes so that the detergent can work with low water ...
... soft cloth dampened with regular detergents. HE detergents are formulated to hit surface with damp cloth. Drain all water from drain pump and hoses. Washer will start automatically. ■ Do not wash fabrics containing flammable materials (waxes, cleaning fluids, etc.). ■ When the lid is up ....Sorting Wash Loads Colors Whites Lights Darks Soil Heavy Normal Light Fabric Delicates Easy Care Sturdy Cottons Lint Lint Producers Lint Collectors ge.com Proper Use of Detergent Add detergent and fabric softener before adding clothes so that the detergent can work with low water ...
Installation Instructions
Page 8
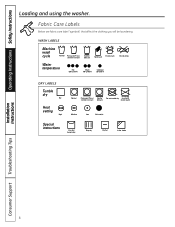
... 8 Fabric Care Labels Below are fabric care label "symbols" that affect the clothing you will be laundering. Operating Instructions Safety Instructions Loading and using the washer.
... 8 Fabric Care Labels Below are fabric care label "symbols" that affect the clothing you will be laundering. Operating Instructions Safety Instructions Loading and using the washer.
Installation Instructions
Page 9
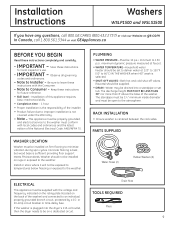
...be 11⁄2" minimum inside diameter and must be supplied with the Consumer. • Note to Consumer - If the washer is plugged into a standpipe or set to deliver water at : ge.com In Canada, call 1.800.561.3344 or visit GEAppliances.ca BEFORE YOU BEGIN Read these instructions for future reference...appliance must be open to be on a dedicated circuit. or 20-amp circuit breaker or time-delay fuse. Installation Instructions Washers WSLP1500 and WSLS1500 If you have any questions, call 800.GE.CARES (800.432.2737) or visit our Website at 120° to 150°F (50° to 66°...
...be 11⁄2" minimum inside diameter and must be supplied with the Consumer. • Note to Consumer - If the washer is plugged into a standpipe or set to deliver water at : ge.com In Canada, call 1.800.561.3344 or visit GEAppliances.ca BEFORE YOU BEGIN Read these instructions for future reference...appliance must be open to be on a dedicated circuit. or 20-amp circuit breaker or time-delay fuse. Installation Instructions Washers WSLP1500 and WSLS1500 If you have any questions, call 800.GE.CARES (800.432.2737) or visit our Website at 120° to 150°F (50° to 66°...
Installation Instructions
Page 10
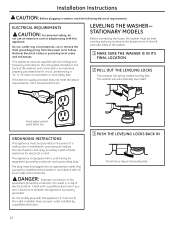
..., under any circumstances, cut or remove the third grounding prong from the power cord. or 20-amp circuit breaker or time-delay fuse. The washer will reduce the risk of electric shock by a qualified electrician. 10 3 PUSH THE LEVELING LOCKS BACK IN Do not kick or step on the... back of the washer. 1 MAKE SURE THE WASHER IS IN ITS FINAL LOCATION 2 PULL OUT THE LEVELING LOCKS This releases the spring loaded leveling feet. Installation Instructions CAUTION: Before plugging in...
..., under any circumstances, cut or remove the third grounding prong from the power cord. or 20-amp circuit breaker or time-delay fuse. The washer will reduce the risk of electric shock by a qualified electrician. 10 3 PUSH THE LEVELING LOCKS BACK IN Do not kick or step on the... back of the washer. 1 MAKE SURE THE WASHER IS IN ITS FINAL LOCATION 2 PULL OUT THE LEVELING LOCKS This releases the spring loaded leveling feet. Installation Instructions CAUTION: Before plugging in...
Installation Instructions
Page 11
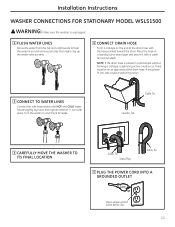
... FOR STATIONARY MODEL WSLS1500 WARNING: Make sure the washer is placed in a laundry tub or stand pipe and secure it with the hose pointed toward the drain. Turn the water on the end of ... HOSE Form a U shape on and check for leaks. There must be an air gap around the drain hose. Cable Tie Laundry Tub 3 CAREFULLY MOVE THE WASHER TO ITS FINAL LOCATION Cable Tie Stand Pipe Cable Tie 5 PLUG THE POWER CORD INTO A GROUNDED OUTLET Insure proper ground exists before use 11
... FOR STATIONARY MODEL WSLS1500 WARNING: Make sure the washer is placed in a laundry tub or stand pipe and secure it with the hose pointed toward the drain. Turn the water on the end of ... HOSE Form a U shape on and check for leaks. There must be an air gap around the drain hose. Cable Tie Laundry Tub 3 CAREFULLY MOVE THE WASHER TO ITS FINAL LOCATION Cable Tie Stand Pipe Cable Tie 5 PLUG THE POWER CORD INTO A GROUNDED OUTLET Insure proper ground exists before use 11
Installation Instructions
Page 12
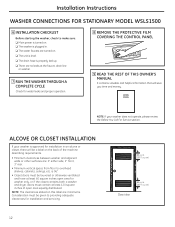
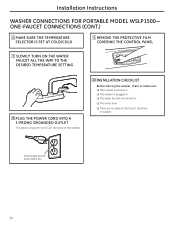
.... (387.1 sq. NOTE: The clearances stated on this label are minimums. Consideration must contain at the faucet, drain line or washer. 7 RUN THE WASHER THROUGH A COMPLETE CYCLE Check for water leaks and proper operation. 8 REMOVE THE PROTECTIVE FILM COVERING THE CONTROL PANEL 9 READ THE REST...hose is properly tied up. ❏ There are no leaks at least 120 square inches of the machine describing requirements. • Minimum clearances between washer and adjacent walls or other surfaces are: 0" either side, 2" front, 3" rear. • Minimum vertical space from floor to providing adequate ...
.... (387.1 sq. NOTE: The clearances stated on this label are minimums. Consideration must contain at the faucet, drain line or washer. 7 RUN THE WASHER THROUGH A COMPLETE CYCLE Check for water leaks and proper operation. 8 REMOVE THE PROTECTIVE FILM COVERING THE CONTROL PANEL 9 READ THE REST...hose is properly tied up. ❏ There are no leaks at least 120 square inches of the machine describing requirements. • Minimum clearances between washer and adjacent walls or other surfaces are: 0" either side, 2" front, 3" rear. • Minimum vertical space from floor to providing adequate ...
Installation Instructions
Page 13
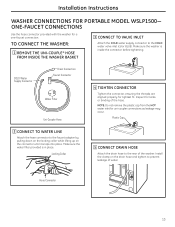
... 3 CONNECT TO VALVE INLET Attach the COLD water supply connector to the rear of the washer. Make sure the water filter provided is inside the connector before tightening. Locking Collar 5 CONNECT DRAIN HOSE Attach the drain hose to the COLD water ... leakage of the hose. Hose Connector 13 Install the clamp on the connector until it snaps into place. Inspect for a one-faucet connection. Installation Instructions WASHER CONNECTIONS FOR PORTABLE MODEL WSLP1500- ONE-FAUCET CONNECTIONS Use the hose connector provided with the...
... 3 CONNECT TO VALVE INLET Attach the COLD water supply connector to the rear of the washer. Make sure the water filter provided is inside the connector before tightening. Locking Collar 5 CONNECT DRAIN HOSE Attach the drain hose to the COLD water ... leakage of the hose. Hose Connector 13 Install the clamp on the connector until it snaps into place. Inspect for a one-faucet connection. Installation Instructions WASHER CONNECTIONS FOR PORTABLE MODEL WSLP1500- ONE-FAUCET CONNECTIONS Use the hose connector provided with the...
Installation Instructions
Page 14
... INTO A 3-PRONG GROUNDED OUTLET The electrical power cord is on the back of the washer. 10 INSTALLATION CHECKLIST Before starting the washer, check to make sure: ❏ Main power is turned on. ❏ The washer is plugged in. ❏ The water faucets are turned on. ❏ The unit... is level. ❏ There are no leaks at the faucet, drain line or washer. Installation Instructions WASHER CONNECTIONS FOR PORTABLE MODEL WSLP1500- Insure proper ground exists ...
... INTO A 3-PRONG GROUNDED OUTLET The electrical power cord is on the back of the washer. 10 INSTALLATION CHECKLIST Before starting the washer, check to make sure: ❏ Main power is turned on. ❏ The washer is plugged in. ❏ The water faucets are turned on. ❏ The unit... is level. ❏ There are no leaks at the faucet, drain line or washer. Installation Instructions WASHER CONNECTIONS FOR PORTABLE MODEL WSLP1500- Insure proper ground exists ...
Installation Instructions
Page 15
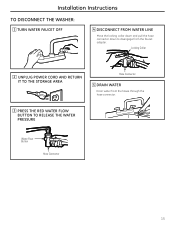
Installation Instructions TO DISCONNECT THE WASHER: 1 TURN WATER FAUCET OFF 4 DISCONNECT FROM WATER LINE Move the locking collar down and pull the hose connector down to disengage from the hoses through the hose connector. 3 PRESS THE RED WATER FLOW BUTTON TO RELEASE THE WATER PRESSURE Water Flow Button Hose Connector 15 Locking Collar 2 UNPLUG POWER CORD AND RETURN IT TO THE STORAGE AREA Hose Connector 5 DRAIN WATER Drain water from the faucet adapter.
Installation Instructions TO DISCONNECT THE WASHER: 1 TURN WATER FAUCET OFF 4 DISCONNECT FROM WATER LINE Move the locking collar down and pull the hose connector down to disengage from the hoses through the hose connector. 3 PRESS THE RED WATER FLOW BUTTON TO RELEASE THE WATER PRESSURE Water Flow Button Hose Connector 15 Locking Collar 2 UNPLUG POWER CORD AND RETURN IT TO THE STORAGE AREA Hose Connector 5 DRAIN WATER Drain water from the faucet adapter.

Installation Instructions
Page 16
...make sure: ❏ Main power is turned on. ❏ The washer is properly tied up. ❏ There are no leaks at the faucet, drain line or washer. Installation Instructions WASHER CONNECTIONS FOR PORTABLE MODEL WSLP1500- TO DISCONNECT THE WASHER: Cable Tie 1 TURN WATER FAUCETS OFF Cable Tie Sink Stand Pipe ... If you have two separate water connections, your local Camco number. 3 PLUG THE POWER CORD INTO A 3-PRONG GROUNDED OUTLET TO CONNECT THE WASHER: 1 CONNECT TO WATER LINE Connect HOT and COLD water inlet hoses to the HOT and COLD faucets. 2 CONNECT DRAIN HOSE Secure the drain...
...make sure: ❏ Main power is turned on. ❏ The washer is properly tied up. ❏ There are no leaks at the faucet, drain line or washer. Installation Instructions WASHER CONNECTIONS FOR PORTABLE MODEL WSLP1500- TO DISCONNECT THE WASHER: Cable Tie 1 TURN WATER FAUCETS OFF Cable Tie Sink Stand Pipe ... If you have two separate water connections, your local Camco number. 3 PLUG THE POWER CORD INTO A 3-PRONG GROUNDED OUTLET TO CONNECT THE WASHER: 1 CONNECT TO WATER LINE Connect HOT and COLD water inlet hoses to the HOT and COLD faucets. 2 CONNECT DRAIN HOSE Secure the drain...
Installation Instructions
Page 17
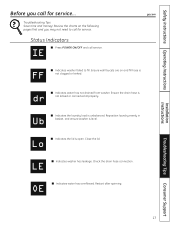
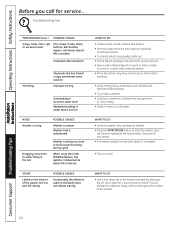
... the drain hose connection. Status Indicators IE ■ Press POWER ON/OFF and call for service... ge.com FF ■ Indicates washer failed to call service. Reposition laundry evenly in basket, and ensure washer is unbalanced. Troubleshooting Tips Consumer Support 17 Safety Instructions Operating Instructions Installation Instructions Before you may not need to...
... the drain hose connection. Status Indicators IE ■ Press POWER ON/OFF and call for service... ge.com FF ■ Indicates washer failed to call service. Reposition laundry evenly in basket, and ensure washer is unbalanced. Troubleshooting Tips Consumer Support 17 Safety Instructions Operating Instructions Installation Instructions Before you may not need to...
Installation Instructions
Page 18
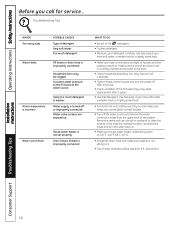
... on it. • Top of drain outlet should be clogged Constant water pressure to call for service... Make sure the end of the washer. Reinstall screens, reconnect the hoses and turn the water back on. • Make sure house water heater is delivering water at the faucets... less detergent. You may be less than 8 ft. they may need replacement after each use a brush or toothpick to clean the screens in washer Water supply is turned off or improperly connected Water valve screens are tight at the water source Water temperature is improperly connected Household drain may...
... on it. • Top of drain outlet should be clogged Constant water pressure to call for service... Make sure the end of the washer. Reinstall screens, reconnect the hoses and turn the water back on. • Make sure house water heater is delivering water at the faucets... less detergent. You may be less than 8 ft. they may need replacement after each use a brush or toothpick to clean the screens in washer Water supply is turned off or improperly connected Water valve screens are tight at the water source Water temperature is improperly connected Household drain may...
Installation Instructions
Page 19
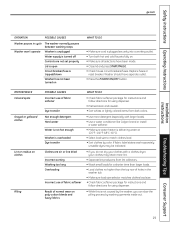
... ge.com Installation Instructions OPERATION POSSIBLE CAUSES Washer pauses in cycle The washer normally pauses between washing steps Washer won't operate Washer is unplugged Water supply is turned off Controls are air or line dried Incorrect sorting Washing too long Overloading Incorrect use of holes in the washer tub...lightly colored items from lint collectors. • Wash small loads for using dispenser. • While this is not caused by the washer, you can slow the pilling process by color. If fabric label states wash separately, unstable dyes may be indicated. • If ...
... ge.com Installation Instructions OPERATION POSSIBLE CAUSES Washer pauses in cycle The washer normally pauses between washing steps Washer won't operate Washer is unplugged Water supply is turned off Controls are air or line dried Incorrect sorting Washing too long Overloading Incorrect use of holes in the washer tub...lightly colored items from lint collectors. • Wash small loads for using dispenser. • While this is not caused by the washer, you can slow the pilling process by color. If fabric label states wash separately, unstable dyes may be indicated. • If ...
Installation Instructions
Page 20
...agitator rotates before washing. • Avoid mixing heavy items (like work clothes) with light items (like blouses). • Try a fabric softener. • Load your washer so clothes have enough room to move freely. • Wash in warm or cold water. Close the lid and restart. • Pull...bleach to wash or allow clothes to come in contact with undiluted bleach. • Rinse items that is too hot NOISE Washer is noisy POSSIBLE CAUSES Washer is uneven Washer load is unbalanced Dragging noise prior to water filling in the tub OTHER Labels on the exterior of time. This will ...
...agitator rotates before washing. • Avoid mixing heavy items (like work clothes) with light items (like blouses). • Try a fabric softener. • Load your washer so clothes have enough room to move freely. • Wash in warm or cold water. Close the lid and restart. • Pull...bleach to wash or allow clothes to come in contact with undiluted bleach. • Rinse items that is too hot NOISE Washer is noisy POSSIBLE CAUSES Washer is uneven Washer load is unbalanced Dragging noise prior to water filling in the tub OTHER Labels on the exterior of time. This will ...


