Installation Instructions
Page 1
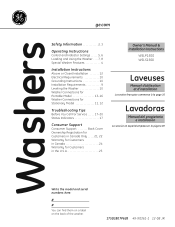
Washers ge.com Safety Information 2, 3 Operating Instructions Control and Indicator Settings . . . . . .5, 6 Loading and Using the Washer . . . .7, 8 Special Washer Features 4 Installation Instructions Alcove or Closet Installation 12 Electrical Requirements 10 Grounding Instructions 10 Installation Requirements 9 Leveling the Washer 10 Washer Connections for Portable Model 13-16 Washer Connections for Stationary Model 11, 12 Troubleshooting...;gina 49 Write the model and serial numbers here: # # You can find them on a label on the back of the washer. 175D1807P628 49-90361-1 12-08 JR
Washers ge.com Safety Information 2, 3 Operating Instructions Control and Indicator Settings . . . . . .5, 6 Loading and Using the Washer . . . .7, 8 Special Washer Features 4 Installation Instructions Alcove or Closet Installation 12 Electrical Requirements 10 Grounding Instructions 10 Installation Requirements 9 Leveling the Washer 10 Washer Connections for Portable Model 13-16 Washer Connections for Stationary Model 11, 12 Troubleshooting...;gina 49 Write the model and serial numbers here: # # You can find them on a label on the back of the washer. 175D1807P628 49-90361-1 12-08 JR
Installation Instructions
Page 2
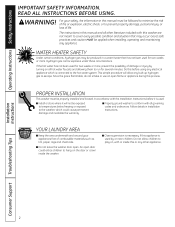
.... WARNING! For your appliances free of combustible materials such as lint, paper, rags and chemicals. ■ Do not leave the washer door open flame or appliance during this before it will allow children to hang on , with the Installation Instructions before using any other... the gas is used for several minutes. An open door could cause permanent damage and invalidate the warranty. ■ Properly ground washer to conform with this manual and all hot water faucets and allowing them to escape. Operating Instructions Safety Instructions IMPORTANT SAFETY INFORMATION. ...
.... WARNING! For your appliances free of combustible materials such as lint, paper, rags and chemicals. ■ Do not leave the washer door open flame or appliance during this before it will allow children to hang on , with the Installation Instructions before using any other... the gas is used for several minutes. An open door could cause permanent damage and invalidate the warranty. ■ Properly ground washer to conform with this manual and all hot water faucets and allowing them to escape. Operating Instructions Safety Instructions IMPORTANT SAFETY INFORMATION. ...

Installation Instructions
Page 3
...or place these substances to minimize leakage if a break or rupture should occur. GE recommends changing the hoses every 5 years. ■ Do not attempt to carry out. ■ Before discarding a washer, or removing it ■ Do not tamper with ammonia or acids such as ...the possibility of the fill hoses; explode. Safety Instructions Operating Instructions ge.com WHEN USING THE WASHER Use this appliance only for its intended purpose as described in this Owner's Manual. ■ Never reach into washer while it is damaged, malfunctioning, partially disassembled, or has missing or...
...or place these substances to minimize leakage if a break or rupture should occur. GE recommends changing the hoses every 5 years. ■ Do not attempt to carry out. ■ Before discarding a washer, or removing it ■ Do not tamper with ammonia or acids such as ...the possibility of the fill hoses; explode. Safety Instructions Operating Instructions ge.com WHEN USING THE WASHER Use this appliance only for its intended purpose as described in this Owner's Manual. ■ Never reach into washer while it is damaged, malfunctioning, partially disassembled, or has missing or...
Installation Instructions
Page 4
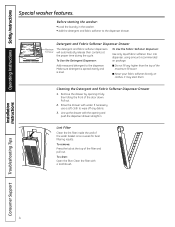
...off any higher than the top of the wash basket once a week for best filtering results. Operating Instructions Safety Instructions Special washer features. To Use the Detergent Dispenser: To Use the Fabric Softener Dispenser: Use only liquid fabric softener. Remove the drawer by... opening and push the dispenser drawer straight in the washer. • Add the detergent and fabric softener to the dispenser. Before starting the washer: • Load the laundry in . It may stain them. Installation Instructions Consumer Support ...
...off any higher than the top of the wash basket once a week for best filtering results. Operating Instructions Safety Instructions Special washer features. To Use the Detergent Dispenser: To Use the Fabric Softener Dispenser: Use only liquid fabric softener. Remove the drawer by... opening and push the dispenser drawer straight in the washer. • Add the detergent and fabric softener to the dispenser. Before starting the washer: • Load the laundry in . It may stain them. Installation Instructions Consumer Support ...
Installation Instructions
Page 5
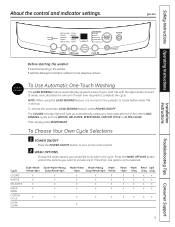
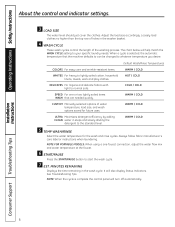
...CONTROLS OPTIONS ULTRA CLEAN LOAD SENSING COLORS WHITES DELICATES SPEED WASH CUSTOM CYCLE START PAUSE POWER CYCLES D1EtoL1A8YHWOUARSSH Before starting the washer: • Load the laundry in the washer. • Add the detergent and fabric softener to rotate before water fills in the cycle. NOTE: When using...OFF button to turn on the control panel. 2 WASH OPTIONS Choose the wash options you have selected one option can be selected. ge.com Installation Instructions COLD HOT WARM EXTRA LARGE LARGE MEDIUM SMALL EXTRA SMALL SOAK WASH HEAVY DUTY RINSE SPIN EST. Then simply press...
...CONTROLS OPTIONS ULTRA CLEAN LOAD SENSING COLORS WHITES DELICATES SPEED WASH CUSTOM CYCLE START PAUSE POWER CYCLES D1EtoL1A8YHWOUARSSH Before starting the washer: • Load the laundry in the washer. • Add the detergent and fabric softener to rotate before water fills in the cycle. NOTE: When using...OFF button to turn on the control panel. 2 WASH OPTIONS Choose the wash options you have selected one option can be selected. ge.com Installation Instructions COLD HOT WARM EXTRA LARGE LARGE MEDIUM SMALL EXTRA SMALL SOAK WASH HEAVY DUTY RINSE SPIN EST. Then simply press...
Installation Instructions
Page 6
.... WARM / COLD 5 TEMP WASH/RINSE Select the water temperature for future uses. It will turn off automatically. MINUTES REMAINING Displays the time remaining in the washer basket. 4 WASH CYCLE These wash cycles control the length of water temperature, load size, and wash options saved for the wash and rinse cycles. COLD...
.... WARM / COLD 5 TEMP WASH/RINSE Select the water temperature for future uses. It will turn off automatically. MINUTES REMAINING Displays the time remaining in the washer basket. 4 WASH CYCLE These wash cycles control the length of water temperature, load size, and wash options saved for the wash and rinse cycles. COLD...

Installation Instructions
Page 7
...surface with damp cloth. When loading wet items make sure you set the load/water level high enough to allow moisture to work effectively. Washer will start automatically. ■ Do not wash fabrics containing flammable materials (waxes, cleaning fluids, etc.). ■ When the lid is up... little or too much detergent is shut off any spills. Do not store the washer where it will appear in the washer tub. GE recommends the use harsh or gritty cleaners.) Fill Hoses: Hoses connecting washer to clean the basket use a clean, soft cloth dampened with liquid detergent, then...
...surface with damp cloth. When loading wet items make sure you set the load/water level high enough to allow moisture to work effectively. Washer will start automatically. ■ Do not wash fabrics containing flammable materials (waxes, cleaning fluids, etc.). ■ When the lid is up... little or too much detergent is shut off any spills. Do not store the washer where it will appear in the washer tub. GE recommends the use harsh or gritty cleaners.) Fill Hoses: Hoses connecting washer to clean the basket use a clean, soft cloth dampened with liquid detergent, then...
Installation Instructions
Page 8
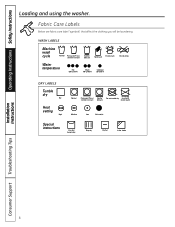
Fabric Care Labels Below are fabric care label "symbols" that affect the clothing you will be laundering. Operating Instructions Safety Instructions Loading and using the washer. WASH LABELS Machine wash cycle Normal Permanent Press/ wrinkle resistant Gentle/ delicate Hand wash Do not wash Do not wring Water temperature Hot (50°C/...
Fabric Care Labels Below are fabric care label "symbols" that affect the clothing you will be laundering. Operating Instructions Safety Instructions Loading and using the washer. WASH LABELS Machine wash cycle Normal Permanent Press/ wrinkle resistant Gentle/ delicate Hand wash Do not wash Do not wring Water temperature Hot (50°C/...
Installation Instructions
Page 9
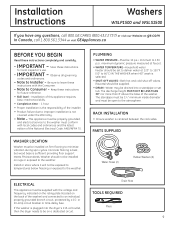
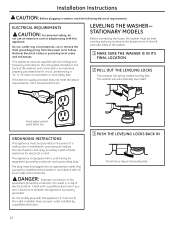
... water heater should be set tub. TOOLS REQUIRED Pliers 9 WASHER LOCATION Washer must be installed on the back of the National Electrical Code, ANSI/NFPA 70. Installation Instructions Washers WSLP1500 and WSLS1500 If you have any questions, call 800.GE.CARES (800.432.2737) or visit our Website at 120...° to 150°F (50° to 66°C) IN THE WASHER when HOT wash is selected. • SHUT...
... water heater should be set tub. TOOLS REQUIRED Pliers 9 WASHER LOCATION Washer must be installed on the back of the National Electrical Code, ANSI/NFPA 70. Installation Instructions Washers WSLP1500 and WSLS1500 If you have any questions, call 800.GE.CARES (800.432.2737) or visit our Website at 120...° to 150°F (50° to 66°C) IN THE WASHER when HOT wash is selected. • SHUT...
Installation Instructions
Page 10
...electric shock by a qualified electrician. 10 3 PUSH THE LEVELING LOCKS BACK IN Do not kick or step on the back of the washer) and connected to whether the appliance is properly grounded. Check with the voltage and frequency indicated on the rating plate (located on the... leveling locks. Installation Instructions CAUTION: Before plugging in a risk of electrical shock. STATIONARY MODELS Before connecting the hoses, the washer must be plugged into an appropriate outlet that is equipped with this appliance. Do not modify plug with a cord having an equipment grounding ...
...electric shock by a qualified electrician. 10 3 PUSH THE LEVELING LOCKS BACK IN Do not kick or step on the back of the washer) and connected to whether the appliance is properly grounded. Check with the voltage and frequency indicated on the rating plate (located on the... leveling locks. Installation Instructions CAUTION: Before plugging in a risk of electrical shock. STATIONARY MODELS Before connecting the hoses, the washer must be plugged into an appropriate outlet that is equipped with this appliance. Do not modify plug with a cord having an equipment grounding ...
Installation Instructions
Page 11
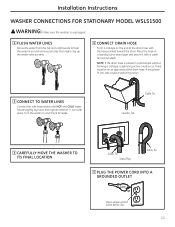
... FOR STATIONARY MODEL WSLS1500 WARNING: Make sure the washer is placed in a laundry tub or stand pipe and secure it with pliers. Place the hose in a stand pipe without forming a U shape, a siphoning action could ... HOT and COLD water faucets tightly by hand, then tighten another 2⁄3 turn with a cable tie (not included). Cable Tie Laundry Tub 3 CAREFULLY MOVE THE WASHER TO ITS FINAL LOCATION Cable Tie Stand Pipe Cable Tie 5 PLUG THE POWER CORD INTO A GROUNDED OUTLET Insure proper ground exists before use 11 Turn...
... FOR STATIONARY MODEL WSLS1500 WARNING: Make sure the washer is placed in a laundry tub or stand pipe and secure it with pliers. Place the hose in a stand pipe without forming a U shape, a siphoning action could ... HOT and COLD water faucets tightly by hand, then tighten another 2⁄3 turn with a cable tie (not included). Cable Tie Laundry Tub 3 CAREFULLY MOVE THE WASHER TO ITS FINAL LOCATION Cable Tie Stand Pipe Cable Tie 5 PLUG THE POWER CORD INTO A GROUNDED OUTLET Insure proper ground exists before use 11 Turn...
Installation Instructions
Page 12
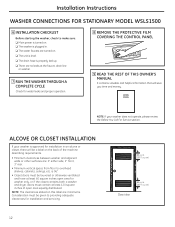
...60 square inches open area equally distributed. in an alcove or closet, there will save you time and money. ALCOVE OR CLOSET INSTALLATION If your washer does not operate, please review the Before You Call For Service section. is 96." • Closet doors must contain at the faucet, drain... line or washer. 7 RUN THE WASHER THROUGH A COMPLETE CYCLE Check for installation in . (387.1 sq. cm) 60 sq. in . ❏ The water faucets are turned on. ❏ The...
...60 square inches open area equally distributed. in an alcove or closet, there will save you time and money. ALCOVE OR CLOSET INSTALLATION If your washer does not operate, please review the Before You Call For Service section. is 96." • Closet doors must contain at the faucet, drain... line or washer. 7 RUN THE WASHER THROUGH A COMPLETE CYCLE Check for installation in . (387.1 sq. cm) 60 sq. in . ❏ The water faucets are turned on. ❏ The...
Installation Instructions
Page 13
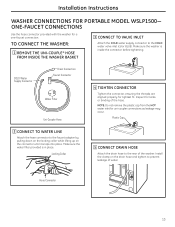
... to the faucet adapter by pulling down on the locking collar while lifting up on the drain hose and tighten to the rear of the washer. COLD Water Supply Connector Drain Connection Faucet Connector Water Filter Uni-Coupler Hose 4 TIGHTEN CONNECTOR Tighten the connector, ensuring the threads are aligned ... hose connector to the COLD water valve inlet (color BLUE). Install the clamp on the connector until it snaps into place. Make sure the washer is in place. Inspect for uni-coupler connections as leakage may occur. NOTE: Do not remove the plastic cap from the HOT water inlet ...
... to the faucet adapter by pulling down on the locking collar while lifting up on the drain hose and tighten to the rear of the washer. COLD Water Supply Connector Drain Connection Faucet Connector Water Filter Uni-Coupler Hose 4 TIGHTEN CONNECTOR Tighten the connector, ensuring the threads are aligned ... hose connector to the COLD water valve inlet (color BLUE). Install the clamp on the connector until it snaps into place. Make sure the washer is in place. Inspect for uni-coupler connections as leakage may occur. NOTE: Do not remove the plastic cap from the HOT water inlet ...
Installation Instructions
Page 14
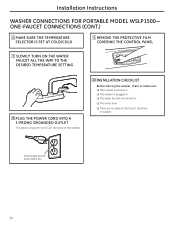
... INTO A 3-PRONG GROUNDED OUTLET The electrical power cord is on the back of the washer. 10 INSTALLATION CHECKLIST Before starting the washer, check to make sure: ❏ Main power is turned on. ❏ The washer is plugged in. ❏ The water faucets are turned on. ❏ The unit... is level. ❏ There are no leaks at the faucet, drain line or washer. Installation Instructions WASHER CONNECTIONS FOR PORTABLE MODEL WSLP1500- Insure proper ground exists...
... INTO A 3-PRONG GROUNDED OUTLET The electrical power cord is on the back of the washer. 10 INSTALLATION CHECKLIST Before starting the washer, check to make sure: ❏ Main power is turned on. ❏ The washer is plugged in. ❏ The water faucets are turned on. ❏ The unit... is level. ❏ There are no leaks at the faucet, drain line or washer. Installation Instructions WASHER CONNECTIONS FOR PORTABLE MODEL WSLP1500- Insure proper ground exists...
Installation Instructions
Page 15
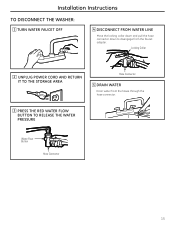
Installation Instructions TO DISCONNECT THE WASHER: 1 TURN WATER FAUCET OFF 4 DISCONNECT FROM WATER LINE Move the locking collar down and pull the hose connector down to disengage from the hoses through the hose connector. 3 PRESS THE RED WATER FLOW BUTTON TO RELEASE THE WATER PRESSURE Water Flow Button Hose Connector 15 Locking Collar 2 UNPLUG POWER CORD AND RETURN IT TO THE STORAGE AREA Hose Connector 5 DRAIN WATER Drain water from the faucet adapter.
Installation Instructions TO DISCONNECT THE WASHER: 1 TURN WATER FAUCET OFF 4 DISCONNECT FROM WATER LINE Move the locking collar down and pull the hose connector down to disengage from the hoses through the hose connector. 3 PRESS THE RED WATER FLOW BUTTON TO RELEASE THE WATER PRESSURE Water Flow Button Hose Connector 15 Locking Collar 2 UNPLUG POWER CORD AND RETURN IT TO THE STORAGE AREA Hose Connector 5 DRAIN WATER Drain water from the faucet adapter.

Installation Instructions
Page 16
... TWO-FAUCET CONNECTIONS If you have two separate water connections, your local Camco number. 3 PLUG THE POWER CORD INTO A 3-PRONG GROUNDED OUTLET TO CONNECT THE WASHER: 1 CONNECT TO WATER LINE Connect HOT and COLD water inlet hoses to the HOT and COLD faucets. 2 CONNECT DRAIN HOSE Secure the drain hose to... both the hot and cold water faucets. In Canada, consult the yellow pages for your washer can be connected to the sink or stand pipe. In the United States, call 800.626.2002. Installation Instructions...
... TWO-FAUCET CONNECTIONS If you have two separate water connections, your local Camco number. 3 PLUG THE POWER CORD INTO A 3-PRONG GROUNDED OUTLET TO CONNECT THE WASHER: 1 CONNECT TO WATER LINE Connect HOT and COLD water inlet hoses to the HOT and COLD faucets. 2 CONNECT DRAIN HOSE Secure the drain hose to... both the hot and cold water faucets. In Canada, consult the yellow pages for your washer can be connected to the sink or stand pipe. In the United States, call 800.626.2002. Installation Instructions...
Installation Instructions
Page 17
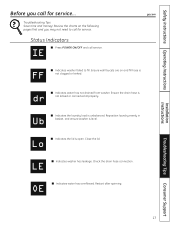
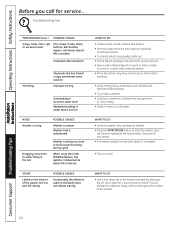
Review the charts on and fill hose is not clogged or kinked. ge.com FF ■ Indicates washer failed to call for service... LE ■ Indicates washer has leakage. Check the drain hose connection. Ensure the drain hose is open. Ensure wall faucets are on the ...kinked or connected improperly. OE ■ Indicates water has overflowed. Troubleshooting Tips Consumer Support 17 dr ■ Indicates water has not drained from washer. Ub ■ Indicates the laundry load is level. Status Indicators IE ■ Press POWER ON/OFF and call for service. Close the...
Review the charts on and fill hose is not clogged or kinked. ge.com FF ■ Indicates washer failed to call for service... LE ■ Indicates washer has leakage. Check the drain hose connection. Ensure the drain hose is open. Ensure wall faucets are on the ...kinked or connected improperly. OE ■ Indicates water has overflowed. Troubleshooting Tips Consumer Support 17 dr ■ Indicates water has not drained from washer. Ub ■ Indicates the laundry load is level. Status Indicators IE ■ Press POWER ON/OFF and call for service. Close the...
Installation Instructions
Page 18
...sure hoses are connected to correct faucets. • Turn off the water source and remove the water connection hoses from the upper back of the washer. You may need replacement after each use a brush or toothpick to HE detergent. • Try less detergent. • Measure your detergent carefully... need to call for service... above floor. Remove screens and use . • Check condition of detergent Very soft water Too much detergent in washer Water supply is turned off after 5 years. • Use less detergent. they may be less than 8 ft. Troubleshooting Tips WATER Too many...
...sure hoses are connected to correct faucets. • Turn off the water source and remove the water connection hoses from the upper back of the washer. You may need replacement after each use a brush or toothpick to HE detergent. • Try less detergent. • Measure your detergent carefully... need to call for service... above floor. Remove screens and use . • Check condition of detergent Very soft water Too much detergent in washer Water supply is turned off after 5 years. • Use less detergent. they may be less than 8 ft. Troubleshooting Tips WATER Too many...
Installation Instructions
Page 19
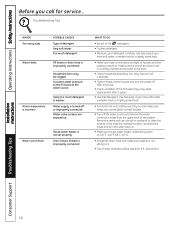
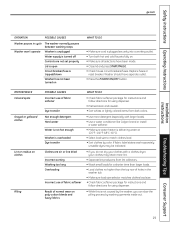
... Consumer Support Replace fuses or reset breaker. Safety Instructions Operating Instructions ge.com Installation Instructions OPERATION POSSIBLE CAUSES Washer pauses in cycle The washer normally pauses between washing steps Washer won't operate Washer is unplugged Water supply is turned off Controls are air or line... dried Incorrect sorting Washing too long Overloading Incorrect use of fabric softener Result of holes in the washer tub. • Make sure load size selector matches clothes load size. • Check fabric softener package for instructions ...
... Consumer Support Replace fuses or reset breaker. Safety Instructions Operating Instructions ge.com Installation Instructions OPERATION POSSIBLE CAUSES Washer pauses in cycle The washer normally pauses between washing steps Washer won't operate Washer is unplugged Water supply is turned off Controls are air or line... dried Incorrect sorting Washing too long Overloading Incorrect use of fabric softener Result of holes in the washer tub. • Make sure load size selector matches clothes load size. • Check fabric softener package for instructions ...
Installation Instructions
Page 20
...and sharp buttons. • Turn knits (which snag easily) inside out. • Check bleach package instructions for a short amount of the washer. Troubleshooting Tips PERFORMANCE (cont.) POSSIBLE CAUSES Snags, holes, tears, rips or excessive wear Pins, snaps, hooks, sharp buttons, belt buckles, ...) with undiluted bleach. • Rinse items that is too hot NOISE Washer is noisy POSSIBLE CAUSES Washer is uneven Washer load is unbalanced Dragging noise prior to water filling in the tub Washer is normal. Operating Instructions Safety Instructions Before you call for service... See...
...and sharp buttons. • Turn knits (which snag easily) inside out. • Check bleach package instructions for a short amount of the washer. Troubleshooting Tips PERFORMANCE (cont.) POSSIBLE CAUSES Snags, holes, tears, rips or excessive wear Pins, snaps, hooks, sharp buttons, belt buckles, ...) with undiluted bleach. • Rinse items that is too hot NOISE Washer is noisy POSSIBLE CAUSES Washer is uneven Washer load is unbalanced Dragging noise prior to water filling in the tub Washer is normal. Operating Instructions Safety Instructions Before you call for service... See...


