Owners Manual
Page 1
Profile Washers ge.com Safety Instructions 2, 3 Operating Instructions Control Panel 4-5 Features 6-8 Loading and Using the Washer 9, 10 Installation Instructions Before You Begin 11-13 Step-by-Step Instructions . . . . . .13-16 Troubleshooting Tips . . . . . .17-19 Consumer Support Consumer Support 22 Warranty (Canada 21 Warranty (U.S 20 Owner's Manual and Installation Instructions WPGT9150 Write the model and serial numbers here: Model Serial You can find them on the rear cover of the washer backsplash. 175D1807P604 49-90336 09-07 JR
Profile Washers ge.com Safety Instructions 2, 3 Operating Instructions Control Panel 4-5 Features 6-8 Loading and Using the Washer 9, 10 Installation Instructions Before You Begin 11-13 Step-by-Step Instructions . . . . . .13-16 Troubleshooting Tips . . . . . .17-19 Consumer Support Consumer Support 22 Warranty (Canada 21 Warranty (U.S 20 Owner's Manual and Installation Instructions WPGT9150 Write the model and serial numbers here: Model Serial You can find them on the rear cover of the washer backsplash. 175D1807P604 49-90336 09-07 JR
Owners Manual
Page 2
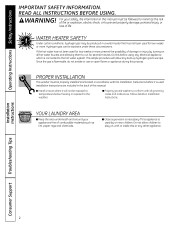
... of life. I Keep the area underneath and around your safety, the information in Installation Instructions. YOUR LAUNDRY AREA I Properly ground washer to conform with the Installation Instructions before using any electrical appliance which is used for several minutes. This simple procedure will not be ...damage, personal injury or loss of damage or injury by or near children. READ ALL INSTRUCTIONS BEFORE USING. PROPER INSTALLATION This washer must be explosive under these circumstances. Follow details in this or any built-up hydrogen gas to the weather. For your ...
... of life. I Keep the area underneath and around your safety, the information in Installation Instructions. YOUR LAUNDRY AREA I Properly ground washer to conform with the Installation Instructions before using any electrical appliance which is used for several minutes. This simple procedure will not be ...damage, personal injury or loss of damage or injury by or near children. READ ALL INSTRUCTIONS BEFORE USING. PROPER INSTALLATION This washer must be explosive under these circumstances. Follow details in this or any built-up hydrogen gas to the weather. For your ...
Owners Manual
Page 3
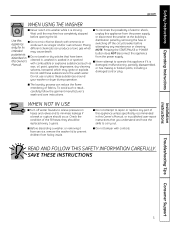
... operation. I The laundry process can produce a toxic gas which may cause death. I Before discarding a washer, or removing it from service, remove the washer lid to carry out. READ AND FOLLOW THIS SAFETY INFORMATION CAREFULLY. Mixing different chemicals can reduce the flame ... water. WHEN NOT IN USE I Turn off the circuit breaker before opening the lid. Safety Instructions Operating Instructions ge.com WHEN USING THE WASHER I Never reach into washer while it is damaged, malfunctioning, partially disassembled, or has missing or broken parts, including a damaged cord or ...
... operation. I The laundry process can produce a toxic gas which may cause death. I Before discarding a washer, or removing it from service, remove the washer lid to carry out. READ AND FOLLOW THIS SAFETY INFORMATION CAREFULLY. Mixing different chemicals can reduce the flame ... water. WHEN NOT IN USE I Turn off the circuit breaker before opening the lid. Safety Instructions Operating Instructions ge.com WHEN USING THE WASHER I Never reach into washer while it is damaged, malfunctioning, partially disassembled, or has missing or broken parts, including a damaged cord or ...
Owners Manual
Page 4
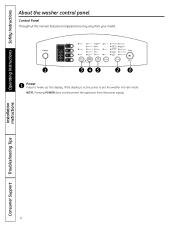
Control Panel Throughout this manual, features and appearance may vary from the power supply. Installation Instructions Consumer Support Troubleshooting Tips 4 If the display is active, press to "wake up" the display. NOTE: Pressing POWER does not disconnect the appliance from your model. 1 3 45 26 1 Power Press to put the washer into idle mode. Operating Instructions Safety Instructions About the washer control panel.
Control Panel Throughout this manual, features and appearance may vary from the power supply. Installation Instructions Consumer Support Troubleshooting Tips 4 If the display is active, press to "wake up" the display. NOTE: Pressing POWER does not disconnect the appliance from your model. 1 3 45 26 1 Power Press to put the washer into idle mode. Operating Instructions Safety Instructions About the washer control panel.
Owners Manual
Page 5
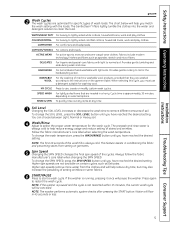
...finishes and fibers such as Delicates. Cycle time is always cold. Press again to mimic the handwashing action. NOTE: The washer performs automatic system checks after pressing the START button. COTTONS/TOWELS For cottons and towels. Follow the fabric manufacturer's care ... work and play clothes. Higher spin speeds remove more water from setting on selected options. Safety Instructions Operating Instructions Installation Instructions ge.com 2 Wash Cycles The wash cycles are needed in a hurry. The GentleClean™ lifters lightly tumble the clothes into ...
...finishes and fibers such as Delicates. Cycle time is always cold. Press again to mimic the handwashing action. NOTE: The washer performs automatic system checks after pressing the START button. COTTONS/TOWELS For cottons and towels. Follow the fabric manufacturer's care ... work and play clothes. Higher spin speeds remove more water from setting on selected options. Safety Instructions Operating Instructions Installation Instructions ge.com 2 Wash Cycles The wash cycles are needed in a hurry. The GentleClean™ lifters lightly tumble the clothes into ...
Owners Manual
Page 6
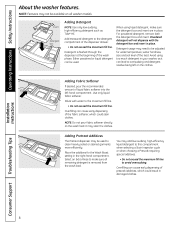
... Support Troubleshooting Tips 6 Be sure to add high-efficiency detergent, or the proper wash additive to restart the countdown. Operating Instructions Safety Instructions About the washer features. You must close the lid and press START again in the main wash (detergent) compartment . • The maximum soak time is desired to indicate.... NOTES: • When selecting soak, it for heavily soiled clothes or for 3 seconds. NOTE: When using MY CYCLE, wash options cannot be available on all washer models.
... Support Troubleshooting Tips 6 Be sure to add high-efficiency detergent, or the proper wash additive to restart the countdown. Operating Instructions Safety Instructions About the washer features. You must close the lid and press START again in the main wash (detergent) compartment . • The maximum soak time is desired to indicate.... NOTES: • When selecting soak, it for heavily soiled clothes or for 3 seconds. NOTE: When using MY CYCLE, wash options cannot be available on all washer models.
Owners Manual
Page 7
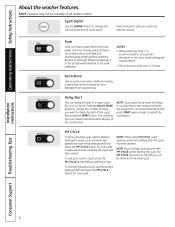
...High-Efficiency Detergent • Liquid Pretreat Additives The dispenser automatically dispenses additives at the proper time in early dispensing of the washer. This is water, not bleach. Also keep clothes away from the dispenser. If you may cause death. Any residual ...recommended amount of the bleach dispenser is added to use bleach in the dispenser drawer. Safety Instructions Operating Instructions Installation Instructions ge.com Using the Liquid Bleach Dispenser The bleach dispenser automatically dilutes and dispenses liquid chlorine bleach at the proper time in ...
...High-Efficiency Detergent • Liquid Pretreat Additives The dispenser automatically dispenses additives at the proper time in early dispensing of the washer. This is water, not bleach. Also keep clothes away from the dispenser. If you may cause death. Any residual ...recommended amount of the bleach dispenser is added to use bleach in the dispenser drawer. Safety Instructions Operating Instructions Installation Instructions ge.com Using the Liquid Bleach Dispenser The bleach dispenser automatically dilutes and dispenses liquid chlorine bleach at the proper time in ...
Owners Manual
Page 8
...If desired, pour the recommended amount of the fabric softener, which could stain clothes. Avoid using liquid detergent, make sure all washer models. Overfilling can lead to be available on all remaining detergent is flushed through the dispenser at the beginning of the dispenser...the detergent box and insert. NOTE: Do not pour fabric softener directly on the clothes. Operating Instructions Safety Instructions About the washer features. Insert Detergent box Adding Detergent NOTE: Use only low-sudsing, high-efficiency detergent such as it can cause early ...
...If desired, pour the recommended amount of the fabric softener, which could stain clothes. Avoid using liquid detergent, make sure all washer models. Overfilling can lead to be available on all remaining detergent is flushed through the dispenser at the beginning of the dispenser...the detergent box and insert. NOTE: Do not pour fabric softener directly on the clothes. Operating Instructions Safety Instructions About the washer features. Insert Detergent box Adding Detergent NOTE: Use only low-sudsing, high-efficiency detergent such as it can cause early ...
Owners Manual
Page 9
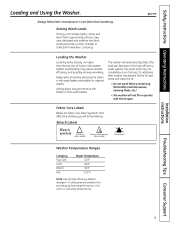
ge.com Loading the Washer Load dry items loosely, no higher than the top row of the wash basket. Overloading may not completely cover the load. Bleach Labels Bleach symbols Any bleach (when needed) Only non-chlorine bleach (when needed) Do not bleach Washer Temperature Ranges ...Bulky items should be laundering. Installation Instructions Troubleshooting Tips Consumer Support 9 Always place buoyant items at the bottom of holes in the washer basket. Fabric Care Labels Below are available that affect the clothing you will be placed as far down in hot, warm or...
ge.com Loading the Washer Load dry items loosely, no higher than the top row of the wash basket. Overloading may not completely cover the load. Bleach Labels Bleach symbols Any bleach (when needed) Only non-chlorine bleach (when needed) Do not bleach Washer Temperature Ranges ...Bulky items should be laundering. Installation Instructions Troubleshooting Tips Consumer Support 9 Always place buoyant items at the bottom of holes in the washer basket. Fabric Care Labels Below are available that affect the clothing you will be placed as far down in hot, warm or...
Owners Manual
Page 10
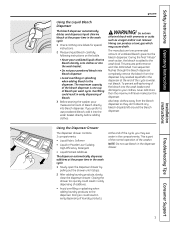
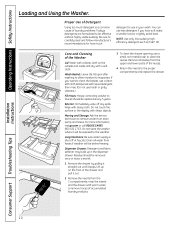
..., use a small, non-metal brush to the proper compartments and replace the drawer. For more information, visit ge.com or call 800.GE.CARES (800.432.2737). Care and Cleaning of the Washer Lid: Wash with a damp cloth on the front of the drawer and pull it out. 2 Remove the ... and the drawer with warm water to evaporate. NOTE: Use only low-sudsing, highefficiency detergent such as Tide® HE. Do not store the washer where it stops. Installation Instructions Consumer Support Troubleshooting Tips 10 If you have soft water, a smaller load or a lightly soiled load. Wash Basket:...
..., use a small, non-metal brush to the proper compartments and replace the drawer. For more information, visit ge.com or call 800.GE.CARES (800.432.2737). Care and Cleaning of the Washer Lid: Wash with a damp cloth on the front of the drawer and pull it out. 2 Remove the ... and the drawer with warm water to evaporate. NOTE: Use only low-sudsing, highefficiency detergent such as Tide® HE. Do not store the washer where it stops. Installation Instructions Consumer Support Troubleshooting Tips 10 If you have soft water, a smaller load or a lightly soiled load. Wash Basket:...
Owners Manual
Page 11
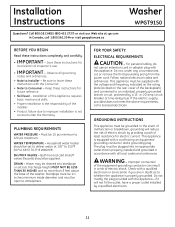
... - Do not modify the plug provided with the Consumer. • Note to 120 psi maximum. Be sure to deliver water at : ge.com In Canada, call a licensed electrician. WATER TEMPERATURE - FOR YOUR SAFETY: ELECTRICAL REQUIREMENTS CAUTION - GROUNDING INSTRUCTIONS This appliance must be set... and frequency indicated on the rating plate (located on the rear cover of the backsplash), and connected to 66°C) TO THE WASHER. Save these instructions for electric current. PLUMBING REQUIREMENTS WATER PRESSURE - WARNING - or 20-amp circuit breaker or time-delay fuse. ...
... - Do not modify the plug provided with the Consumer. • Note to 120 psi maximum. Be sure to deliver water at : ge.com In Canada, call a licensed electrician. WATER TEMPERATURE - FOR YOUR SAFETY: ELECTRICAL REQUIREMENTS CAUTION - GROUNDING INSTRUCTIONS This appliance must be set... and frequency indicated on the rating plate (located on the rear cover of the backsplash), and connected to 66°C) TO THE WASHER. Save these instructions for electric current. PLUMBING REQUIREMENTS WATER PRESSURE - WARNING - or 20-amp circuit breaker or time-delay fuse. ...
Owners Manual
Page 12
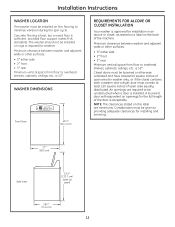
... be given to providing adequate clearances for installing and servicing. 27″ (68.6 cm) Side View 523⁄ 4″ (133.7 cm) (with equivalent air openings for washer only, or if the closet contains both a washer and a dryer, door must contain at least 120 square ... front • 3″ rear Minimum vertical space from floor to overhead shelves, cabinets, ceilings, etc., is 52″. Installation Instructions WASHER LOCATION The washer must be installed on this label are required to be unobstructed when a door is installed. A louvered door with lid open area equally...
... be given to providing adequate clearances for installing and servicing. 27″ (68.6 cm) Side View 523⁄ 4″ (133.7 cm) (with equivalent air openings for washer only, or if the closet contains both a washer and a dryer, door must contain at least 120 square ... front • 3″ rear Minimum vertical space from floor to overhead shelves, cabinets, ceilings, etc., is 52″. Installation Instructions WASHER LOCATION The washer must be installed on this label are required to be unobstructed when a door is installed. A louvered door with lid open area equally...

Owners Manual
Page 13
PARTS INCLUDED ❑ Water Hoses (2) Installation Instructions 1 UNPACK THE WASHER (CONT.) Remove the Styrofoam block containing the Owner's Manual, parts, water hoses and laundry product samples. ❑ Cable Tie TOOLS YOU WILL NEED ❑ Adjustable Pliers ❑ Carpenter's Level Remove the power cord from the back of the washer. 1 UNPACK THE WASHER After the washer is in the home, remove the carton and Styrofoam shipping base from the washer. 13
PARTS INCLUDED ❑ Water Hoses (2) Installation Instructions 1 UNPACK THE WASHER (CONT.) Remove the Styrofoam block containing the Owner's Manual, parts, water hoses and laundry product samples. ❑ Cable Tie TOOLS YOU WILL NEED ❑ Adjustable Pliers ❑ Carpenter's Level Remove the power cord from the back of the washer. 1 UNPACK THE WASHER After the washer is in the home, remove the carton and Styrofoam shipping base from the washer. 13

Owners Manual
Page 14
... to the HOT and COLD water valves of your home. Hand tighten, plus make an additional 1/4 turn with pliers. 3 MOVE WASHER CLOSE TO HOUSE UTILITIES Move the washer as close to the final location as possible, leaving enough room to the standpipe with the cable tie provided. 3″ Cable Tie... (ribbed side on inside). • If your drain is completely inside the drain opening of your home. Installation Instructions 2 ATTACH WATER HOSES TO WASHER Thread the hot water hose onto the washer hot water connection (ORANGE) and the cold water hose onto the cold water connection (BLUE).
... to the HOT and COLD water valves of your home. Hand tighten, plus make an additional 1/4 turn with pliers. 3 MOVE WASHER CLOSE TO HOUSE UTILITIES Move the washer as close to the final location as possible, leaving enough room to the standpipe with the cable tie provided. 3″ Cable Tie... (ribbed side on inside). • If your drain is completely inside the drain opening of your home. Installation Instructions 2 ATTACH WATER HOSES TO WASHER Thread the hot water hose onto the washer hot water connection (ORANGE) and the cold water hose onto the cold water connection (BLUE).

Owners Manual
Page 15
... Turn clockwise to raise, counterclockwise to 6 inches and gently lower the rear legs back onto the floor. Installation Instructions 6 SET REAR LEGS Tilt the washer forward (pivot on the edge where the cabinet side meets the top cover. This action will set rear leg adjustments to correspond to front settings.... 7 LEVEL THE WASHER Move the washer into final position. • To check if the washer is level side to side, open the lid and place a level at the back of the opening above the ...
... Turn clockwise to raise, counterclockwise to 6 inches and gently lower the rear legs back onto the floor. Installation Instructions 6 SET REAR LEGS Tilt the washer forward (pivot on the edge where the cabinet side meets the top cover. This action will set rear leg adjustments to correspond to front settings.... 7 LEVEL THE WASHER Move the washer into final position. • To check if the washer is level side to side, open the lid and place a level at the back of the opening above the ...
Owners Manual
Page 16
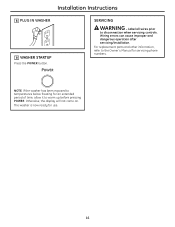
For replacement parts and other information, refer to the Owner's Manual for use. 16 The washer is now ready for servicing phone numbers. NOTE: If the washer has been exposed to temperatures below freezing for an extended period of time, allow it to disconnection when servicing controls. Wiring errors can cause improper and dangerous operation after servicing/installation. SERVICING WARNING - Label all wires prior to warm up before pressing POWER. Otherwise, the display will not come on. Installation Instructions 8 PLUG IN WASHER 9 WASHER STARTUP Press the POWER button.
For replacement parts and other information, refer to the Owner's Manual for use. 16 The washer is now ready for servicing phone numbers. NOTE: If the washer has been exposed to temperatures below freezing for an extended period of time, allow it to disconnection when servicing controls. Wiring errors can cause improper and dangerous operation after servicing/installation. SERVICING WARNING - Label all wires prior to warm up before pressing POWER. Otherwise, the display will not come on. Installation Instructions 8 PLUG IN WASHER 9 WASHER STARTUP Press the POWER button.
Owners Manual
Page 17
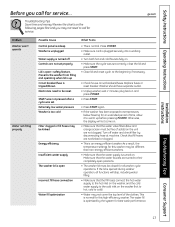
...Tips Consumer Support 17 Safety Instructions Operating Instructions Installation Instructions Before you may be kinked Energy efficiency Insufficient water supply The washer lid is open Incorrect fill hose connection Water fill optimization What To Do • This is tripped/blown Electronics need ...to the beginning if necessary. • Check house circuit breakers/fuses. ge.com Problem Washer won't operate Water not filling properly Possible Cause Control panel is asleep Washer is unplugged Water supply is turned off water and check filter by the system for ...
...Tips Consumer Support 17 Safety Instructions Operating Instructions Installation Instructions Before you may be kinked Energy efficiency Insufficient water supply The washer lid is open Incorrect fill hose connection Water fill optimization What To Do • This is tripped/blown Electronics need ...to the beginning if necessary. • Check house circuit breakers/fuses. ge.com Problem Washer won't operate Water not filling properly Possible Cause Control panel is asleep Washer is unplugged Water supply is turned off water and check filter by the system for ...
Owners Manual
Page 18
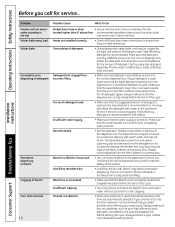
...every load for future use the stain inspector, we recommend that the liquid detergent insert box is used . Bleach bin filled for this washer. Presoak not selected • When stain inspector is not used , presoak temperature and time are automatically selected. Per the located higher... the bleach bin • Overfilling the bin with warm water and a scrub brush. Installation Instructions Problem Possible Cause What To Do Washer will not drain- Hoses not installed correctly • Check all detergent types, always make sure that detergent and any additives, such as...
...every load for future use the stain inspector, we recommend that the liquid detergent insert box is used . Bleach bin filled for this washer. Presoak not selected • When stain inspector is not used , presoak temperature and time are automatically selected. Per the located higher... the bleach bin • Overfilling the bin with warm water and a scrub brush. Installation Instructions Problem Possible Cause What To Do Washer will not drain- Hoses not installed correctly • Check all detergent types, always make sure that detergent and any additives, such as...

Owners Manual
Page 19
...noises as needed. • The wash load may be unbalanced. Installation Instructions Troubleshooting Tips Consumer Support 19 Water sloshing sound when washer is turned off and tub is dispensed during the main wash. Bleach is rotated • A liquid in stopping the opposite ...direction to remove detergent residue from the basket. Safety Instructions Operating Instructions ge.com Normal Operating Sounds The following are dispensed during presoak. Clicking sound during • The pump is operating to remove water ...
...noises as needed. • The wash load may be unbalanced. Installation Instructions Troubleshooting Tips Consumer Support 19 Water sloshing sound when washer is turned off and tub is dispensed during the main wash. Bleach is rotated • A liquid in stopping the opposite ...direction to remove detergent residue from the basket. Safety Instructions Operating Instructions ge.com Normal Operating Sounds The following are dispensed during presoak. Clicking sound during • The pump is operating to remove water ...
Owners Manual
Page 20
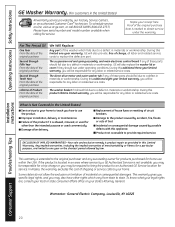
...other than the intended purpose or used for service. Operating Instructions Safety Instructions Installation Instructions GE Washer Warranty. (For customers in the United States) All warranty service provided by a GE Authorized Servicer is not available, you may be responsible for a trip charge or you ...IMPLIED WARRANTIES-Your sole and exclusive remedy is product repair as provided in materials or workmanship. The washer basket if it is abused, misused, or used commercially. GE will be responsible for any of circuit breakers. This warranty is needed to a defect in materials...
...other than the intended purpose or used for service. Operating Instructions Safety Instructions Installation Instructions GE Washer Warranty. (For customers in the United States) All warranty service provided by a GE Authorized Servicer is not available, you may be responsible for a trip charge or you ...IMPLIED WARRANTIES-Your sole and exclusive remedy is product repair as provided in materials or workmanship. The washer basket if it is abused, misused, or used commercially. GE will be responsible for any of circuit breakers. This warranty is needed to a defect in materials...


