Owners Manual
Page 1
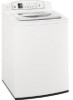
Profile Washers ge.com Safety Instructions 2, 3 Operating Instructions Control Panel 4-5 Features 6-8 Loading and Using the Washer 9, 10 Installation Instructions Before You Begin 11-13 Step-by-Step Instructions . . . . . .13-16 Troubleshooting Tips . . . . . .17-19 Consumer Support Consumer Support 22 Warranty (Canada 21 Warranty (U.S 20 Owner's Manual and Installation Instructions WPGT9150 Write the model and serial numbers here: Model Serial You can find them on the rear cover of the washer backsplash. 175D1807P604 49-90336 09-07 JR
Profile Washers ge.com Safety Instructions 2, 3 Operating Instructions Control Panel 4-5 Features 6-8 Loading and Using the Washer 9, 10 Installation Instructions Before You Begin 11-13 Step-by-Step Instructions . . . . . .13-16 Troubleshooting Tips . . . . . .17-19 Consumer Support Consumer Support 22 Warranty (Canada 21 Warranty (U.S 20 Owner's Manual and Installation Instructions WPGT9150 Write the model and serial numbers here: Model Serial You can find them on the rear cover of the washer backsplash. 175D1807P604 49-90336 09-07 JR
Owners Manual
Page 3
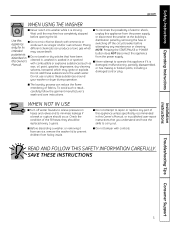
...Tips Consumer Support 3 I Never attempt to prevent children from the power supply. Safety Instructions Operating Instructions ge.com WHEN USING THE WASHER I Never reach into washer while it is damaged, malfunctioning, partially disassembled, or has missing or broken parts, including a damaged ... the possibility of this appliance unless specifically recommended in this appliance if it is moving. or disconnect the washer at the building's Use this Owner's Manual. this appliance only for its intended purpose as wax, oil, paint, gasoline, degreasers, dry-cleaning solvents...
...Tips Consumer Support 3 I Never attempt to prevent children from the power supply. Safety Instructions Operating Instructions ge.com WHEN USING THE WASHER I Never reach into washer while it is damaged, malfunctioning, partially disassembled, or has missing or broken parts, including a damaged ... the possibility of this appliance unless specifically recommended in this appliance if it is moving. or disconnect the washer at the building's Use this Owner's Manual. this appliance only for its intended purpose as wax, oil, paint, gasoline, degreasers, dry-cleaning solvents...

Owners Manual
Page 13
PARTS INCLUDED ❑ Water Hoses (2) Installation Instructions 1 UNPACK THE WASHER (CONT.) Remove the Styrofoam block containing the Owner's Manual, parts, water hoses and laundry product samples. ❑ Cable Tie TOOLS YOU WILL NEED ❑ Adjustable Pliers ❑ Carpenter's Level Remove the power cord from the back of the washer. 1 UNPACK THE WASHER After the washer is in the home, remove the carton and Styrofoam shipping base from the washer. 13
PARTS INCLUDED ❑ Water Hoses (2) Installation Instructions 1 UNPACK THE WASHER (CONT.) Remove the Styrofoam block containing the Owner's Manual, parts, water hoses and laundry product samples. ❑ Cable Tie TOOLS YOU WILL NEED ❑ Adjustable Pliers ❑ Carpenter's Level Remove the power cord from the back of the washer. 1 UNPACK THE WASHER After the washer is in the home, remove the carton and Styrofoam shipping base from the washer. 13
Owners Manual
Page 16
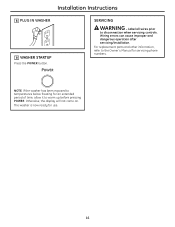
For replacement parts and other information, refer to the Owner's Manual for use. 16 The washer is now ready for servicing phone numbers. SERVICING WARNING - NOTE: If the washer has been exposed to temperatures below freezing for an extended period of time, allow it to disconnection when servicing controls. Otherwise, the display will not come on. Wiring errors can cause improper and dangerous operation after servicing/installation. Label all wires prior to warm up before pressing POWER. Installation Instructions 8 PLUG IN WASHER 9 WASHER STARTUP Press the POWER button.
For replacement parts and other information, refer to the Owner's Manual for use. 16 The washer is now ready for servicing phone numbers. SERVICING WARNING - NOTE: If the washer has been exposed to temperatures below freezing for an extended period of time, allow it to disconnection when servicing controls. Otherwise, the display will not come on. Wiring errors can cause improper and dangerous operation after servicing/installation. Label all wires prior to warm up before pressing POWER. Installation Instructions 8 PLUG IN WASHER 9 WASHER STARTUP Press the POWER button.
Owners Manual
Page 22
... contact: Manager, Consumer Relations, Mabe Canada Inc. E1C 9M3 Extended Warranties In the U.S.: ge.com Purchase a GE extended warranty and learn about special discounts that can now download Owner's Manuals, order parts or even schedule service on -line and schedule your service at your warranty ... Director, Consumer Relations, Mabe Canada Inc. In Canada: www.geappliances.ca Schedule Service In the U.S.: ge.com Expert GE repair service is still in this manual cover procedures to design for enhanced communication and prompt service under the terms of physical and mental abilities ...
... contact: Manager, Consumer Relations, Mabe Canada Inc. E1C 9M3 Extended Warranties In the U.S.: ge.com Purchase a GE extended warranty and learn about special discounts that can now download Owner's Manuals, order parts or even schedule service on -line and schedule your service at your warranty ... Director, Consumer Relations, Mabe Canada Inc. In Canada: www.geappliances.ca Schedule Service In the U.S.: ge.com Expert GE repair service is still in this manual cover procedures to design for enhanced communication and prompt service under the terms of physical and mental abilities ...


