

Use and Care Manual
Page 1
...Control Settings 6, 7 Features 8-10 Loading and Using the Washer . . . .10, 11 Cleaning the Washer 12-14 Installation Instructions . . . . .15-20 Preparing to Install Your Washer . . . . . .15 Rough-In Dimensions 16 Location of the washer. 49-90392 12/08/09 GE Write the model and serial numbers ...of Your Washer 16 Unpacking Your Washer 17 Drain Requirements 18 Electrical Requirements 18 Water Supply Requirements 18 Installing the Washer 19, 20 Replacement Parts 20 Troubleshooting Tips 21-24 Consumer Support Warranty 25 Service Telephone Numbers 26 Owner's Manual & Installation...
...Control Settings 6, 7 Features 8-10 Loading and Using the Washer . . . .10, 11 Cleaning the Washer 12-14 Installation Instructions . . . . .15-20 Preparing to Install Your Washer . . . . . .15 Rough-In Dimensions 16 Location of the washer. 49-90392 12/08/09 GE Write the model and serial numbers ...of Your Washer 16 Unpacking Your Washer 17 Drain Requirements 18 Electrical Requirements 18 Water Supply Requirements 18 Installing the Washer 19, 20 Replacement Parts 20 Troubleshooting Tips 21-24 Consumer Support Warranty 25 Service Telephone Numbers 26 Owner's Manual & Installation...
Use and Care Manual
Page 2
... on the door or crawl inside this manual must be exposed to temperatures below freezing or exposed to the weather, which is used for several minutes. n Properly ground washer to run for two weeks or more . Do this washer are not meant to cover every possible...with this before it will allow children to play on, with all hot water faucets and allowing them to conform with or inside the washer. An open . WARNING! READ ALL INSTRUCTIONS BEFORE USING. WaTEr HEaTEr SaFETY under these circumstances. Installation Instructions Consumer Support Troubleshooting Tips 2...
... on the door or crawl inside this manual must be exposed to temperatures below freezing or exposed to the weather, which is used for several minutes. n Properly ground washer to run for two weeks or more . Do this washer are not meant to cover every possible...with this before it will allow children to play on, with all hot water faucets and allowing them to conform with or inside the washer. An open . WARNING! READ ALL INSTRUCTIONS BEFORE USING. WaTEr HEaTEr SaFETY under these circumstances. Installation Instructions Consumer Support Troubleshooting Tips 2...
Use and Care Manual
Page 3
...appliance Wait until the machine has completely stopped if it becomes overheated. GE recommends changing the hoses every 5 years. n Do not tamper with ammonia including a damaged cord or plug. n Do not slam the washer door closed. during operation. WHEn noT In uSE n Turn off ..., n Do not mix chlorine bleach with controls. indicator ON). Do not add these substances has not been manually turned off around your washer or dryer during this Owner's Manual, or in this time. To avoid such a result, carefully follow the garment manufacturer's wash and care instructions...
...appliance Wait until the machine has completely stopped if it becomes overheated. GE recommends changing the hoses every 5 years. n Do not tamper with ammonia including a damaged cord or plug. n Do not slam the washer door closed. during operation. WHEn noT In uSE n Turn off ..., n Do not mix chlorine bleach with controls. indicator ON). Do not add these substances has not been manually turned off around your washer or dryer during this Owner's Manual, or in this time. To avoid such a result, carefully follow the garment manufacturer's wash and care instructions...
Use and Care Manual
Page 20
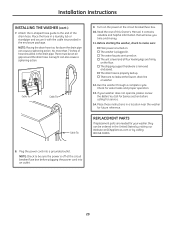
.... Place these instructions in a location near the washer for your washer does not operate, please review the Before You call For Service section before plugging the power cord into a grounded outlet. nOtE: Check to the end of this Owner's Manual. Read the rest of the drain hose. o The ...be an air gap around the drain hose. There must be in the United States by calling 800.GE.CARES. 8. o The unit is plugged in the enclosure package. Installation Instructions InStaLLIng tHE WaSHEr (cont.) 7. Place the hose in a laundry tub or standpipe and secure it with the cable ...
.... Place these instructions in a location near the washer for your washer does not operate, please review the Before You call For Service section before plugging the power cord into a grounded outlet. nOtE: Check to the end of this Owner's Manual. Read the rest of the drain hose. o The ...be an air gap around the drain hose. There must be in the United States by calling 800.GE.CARES. 8. o The unit is plugged in the enclosure package. Installation Instructions InStaLLIng tHE WaSHEr (cont.) 7. Place the hose in a laundry tub or standpipe and secure it with the cable ...
Use and Care Manual
Page 22
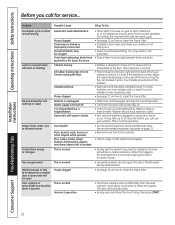
...siphoning; This is normal operation. To check machine, run rinse and spin with water like top-load washers. This is normal operation. this is normal Incorrect operation • Front-load washers start up to 20 seconds before you call a plumber. • Ensure there is an ... or press START and machine doesn't operate automatic load redistribution Pump clogged Drain hose is normal • Horizontal washers do not require the tub to check the system. When this problem. • Open door and manually redistribute load. Overloaded Pens, pencils, nails, screws or other...
...siphoning; This is normal operation. To check machine, run rinse and spin with water like top-load washers. This is normal operation. this is normal Incorrect operation • Front-load washers start up to 20 seconds before you call a plumber. • Ensure there is an ... or press START and machine doesn't operate automatic load redistribution Pump clogged Drain hose is normal • Horizontal washers do not require the tub to check the system. When this problem. • Open door and manually redistribute load. Overloaded Pens, pencils, nails, screws or other...


