
Use and Care Manual
Page 1
Refrigeradores Manual del Propietario e Instrucciones de Instalación GE y GE Profile™ modelos *Select Models Only Write the model and serial numbers here: Model Serial Find these numbers on a label on the left side, near the middle of the refrigerator compartment. Los modelos que comienzan con las letras DFE, PFE, GFE, DFE, PFH, y GNE son Modelos con...
Refrigeradores Manual del Propietario e Instrucciones de Instalación GE y GE Profile™ modelos *Select Models Only Write the model and serial numbers here: Model Serial Find these numbers on a label on the left side, near the middle of the refrigerator compartment. Los modelos que comienzan con las letras DFE, PFE, GFE, DFE, PFH, y GNE son Modelos con...
Use and Care Manual
Page 3
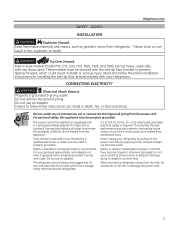
.... For personal safety, this appliance. Have the wall outlet and circuit checked by pulling on the power cord. The refrigerator should always be properly grounded. These models must be plugged into a grounded 3-prong outlet Do not remove the ground prong Do not use an adapter. The ...power cord of electric shock hazard from overheated wires. When moving the refrigerator away from the power cord. Do not, under any...
.... For personal safety, this appliance. Have the wall outlet and circuit checked by pulling on the power cord. The refrigerator should always be properly grounded. These models must be plugged into a grounded 3-prong outlet Do not remove the ground prong Do not use an adapter. The ...power cord of electric shock hazard from overheated wires. When moving the refrigerator away from the power cord. Do not, under any...
Use and Care Manual
Page 5
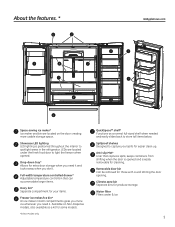
...filter Filters water & Ice 5 Removable door bin Can be removed for produce storage. LEDs are located on Non-Dispense models, also available as a kit for some models. *Select Models Only QuickSpace™ shelf* Functions as a normal full-sized shelf when needed and easily slides back to capture your... items. Freezer ice maker/Ice bin* An ice maker in the refrigerator. Drop-down tray* Allows for easier clean up...
...filter Filters water & Ice 5 Removable door bin Can be removed for produce storage. LEDs are located on Non-Dispense models, also available as a kit for some models. *Select Models Only QuickSpace™ shelf* Functions as a normal full-sized shelf when needed and easily slides back to capture your... items. Freezer ice maker/Ice bin* An ice maker in the refrigerator. Drop-down tray* Allows for easier clean up...
Use and Care Manual
Page 6
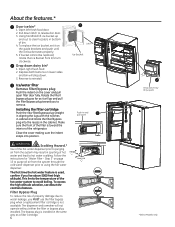
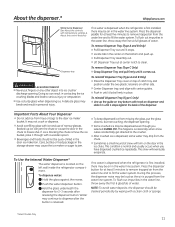
... WARNING Scalding Hazard.* Use of hot Swing 1 water and lead to using the hot water dispenser. Step 3" on the cover and pull open ) *Select Models Only Drop down . 3. The first time the hot water feature is not available. Depress both buttons on the guide brackets and push until the ice... Using handhold lift ice bucket up and out to remove. This limits the temperature of bin. 4. Filter Bypass Plug To reduce the risk of the refrigerator. Pull down tray (tray open filter door fully. Reverse to release bin door. 3. Make sure the front of the filter is toward you live above...
... WARNING Scalding Hazard.* Use of hot Swing 1 water and lead to using the hot water dispenser. Step 3" on the cover and pull open ) *Select Models Only Drop down . 3. The first time the hot water feature is not available. Depress both buttons on the guide brackets and push until the ice... Using handhold lift ice bucket up and out to remove. This limits the temperature of bin. 4. Filter Bypass Plug To reduce the risk of the refrigerator. Pull down tray (tray open filter door fully. Reverse to release bin door. 3. Make sure the front of the filter is toward you live above...

Use and Care Manual
Page 7
... are preset in the refrigerator and freezer. PFE28P, PYE22P Control Style A, Single Serve Models PFH28, PFE28K, DFE28, PYE22K, DYE22 Control Style B, AutoFill Models Ice GFE28, GFE26, GYE22 Control Style C, GE Models Error Complete Sensing Cubed Crushed GNE29, PWE23 Control Style D, Non-Dispense Control GEAppliances.com Refrigerator Recommended: 37 °F... the SET temperature as well as the actual temperature in the factory at 37°F for the refrigerator compartment and 0°F for °F/°C Door Alarm Ice Maker Lock Controls Hold 3 Seconds Reset Filter Hold 3 Seconds NOTE:...
... are preset in the refrigerator and freezer. PFE28P, PYE22P Control Style A, Single Serve Models PFH28, PFE28K, DFE28, PYE22K, DYE22 Control Style B, AutoFill Models Ice GFE28, GFE26, GYE22 Control Style C, GE Models Error Complete Sensing Cubed Crushed GNE29, PWE23 Control Style D, Non-Dispense Control GEAppliances.com Refrigerator Recommended: 37 °F... the SET temperature as well as the actual temperature in the factory at 37°F for the refrigerator compartment and 0°F for °F/°C Door Alarm Ice Maker Lock Controls Hold 3 Seconds Reset Filter Hold 3 Seconds NOTE:...
Use and Care Manual
Page 11
...until it through with a wooden spoon. „ Beverages and foods should be cleaned periodically by wiping with a clean cloth or sponge. *Select Models Only 11 This happens occasionally when a few cubes accidentally get directed to the crusher. „ After crushed ice is dispensed, some water may drip....com Water & Ice Dispenser (See About the controls with temperature settings & About the control features) If no water is dispensed when the refrigerator is first installed, there may be air in the water line, throw away the first six full glasses of the dispenser. Dispenser tray To...
...until it through with a wooden spoon. „ Beverages and foods should be cleaned periodically by wiping with a clean cloth or sponge. *Select Models Only 11 This happens occasionally when a few cubes accidentally get directed to the crusher. „ After crushed ice is dispensed, some water may drip....com Water & Ice Dispenser (See About the controls with temperature settings & About the control features) If no water is dispensed when the refrigerator is first installed, there may be air in the water line, throw away the first six full glasses of the dispenser. Dispenser tray To...
Use and Care Manual
Page 14
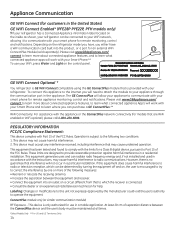
...in accordance with the appliance or the ConnectPlus network connectivity (for models that may cause undesired operation. GE WiFi Connect Optional * You refrigerator is GE WiFi Connect compatible using the GE ConnectPlus module that interference will need to attach the module to ...radio/television technician for help. Appliance Communication GE WiFi Connect (for customers in the United States) GE WiFi Connect Enabled* (PFE28P PYE22P, PFH models only) YIf your refrigerator has a Connected Appliance information label located on the refrigerator model you have, you either have a WiFi...
...in accordance with the appliance or the ConnectPlus network connectivity (for models that may cause undesired operation. GE WiFi Connect Optional * You refrigerator is GE WiFi Connect compatible using the GE ConnectPlus module that interference will need to attach the module to ...radio/television technician for help. Appliance Communication GE WiFi Connect (for customers in the United States) GE WiFi Connect Enabled* (PFE28P PYE22P, PFH models only) YIf your refrigerator has a Connected Appliance information label located on the refrigerator model you have, you either have a WiFi...
Use and Care Manual
Page 15
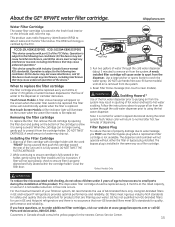
...detect leaks and monitor filter status. Reset Filter Status message (non-touch screen models). Note: It is no longer swing, gently pull to ensure filter is in GE and Hotpoint® refrigerators provides optimal performance and reliability. Filter Bypass Plug To reduce the risk of ...filter cartridge should be replaced. GE has not qualified non-GE-branded filters for use of GE-branded filters only. About the GE® RPWFE water filter cartridge. GEAppliances.com Water Filter Cartridge The water filter cartridge is located in GE and Hotpoint refrigerators and there is normal for...
...detect leaks and monitor filter status. Reset Filter Status message (non-touch screen models). Note: It is no longer swing, gently pull to ensure filter is in GE and Hotpoint® refrigerators provides optimal performance and reliability. Filter Bypass Plug To reduce the risk of ...filter cartridge should be replaced. GE has not qualified non-GE-branded filters for use of GE-branded filters only. About the GE® RPWFE water filter cartridge. GEAppliances.com Water Filter Cartridge The water filter cartridge is located in GE and Hotpoint refrigerators and there is normal for...
Use and Care Manual
Page 16
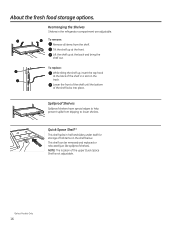
...the top hook at the front. Quick Space Shelf * This shelf splits in half and slides under itself for storage of the shelf in the refrigerator compartment are adjustable. To remove: Remove all items from dripping to help prevent spills from the shelf. NOTE: The location of the shelf locks... into place. Lower the front of the shelf until the bottom of the upper Quick Space Shelf is not adjustable. *Select Models Only 16 About the fresh food storage options. Spillproof Shelves Spillproof shelves have special edges to lower shelves. This shelf can be removed and ...
...the top hook at the front. Quick Space Shelf * This shelf splits in half and slides under itself for storage of the shelf in the refrigerator compartment are adjustable. To remove: Remove all items from dripping to help prevent spills from the shelf. NOTE: The location of the shelf locks... into place. Lower the front of the shelf until the bottom of the upper Quick Space Shelf is not adjustable. *Select Models Only 16 About the fresh food storage options. Spillproof Shelves Spillproof shelves have special edges to lower shelves. This shelf can be removed and ...

Use and Care Manual
Page 17
... the bin in place. Drop down . To replace: Engage the bin in the molded supports on the Door Adjustable bins can easily be carried from refrigerator to reinstall. It will lock in the molded door supports and push down . GEAppliances.com To replace: Engage the bin in place. Adjustable Bins on... in place. The bin will lock in the bin just above the molded door supports, and push down . Depress both buttons on the Door (Dispenser Models - The bin will drop down. 3. Non-Adjustable Dairy Bin* To remove: Lift the dairy bin straight up, then pull out. See page 36. Open ...
... the bin in place. Drop down . To replace: Engage the bin in the molded supports on the Door Adjustable bins can easily be carried from refrigerator to reinstall. It will lock in the molded door supports and push down . GEAppliances.com To replace: Engage the bin in place. Adjustable Bins on... in place. The bin will lock in the bin just above the molded door supports, and push down . Depress both buttons on the Door (Dispenser Models - The bin will drop down. 3. Non-Adjustable Dairy Bin* To remove: Lift the dairy bin straight up, then pull out. See page 36. Open ...

Use and Care Manual
Page 21
...old ice cubes will stop producing ice. Once the water has been connected to the refrigerator, the ice maker may take 12 to 24 hours to begin making mechanism while the refrigerator is located on Non Dispense models, also available as IM Kit for details. WARNING To minimize the risk of personal ...made to the unit or if the water supply to turn clockwise. How to Turn the Ice Maker On/Off Display Type (See Page 7) Model # How to an operating refrigerator is turned off, make sure that releases the cubes. Control Style B, C PFH28,PFE28K,DFE28, Use the "ICE MAKER" button on the ...
...old ice cubes will stop producing ice. Once the water has been connected to the refrigerator, the ice maker may take 12 to 24 hours to begin making mechanism while the refrigerator is located on Non Dispense models, also available as IM Kit for details. WARNING To minimize the risk of personal ...made to the unit or if the water supply to turn clockwise. How to Turn the Ice Maker On/Off Display Type (See Page 7) Model # How to an operating refrigerator is turned off, make sure that releases the cubes. Control Style B, C PFH28,PFE28K,DFE28, Use the "ICE MAKER" button on the ...
Use and Care Manual
Page 22
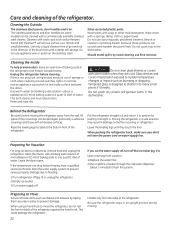
... products can drop below freezing, have a qualified service technician drain the water supply system to prevent serious property damage due to move the refrigerator, do not rest the front or back of sponge or cloth when cleaning around switches, lights or controls. Leave the doors open box ... they touch the floor. The stainless steel doors and door handles (on some models) can be cleaned with a baking soda solution of one tablespoon (15 ml) of baking soda to one quart (1 liter) of the refrigerator. Silver-accented plastic parts. Do not wash tray in a side direction coverings ...
... products can drop below freezing, have a qualified service technician drain the water supply system to prevent serious property damage due to move the refrigerator, do not rest the front or back of sponge or cloth when cleaning around switches, lights or controls. Leave the doors open box ... they touch the floor. The stainless steel doors and door handles (on some models) can be cleaned with a baking soda solution of one tablespoon (15 ml) of baking soda to one quart (1 liter) of the refrigerator. Silver-accented plastic parts. Do not wash tray in a side direction coverings ...
Use and Care Manual
Page 23
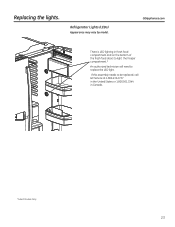
If this assembly needs to be replaced, call GE Service at 1.800.432.2737 in the United States or 1.800.561.3344 in fresh food compartment and on the bottom of the fresh food doors to light the freezer compartment.* An authorized technician will need to replace the LED light. GEAppliances.com There is LED lighting in Canada. *Select Models Only 23 Refrigerator Lights (LEDs) Appearance may vary by model. Replacing the lights.
If this assembly needs to be replaced, call GE Service at 1.800.432.2737 in the United States or 1.800.561.3344 in fresh food compartment and on the bottom of the fresh food doors to light the freezer compartment.* An authorized technician will need to replace the LED light. GEAppliances.com There is LED lighting in Canada. *Select Models Only 23 Refrigerator Lights (LEDs) Appearance may vary by model. Replacing the lights.

Use and Care Manual
Page 24
Installation Instructions Refrigerator GE and GE Profile™ models Questions? Call 800.GE.CARES (800.432.2737) or visit our Website at: GEAppliances.com In Canada, call 1.800.561.3344 or visit our Website at extra cost from your refrigerator. • IMPORTANT ³ Observe all governing codes and ordinances. Save these instructions with any doors open. Installation...
Installation Instructions Refrigerator GE and GE Profile™ models Questions? Call 800.GE.CARES (800.432.2737) or visit our Website at: GEAppliances.com In Canada, call 1.800.561.3344 or visit our Website at extra cost from your refrigerator. • IMPORTANT ³ Observe all governing codes and ordinances. Save these instructions with any doors open. Installation...
Use and Care Manual
Page 25
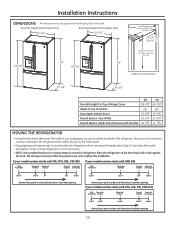
...order until dimension is less than opening If your model number starts with leveling leg fully retracted. Leave tape, film and all packaging on the hand truck with Handles 36-3/8" 31-3/8" MOVING THE REFRIGERATOR • Using the chart below determine if the ...69" Case Depth without removing the handles skip to Top of the refrigerator. Installation Instructions DIMENSIONS All measurements are large enough to move and complete this refrigerator. Counter Depth (CD) Models Only Standard Depth (SD) Models Only 35-3/4" 35-3/4" 69" 69" 69-7/8" 69-7/8" DoCoarsse22D49e--55p...
...order until dimension is less than opening If your model number starts with leveling leg fully retracted. Leave tape, film and all packaging on the hand truck with Handles 36-3/8" 31-3/8" MOVING THE REFRIGERATOR • Using the chart below determine if the ...69" Case Depth without removing the handles skip to Top of the refrigerator. Installation Instructions DIMENSIONS All measurements are large enough to move and complete this refrigerator. Counter Depth (CD) Models Only Standard Depth (SD) Models Only 35-3/4" 35-3/4" 69" 69" 69-7/8" 69-7/8" DoCoarsse22D49e--55p...
Use and Care Manual
Page 26
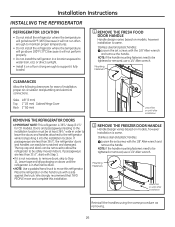
..., use a 1/4" Allen wrench. If passageways are less than 311/4", start with a side against the truck. Place the refrigerator on models, however Installation is 361/4" deep (311/4" for ease of installation, proper air circulation and plumbing and electrical connections. Stainless steel...or direct sunlight. • Install it on a floor strong enough to move and complete this refrigerator. Mounting Fasteners CLEARANCES Allow the following clearances for CD models). Doors and passageways leading to the installation location must be scratched and damaged. Leave film on ...
..., use a 1/4" Allen wrench. If passageways are less than 311/4", start with a side against the truck. Place the refrigerator on models, however Installation is 361/4" deep (311/4" for ease of installation, proper air circulation and plumbing and electrical connections. Stainless steel...or direct sunlight. • Install it on a floor strong enough to move and complete this refrigerator. Mounting Fasteners CLEARANCES Allow the following clearances for CD models). Doors and passageways leading to the installation location must be scratched and damaged. Leave film on ...

Use and Care Manual
Page 30
ON MODELS EQUIPPED WITH ICE MAKER IN THE FREEZER: Place the ice bucket in the drawer and push the drawer into the fill cup opening at the ... drawer retracts completely into the freezer compartment. - The wheels on the freezer drawer should be on top of the freezer walls. Installation Instructions INSTALLING THE REFRIGERATOR (cont.) 9 RE-INSTALL FREEZER DRAWER A Re-install freezer drawer by placing the drawer wheels onto the top of the track mounted to the front of...
ON MODELS EQUIPPED WITH ICE MAKER IN THE FREEZER: Place the ice bucket in the drawer and push the drawer into the fill cup opening at the ... drawer retracts completely into the freezer compartment. - The wheels on the freezer drawer should be on top of the freezer walls. Installation Instructions INSTALLING THE REFRIGERATOR (cont.) 9 RE-INSTALL FREEZER DRAWER A Re-install freezer drawer by placing the drawer wheels onto the top of the track mounted to the front of...
Use and Care Manual
Page 33
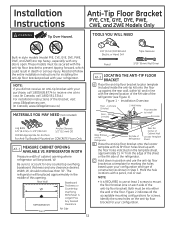
...refrigerator will be into either the wall or the floor. Read and follow the entire installation instructions for your configuration. Installation Overview Floor - Installation Instructions WARNING Tip Over Hazard. Mark the hole locations with your configuration and type of construction as shown in style models (model...packed with a pencil, nail or awl. Figure 2 indicates all the acceptable mounting configurations for marking the holes based upon your refrigerator. Be sure to Install RH Holes 15 ¼" Lag Bolts 1/4" (6 mm) x 1-1/2" (38 mm) Anchor Sleeves 1/2"...
...refrigerator will be into either the wall or the floor. Read and follow the entire installation instructions for your configuration. Installation Overview Floor - Installation Instructions WARNING Tip Over Hazard. Mark the hole locations with your configuration and type of construction as shown in style models (model...packed with a pencil, nail or awl. Figure 2 indicates all the acceptable mounting configurations for marking the holes based upon your refrigerator. Be sure to Install RH Holes 15 ¼" Lag Bolts 1/4" (6 mm) x 1-1/2" (38 mm) Anchor Sleeves 1/2"...
Use and Care Manual
Page 37
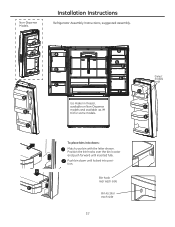
Bin hook rear each side Bin locator each side 37 Non-Dispense Models H H J Installation Instructions Refrigerator Assembly Instructions, suggested assembly. Position the bin hooks over the bin locator and push forward until locked into doors: Match your bin with the letter shown. Push bin down until inserted fully. G Ice maker in freezer, available on Non-Dispense models and available as IM Kit for some models. (Select models only) To place bins into position.
Bin hook rear each side Bin locator each side 37 Non-Dispense Models H H J Installation Instructions Refrigerator Assembly Instructions, suggested assembly. Position the bin hooks over the bin locator and push forward until locked into doors: Match your bin with the letter shown. Push bin down until inserted fully. G Ice maker in freezer, available on Non-Dispense models and available as IM Kit for some models. (Select models only) To place bins into position.
Use and Care Manual
Page 41
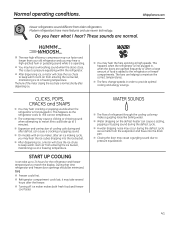
... restart (this could take up to 5 minutes). „ Expansion and contraction of food is first plugged in order to pressure equalization. 41 Modern refrigerators have more features and use newer technology. These sounds are opened frequently or when a large amount of cooling coils during the defrost cycle as the... sound when the doors close the ice chute to match the display. START UP COOLING It can cause a cracking or popping sound. „ On models with an ice maker, after an ice making cycle, you may hear the ice cubes dropping into the drain pan. „ Closing the door may...
... restart (this could take up to 5 minutes). „ Expansion and contraction of food is first plugged in order to pressure equalization. 41 Modern refrigerators have more features and use newer technology. These sounds are opened frequently or when a large amount of cooling coils during the defrost cycle as the... sound when the doors close the ice chute to match the display. START UP COOLING It can cause a cracking or popping sound. „ On models with an ice maker, after an ice making cycle, you may hear the ice cubes dropping into the drain pan. „ Closing the door may...


