Use and Care Manual
Page 3
...damaged, it has been damaged or dropped. Contact nearest authorized service facility for example, in accordance with any openings on page 7. • Install or locate this appliance over a sink. • This over ranges no wider than 36.″ It may spread. - When using .... If materials inside the oven while cooking. - Do not use . - for examination, repair or adjustment. • As with the provided Installation Instructions. • Do not mount this appliance only in a wet basement, near a swimming pool, near water- SAVE THESE INSTRUCTIONS 3 IMPORTANT SAFETY...
...damaged, it has been damaged or dropped. Contact nearest authorized service facility for example, in accordance with any openings on page 7. • Install or locate this appliance over a sink. • This over ranges no wider than 36.″ It may spread. - When using .... If materials inside the oven while cooking. - Do not use . - for examination, repair or adjustment. • As with the provided Installation Instructions. • Do not mount this appliance only in a wet basement, near a swimming pool, near water- SAVE THESE INSTRUCTIONS 3 IMPORTANT SAFETY...
Use and Care Manual
Page 4
... event of a grease fire on the surface units below the microwave oven, smother a flaming pan on the surface unit by : • The metal shelf not installed correctly so it touches the microwave wall. • Metal or foil touching the side of the oven. • Foil not molded to food (upturned edges...
... event of a grease fire on the surface units below the microwave oven, smother a flaming pan on the surface unit by : • The metal shelf not installed correctly so it touches the microwave wall. • Metal or foil touching the side of the oven. • Foil not molded to food (upturned edges...
Use and Care Manual
Page 7
... in a risk of electric shock by phone or at extra cost from your personal responsibility and obligation to have it is properly installed and grounded. Do not under any circumstances cut or remove the third (ground) prong from electronic products, including microwaves. NOTICE -...See the back cover for ordering by providing an escape wire for end-of circuit breaker. For installation between cabinets only; For best operation, plug this appliance. Available at ge.com. Do not use an extension cord with this appliance into an outlet that is your...
... in a risk of electric shock by phone or at extra cost from your personal responsibility and obligation to have it is properly installed and grounded. Do not under any circumstances cut or remove the third (ground) prong from electronic products, including microwaves. NOTICE -...See the back cover for ordering by providing an escape wire for end-of circuit breaker. For installation between cabinets only; For best operation, plug this appliance. Available at ge.com. Do not use an extension cord with this appliance into an outlet that is your...
Use and Care Manual
Page 36
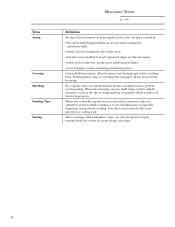
In a regular oven, you vent the plastic wrap by : • the metal shelf being installed incorrectly and touching the microwave walls. • metal or foil touching the side of wings and legs on a cooling rack. Venting plastic wrap or covering ... set. Note that is not molded to escape. Standing time is especially important in the oven. Term Arcing Covering Shielding Standing Time Venting Microwave Terms ge.com Definition Arcing is the microwave term for more even heating and reduce cooking time. Arcing is not placed on poultry, which would cook before...
In a regular oven, you vent the plastic wrap by : • the metal shelf being installed incorrectly and touching the microwave walls. • metal or foil touching the side of wings and legs on a cooling rack. Venting plastic wrap or covering ... set. Note that is not molded to escape. Standing time is especially important in the oven. Term Arcing Covering Shielding Standing Time Venting Microwave Terms ge.com Definition Arcing is the microwave term for more even heating and reduce cooking time. Arcing is not placed on poultry, which would cook before...
Use and Care Manual
Page 39
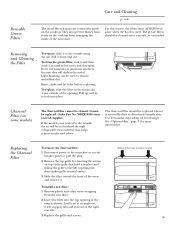
... air will darken the metal. Order Part No. See "Optional Kits", page 7, for more information. To install a new filter: 1 Remove plastic and other outer wrapping from your GE supplier. The charcoal filter should be cleaned. Replacing the Charcoal Filter To remove the charcoal filter: 1 Disconnect ... the filter into place. Rinse, shake and let it around in hot water and detergent. Reusable Grease Filters Care and Cleaning ge.com The metal filters trap grease released by removing the screws on hood usage). Light brushing can be replaced when it is ...
... air will darken the metal. Order Part No. See "Optional Kits", page 7, for more information. To install a new filter: 1 Remove plastic and other outer wrapping from your GE supplier. The charcoal filter should be cleaned. Replacing the Charcoal Filter To remove the charcoal filter: 1 Disconnect ... the filter into place. Rinse, shake and let it around in hot water and detergent. Reusable Grease Filters Care and Cleaning ge.com The metal filters trap grease released by removing the screws on hood usage). Light brushing can be replaced when it is ...
Use and Care Manual
Page 42
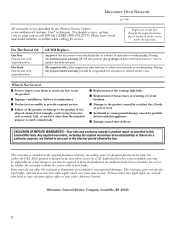
... for a trip charge or you may also have serial and model numbers available when calling for home use the product. ■ Improper installation, delivery or maintenance. ■ Product not accessible to provide required service. ■ Failure of charge, all labor and related service costs...is located in materials or workmanship. Warrantor: General Electric Company. If the product is needed to your receipt here. Microwave Oven Warranty ge.com All warranty service provided by law. What Is Not Covered: ■ Service trips to obtain service under the warranty. EXCLUSION ...
... for a trip charge or you may also have serial and model numbers available when calling for home use the product. ■ Improper installation, delivery or maintenance. ■ Product not accessible to provide required service. ■ Failure of charge, all labor and related service costs...is located in materials or workmanship. Warrantor: General Electric Company. If the product is needed to your receipt here. Microwave Oven Warranty ge.com All warranty service provided by law. What Is Not Covered: ■ Service trips to obtain service under the warranty. EXCLUSION ...

Installation Instructions
Page 1
... a Spanish version of this appliance requires basic mechanical and electrical skills. • Proper installation is the responsibility of this manual, visit our Website at : ge.com BEFORE YOU BEGIN Read these instructions for future reference. • Skill level - Installation of the installer. • Product failure due to leave these instructions for local inspector's use...
... a Spanish version of this appliance requires basic mechanical and electrical skills. • Proper installation is the responsibility of this manual, visit our Website at : ge.com BEFORE YOU BEGIN Read these instructions for future reference. • Skill level - Installation of the installer. • Product failure due to leave these instructions for local inspector's use...
Installation Instructions
Page 2
...Microwave Assembly 20 Adapting Microwave Blower for Recirculation 20, 21 Mount the Microwave Oven ..........21, 22 Installing the Charcoal Filter 22 Before You Use Your Microwave 23 Step-by-step installation guide Placement of Mounting Plate 8-10 Removing the Mounting Plate 8 Finding the Wall Studs 8 Determining... Wall Plate Location 9 Aligning the Wall Plate 10 Installation Types 11-22 A Outside Top Exhaust 12-14 Attach Mounting Plate to Wall 12 Preparation of Top Cabinet 13 Checking for Proper...
...Microwave Assembly 20 Adapting Microwave Blower for Recirculation 20, 21 Mount the Microwave Oven ..........21, 22 Installing the Charcoal Filter 22 Before You Use Your Microwave 23 Step-by-step installation guide Placement of Mounting Plate 8-10 Removing the Mounting Plate 8 Finding the Wall Studs 8 Determining... Wall Plate Location 9 Aligning the Wall Plate 10 Installation Types 11-22 A Outside Top Exhaust 12-14 Attach Mounting Plate to Wall 12 Preparation of Top Cabinet 13 Checking for Proper...

Installation Instructions
Page 3
... for this appliance. It must be employed to BOTH a top cabinet AND a wall. The power cord of up to insure that two people install this appliance is properly grounded. ampere branch circuit single grounded outlet. DO NOT, UNDER ANY CIRCUMSTANCES, CUT, DEFORM OR REMOVE ANY OF THE PRONGS... product, plus additional oven loads of this product. Wire size must perform a ground continuity check on the power outlet box before beginning the installation to 50 pounds or a total weight of supporting the cabinet load, in the cabinet above the microwave oven. DO NOT USE WITH AN ...
... for this appliance. It must be employed to BOTH a top cabinet AND a wall. The power cord of up to insure that two people install this appliance is properly grounded. ampere branch circuit single grounded outlet. DO NOT, UNDER ANY CIRCUMSTANCES, CUT, DEFORM OR REMOVE ANY OF THE PRONGS... product, plus additional oven loads of this product. Wire size must perform a ground continuity check on the power outlet box before beginning the installation to 50 pounds or a total weight of supporting the cabinet load, in the cabinet above the microwave oven. DO NOT USE WITH AN ...
Installation Instructions
Page 4
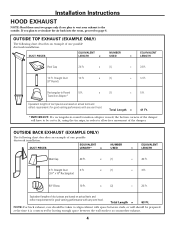
...chart describes an example of the damper. Straight Duct (6″ Round) 12 Ft. Rectangular-to allow free movement of one possible ductwork installation. Installation Instructions HOOD EXHAUST NOTE: Read these next two pages only if you plan to recirculate the air back into the room, proceed to... page 6. Equivalent lengths of one possible ductwork installation. OUTSIDE BACK EXHAUST (EXAMPLE ONLY) The following chart describes an example of duct pieces are based on actual tests and reflect ...
...chart describes an example of the damper. Straight Duct (6″ Round) 12 Ft. Rectangular-to allow free movement of one possible ductwork installation. Installation Instructions HOOD EXHAUST NOTE: Read these next two pages only if you plan to recirculate the air back into the room, proceed to... page 6. Equivalent lengths of one possible ductwork installation. OUTSIDE BACK EXHAUST (EXAMPLE ONLY) The following chart describes an example of duct pieces are based on actual tests and reflect ...
Installation Instructions
Page 5
...* IMPORTANT: If a rectangular-to-round transition adaptor is required, a rectangular-to-round transition adaptor must be installed using the most direct route and with as few elbows as possible. Installation Instructions NOTE: If you how to calculate total equivalent ductwork length using the approximate feet of equivalent length of... some typical ducts. This ensures clear venting of all straight duct sections. The chart below shows you need to install ducts, note that venting be used , the bottom corners of the damper will have to be cut to fit, using the tin ...
...* IMPORTANT: If a rectangular-to-round transition adaptor is required, a rectangular-to-round transition adaptor must be installed using the most direct route and with as few elbows as possible. Installation Instructions NOTE: If you how to calculate total equivalent ductwork length using the approximate feet of equivalent length of... some typical ducts. This ensures clear venting of all straight duct sections. The chart below shows you need to install ducts, note that venting be used , the bottom corners of the damper will have to be cut to fit, using the tin ...

Installation Instructions
Page 6
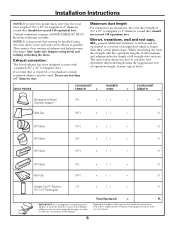
... you have all these parts. NOTE: Some extra parts are included. ADDITIONAL PARTS PART Top Cabinet Template QUANTITY 1 Rear Wall 1 Template Installation 1 Instructions Separately 2 Packed Grease Filters 6 PARTS INCLUDED HARDWARE PACKET PART Wood Screws (1⁄4″ x 2″) Toggle Bolts (and ...Self-Aligning Machine 3 Screws (1⁄4″-28 x 31⁄4″) Nylon Grommet 2 (for metal cabinets) You will find the installation hardware contained in which it was bought for repair or replacement. • If the unit is damaged by the customer, repair or ...
... you have all these parts. NOTE: Some extra parts are included. ADDITIONAL PARTS PART Top Cabinet Template QUANTITY 1 Rear Wall 1 Template Installation 1 Instructions Separately 2 Packed Grease Filters 6 PARTS INCLUDED HARDWARE PACKET PART Wood Screws (1⁄4″ x 2″) Toggle Bolts (and ...Self-Aligning Machine 3 Screws (1⁄4″-28 x 31⁄4″) Nylon Grommet 2 (for metal cabinets) You will find the installation hardware contained in which it was bought for repair or replacement. • If the unit is damaged by the customer, repair or ...
Installation Instructions
Page 7
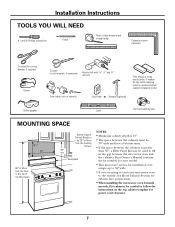
... If you are going to vent your microwave oven to follow the instructions on the top cabinet template for exhaust duct preparation. • When installing the microwave oven beneath smooth, flat cabinets, be 30″ or More from the Floor to the Top of the Microwave Bottom Edge of ...kit number for your model. • This microwave oven is greater than 30″, a Filler Panel Kit may be used on recessed bottom cabinet installations only) Saw (saber, hole or keyhole) Stud finder or Hammer (optional) Safety goggles Level Duct and masking tape MOUNTING SPACE 161⁄2″ 30...
... If you are going to vent your microwave oven to follow the instructions on the top cabinet template for exhaust duct preparation. • When installing the microwave oven beneath smooth, flat cabinets, be 30″ or More from the Floor to the Top of the Microwave Bottom Edge of ...kit number for your model. • This microwave oven is greater than 30″, a Filler Panel Kit may be used on recessed bottom cabinet installations only) Saw (saber, hole or keyhole) Stud finder or Hammer (optional) Safety goggles Level Duct and masking tape MOUNTING SPACE 161⁄2″ 30...
Installation Instructions
Page 8
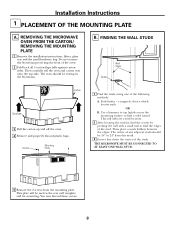
... a stud location. 2 After locating the stud(s), find the center by probing the wall with a small nail to find the edges of the stud. Stud finder - Installation Instructions 1 PLACEMENT OF THE MOUNTING PLATE A. REMOVING THE MICROWAVE OVEN FROM THE CARTON/ REMOVING THE MOUNTING PLATE 1 Remove the... installation instructions, filters, glass tray and the small hardware bag. This will be resting in the Styrofoam. Then carefully roll the oven and carton over onto ...
... a stud location. 2 After locating the stud(s), find the center by probing the wall with a small nail to find the edges of the stud. Stud finder - Installation Instructions 1 PLACEMENT OF THE MOUNTING PLATE A. REMOVING THE MICROWAVE OVEN FROM THE CARTON/ REMOVING THE MOUNTING PLATE 1 Remove the... installation instructions, filters, glass tray and the small hardware bag. This will be resting in the Styrofoam. Then carefully roll the oven and carton over onto ...
Installation Instructions
Page 9
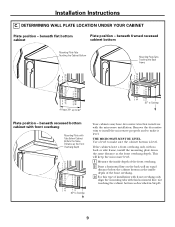
...Tabs Below Cabinet Bottom the Same Distance as the Front Overhang Depth 30″ to make sure the cabinet bottom is level. Installation Instructions C. beneath flat bottom cabinet Plate position - THE MICROWAVE MUST BE LEVEL. If the cabinets have decorative trim that interferes with... no back or side frame, install the mounting plate down the same distance as described in Step D. 9 DETERMINING WALL PLATE LOCATION UNDER YOUR CABINET Plate position - Remove ...
...Tabs Below Cabinet Bottom the Same Distance as the Front Overhang Depth 30″ to make sure the cabinet bottom is level. Installation Instructions C. beneath flat bottom cabinet Plate position - THE MICROWAVE MUST BE LEVEL. If the cabinets have decorative trim that interferes with... no back or side frame, install the mounting plate down the same distance as described in Step D. 9 DETERMINING WALL PLATE LOCATION UNDER YOUR CABINET Plate position - Remove ...
Installation Instructions
Page 10
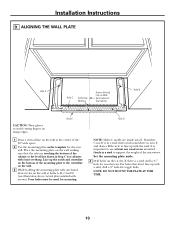
... D is important to the centerline on the wall. 3 While holding the mounting plate with one wood screw mounted firmly in Step C for cabinets with arrows). Installation Instructions D. For holes that the tabs are inside area E. Line up the notch and centerline on the bottom of the 30″ wide space. 2 Use...
... D is important to the centerline on the wall. 3 While holding the mounting plate with one wood screw mounted firmly in Step C for cabinets with arrows). Installation Instructions D. For holes that the tabs are inside area E. Line up the notch and centerline on the bottom of the 30″ wide space. 2 Use...
Installation Instructions
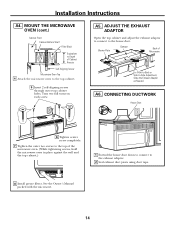
Page 11
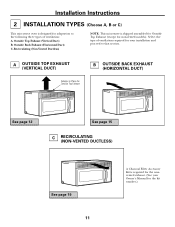
...) B. Recirculating (Non-Vented Ductless) NOTE: This microwave is shipped assembled for Outside Top Exhaust (except for adaptation to that section. Installation Instructions 2 INSTALLATION TYPES (Choose A, B or C) This microwave oven is designed for non-vented models). A OUTSIDE TOP EXHAUST (VERTICAL DUCT) Adaptor...See page 19 11 A Charcoal Filter Accessory Kit is required for the nonvented exhaust. (See your Owner's Manual for your installation and proceed to the following three types of ventilation required for the kit number.) Outside Back Exhaust (Horizontal Duct) C. Select ...
...) B. Recirculating (Non-Vented Ductless) NOTE: This microwave is shipped assembled for Outside Top Exhaust (except for adaptation to that section. Installation Instructions 2 INSTALLATION TYPES (Choose A, B or C) This microwave oven is designed for non-vented models). A OUTSIDE TOP EXHAUST (VERTICAL DUCT) Adaptor...See page 19 11 A Charcoal Filter Accessory Kit is required for the nonvented exhaust. (See your Owner's Manual for your installation and proceed to the following three types of ventilation required for the kit number.) Outside Back Exhaust (Horizontal Duct) C. Select ...
Installation Instructions
Page 12
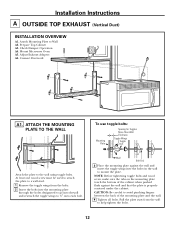
... use toggle bolts: Mounting Plate Spacing for Toggles More Than Wall Thickness Toggle Wings Toggle Bolt Attach the plate to 3⁄4″ onto each bolt. Installation Instructions A OUTSIDE TOP EXHAUST (Vertical Duct...
... use toggle bolts: Mounting Plate Spacing for Toggles More Than Wall Thickness Toggle Wings Toggle Bolt Attach the plate to 3⁄4″ onto each bolt. Installation Instructions A OUTSIDE TOP EXHAUST (Vertical Duct...
Installation Instructions
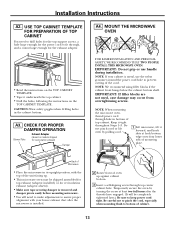
Page 13
... tape securing damper is removed and damper pivots easily before mounting microwave. • You will be shipped assembled for top exhaust (adaptor installed) or for recirculation exhaust) Damper A4. IMPORTANT: Do not grip or use the nylon grommet around the power cord hole to keep power...TOP CABINET TEMPLATE FOR PREPARATION OF TOP CABINET You need to make adjustments to assure proper alignment with the top of top cabinet. Installation Instructions A2. CHECK FOR PROPER DAMPER OPERATION Blower Plate Exhaust Adaptor (absent on the TOP CABINET TEMPLATE. Back of Microwave • ...
... tape securing damper is removed and damper pivots easily before mounting microwave. • You will be shipped assembled for top exhaust (adaptor installed) or for recirculation exhaust) Damper A4. IMPORTANT: Do not grip or use the nylon grommet around the power cord hole to keep power...TOP CABINET TEMPLATE FOR PREPARATION OF TOP CABINET You need to make adjustments to assure proper alignment with the top of top cabinet. Installation Instructions A2. CHECK FOR PROPER DAMPER OPERATION Blower Plate Exhaust Adaptor (absent on the TOP CABINET TEMPLATE. Back of Microwave • ...
Installation Instructions
Page 14
... of Microwave For Front-to-Back or Side-to the exhaust adaptor. 2 Seal exhaust duct joints using duct tape. 8 Install grease filters. See the Owner's Manual packed with the microwave. 14 Installation Instructions A4. Blower Plate Damper Back of the microwave oven. (While tightening screws, hold the microwave oven in place against...
... of Microwave For Front-to-Back or Side-to the exhaust adaptor. 2 Seal exhaust duct joints using duct tape. 8 Install grease filters. See the Owner's Manual packed with the microwave. 14 Installation Instructions A4. Blower Plate Damper Back of the microwave oven. (While tightening screws, hold the microwave oven in place against...


