Installation Instructions
Page 15
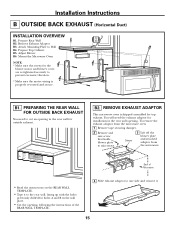
...Rear Wall B2. PREPARING THE REAR WALL FOR OUTSIDE BACK EXHAUST You need the exhaust adaptor for installation in the rear wall for the blower motor and blower cover are re-tightened securely to Wall B4. You will need to cut an opening in the rear wall opening , following ...of Microwave • Read the instructions on the REAR WALL TEMPLATE. • Tape it . 15 Attach Mounting Plate to prevent excessive vibration. * Make sure the motor wiring is shipped assembled for holes A and B in the wall plate. • Cut the opening . Mount the Microwave Oven NOTE: * Make sure the screws...
...Rear Wall B2. PREPARING THE REAR WALL FOR OUTSIDE BACK EXHAUST You need the exhaust adaptor for installation in the rear wall for the blower motor and blower cover are re-tightened securely to Wall B4. You will need to cut an opening in the rear wall opening , following ...of Microwave • Read the instructions on the REAR WALL TEMPLATE. • Tape it . 15 Attach Mounting Plate to prevent excessive vibration. * Make sure the motor wiring is shipped assembled for holes A and B in the wall plate. • Cut the opening . Mount the Microwave Oven NOTE: * Make sure the screws...
Installation Instructions
Page 16
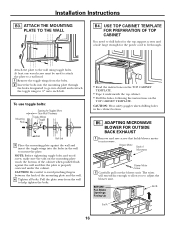
... enough for Toggles More Than Wall Thickness Toggle Wings Toggle Bolt Wall Bolt End 3 Place the mounting plate against the wall and that holds blower motor to the wall using toggle bolts. CAUTION: Be careful to help tighten the bolts. • Read the instructions on the TOP CABINET TEMPLATE. ...to attach the plate to a wall stud. 1 Remove the toggle wings from the wall to avoid pinching fingers between the back of Microwave Blower Motor Screw 2 Carefully pull out the blower unit. To use toggle bolts: Mounting Plate Spacing for the power cord to mount the plate. NOTE: Before...
... enough for Toggles More Than Wall Thickness Toggle Wings Toggle Bolt Wall Bolt End 3 Place the mounting plate against the wall and that holds blower motor to the wall using toggle bolts. CAUTION: Be careful to help tighten the bolts. • Read the instructions on the TOP CABINET TEMPLATE. ...to attach the plate to a wall stud. 1 Remove the toggle wings from the wall to avoid pinching fingers between the back of Microwave Blower Motor Screw 2 Carefully pull out the blower unit. To use toggle bolts: Mounting Plate Spacing for the power cord to mount the plate. NOTE: Before...

Installation Instructions
Page 17
... wires are facing the front of microwave oven. 17 NOTE: The blower unit exhaust openings should match exhaust openings on the top of Microwave Blower Motor Screw 5 Rotate blower unit counterclockwise 180°. Installation Instructions B5.
... wires are facing the front of microwave oven. 17 NOTE: The blower unit exhaust openings should match exhaust openings on the top of Microwave Blower Motor Screw 5 Rotate blower unit counterclockwise 180°. Installation Instructions B5.
Installation Instructions
Page 19
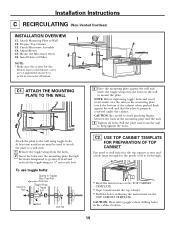
... and wood screw, make sure the tabs on the TOP CABINET TEMPLATE. Adjust Blower C5. To use toggle bolts: Mounting Plate Spacing for the blower motor and blower cover are re-tightened securely to go into the holes in the cabinet bottom. 19 Prepare Top Cabinet C3. C1. Attach the plate...
... and wood screw, make sure the tabs on the TOP CABINET TEMPLATE. Adjust Blower C5. To use toggle bolts: Mounting Plate Spacing for the blower motor and blower cover are re-tightened securely to go into the holes in the cabinet bottom. 19 Prepare Top Cabinet C3. C1. Attach the plate...
Installation Instructions
Page 20
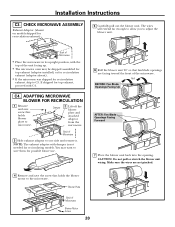
... facing toward the front of the unit facing up. • The microwave oven may want to save screw that holds the blower motor to the microwave. Back of Microwave Blower Motor Screw 20 CHECK MICROWAVE ASSEMBLY Exhaust Adaptor (absent on models shipped for possible future use. 6 Roll the blower unit 90°...
... facing toward the front of the unit facing up. • The microwave oven may want to save screw that holds the blower motor to the microwave. Back of Microwave Blower Motor Screw 20 CHECK MICROWAVE ASSEMBLY Exhaust Adaptor (absent on models shipped for possible future use. 6 Roll the blower unit 90°...


