Use and Care Manual
Page 1
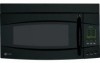
Back Cover Warranty 42 Owner's Manual PVM2070 Write the model and serial numbers here: Model Serial Find these numbers on a label on the left front when the door is open. DE68-03454A 49-40568-1 11-08 JR Spacemaker Microwave Oven ge.com Safety Instructions 2-7 Operating Instructions Care and Cleaning 37-40 Cooking Features...
Back Cover Warranty 42 Owner's Manual PVM2070 Write the model and serial numbers here: Model Serial Find these numbers on a label on the left front when the door is open. DE68-03454A 49-40568-1 11-08 JR Spacemaker Microwave Oven ge.com Safety Instructions 2-7 Operating Instructions Care and Cleaning 37-40 Cooking Features...
Use and Care Manual
Page 3
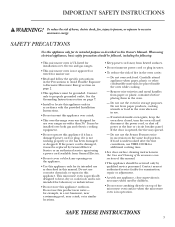
... a power cord available from heated surfaces. • Do not immerse power cord or plug in water. • To reduce the risk of this manual. Connect only to excessive microwave energy: SAFETY PRECAUTIONS Use this appliance only for example, in a wet basement, near a swimming pool, near water- for...has been damaged or dropped. Do not overcook food. Do not leave paper products, cooking utensils or food in the oven when not in this manual. • This appliance should be followed, including the following: • This microwave oven is UL listed for laboratory or industrial use . &#...
... a power cord available from heated surfaces. • Do not immerse power cord or plug in water. • To reduce the risk of this manual. Connect only to excessive microwave energy: SAFETY PRECAUTIONS Use this appliance only for example, in a wet basement, near a swimming pool, near water- for...has been damaged or dropped. Do not overcook food. Do not leave paper products, cooking utensils or food in the oven when not in this manual. • This appliance should be followed, including the following: • This microwave oven is UL listed for laboratory or industrial use . &#...
Use and Care Manual
Page 6
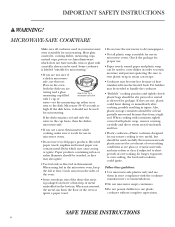
... suitable for use the microwave to short periods of heat transferred from hands and face. • Plastic cookware-Plastic cookware designed for proper use this manual. Pot holders may become hot because of overcooking. In longer exposures to vent plastic wrap so steam can escape. • Cookware may be slit, pierced...
... suitable for use the microwave to short periods of heat transferred from hands and face. • Plastic cookware-Plastic cookware designed for proper use this manual. Pot holders may become hot because of overcooking. In longer exposures to vent plastic wrap so steam can escape. • Cookware may be slit, pierced...

Use and Care Manual
Page 8
... Turntable. The turntable may vary from the side stirrer. Oven vent(s) and oven light are located on more than one level. Microwave Oven Features ge.com Throughout this manual, features and appearance may be in the oven. 4 Active Vent. The vent door swings open . Do not store the shelf inside walls of...
... Turntable. The turntable may vary from the side stirrer. Oven vent(s) and oven light are located on more than one level. Microwave Oven Features ge.com Throughout this manual, features and appearance may be in the oven. 4 Active Vent. The vent door swings open . Do not store the shelf inside walls of...

Use and Care Manual
Page 44
...may also mail in the preprinted registration card included in this manual cover procedures to qualified service personnel. GE Consumer Home Services will allow for enhanced communication and prompt service under the terms of GE's Universal Design applications, including kitchen design ideas for a wide...! Printed in effect. You can now download Owner's Manuals, order parts or even schedule service on -line anytime or call 800.626.2224 during normal business hours. Consumer Support GE Appliances Web site ge.com Have a question or need assistance with disabilities, ...
...may also mail in the preprinted registration card included in this manual cover procedures to qualified service personnel. GE Consumer Home Services will allow for enhanced communication and prompt service under the terms of GE's Universal Design applications, including kitchen design ideas for a wide...! Printed in effect. You can now download Owner's Manuals, order parts or even schedule service on -line anytime or call 800.626.2224 during normal business hours. Consumer Support GE Appliances Web site ge.com Have a question or need assistance with disabilities, ...

Installation Instructions
Page 1
...Para consultar una version en español de este manual de instrucciones, visite nuestro sitio de internet ge.com. READ CAREFULLY. Be sure to Consumer - Call 800.GE.CARES (800.432.2737) or Visit our Website at ge.com. Installation of this appliance requires basic mechanical and... electrical skills. • Proper installation is the responsibility of this manual, visit our Website at : ge.com BEFORE YOU BEGIN Read these instructions with the Consumer. • Note to leave these instructions completely and carefully....
...Para consultar una version en español de este manual de instrucciones, visite nuestro sitio de internet ge.com. READ CAREFULLY. Be sure to Consumer - Call 800.GE.CARES (800.432.2737) or Visit our Website at ge.com. Installation of this appliance requires basic mechanical and... electrical skills. • Proper installation is the responsibility of this manual, visit our Website at : ge.com BEFORE YOU BEGIN Read these instructions with the Consumer. • Note to leave these instructions completely and carefully....
Installation Instructions
Page 7
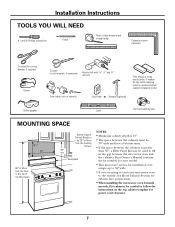
Your Owner's Manual contains the kit number for power cord clearance. 7 Backsplash NOTES: • Maximum cabinet depth is 13″. • The space between the cabinets must be ...
Your Owner's Manual contains the kit number for power cord clearance. 7 Backsplash NOTES: • Maximum cabinet depth is 13″. • The space between the cabinets must be ...
Installation Instructions
Page 11
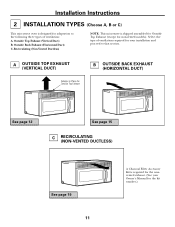
... ventilation: A. Installation Instructions 2 INSTALLATION TYPES (Choose A, B or C) This microwave oven is designed for adaptation to the following three types of ventilation required for your Owner's Manual for non-vented models). Outside Back Exhaust (Horizontal Duct) C. Outside Top Exhaust (Vertical Duct) B. A OUTSIDE TOP EXHAUST (VERTICAL DUCT) Adaptor in Place for Outside Top...
... ventilation: A. Installation Instructions 2 INSTALLATION TYPES (Choose A, B or C) This microwave oven is designed for adaptation to the following three types of ventilation required for your Owner's Manual for non-vented models). Outside Back Exhaust (Horizontal Duct) C. Outside Top Exhaust (Vertical Duct) B. A OUTSIDE TOP EXHAUST (VERTICAL DUCT) Adaptor in Place for Outside Top...
Installation Instructions
Page 14
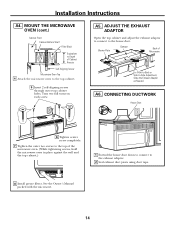
... Damper Back of Cabinet Recess Self-Aligning Screw Microwave Oven Top 4 Attach the microwave oven to the house duct. Installation Instructions A4. See the Owner's Manual packed with the microwave. 14 A5. ADJUST THE EXHAUST ADAPTOR Open the top cabinet and adjust the exhaust adaptor to connect to the top cabinet...
... Damper Back of Cabinet Recess Self-Aligning Screw Microwave Oven Top 4 Attach the microwave oven to the house duct. Installation Instructions A4. See the Owner's Manual packed with the microwave. 14 A5. ADJUST THE EXHAUST ADAPTOR Open the top cabinet and adjust the exhaust adaptor to connect to the top cabinet...
Installation Instructions
Page 18
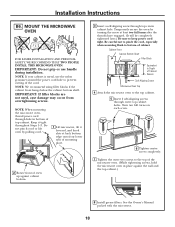
.... 6 Tighten center screw completely. 7 Tighten the outer two screws to the top cabinet. 5 Insert 2 self-aligning screws through top center cabinet hole. See the Owner's Manual packed with the microwave. 18 NOTE: We recommend using filler blocks if the cabinet front hangs below the cabinet bottom shelf. IMPORTANT: If filler blocks...
.... 6 Tighten center screw completely. 7 Tighten the outer two screws to the top cabinet. 5 Insert 2 self-aligning screws through top center cabinet hole. See the Owner's Manual packed with the microwave. 18 NOTE: We recommend using filler blocks if the cabinet front hangs below the cabinet bottom shelf. IMPORTANT: If filler blocks...
Installation Instructions
Page 22
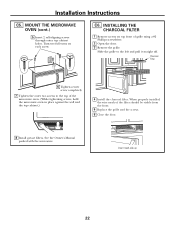
C6. INSTALLING THE CHARCOAL FILTER 1 Remove screws on each screw. See the Owner's Manual packed with the microwave. When properly installed, the wire mesh of grille using a #2 Phillips screwdriver. 2 Open the door. 3 Remove the grille. Insert mesh-side up ...
C6. INSTALLING THE CHARCOAL FILTER 1 Remove screws on each screw. See the Owner's Manual packed with the microwave. When properly installed, the wire mesh of grille using a #2 Phillips screwdriver. 2 Open the door. 3 Remove the grille. Insert mesh-side up ...

Installation Instructions
Page 23
Install turntable and ring in cavity. 4. KEEP INSTALLATION INSTRUCTIONS FOR THE LOCAL INSPECTOR'S USE. 5. Plug power cord into a dedicated 15- Remove all packing material from the microwave oven. 3. Ensure proper ground exists before use 23 Read the Owner's Manual. 2. Installation Instructions BEFORE YOU USE YOUR MICROWAVE 1. to instructions. 6. Make sure the microwave oven has been installed according to 20-amp electrical outlet. Replace house fuse or turn breaker back on. 7.
Install turntable and ring in cavity. 4. KEEP INSTALLATION INSTRUCTIONS FOR THE LOCAL INSPECTOR'S USE. 5. Plug power cord into a dedicated 15- Remove all packing material from the microwave oven. 3. Ensure proper ground exists before use 23 Read the Owner's Manual. 2. Installation Instructions BEFORE YOU USE YOUR MICROWAVE 1. to instructions. 6. Make sure the microwave oven has been installed according to 20-amp electrical outlet. Replace house fuse or turn breaker back on. 7.


