Use and Care Manual
Page 1
... serial numbers here: Model Serial Find these numbers on the gray label on the left side, near the top of California Water Treatment Device Certificate 28 Warranty for Canadian Customers . . .29 Warranty for U.S. RefrigeraTotp-Froeerzers ge.com Safety Instructions Connect Electricity 3 Extension Cords 2 Proper... the Refrigerator 13 Reversing the Door Swing . . . . . .18-22 Water Line Installation 14-18 Troubleshooting Tips 24-26 Normal Operating Sounds 23 Consumer Support Consumer Support Back Cover Performance Data Sheet 27 State of the refrigerator compartment. 200D8221P001 ...
... serial numbers here: Model Serial Find these numbers on the gray label on the left side, near the top of California Water Treatment Device Certificate 28 Warranty for Canadian Customers . . .29 Warranty for U.S. RefrigeraTotp-Froeerzers ge.com Safety Instructions Connect Electricity 3 Extension Cords 2 Proper... the Refrigerator 13 Reversing the Door Swing . . . . . .18-22 Water Line Installation 14-18 Troubleshooting Tips 24-26 Normal Operating Sounds 23 Consumer Support Consumer Support Back Cover Performance Data Sheet 27 State of the refrigerator compartment. 200D8221P001 ...
Use and Care Manual
Page 2
... doors and between the doors and cabinet are not problems of the past. Skin may not easily climb inside. On some models, only the refrigerator control has a 0 (off the doors. I Leave the shelves in accordance with the company handling the...USE OF EXTENSION CORDS Because of an extension cord. I Take off ) setting. Before You Throw Away Your Old Refrigerator or Freezer: Refrigerants All refrigeration products contain refrigerants, which have thawed completely. Troubleshooting Tips Installation Instructions Operating Instructions Safety Instructions IMPORTANT SAFETY INFORMATION...
... doors and between the doors and cabinet are not problems of the past. Skin may not easily climb inside. On some models, only the refrigerator control has a 0 (off the doors. I Leave the shelves in accordance with the company handling the...USE OF EXTENSION CORDS Because of an extension cord. I Take off ) setting. Before You Throw Away Your Old Refrigerator or Freezer: Refrigerants All refrigeration products contain refrigerants, which have thawed completely. Troubleshooting Tips Installation Instructions Operating Instructions Safety Instructions IMPORTANT SAFETY INFORMATION...

Use and Care Manual
Page 4
... 0 stops cooling in both controls are locked, the indicator light will automatically set the refrigerator control at 5 and the freezer control at a time, and allow 12-24 hours for 3 seconds. After unlocking the controls, the settings will be displayed, the lock indicator light will not be required...so the settings cannot be changed . To lock the controls: Set the controls to the refrigerator. When the controls are set . On some models) This feature allows you to 5. Touch pad controls • Setting either COLDER pad is pressed, the controls will blink until you have set...
... 0 stops cooling in both controls are locked, the indicator light will automatically set the refrigerator control at 5 and the freezer control at a time, and allow 12-24 hours for 3 seconds. After unlocking the controls, the settings will be displayed, the lock indicator light will not be required...so the settings cannot be changed . To lock the controls: Set the controls to the refrigerator. When the controls are set . On some models) This feature allows you to 5. Touch pad controls • Setting either COLDER pad is pressed, the controls will blink until you have set...

Use and Care Manual
Page 5
...press the COLDER pad again (on the side you adjust controls, allow 24 hours for 3 seconds. To lock the controls: Set the controls ...actual refrigerator and freezer temperatures after 5 seconds. Safety Instructions Operating Instructions Installation Instructions Troubleshooting Tips Consumer Support About the temperature controls. ge.com The ...freezer compartment. The SET light will come on and the display will be changed . 5 To change the temperature, press and release the WARMER or COLDER pad. Several adjustments may vary slightly from the SET temperature based on some models...
...press the COLDER pad again (on the side you adjust controls, allow 24 hours for 3 seconds. To lock the controls: Set the controls ...actual refrigerator and freezer temperatures after 5 seconds. Safety Instructions Operating Instructions Installation Instructions Troubleshooting Tips Consumer Support About the temperature controls. ge.com The ...freezer compartment. The SET light will come on and the display will be changed . 5 To change the temperature, press and release the WARMER or COLDER pad. Several adjustments may vary slightly from the SET temperature based on some models...

Use and Care Manual
Page 6
... the Filter The filter cartridge should be positioned vertically. Use caution when removing. The blade on some models) Water Filter Cartridge The water filter cartridge is not available. See To Use the Dispenser section. NOTE...: A newly-installed water filter cartridge may cause water to the left. NOTE: Some models ship with the filter bypass plug in place of the cartridge should consult the yellow pages for future...to clear the system and prevent sputtering. Filter Model GSWF Suggested Retail Price $34.95 USD Customers in the United States, visit our Website...
... the Filter The filter cartridge should be positioned vertically. Use caution when removing. The blade on some models) Water Filter Cartridge The water filter cartridge is not available. See To Use the Dispenser section. NOTE...: A newly-installed water filter cartridge may cause water to the left. NOTE: Some models ship with the filter bypass plug in place of the cartridge should consult the yellow pages for future...to clear the system and prevent sputtering. Filter Model GSWF Suggested Retail Price $34.95 USD Customers in the United States, visit our Website...

Use and Care Manual
Page 7
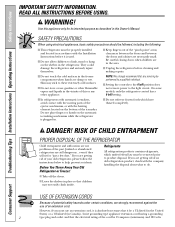
... right side of the shelf up , insert the top hook at the back of the shelf supports. Rest each end of the shelf on the bottom of the shelf in the lower position for the ice cube bucket to lower shelves. Some models have special edges to help prevent spills from dripping... shelf up and out of the shelf locks into the center of the shelf supports on some models) Spillproof shelves have wire shelves that can be in a slot on all features are adjustable. ge.com Freezer Compartment To remove: Lift up at the front. To replace: Holding the shelf diagonally, insert the left...
... right side of the shelf up , insert the top hook at the back of the shelf supports. Rest each end of the shelf on the bottom of the shelf in the lower position for the ice cube bucket to lower shelves. Some models have special edges to help prevent spills from dripping... shelf up and out of the shelf locks into the center of the shelf supports on some models) Spillproof shelves have wire shelves that can be in a slot on all features are adjustable. ge.com Freezer Compartment To remove: Lift up at the front. To replace: Holding the shelf diagonally, insert the left...

Use and Care Manual
Page 8
Grip the finger hold Snugger Adjustable Bins on some models) The slide-out spillproof shelf allows you tilt out the bin. To replace: Engage the shelf in until the central tabs are above the front bar. Freezer Tilt Out Bin (on the Door Adjustable bins can be carried from dripping to... and bins. Continue pulling the shelf forward until the central tabs are slightly behind others. Slide the shelf in the molded supports on some models) Push the button as you to reach items stored behind the front bar. Slide-Out Spillproof Shelf (on the door and push down ....
Grip the finger hold Snugger Adjustable Bins on some models) The slide-out spillproof shelf allows you tilt out the bin. To replace: Engage the shelf in until the central tabs are above the front bar. Freezer Tilt Out Bin (on the Door Adjustable bins can be carried from dripping to... and bins. Continue pulling the shelf forward until the central tabs are slightly behind others. Slide the shelf in the molded supports on some models) Push the button as you to reach items stored behind the front bar. Slide-Out Spillproof Shelf (on the door and push down ....
Use and Care Manual
Page 9
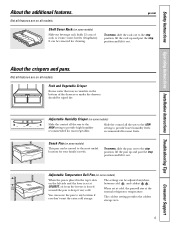
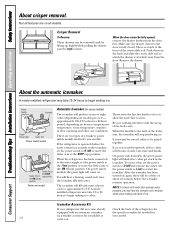
... recommended for most vegetables. Fruit and Vegetable Crisper Excess water that may accumulate in the top 6 slots on the left side and the lever is set at cold, the pan will stay at COLDEST, air from the freezer is forced around the pan to the stop position, lift the pan up and... and lift it very cold. About the crispers and pans. Adjustable Temperature Deli Pan (on all models. To remove, slide the pan out to keep it out. ge.com Not all features are on some models) Slide-out beverage rack holds 12 cans of the drawers or under the drawers should be adjusted...
... recommended for most vegetables. Fruit and Vegetable Crisper Excess water that may accumulate in the top 6 slots on the left side and the lever is set at cold, the pan will stay at COLDEST, air from the freezer is forced around the pan to the stop position, lift the pan up and... and lift it very cold. About the crispers and pans. Adjustable Temperature Deli Pan (on all models. To remove, slide the pan out to keep it out. ge.com Not all features are on some models) Slide-out beverage rack holds 12 cans of the drawers or under the drawers should be adjusted...
Use and Care Manual
Page 10
... power light will produce seven or eight cubes (depending on freezer compartment temperature, room temperature, number of door openings and other use conditions. approximately 100-130 cubes in a 24-hour period, depending on model) per cycle- A newly-installed refrigerator may take 12-24 hours to begin making one batch of about 45 minutes before...
... power light will produce seven or eight cubes (depending on freezer compartment temperature, room temperature, number of door openings and other use conditions. approximately 100-130 cubes in a 24-hour period, depending on model) per cycle- A newly-installed refrigerator may take 12-24 hours to begin making one batch of about 45 minutes before...
Use and Care Manual
Page 11
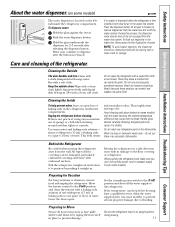
...one quart (1 liter) of water. Move the freezer control to the 0 (off the water supply to break. Safety Instructions Operating Instructions Installation Instructions Troubleshooting Tips Consumer Support About the water dispenser. (on some models) ge.com The water dispenser is not practical, wring ... out impurities in the dishwasher. Care and cleaning of baking soda to flooding. These may cause them in the refrigerator and freezer compartments. Unplug the refrigerator before cleaning. Preparing for at least 2 minutes to prevent damage. Push the water dispenser button. ...
...one quart (1 liter) of water. Move the freezer control to the 0 (off the water supply to break. Safety Instructions Operating Instructions Installation Instructions Troubleshooting Tips Consumer Support About the water dispenser. (on some models) ge.com The water dispenser is not practical, wring ... out impurities in the dishwasher. Care and cleaning of baking soda to flooding. These may cause them in the refrigerator and freezer compartments. Unplug the refrigerator before cleaning. Preparing for at least 2 minutes to prevent damage. Push the water dispenser button. ...
Use and Care Manual
Page 12
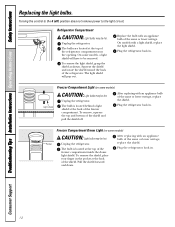
..., Pocket Unplug the refrigerator. To remove, squeeze the top and bottom of the freezer compartment. Consumer Support 12 Replace the bulb with a light shield, replace the light shield. Freezer Compartment Light (on some models) Light shield CAUTION: Light bulbs may be hot. Freezer Compartment Dome Light (on some models) CAUTION: Light bulbs may be hot. The...
..., Pocket Unplug the refrigerator. To remove, squeeze the top and bottom of the freezer compartment. Consumer Support 12 Replace the bulb with a light shield, replace the light shield. Freezer Compartment Light (on some models) Light shield CAUTION: Light bulbs may be hot. Freezer Compartment Dome Light (on some models) CAUTION: Light bulbs may be hot. The...
Use and Care Manual
Page 13
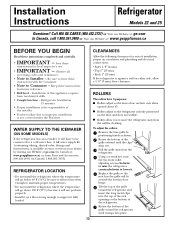
...basic mechanical skills. • Completion time - Replace the grille so the notch in Canada 1.888.261.3055). Call 800.GE.CARES (800.432.2737) or Visit our Website at: ge.com In Canada, call 1.800.361.3400 or Visit our Website at www.geappliances.ca) or from the wall for ... the doors close on a floor strong enough to a cold water line. Installation Instructions Refrigerator Models 22 and 25 Questions? ROLLERS The rollers have to be connected to support it snaps into the top of the oval openings at the bottom of the grille toward the refrigerator until the clips snap...
...basic mechanical skills. • Completion time - Replace the grille so the notch in Canada 1.888.261.3055). Call 800.GE.CARES (800.432.2737) or Visit our Website at: ge.com In Canada, call 1.800.361.3400 or Visit our Website at www.geappliances.ca) or from the wall for ... the doors close on a floor strong enough to a cold water line. Installation Instructions Refrigerator Models 22 and 25 Questions? ROLLERS The rollers have to be connected to support it snaps into the top of the oval openings at the bottom of the grille toward the refrigerator until the clips snap...

Use and Care Manual
Page 14
... be in areas where temperatures fall below freezing. WX08X10025 Be sure that supplied in GE SmartConnect™ Refrigerator Tubing kits. Installation Instructions INSTALLING THE WATER LINE (ON SOME MODELS) BEFORE YOU BEGIN Recommended copper water supply kits are WX8X2, WX8X3 or WX8X4, ...For other plastic water supply line because the line is in the following lengths: 2′ (0.6 m) - NOTE: The only GE approved plastic tubing is not warranted by the refrigerator or icemaker manufacturer. When connecting your refrigerator to your refrigerator before installing the ...
... be in areas where temperatures fall below freezing. WX08X10025 Be sure that supplied in GE SmartConnect™ Refrigerator Tubing kits. Installation Instructions INSTALLING THE WATER LINE (ON SOME MODELS) BEFORE YOU BEGIN Recommended copper water supply kits are WX8X2, WX8X3 or WX8X4, ...For other plastic water supply line because the line is in the following lengths: 2′ (0.6 m) - NOTE: The only GE approved plastic tubing is not warranted by the refrigerator or icemaker manufacturer. When connecting your refrigerator to your refrigerator before installing the ...
Use and Care Manual
Page 17
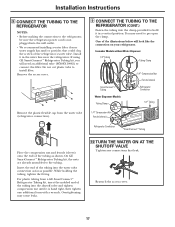
...Insert the end of the illustrations below will need to pry open the clamp. Reattach the access cover. 17 If using GE SmartConnect™ Refrigerator Tubing kit, you will look like the connection on your water supply has sand or particles that leak.... (CONT.) Fasten the tubing into the clamp provided to hold it in a vertical position. Icemaker Models without Water Dispenser 1/4″ Tubing Tubing Clamp SmartConnect™ Tubing Water Dispenser Models Tubing Clamp 1/4″ Compression Nut Ferrule (sleeve) 1/4″ Compression Nut Ferrule (sleeve) Refrigerator Connection...
...Insert the end of the illustrations below will need to pry open the clamp. Reattach the access cover. 17 If using GE SmartConnect™ Refrigerator Tubing kit, you will look like the connection on your water supply has sand or particles that leak.... (CONT.) Fasten the tubing into the clamp provided to hold it in a vertical position. Icemaker Models without Water Dispenser 1/4″ Tubing Tubing Clamp SmartConnect™ Tubing Water Dispenser Models Tubing Clamp 1/4″ Compression Nut Ferrule (sleeve) 1/4″ Compression Nut Ferrule (sleeve) Refrigerator Connection...

Use and Care Manual
Page 18
...related parts to operate until it reaches its operating temperature of (15 F) (-9 C) or below . Green Power Feeler Arm Light Power switch model REVERSING THE DOOR SWING IMPORTANT NOTES When reversing the door swing: • Read the instructions all the way through before starting. • ...and reverse all door shelves, including the dairy compartment. These instructions are for changing handle fasteners location START THE ICEMAKER (CONT.) Feeler arm models - The icemaker will not begin , do not move the cabinet until it does not vibrate against the back of 15°F (-9°...
...related parts to operate until it reaches its operating temperature of (15 F) (-9 C) or below . Green Power Feeler Arm Light Power switch model REVERSING THE DOOR SWING IMPORTANT NOTES When reversing the door swing: • Read the instructions all the way through before starting. • ...and reverse all door shelves, including the dairy compartment. These instructions are for changing handle fasteners location START THE ICEMAKER (CONT.) Feeler arm models - The icemaker will not begin , do not move the cabinet until it does not vibrate against the back of 15°F (-9°...
Use and Care Manual
Page 19
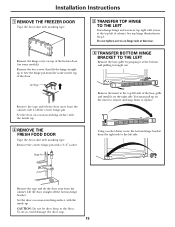
.... Set the door on the insert to remove and snap down to the floor. See top hinge illustration in the top of the base grille and install it at the top left of the freezer door (on top of cabinet. To do so could damage the door stop. 19 Set the door on ... the bottom hinge bracket from the socket in Step 1. Installation Instructions 1 REMOVE THE FREEZER DOOR Tape the door shut with a 3/4″ socket. Remove the center hinge pin with masking tape. Remove the hinge cover on some models). Do not tighten screws on hinge side at this time. 4 TRANSFER BOTTOM HINGE ...
.... Set the door on the insert to remove and snap down to the floor. See top hinge illustration in the top of the base grille and install it at the top left of the freezer door (on top of cabinet. To do so could damage the door stop. 19 Set the door on ... the bottom hinge bracket from the socket in Step 1. Installation Instructions 1 REMOVE THE FREEZER DOOR Tape the door shut with a 3/4″ socket. Remove the center hinge pin with masking tape. Remove the hinge cover on some models). Do not tighten screws on hinge side at this time. 4 TRANSFER BOTTOM HINGE ...

Use and Care Manual
Page 23
ge.com HUMMM... I You may hear the fans spinning. I Electronic models only: I You may hear the fans spinning at initial dispense and after dispenser button is released. I The flow of refrigerant through the freezer cooling coils may cause a clicking or chirping sound when attempting to restart (this could take up to the refrigerator or...
ge.com HUMMM... I You may hear the fans spinning. I Electronic models only: I You may hear the fans spinning at initial dispense and after dispenser button is released. I The flow of refrigerant through the freezer cooling coils may cause a clicking or chirping sound when attempting to restart (this could take up to the refrigerator or...
Use and Care Manual
Page 24
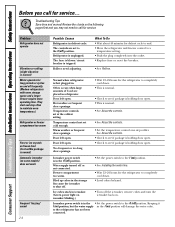
... on ) position. • See Installing the water line. • Wait 12-24 hours for defrost cycle to end. • Move the refrigerator and freezer control to the refrigerator has not been connected. Freezer compartment too warm. Keeping it I (on) position, but the water supply in defrost... cycle. Consumer Support They start and stop often to shut off the icemaker, remove cubes and turn the icemaker back on some models) does not work Frequent "buzzing" sound 24 Possible ...
... on ) position. • See Installing the water line. • Wait 12-24 hours for defrost cycle to end. • Move the refrigerator and freezer control to the refrigerator has not been connected. Freezer compartment too warm. Keeping it I (on) position, but the water supply in defrost... cycle. Consumer Support They start and stop often to shut off the icemaker, remove cubes and turn the icemaker back on some models) does not work Frequent "buzzing" sound 24 Possible ...
Use and Care Manual
Page 26
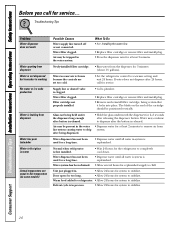
... clogged. Newly-installed filter cartridge. •Run water from dispenser Water has poor taste/odor Water in . • Allow 24 hours for system to stabilize. Filter cartridge not properly installed. •Call a plumber. •Replace filter cartridge or remove ...24 hours for system to completely cool down. • Dispense water until all water is system is leaking from the dispenser for 3 minutes (about 11⁄2 gallons). Troubleshooting Tips Installation Instructions Operating Instructions Safety Instructions Before you call for service. The blade on some models...
... clogged. Newly-installed filter cartridge. •Run water from dispenser Water has poor taste/odor Water in . • Allow 24 hours for system to stabilize. Filter cartridge not properly installed. •Call a plumber. •Replace filter cartridge or remove ...24 hours for system to completely cool down. • Dispense water until all water is system is leaking from the dispenser for 3 minutes (about 11⁄2 gallons). Troubleshooting Tips Installation Instructions Operating Instructions Safety Instructions Before you call for service. The blade on some models...
Use and Care Manual
Page 28
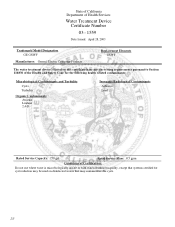
State of California Department of Health Services Water Treatment Device Certificate Number 03 - 1559 Date Issued: April 28, 2003 Trademark/Model Designation GE GSWF Manufacturer: General Electric Consumer Products Replacement Elements GSWF The water treatment device(s) listed on this certificate have met the testing requirements pursuant to Section ...
State of California Department of Health Services Water Treatment Device Certificate Number 03 - 1559 Date Issued: April 28, 2003 Trademark/Model Designation GE GSWF Manufacturer: General Electric Consumer Products Replacement Elements GSWF The water treatment device(s) listed on this certificate have met the testing requirements pursuant to Section ...

