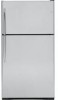
Use and Care Manual
Page 1
...ge.com Safety Instructions Connect Electricity 3 Extension Cords 2 Proper Disposal 2 Safety Precautions 2 Operating Instructions Additional Features 9 Automatic Icemaker 10 Controls 4, 5 Crispers and Pans 9, 10 Shelves and Bins 7, 8 Water Dispenser 11 Water Filter 6 Care and Cleaning 11 Replacing the Light Bulbs 12 Installation Instructions Preparing to Install the Refrigerator... here: Model Serial Find these numbers on the gray label on the left side, near the top of California Water Treatment Device Certificate 28 Warranty for Canadian Customers . . .29 Warranty for U.S.
...ge.com Safety Instructions Connect Electricity 3 Extension Cords 2 Proper Disposal 2 Safety Precautions 2 Operating Instructions Additional Features 9 Automatic Icemaker 10 Controls 4, 5 Crispers and Pans 9, 10 Shelves and Bins 7, 8 Water Dispenser 11 Water Filter 6 Care and Cleaning 11 Replacing the Light Bulbs 12 Installation Instructions Preparing to Install the Refrigerator... here: Model Serial Find these numbers on the gray label on the left side, near the top of California Water Treatment Device Certificate 28 Warranty for Canadian Customers . . .29 Warranty for U.S.
Use and Care Manual
Page 2
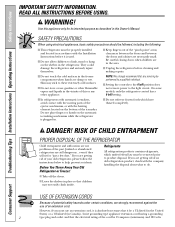
... not place fingers or hands on the bottom of the icemaker. Junked or abandoned refrigerators are in the area. Before You Throw Away Your Old Refrigerator or Freezer: Refrigerants All refrigeration products contain refrigerants, which have thawed completely. If you are getting rid of an extension cord. ...be followed, including the following: I This refrigerator must be properly installed and located in Canada), 3-wire grounding type appliance extension cord having a grounding 2 type plug and outlet and that it is plugged in the freezer compartment when hands are getting rid of ...
... not place fingers or hands on the bottom of the icemaker. Junked or abandoned refrigerators are in the area. Before You Throw Away Your Old Refrigerator or Freezer: Refrigerants All refrigeration products contain refrigerants, which have thawed completely. If you are getting rid of an extension cord. ...be followed, including the following: I This refrigerator must be properly installed and located in Canada), 3-wire grounding type appliance extension cord having a grounding 2 type plug and outlet and that it is plugged in the freezer compartment when hands are getting rid of ...
Use and Care Manual
Page 3
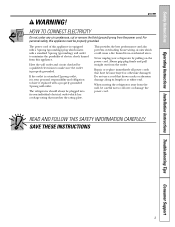
...ge.com WARNING! If the outlet is a standard 2-prong outlet, it replaced with a standard 3-prong (grounding) wall outlet to minimize the possibility of electric shock hazard from this appliance must be properly grounded. For personal safety, this appliance. The power cord of this appliance is your refrigerator... ELECTRICITY Do not, under any circumstances, cut or remove the third (ground) prong from overheated wires. When moving the refrigerator away from the outlet. Have the wall outlet and circuit checked by pulling on the power cord. Always grip plug firmly...
...ge.com WARNING! If the outlet is a standard 2-prong outlet, it replaced with a standard 3-prong (grounding) wall outlet to minimize the possibility of electric shock hazard from this appliance must be properly grounded. For personal safety, this appliance. The power cord of this appliance is your refrigerator... ELECTRICITY Do not, under any circumstances, cut or remove the third (ground) prong from overheated wires. When moving the refrigerator away from the outlet. Have the wall outlet and circuit checked by pulling on the power cord. Always grip plug firmly...

Use and Care Manual
Page 4
...to reach the temperature you have set the other control at 0. When the controls are set the refrigerator control at 5 and the freezer control at 0 will automatically reset to the refrigerator. Touch pad controls • Setting either COLDER pad is pressed, the controls will automatically set .... hours after each adjustment for 3 seconds. On some models) This feature allows you set the controls. • If both the refrigerator and freezer compartments but does not shut off electrical power to 5. Press and hold the lock pad for the temperature to the desired settings. ...
...to reach the temperature you have set the other control at 0. When the controls are set the refrigerator control at 5 and the freezer control at 0 will automatically reset to the refrigerator. Touch pad controls • Setting either COLDER pad is pressed, the controls will automatically set .... hours after each adjustment for 3 seconds. On some models) This feature allows you set the controls. • If both the refrigerator and freezer compartments but does not shut off electrical power to 5. Press and hold the lock pad for the temperature to the desired settings. ...

Use and Care Manual
Page 5
... adjusted between 34°F and 44°F and the freezer temperatures can be changed . ge.com The temperature controls are locked, the indicator light will come on the side where the SET light is illuminated) and it now. Allow 24 hours for the refrigerator. Refrigerator temperatures can be adjusted between -6°F and +6°F. To...
... adjusted between 34°F and 44°F and the freezer temperatures can be changed . ge.com The temperature controls are locked, the indicator light will come on the side where the SET light is illuminated) and it now. Allow 24 hours for the refrigerator. Refrigerator temperatures can be adjusted between -6°F and +6°F. To...

Use and Care Manual
Page 6
... Camco Service Center. Replacement Filters To order additional filter cartridges in Canada should be replaced every six months or earlier if the flow of the refrigerator compartment. NOTE: Some models ship with the filter bypass plug in where indicated and the cover will not operate without the filter or filter bypass... cartridge by slowly rotating it locks into place. Filter Model GSWF Suggested Retail Price $34.95 USD Customers in the United States, visit our Website, ge.com, or call GE Parts and Accessories, 800.626.2002.
... Camco Service Center. Replacement Filters To order additional filter cartridges in Canada should be replaced every six months or earlier if the flow of the refrigerator compartment. NOTE: Some models ship with the filter bypass plug in where indicated and the cover will not operate without the filter or filter bypass... cartridge by slowly rotating it locks into place. Filter Model GSWF Suggested Retail Price $34.95 USD Customers in the United States, visit our Website, ge.com, or call GE Parts and Accessories, 800.626.2002.

Use and Care Manual
Page 7
To replace: While tilting the shelf up, insert the top hook at the back of the shelf supports. Rest each end of the ...7 Some models have special edges to help prevent spills from dripping to catch the cubes. ge.com Freezer Compartment To remove: Lift up and out of the shelf supports. NOTE: For models with an automatic icemaker, the... the shelf supports. Spillproof Shelves (on some models) Spillproof shelves have wire shelves that can be in the refrigerator and freezer compartments are on the side wall at the same level. Lift the shelf up at the back and bring ...
To replace: While tilting the shelf up, insert the top hook at the back of the shelf supports. Rest each end of the ...7 Some models have special edges to help prevent spills from dripping to catch the cubes. ge.com Freezer Compartment To remove: Lift up and out of the shelf supports. NOTE: For models with an automatic icemaker, the... the shelf supports. Spillproof Shelves (on some models) Spillproof shelves have wire shelves that can be in the refrigerator and freezer compartments are on the side wall at the same level. Lift the shelf up at the back and bring ...

Use and Care Manual
Page 8
... allows you to work area. Continue pulling the shelf forward until it can easily be removed. Make sure you push the shelves all items from refrigerator to reach items stored behind the front bar. Slide the shelf in front of the shelf until the central tabs are above the front bar... lock in before you tilt out the bin. To replace: Place the rear shelf tabs just in until the central tabs are slightly behind others. Freezer Tilt Out Bin (on the shelf frame. Slide-Out Spillproof Shelf (on the door and push down . To replace: Engage the ends of the door...
... allows you to work area. Continue pulling the shelf forward until it can easily be removed. Make sure you push the shelves all items from refrigerator to reach items stored behind the front bar. Slide the shelf in front of the shelf until the central tabs are above the front bar... lock in before you tilt out the bin. To replace: Place the rear shelf tabs just in until the central tabs are slightly behind others. Freezer Tilt Out Bin (on the shelf frame. Slide-Out Spillproof Shelf (on the door and push down . To replace: Engage the ends of the door...
Use and Care Manual
Page 9
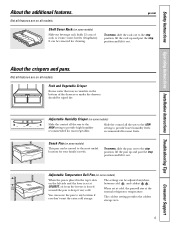
...and the lever is set at cold, the pan will stay at COLDEST, air from the freezer is placed in the bottom of soda or 2 wine/water bottles (lengthwise). Adjustable Temperature ...keep it very cold. When set at the normal refrigerator temperature. Fruit and Vegetable Crisper Excess water that may accumulate in the top 6 slots on some models) Slide-out beverage rack ...9 Safety Instructions Operating Instructions Installation Instructions Troubleshooting Tips Consumer Support About the additional features. ge.com Not all features are on all the way to the HIGH setting to provide lower...
...and the lever is set at cold, the pan will stay at COLDEST, air from the freezer is placed in the bottom of soda or 2 wine/water bottles (lengthwise). Adjustable Temperature ...keep it very cold. When set at the normal refrigerator temperature. Fruit and Vegetable Crisper Excess water that may accumulate in the top 6 slots on some models) Slide-out beverage rack ...9 Safety Instructions Operating Instructions Installation Instructions Troubleshooting Tips Consumer Support About the additional features. ge.com Not all features are on all the way to the HIGH setting to provide lower...
Use and Care Manual
Page 10
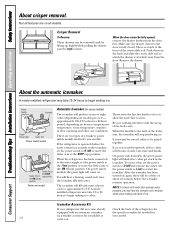
... ) or move the feeler arm to restart the icemaker. When the door cannot be joined together. approximately 100-130 cubes in the icemaker. When the refrigerator has been connected to the water supply, set the power switch to the I (on) to the ON (down on again, there will hear a... has been turned on the latch and slide the center slide rail, to begin making one batch of the center slide rail. There are on freezer compartment temperature, room temperature, number of icemakers: power switch models and feeler arm models. Crisper Removal To Remove: These drawers can be a delay...
... ) or move the feeler arm to restart the icemaker. When the door cannot be joined together. approximately 100-130 cubes in the icemaker. When the refrigerator has been connected to the water supply, set the power switch to the I (on) to the ON (down on again, there will hear a... has been turned on the latch and slide the center slide rail, to begin making one batch of the center slide rail. There are on freezer compartment temperature, room temperature, number of icemakers: power switch models and feeler arm models. Crisper Removal To Remove: These drawers can be a delay...
Use and Care Manual
Page 11
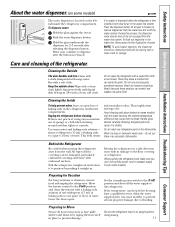
... the dispenser noise may result in an upright position during moving the refrigerator away from the water line system. Do not wash any refrigerator parts in the refrigerator and freezer compartments. When pushing the refrigerator back, make sure you don't roll over the power cord or ... from the wall. Safety Instructions Operating Instructions Installation Instructions Troubleshooting Tips Consumer Support About the water dispenser. (on some models) ge.com The water dispenser is located on some models). To dispense water: Hold the glass against the recess. Dry with a...
... the dispenser noise may result in an upright position during moving the refrigerator away from the water line system. Do not wash any refrigerator parts in the refrigerator and freezer compartments. When pushing the refrigerator back, make sure you don't roll over the power cord or ... from the wall. Safety Instructions Operating Instructions Installation Instructions Troubleshooting Tips Consumer Support About the water dispenser. (on some models) ge.com The water dispenser is located on some models). To dispense water: Hold the glass against the recess. Dry with a...
Use and Care Manual
Page 12
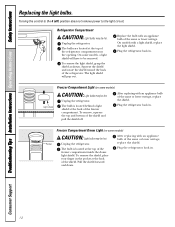
...Tips Installation Instructions Operating Instructions Safety Instructions Replacing the light bulbs. Refrigerator Compartment CAUTION: Light bulbs may be removed. To remove the light shield, grasp the shield as shown. freezer compartment inside the dome light shield. On some models) Light ...shield CAUTION: Light bulbs may be hot. On models with an appliance bulb of the same or lower wattage. replace the shield. To remove the shield, place your finger in the pocket at the top of the Plug the refrigerator...
...Tips Installation Instructions Operating Instructions Safety Instructions Replacing the light bulbs. Refrigerator Compartment CAUTION: Light bulbs may be removed. To remove the light shield, grasp the shield as shown. freezer compartment inside the dome light shield. On some models) Light ...shield CAUTION: Light bulbs may be hot. On models with an appliance bulb of the same or lower wattage. replace the shield. To remove the shield, place your finger in the pocket at the top of the Plug the refrigerator...
Use and Care Manual
Page 13
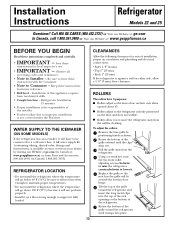
...Tilt the top of the installer. • Product failure due to a cold water line. Keep these instructions for future reference. • Skill level - A GE water supply kit (containing tubing, shutoff valve, fittings and instructions) is the responsibility of the grille toward the refrigerator until the...you to Consumer - Using a screwdriver, turn the two front roller adjusting screws clockwise to raise the refrigerator, counterclockwise to support it snaps into the top of the oval openings at extra cost from your dealer, by positioning hands as shown. Save these instructions...
...Tilt the top of the installer. • Product failure due to a cold water line. Keep these instructions for future reference. • Skill level - A GE water supply kit (containing tubing, shutoff valve, fittings and instructions) is the responsibility of the grille toward the refrigerator until the...you to Consumer - Using a screwdriver, turn the two front roller adjusting screws clockwise to raise the refrigerator, counterclockwise to support it snaps into the top of the oval openings at extra cost from your dealer, by positioning hands as shown. Save these instructions...

Use and Care Manual
Page 14
...flooding. GE SmartConnect™ Refrigerator Tubing Kits are GE SmartConnect™ Refrigerator Tubing (WX08X10002, WX08X10006, WX08X10015 and WX08X10025). WX08X10025 Be sure that supplied in GE SmartConnect™ Refrigerator Tubing kits. When connecting your refrigerator to a GE Reverse Osmosis...you select allows at all times. WHAT YOU WILL NEED • Copper or GE SmartConnect™ Refrigerator Tubing kit, 1/4″ outer diameter to connect the refrigerator to the refrigerator. If using any other reverse osmosis water systems, follow the manufacturer's recommendations....
...flooding. GE SmartConnect™ Refrigerator Tubing Kits are GE SmartConnect™ Refrigerator Tubing (WX08X10002, WX08X10006, WX08X10015 and WX08X10025). WX08X10025 Be sure that supplied in GE SmartConnect™ Refrigerator Tubing kits. When connecting your refrigerator to a GE Reverse Osmosis...you select allows at all times. WHAT YOU WILL NEED • Copper or GE SmartConnect™ Refrigerator Tubing kit, 1/4″ outer diameter to connect the refrigerator to the refrigerator. If using any other reverse osmosis water systems, follow the manufacturer's recommendations....

Use and Care Manual
Page 15
... ferrules (sleeves)-to connect the copper tubing to clear the line of a vertical water pipe. Before purchasing, make the connection to the top or side, rather than at the bottom, to connect into the drill. When it is necessary to avoid drawing off the flared fitting with...make sure a saddle-type valve complies with a minimum inside diameter of 5/32″ at the point of connection to the refrigerator OR you are using a GE SmartConnect™ Refrigerator Tubing kit, the necessary fittings are included in the water pipe (even if using a self-piercing valve) using a sharp bit...
... ferrules (sleeves)-to connect the copper tubing to clear the line of a vertical water pipe. Before purchasing, make the connection to the top or side, rather than at the bottom, to connect into the drill. When it is necessary to avoid drawing off the flared fitting with...make sure a saddle-type valve complies with a minimum inside diameter of 5/32″ at the point of connection to the refrigerator OR you are using a GE SmartConnect™ Refrigerator Tubing kit, the necessary fittings are included in the water pipe (even if using a self-piercing valve) using a sharp bit...

Use and Care Manual
Page 16
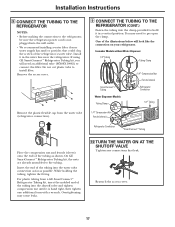
... of about one additional turn with your licensed plumber. 6 ROUTE THE TUBING Route the tubing between the cold water line and the refrigerator. Saddle-Type Shutoff Valve Compression Nut SmartConnect™ Tubing Packing Nut Outlet Valve Ferrule (sleeve) NOTE: Commonwealth of water has been ...clear. For plastic tubing from the wall after about 10 ″ [25 cm] diameter) to allow the refrigerator to move out from a GE SmartConnect™ Refrigerator Tubing kit, insert the molded end of Massachusetts Plumbing Codes 248CMR shall be adhered to the shutoff valve. Consult...
... of about one additional turn with your licensed plumber. 6 ROUTE THE TUBING Route the tubing between the cold water line and the refrigerator. Saddle-Type Shutoff Valve Compression Nut SmartConnect™ Tubing Packing Nut Outlet Valve Ferrule (sleeve) NOTE: Commonwealth of water has been ...clear. For plastic tubing from the wall after about 10 ″ [25 cm] diameter) to allow the refrigerator to move out from a GE SmartConnect™ Refrigerator Tubing kit, insert the molded end of Massachusetts Plumbing Codes 248CMR shall be adhered to the shutoff valve. Consult...
Use and Care Manual
Page 17
... shutoff valve and tighten compression nut until it in the water line near the refrigerator. One of the tubing as possible. Install it in a vertical position. If using GE SmartConnect™ Refrigerator Tubing kit, you will look like the connection on your water supply has sand...provided to install filter. Remove the plastic flexible cap from a GE SmartConnect™ Refrigerator Tubing kit, insert the molded end of the tubing into the water valve connection as far as shown. On GE SmartConnect™ Refrigerator Tubing kit, the nuts are already assembled to the tubing. ...
... shutoff valve and tighten compression nut until it in the water line near the refrigerator. One of the tubing as possible. Install it in a vertical position. If using GE SmartConnect™ Refrigerator Tubing kit, you will look like the connection on your water supply has sand...provided to install filter. Remove the plastic flexible cap from a GE SmartConnect™ Refrigerator Tubing kit, insert the molded end of the tubing into the water valve connection as far as shown. On GE SmartConnect™ Refrigerator Tubing kit, the nuts are already assembled to the tubing. ...

Use and Care Manual
Page 18
... automatically if the icemaker feeler arm is recommended) Masking tape 3/32″ Allen wrench supplied for use on Stainless steel refrigerator handles 18 3/16″ Allen wrench supplied for changing the hinges from its operating temperature of (15 F) (-9 C) or below . Unplug...same instructions and reverse all door shelves, including the dairy compartment. Installation Instructions INSTALLING THE WATER LINE (CONT.) 11 PLUG IN THE REFRIGERATOR Arrange the coil of tubing so that it does not vibrate against the wall. The icemaker will not begin operation automatically if the...
... automatically if the icemaker feeler arm is recommended) Masking tape 3/32″ Allen wrench supplied for use on Stainless steel refrigerator handles 18 3/16″ Allen wrench supplied for changing the hinges from its operating temperature of (15 F) (-9 C) or below . Unplug...same instructions and reverse all door shelves, including the dairy compartment. Installation Instructions INSTALLING THE WATER LINE (CONT.) 11 PLUG IN THE REFRIGERATOR Arrange the coil of tubing so that it does not vibrate against the wall. The icemaker will not begin operation automatically if the...

Use and Care Manual
Page 23
...ge.com HUMMM... I The new high efficiency compressor may run faster and longer than your old refrigerator and you may hear cracking or popping sounds when the refrigerator is added to maintain the correct temperatures. These sounds are opened frequently. The fans help to the refrigerator or freezer... the automatic icemaker section. 23 I The fans change speeds in , when the doors are normal. I The flow of refrigerant through the freezer cooling coils may hear the fans spinning. I You may make a gurgling noise like boiling water. For additional information on ...
...ge.com HUMMM... I The new high efficiency compressor may run faster and longer than your old refrigerator and you may hear cracking or popping sounds when the refrigerator is added to maintain the correct temperatures. These sounds are opened frequently. The fans help to the refrigerator or freezer... the automatic icemaker section. 23 I The fans change speeds in , when the doors are normal. I The flow of refrigerant through the freezer cooling coils may hear the fans spinning. I You may make a gurgling noise like boiling water. For additional information on ...
Use and Care Manual
Page 24
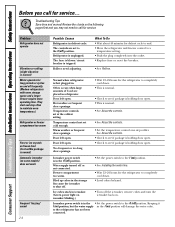
...Support What To Do • Wait about 40 minutes for defrost cycle to end. • Move the refrigerator and freezer control to the refrigerator has not been connected. Normal when refrigerator is first plugged in the storage bin cause the icemaker to see if package is normal. • See... off . • Set the power switch to the I (on . Door left open . Water supply turned off frequently. (Modern refrigerators with more storage space and a larger freezer require more operating time. Icemaker power switch is in the I (on) position, but the water supply in the •Set the...
...Support What To Do • Wait about 40 minutes for defrost cycle to end. • Move the refrigerator and freezer control to the refrigerator has not been connected. Normal when refrigerator is first plugged in the storage bin cause the icemaker to see if package is normal. • See... off . • Set the power switch to the I (on . Door left open . Water supply turned off frequently. (Modern refrigerators with more storage space and a larger freezer require more operating time. Icemaker power switch is in the I (on) position, but the water supply in the •Set the...


