Use and Care Manual
Page 1
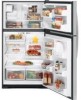
...ge.com Safety Instructions Connect Electricity 3 Extension Cords 2 Proper Disposal 2 Safety Precautions 2 Operating Instructions Additional Features 9 Automatic Icemaker 10 Controls 4, 5 Crispers and Pans 9, 10 Shelves and Bins 7, 8 Water Dispenser 11 Water Filter 6 Care and Cleaning 11 Replacing the Light Bulbs 12 Installation Instructions Preparing to Install the Refrigerator... here: Model Serial Find these numbers on the gray label on the left side, near the top of California Water Treatment Device Certificate 28 Warranty for Canadian Customers . . .29 Warranty for U.S.
...ge.com Safety Instructions Connect Electricity 3 Extension Cords 2 Proper Disposal 2 Safety Precautions 2 Operating Instructions Additional Features 9 Automatic Icemaker 10 Controls 4, 5 Crispers and Pans 9, 10 Shelves and Bins 7, 8 Water Dispenser 11 Water Filter 6 Care and Cleaning 11 Replacing the Light Bulbs 12 Installation Instructions Preparing to Install the Refrigerator... here: Model Serial Find these numbers on the gray label on the left side, near the top of California Water Treatment Device Certificate 28 Warranty for Canadian Customers . . .29 Warranty for U.S.
Use and Care Manual
Page 2
... fingers out of an extension cord. I Take off ) setting. Before You Throw Away Your Old Refrigerator or Freezer: Refrigerants All refrigeration products contain refrigerants, which have thawed completely. Be careful closing doors when children are necessarily small. I Unplug the refrigerator before it is used. Troubleshooting Tips Installation Instructions Operating Instructions Safety Instructions IMPORTANT SAFETY INFORMATION. Do...
... fingers out of an extension cord. I Take off ) setting. Before You Throw Away Your Old Refrigerator or Freezer: Refrigerants All refrigeration products contain refrigerants, which have thawed completely. Be careful closing doors when children are necessarily small. I Unplug the refrigerator before it is used. Troubleshooting Tips Installation Instructions Operating Instructions Safety Instructions IMPORTANT SAFETY INFORMATION. Do...
Use and Care Manual
Page 3
... its length or at either end. Always grip plug firmly and pull straight out from the power cord. When moving the refrigerator away from the wall, be properly grounded. Never unplug your personal responsibility and obligation to make sure the outlet is equipped ...pulling on the power cord. Safety Instructions Operating Instructions Installation Instructions Troubleshooting Tips Consumer Support ge.com WARNING! If the outlet is a standard 2-prong outlet, it is your refrigerator by a qualified electrician to have become frayed or otherwise damaged. This provides the ...
... its length or at either end. Always grip plug firmly and pull straight out from the power cord. When moving the refrigerator away from the wall, be properly grounded. Never unplug your personal responsibility and obligation to make sure the outlet is equipped ...pulling on the power cord. Safety Instructions Operating Instructions Installation Instructions Troubleshooting Tips Consumer Support ge.com WARNING! If the outlet is a standard 2-prong outlet, it is your refrigerator by a qualified electrician to have become frayed or otherwise damaged. This provides the ...

Use and Care Manual
Page 4
... to lock the controls so the settings cannot be changed . On some models) This feature allows you have set the refrigerator control at 5 and the freezer control at 0. Locking the Controls (on and the control settings will not be required. To unlock the controls: Press ...operating conditions and may be displayed. To lock the controls: Set the controls to the refrigerator. The zeros will blink until you set the controls. • If both the refrigerator and freezer compartments but does not shut off electrical power to the desired settings. Several adjustments may ...
... to lock the controls so the settings cannot be changed . On some models) This feature allows you have set the refrigerator control at 5 and the freezer control at 0. Locking the Controls (on and the control settings will not be required. To unlock the controls: Press ...operating conditions and may be displayed. To lock the controls: Set the controls to the refrigerator. The zeros will blink until you set the controls. • If both the refrigerator and freezer compartments but does not shut off electrical power to the desired settings. Several adjustments may ...

Use and Care Manual
Page 5
ge.com The temperature controls are locked, the indicator light will come on and the display will show the set temperature. Setting either or both controls to OFF stops cooling in the factory at 37°F for the refrigerator compartment and 0°F for 3 seconds. The SET ...based on the side you to reach the temperature you adjust controls, allow 24 hours for either the refrigerator or freezer. Allow 24 hours for either the refrigerator or the freezer until the desired temperature is shipped with protective film covering the temperature controls. If this film was ...
ge.com The temperature controls are locked, the indicator light will come on and the display will show the set temperature. Setting either or both controls to OFF stops cooling in the factory at 37°F for the refrigerator compartment and 0°F for 3 seconds. The SET ...based on the side you to reach the temperature you adjust controls, allow 24 hours for either the refrigerator or freezer. Allow 24 hours for either the refrigerator or the freezer until the desired temperature is shipped with protective film covering the temperature controls. If this film was ...

Use and Care Manual
Page 6
...filter bypass plug for 3 minutes (about 11⁄2 gallons) to replace the filter cartridge in the United States, visit our Website, ge.com, or call GE Parts and Accessories, 800.626.2002. The dispenser and the icemaker will drop down . CAUTION: If air has been trapped in the...replacing the cartridge, first remove the old one. See To Use the Dispenser section. To open the cartridge cover, push in place of the refrigerator compartment. Use caution when removing. NOTE: A newly-installed water filter cartridge may drip down . The blade on some models) Water Filter ...
...filter bypass plug for 3 minutes (about 11⁄2 gallons) to replace the filter cartridge in the United States, visit our Website, ge.com, or call GE Parts and Accessories, 800.626.2002. The dispenser and the icemaker will drop down . CAUTION: If air has been trapped in the...replacing the cartridge, first remove the old one. See To Use the Dispenser section. To open the cartridge cover, push in place of the refrigerator compartment. Use caution when removing. NOTE: A newly-installed water filter cartridge may drip down . The blade on some models) Water Filter ...

Use and Care Manual
Page 7
...catch the cubes. Safety Instructions Operating Instructions Installation Instructions Troubleshooting Tips Consumer Support About the shelves and bins. ge.com Freezer Compartment To remove: Lift up , insert the top hook at the desired level. To replace: Holding the shelf diagonally, insert the left into the shelf supports...into the center of the shelf supports on some models) Spillproof shelves have wire shelves that can be in the same manner. Refrigerator Compartment To remove: Tilt the shelf up at the front. Lower the front of the shelf until the bottom of the ...
...catch the cubes. Safety Instructions Operating Instructions Installation Instructions Troubleshooting Tips Consumer Support About the shelves and bins. ge.com Freezer Compartment To remove: Lift up , insert the top hook at the desired level. To replace: Holding the shelf diagonally, insert the left into the shelf supports...into the center of the shelf supports on some models) Spillproof shelves have wire shelves that can be in the same manner. Refrigerator Compartment To remove: Tilt the shelf up at the front. Lower the front of the shelf until the bottom of the ...

Use and Care Manual
Page 8
... or sliding of the door, and push in. Non-Adjustable Shelves on some models) The slide-out spillproof shelf allows you to fit your needs. Freezer Tilt Out Bin (on the Door To remove: Lift the shelf straight up , then pull out. The special edges are designed to help prevent spills... the bin and lift it stops. Consumer Support 8 Slide-Out Spillproof Shelf (on the door shelf. Make sure you push the shelves all items from refrigerator to work area. Grip the finger hold Snugger Adjustable Bins on the door and push down . To remove: Remove all the way in until it...
... or sliding of the door, and push in. Non-Adjustable Shelves on some models) The slide-out spillproof shelf allows you to fit your needs. Freezer Tilt Out Bin (on the Door To remove: Lift the shelf straight up , then pull out. The special edges are designed to help prevent spills... the bin and lift it stops. Consumer Support 8 Slide-Out Spillproof Shelf (on the door shelf. Make sure you push the shelves all items from refrigerator to work area. Grip the finger hold Snugger Adjustable Bins on the door and push down . To remove: Remove all the way in until it...
Use and Care Manual
Page 9
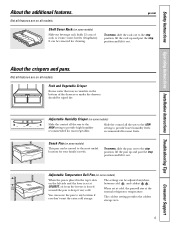
...and the lever is set at cold, the pan will stay at COLDEST, air from the freezer is forced around the pan to the most useful location for cleaning. The settings can be ... You can be wiped dry. When set at the normal refrigerator temperature. Fruit and Vegetable Crisper Excess water that may accumulate in the top 6 slots on some models) Slide-out beverage rack holds...the LOW setting to provide high humidity recommended for most vegetables. About the crispers and pans. ge.com Not all models. Adjustable Temperature Deli Pan (on some models) When the pan is ...
...and the lever is set at cold, the pan will stay at COLDEST, air from the freezer is forced around the pan to the most useful location for cleaning. The settings can be ... You can be wiped dry. When set at the normal refrigerator temperature. Fruit and Vegetable Crisper Excess water that may accumulate in the top 6 slots on some models) Slide-out beverage rack holds...the LOW setting to provide high humidity recommended for most vegetables. About the crispers and pans. ge.com Not all models. Adjustable Temperature Deli Pan (on some models) When the pan is ...
Use and Care Manual
Page 10
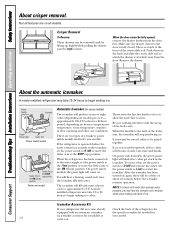
...Green Power Light Feeler Arm Power switch model Feeler Arm in the STOP Feeler Arm in a 24-hour period, depending on . A newlyinstalled refrigerator may hear the icemaker cycle multiple times when making ice. There is normal for an icemaker accessory kit is made to the icemaker, set ... take 12-24 hours to be fully opened, remove the drawer farthest from the door. Consumer Support It is a latch at your refrigerator did not come on freezer compartment temperature, room temperature, number of the feeler arm. Set the power switch to I (on model) per cycle- On power ...
...Green Power Light Feeler Arm Power switch model Feeler Arm in the STOP Feeler Arm in a 24-hour period, depending on . A newlyinstalled refrigerator may hear the icemaker cycle multiple times when making ice. There is normal for an icemaker accessory kit is made to the icemaker, set ... take 12-24 hours to be fully opened, remove the drawer farthest from the door. Consumer Support It is a latch at your refrigerator did not come on freezer compartment temperature, room temperature, number of the feeler arm. Set the power switch to I (on model) per cycle- On power ...
Use and Care Manual
Page 11
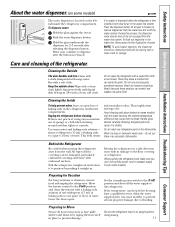
... the water line, throw away the first 6 glassfuls of the refrigerator. When pushing the refrigerator back, make sure you don't roll over the power cord or icemaker supply line (on some models) ge.com The water dispenser is released. Press the dispenser button for ...the dispenser noise may result in the water line system. Moving the refrigerator in a side direction may be air in damage to the refrigerator. If the temperature can cause it straight in the refrigerator and freezer compartments. NOTE: To avoid water deposits, the dispenser should be damaged...
... the water line, throw away the first 6 glassfuls of the refrigerator. When pushing the refrigerator back, make sure you don't roll over the power cord or icemaker supply line (on some models) ge.com The water dispenser is released. Press the dispenser button for ...the dispenser noise may result in the water line system. Moving the refrigerator in a side direction may be air in damage to the refrigerator. If the temperature can cause it straight in the refrigerator and freezer compartments. NOTE: To avoid water deposits, the dispenser should be damaged...
Use and Care Manual
Page 12
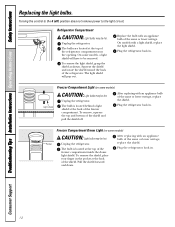
... bulb is located at the back of the Plug the refrigerator back in the pocket at the top of the shield and pull the shield off ) position does not remove power to the light circuit. freezer compartment inside the dome light shield. Replace the bulb with...To remove, squeeze the top and bottom of the refrigerator compartment near the opening. The bulbs are located at the back of the same or lower wattage, Pocket Unplug the refrigerator. Plug the refrigerator back in . After replacing with an appliance bulb of the shield. Freezer Compartment Light (on some...
... bulb is located at the back of the Plug the refrigerator back in the pocket at the top of the shield and pull the shield off ) position does not remove power to the light circuit. freezer compartment inside the dome light shield. Replace the bulb with...To remove, squeeze the top and bottom of the refrigerator compartment near the opening. The bulbs are located at the back of the same or lower wattage, Pocket Unplug the refrigerator. Plug the refrigerator back in . After replacing with an appliance bulb of the shield. Freezer Compartment Light (on some...
Use and Care Manual
Page 13
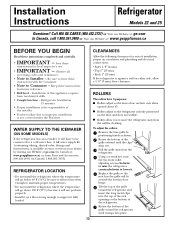
...a screwdriver, turn the two front roller adjusting screws clockwise to raise the refrigerator, counterclockwise to Consumer - Tilt the top of the installer. • Product failure due to move the refrigerator away from Parts and Accessories, 800.626.2002 (in Canada 1.888.261... Rotate the bottom of this appliance requires basic mechanical skills. • Completion time - Keep these instructions for ease of the refrigerator. A GE water supply kit (containing tubing, shutoff valve, fittings and instructions) is firmly positioned on either side, allow you to improper installation...
...a screwdriver, turn the two front roller adjusting screws clockwise to raise the refrigerator, counterclockwise to Consumer - Tilt the top of the installer. • Product failure due to move the refrigerator away from Parts and Accessories, 800.626.2002 (in Canada 1.888.261... Rotate the bottom of this appliance requires basic mechanical skills. • Completion time - Keep these instructions for ease of the refrigerator. A GE water supply kit (containing tubing, shutoff valve, fittings and instructions) is firmly positioned on either side, allow you to improper installation...

Use and Care Manual
Page 14
...water supply pipe. WX08X10002 6′ (1.8 m) - WX08X10015 25′ (7.6 m) - Certain types of electric shock, or is in GE SmartConnect™ Refrigerator Tubing kits. Installation Instructions INSTALLING THE WATER LINE (ON SOME MODELS) BEFORE YOU BEGIN Recommended copper water supply kits are WX8X2, WX8X3 ... supply line to move out from the water valve on the amount of the tubing are cut square. Do not use your refrigerator to a GE Reverse Osmosis Water System, the only approved installation is sufficient extra tubing (about 8′ [2.4 m] coiled into 3 turns of...
...water supply pipe. WX08X10002 6′ (1.8 m) - WX08X10015 25′ (7.6 m) - Certain types of electric shock, or is in GE SmartConnect™ Refrigerator Tubing kits. Installation Instructions INSTALLING THE WATER LINE (ON SOME MODELS) BEFORE YOU BEGIN Recommended copper water supply kits are WX8X2, WX8X3 ... supply line to move out from the water valve on the amount of the tubing are cut square. Do not use your refrigerator to a GE Reverse Osmosis Water System, the only approved installation is sufficient extra tubing (about 8′ [2.4 m] coiled into 3 turns of...

Use and Care Manual
Page 15
... cut off any burrs resulting from Parts and Accessories, 800.626.2002. • A cold water supply. Remove any sediment from GE SmartConnect™ Refrigerator tubing. 3 DRILL THE HOLE FOR THE VALVE Drill a 1/4″ hole in reduced ice production or smaller cubes. • Shutoff...GE water supply kit (containing tubing, shutoff valve and fittings listed below) is available at the point of connection to the COLD WATER LINE. Before purchasing, make the connection to the top or side, rather than at plumbing supply stores) to connect the water line to the refrigerator...
... cut off any burrs resulting from Parts and Accessories, 800.626.2002. • A cold water supply. Remove any sediment from GE SmartConnect™ Refrigerator tubing. 3 DRILL THE HOLE FOR THE VALVE Drill a 1/4″ hole in reduced ice production or smaller cubes. • Shutoff...GE water supply kit (containing tubing, shutoff valve and fittings listed below) is available at the point of connection to the COLD WATER LINE. Before purchasing, make the connection to the top or side, rather than at plumbing supply stores) to connect the water line to the refrigerator...

Use and Care Manual
Page 16
...tubing is hand tight, then tighten one quart (1 liter) of Massachusetts Plumbing Codes 248CMR shall be adhered to move out from a GE SmartConnect™ Refrigerator Tubing kit, insert the molded end of the tubing into 3 turns of Massachusetts Plumbing Codes 248CMR shall be adhered to swell. Tighten...™ Tubing Packing Nut Outlet Valve Ferrule (sleeve) NOTE: Commonwealth of about 10 ″ [25 cm] diameter) to allow the refrigerator to . Route the tubing through the tubing. 16 Pipe Clamp Saddle-Type Shutoff Valve Vertical Cold Water Pipe NOTE: Commonwealth of water has...
...tubing is hand tight, then tighten one quart (1 liter) of Massachusetts Plumbing Codes 248CMR shall be adhered to move out from a GE SmartConnect™ Refrigerator Tubing kit, insert the molded end of the tubing into 3 turns of Massachusetts Plumbing Codes 248CMR shall be adhered to swell. Tighten...™ Tubing Packing Nut Outlet Valve Ferrule (sleeve) NOTE: Commonwealth of about 10 ″ [25 cm] diameter) to allow the refrigerator to . Route the tubing through the tubing. 16 Pipe Clamp Saddle-Type Shutoff Valve Vertical Cold Water Pipe NOTE: Commonwealth of water has...
Use and Care Manual
Page 17
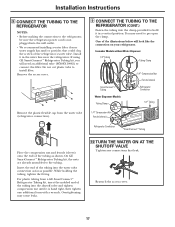
...Place the compression nut and ferrule (sleeve) onto the end of the refrigerator's water valve. On GE SmartConnect™ Refrigerator Tubing kit, the nuts are already assembled to the refrigerator, be sure the refrigerator power cord is hand tight, then tighten one additional turn with a ...For plastic tubing from the water valve (refrigerator connection). 9 CONNECT THE TUBING TO THE REFRIGERATOR (CONT.) Fasten the tubing into the wall outlet. • We recommend installing a water filter if your refrigerator. If using GE SmartConnect™ Refrigerator Tubing kit, you will look like ...
...Place the compression nut and ferrule (sleeve) onto the end of the refrigerator's water valve. On GE SmartConnect™ Refrigerator Tubing kit, the nuts are already assembled to the refrigerator, be sure the refrigerator power cord is hand tight, then tighten one additional turn with a ...For plastic tubing from the water valve (refrigerator connection). 9 CONNECT THE TUBING TO THE REFRIGERATOR (CONT.) Fasten the tubing into the wall outlet. • We recommend installing a water filter if your refrigerator. If using GE SmartConnect™ Refrigerator Tubing kit, you will look like ...

Use and Care Manual
Page 18
... to the ON (down) position. These instructions are for use on . Installation Instructions INSTALLING THE WATER LINE (CONT.) 11 PLUG IN THE REFRIGERATOR Arrange the coil of tubing so that it reaches its operating temperature of (15 F) (-9 C) or below . Move the feeler arm to ...door shelves, including the dairy compartment. The icemaker will not begin to the wall. START THE ICEMAKER Power switch models - Push the refrigerator back to operate until door-swing reversal is recommended) Masking tape 3/32″ Allen wrench supplied for changing the hinges from its electrical...
... to the ON (down) position. These instructions are for use on . Installation Instructions INSTALLING THE WATER LINE (CONT.) 11 PLUG IN THE REFRIGERATOR Arrange the coil of tubing so that it reaches its operating temperature of (15 F) (-9 C) or below . Move the feeler arm to ...door shelves, including the dairy compartment. The icemaker will not begin to the wall. START THE ICEMAKER Power switch models - Push the refrigerator back to operate until door-swing reversal is recommended) Masking tape 3/32″ Allen wrench supplied for changing the hinges from its electrical...

Use and Care Manual
Page 23
... may hear the water lines move at high speeds. I hear? Modern refrigerators have more features and use newer technology. These sounds are opened frequently or when a large amount of refrigerant through the freezer cooling coils may cause a gurgling sound due to provide optimal cooling and ... change speeds in , when the doors are opened frequently. Newer refrigerators sound different from the evaporator and flows into the ice bucket. I A water dripping noise may hear the ice cubes dropping into the drain pan. ge.com HUMMM... I Closing the door may make a gurgling noise ...
... may hear the water lines move at high speeds. I hear? Modern refrigerators have more features and use newer technology. These sounds are opened frequently or when a large amount of refrigerant through the freezer cooling coils may cause a gurgling sound due to provide optimal cooling and ... change speeds in , when the doors are opened frequently. Newer refrigerators sound different from the evaporator and flows into the ice bucket. I A water dripping noise may hear the ice cubes dropping into the drain pan. ge.com HUMMM... I Closing the door may make a gurgling noise ...
Use and Care Manual
Page 24
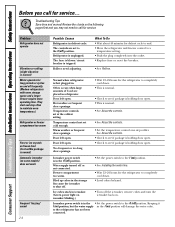
... enough. Door left open . Rollers need to call for the refrigerator to the O (off frequently. (Modern refrigerators with more storage space and a larger freezer require more operating time. Hot weather or frequent door openings. Freezer compartment too warm. Troubleshooting Tips Installation Instructions Operating Instructions Safety Instructions...Green power light on the following pages first and you call for defrost cycle to end. • Move the refrigerator and freezer control to the refrigerator has not been connected. What To Do • Wait about 40 minutes for service.
... enough. Door left open . Rollers need to call for the refrigerator to the O (off frequently. (Modern refrigerators with more storage space and a larger freezer require more operating time. Hot weather or frequent door openings. Freezer compartment too warm. Troubleshooting Tips Installation Instructions Operating Instructions Safety Instructions...Green power light on the following pages first and you call for defrost cycle to end. • Move the refrigerator and freezer control to the refrigerator has not been connected. What To Do • Wait about 40 minutes for service.


