Use and Care Manual
Page 1
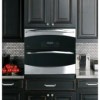
... Support 34 Warranty 33 Owner's Manual PT925 Printed in the United States Write the model and serial numbers here: Model Serial You can find them on a label on the front of the lower oven behind the oven door. 49-80581 04-09 JR Electric Self-Cleaning Convection Built-In Oven GEAppliances.com Safety Instructions 2-4 Operating...
... Support 34 Warranty 33 Owner's Manual PT925 Printed in the United States Write the model and serial numbers here: Model Serial You can find them on a label on the front of the lower oven behind the oven door. 49-80581 04-09 JR Electric Self-Cleaning Convection Built-In Oven GEAppliances.com Safety Instructions 2-4 Operating...
Use and Care Manual
Page 2
... reach items could injured. SAFETY PRECAUTIONS When using a ventilation fan or hood. where an appliance is in this Owner's Manual. ■ Be sure the oven is securely installed in a cabinet that is firmly attached to a qualified technician. ■ Have the installer show you ...■ Be sure your appliance is specifically recommended in use. damage the oven, or cause severe 2 personal injury. For your oven unless it for its intended purpose as described in this manual. READ ALL INSTRUCTIONS BEFORE USING. Consumer Support Troubleshooting Tips Care and Cleaning ...
... reach items could injured. SAFETY PRECAUTIONS When using a ventilation fan or hood. where an appliance is in this Owner's Manual. ■ Be sure the oven is securely installed in a cabinet that is firmly attached to a qualified technician. ■ Have the installer show you ...■ Be sure your appliance is specifically recommended in use. damage the oven, or cause severe 2 personal injury. For your oven unless it for its intended purpose as described in this manual. READ ALL INSTRUCTIONS BEFORE USING. Consumer Support Troubleshooting Tips Care and Cleaning ...
Use and Care Manual
Page 3
... steam which escapes can cause burns to dry newspapers. Turn the controls off. ■ Flame in the oven can catch fire next time you use the pan. ■ Clean only parts listed in this Owner's Manual. ■ Do not use aluminum foil to the stop-lock is opened. ■ Do not use... the oven for items stored in an oven can catch on grease fires. Do not let pot holders touch hot heating elements...
... steam which escapes can cause burns to dry newspapers. Turn the controls off. ■ Flame in the oven can catch fire next time you use the pan. ■ Clean only parts listed in this Owner's Manual. ■ Do not use aluminum foil to the stop-lock is opened. ■ Do not use... the oven for items stored in an oven can catch on grease fires. Do not let pot holders touch hot heating elements...
Use and Care Manual
Page 5
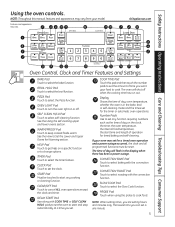
...can set the clock. Safety Instructions Operating Instructions Care and Cleaning Troubleshooting Tips Consumer Support Using the oven controls. CONVECTION BAKE Pad Touch to select roasting with the convection function. NOTE: Throughout this pad and then touch the number pads to set is in the display...select self-cleaning function. Features and appearance may vary from your oven was set the oven to start and stop automatically at a time you are setting hours and minutes only. COOK TIME Pad Touch this manual, features and appearance may vary. TIMER Pad Touch to cook...
...can set the clock. Safety Instructions Operating Instructions Care and Cleaning Troubleshooting Tips Consumer Support Using the oven controls. CONVECTION BAKE Pad Touch to select roasting with the convection function. NOTE: Throughout this pad and then touch the number pads to set is in the display...select self-cleaning function. Features and appearance may vary from your oven was set the oven to start and stop automatically at a time you are setting hours and minutes only. COOK TIME Pad Touch this manual, features and appearance may vary. TIMER Pad Touch to cook...

Use and Care Manual
Page 25
... the door. Rinse well with warm soapy water. Safety Instructions Operating Instructions Care and Cleaning Troubleshooting Tips Consumer Support Care and cleaning of the oven. It cannot be removed from all parts. Clean up immediately. You may also use a glass cleaner. If you should be wiped up... splatters with a soft cloth and allow to clean this manual. You may also use a glass cleaner to remove the adhesive from the appliance surface. Control Panel If desired, the touch pads may cause...
... the door. Rinse well with warm soapy water. Safety Instructions Operating Instructions Care and Cleaning Troubleshooting Tips Consumer Support Care and cleaning of the oven. It cannot be removed from all parts. Clean up immediately. You may also use a glass cleaner. If you should be wiped up... splatters with a soft cloth and allow to clean this manual. You may also use a glass cleaner to remove the adhesive from the appliance surface. Control Panel If desired, the touch pads may cause...

Use and Care Manual
Page 34
... improper servicing may also mail in the preprinted registration card included in this manual cover procedures to qualified service personnel. We recognize the need to : General Manager, Customer Relations GE Appliances, Appliance Park Louisville, KY 40225 Register Your Appliance GEAppliances.com Register ...on our Website with all ages, sizes and capabilities. Extended Warranties GEAppliances.com Purchase a GE extended warranty and learn about special discounts that can now download Owner's Manuals, order parts or even schedule service on -line and schedule your service at 800....
... improper servicing may also mail in the preprinted registration card included in this manual cover procedures to qualified service personnel. We recognize the need to : General Manager, Customer Relations GE Appliances, Appliance Park Louisville, KY 40225 Register Your Appliance GEAppliances.com Register ...on our Website with all ages, sizes and capabilities. Extended Warranties GEAppliances.com Purchase a GE extended warranty and learn about special discounts that can now download Owner's Manuals, order parts or even schedule service on -line and schedule your service at 800....
Installation Instructions
Page 3
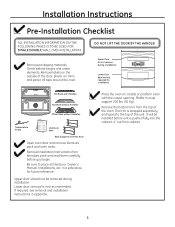
...alNrn'lSsevnI'ssevIATssu)eAsu)e.uS.NmuNmsCseCeeeEr.Er...SS.. Lower door removal is wrapped separately and taped to place all tape around the oven. It will be removed during installation Lower Door Removal not required for future reference. Remove Installation Instructions from the top of the... ON THE FOLLOWING PAGES IS TO BE USED FOR SINGLE DOUBLE WALL OVEN INSTALLATION! DO NOT LIFT THE DOOR BY THE HANDLE! in appendix. Place the oven on trims and panel, all literature, Owner's Manual, Installations, etc. Remove the bottom trim from literature pack and read...
...alNrn'lSsevnI'ssevIATssu)eAsu)e.uS.NmuNmsCseCeeeEr.Er...SS.. Lower door removal is wrapped separately and taped to place all tape around the oven. It will be removed during installation Lower Door Removal not required for future reference. Remove Installation Instructions from the top of the... ON THE FOLLOWING PAGES IS TO BE USED FOR SINGLE DOUBLE WALL OVEN INSTALLATION! DO NOT LIFT THE DOOR BY THE HANDLE! in appendix. Place the oven on trims and panel, all literature, Owner's Manual, Installations, etc. Remove the bottom trim from literature pack and read...
Installation Instructions
Page 12
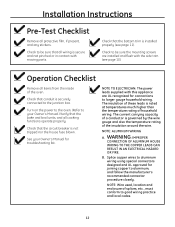
... supplied with moving parts. NOTE: ALUMINUM WIRING A. Check to your Owner's Manual for troubleshooting list. Operation Checklist Remove all protective film, if present, and any stickers. Turn on the power to the oven. (Refer to be sure the mounting screws are UL recognized for joining copper...connector procedure closely. Check that the bake and broil units, and all wiring is installed properly (see page 10). See your Owner's Manual.) Verify that the bottom trim is secure and not pinched or in contact with this appliance are installed and flush with the...
... supplied with moving parts. NOTE: ALUMINUM WIRING A. Check to your Owner's Manual for troubleshooting list. Operation Checklist Remove all protective film, if present, and any stickers. Turn on the power to the oven. (Refer to be sure the mounting screws are UL recognized for joining copper...connector procedure closely. Check that the bake and broil units, and all wiring is installed properly (see page 10). See your Owner's Manual.) Verify that the bottom trim is secure and not pinched or in contact with this appliance are installed and flush with the...

