Owners Manual
Page 1
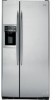
Profile Refr igeraSidetobyrSides ge.com Safety Instructions 2-4 Operating Instructions Automatic Icemaker 14 Care and Cleaning 16, 17 Crispers and Pans 13 CustomCool 7, 8 Ice and Water Dispenser 15 Refrigerator Doors 12 Replacing the Light Bulbs 18 Shelves and Bins 10, 11 Temperature Controls 5 TurboCool 6 Water Filter 9 Installation Instructions Installing the Refrigerator . . . .28-31 Moving the Refrigerator... . . . . . .24-27 Preparing to Install the Refrigerator 23 Trim Kits and Panels ...
Profile Refr igeraSidetobyrSides ge.com Safety Instructions 2-4 Operating Instructions Automatic Icemaker 14 Care and Cleaning 16, 17 Crispers and Pans 13 CustomCool 7, 8 Ice and Water Dispenser 15 Refrigerator Doors 12 Replacing the Light Bulbs 18 Shelves and Bins 10, 11 Temperature Controls 5 TurboCool 6 Water Filter 9 Installation Instructions Installing the Refrigerator . . . .28-31 Moving the Refrigerator... . . . . . .24-27 Preparing to Install the Refrigerator 23 Trim Kits and Panels ...
Owners Manual
Page 2
...vicinity of the ejector mechanism, or with the heating element located on the automatic icemaking mechanism while the refrigerator is used. s In refrigerators with automatic icemakers, avoid contact with the Installation Instructions before cleaning and making repairs. Be careful closing ... When using electrical appliances, basic safety precautions should be followed, including the following: s This refrigerator must be performed by a qualified individual. s Unplug the refrigerator before it is plugged in this or any servicing be properly installed and located in the freezer...
...vicinity of the ejector mechanism, or with the heating element located on the automatic icemaking mechanism while the refrigerator is used. s In refrigerators with automatic icemakers, avoid contact with the Installation Instructions before cleaning and making repairs. Be careful closing ... When using electrical appliances, basic safety precautions should be followed, including the following: s This refrigerator must be performed by a qualified individual. s Unplug the refrigerator before it is plugged in this or any servicing be properly installed and located in the freezer...
Owners Manual
Page 3
...Old Refrigerator or Freezer: s Take off the doors. Refrigerants All refrigeration products contain refrigerants, ... 3 Junked or abandoned refrigerators are not problems of an extension cord. RISK OF CHILD ENTRAPMENT PROPER DISPOSAL OF THE REFRIGERATOR Child entrapment and suffocation ...are still dangerous...even if they will sit for "just a few days." If you are getting rid of your old refrigerator..., please follow the instructions below to do. If you are getting rid of an old refrigeration product, check with...
...Old Refrigerator or Freezer: s Take off the doors. Refrigerants All refrigeration products contain refrigerants, ... 3 Junked or abandoned refrigerators are not problems of an extension cord. RISK OF CHILD ENTRAPMENT PROPER DISPOSAL OF THE REFRIGERATOR Child entrapment and suffocation ...are still dangerous...even if they will sit for "just a few days." If you are getting rid of your old refrigerator..., please follow the instructions below to do. If you are getting rid of an old refrigeration product, check with...
Owners Manual
Page 4
... on the power cord. Do not use a cord that have it is your refrigerator by a qualified electrician to roll over or damage the power cord. When moving the refrigerator away from overheated wires. SAVE THESE INSTRUCTIONS 4 The power cord of this appliance ...either end. Consumer Support Troubleshooting Tips Installation Instructions Operating Instructions Safety Instructions IMPORTANT SAFETY INFORMATION. READ ALL INSTRUCTIONS BEFORE USING. The refrigerator should always be careful not to make sure the outlet is equipped with a standard 3-prong (grounding) wall outlet to have...
... on the power cord. Do not use a cord that have it is your refrigerator by a qualified electrician to roll over or damage the power cord. When moving the refrigerator away from overheated wires. SAVE THESE INSTRUCTIONS 4 The power cord of this appliance ...either end. Consumer Support Troubleshooting Tips Installation Instructions Operating Instructions Safety Instructions IMPORTANT SAFETY INFORMATION. READ ALL INSTRUCTIONS BEFORE USING. The refrigerator should always be careful not to make sure the outlet is equipped with a standard 3-prong (grounding) wall outlet to have...
Owners Manual
Page 5
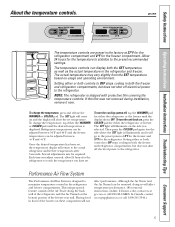
... and the display will show the set , the temperature display will return to the preset recommended settings. ge.com The temperature controls are preset in front of the refrigerator and the Air Tunnel on the side you adjust controls, allow 24 hours for the temperature to stabilize ...has been set temperature. Setting either or both controls to OFF stops cooling in the refrigerator and freezer compartments. In Canada, contact us at geappliances.ca or call 800.GE.CARES. NOTE: The refrigerator is illuminated) and it now. Setting either or both controls to OFF stops cooling ...
... and the display will show the set , the temperature display will return to the preset recommended settings. ge.com The temperature controls are preset in front of the refrigerator and the Air Tunnel on the side you adjust controls, allow 24 hours for the temperature to stabilize ...has been set temperature. Setting either or both controls to OFF stops cooling in the refrigerator and freezer compartments. In Canada, contact us at geappliances.ca or call 800.GE.CARES. NOTE: The refrigerator is illuminated) and it now. Setting either or both controls to OFF stops cooling ...
Owners Manual
Page 6
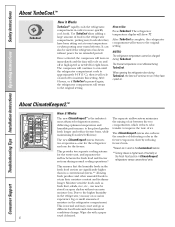
...fog or small amounts of air between the fresh food and freezer sections during TurboCool. Due to the higher humidity in the refrigerator, you may come and go as different food loads and environmental conditions change. Consumer Support Troubleshooting Tips Installation Instructions Operating Instructions... setting. About ClimateKeeper2.™ How it will show TC. The ClimateKeeper2 system also reduces the number of ice. How to the refrigerator compartment, putting away foods after they have been sitting out at high speed as fresh fruit, salads, rice, etc., can also...
...fog or small amounts of air between the fresh food and freezer sections during TurboCool. Due to the higher humidity in the refrigerator, you may come and go as different food loads and environmental conditions change. Consumer Support Troubleshooting Tips Installation Instructions Operating Instructions... setting. About ClimateKeeper2.™ How it will show TC. The ClimateKeeper2 system also reduces the number of ice. How to the refrigerator compartment, putting away foods after they have been sitting out at high speed as fresh fruit, salads, rice, etc., can also...
Owners Manual
Page 7
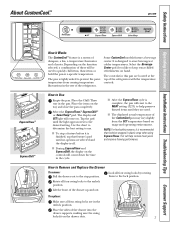
...Lock all four swing locks to the unlock position. Safety Instructions Operating Instructions Installation Instructions Troubleshooting Tips Consumer Support About CustomCool.™ ge.com ExpressThaw™ ExpressChill™ How it Works The CustomCool™ feature is designed to store beverages at colder temperatures. The ...Tap the pad until no options are used to quickly chill items, thaw items or hold the pan at the top of the refrigerator with the temperature controls. s During ExpressThaw and ExpressChill, the display on the controls will reset to the MEAT setting (32°...
...Lock all four swing locks to the unlock position. Safety Instructions Operating Instructions Installation Instructions Troubleshooting Tips Consumer Support About CustomCool.™ ge.com ExpressThaw™ ExpressChill™ How it Works The CustomCool™ feature is designed to store beverages at colder temperatures. The ...Tap the pad until no options are used to quickly chill items, thaw items or hold the pan at the top of the refrigerator with the temperature controls. s During ExpressThaw and ExpressChill, the display on the controls will reset to the MEAT setting (32°...
Owners Manual
Page 9
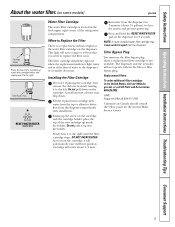
... installation. Filter Bypass Plug Water Filter Cartridge The water filter cartridge is located in the back upper right corner of the refrigerator compartment. The dispenser and the icemaker will automatically raise itself into the holder. NOTE: A newly-installed water filter cartridge...Service Center. 9 Safety Instructions Operating Instructions Installation Instructions Troubleshooting Tips Consumer Support About the water filter. (on some models) ge.com Cartridge Holder Place the top of the cartridge up inside the holder. Installing the Filter Cartridge If you turn the ...
... installation. Filter Bypass Plug Water Filter Cartridge The water filter cartridge is located in the back upper right corner of the refrigerator compartment. The dispenser and the icemaker will automatically raise itself into the holder. NOTE: A newly-installed water filter cartridge...Service Center. 9 Safety Instructions Operating Instructions Installation Instructions Troubleshooting Tips Consumer Support About the water filter. (on some models) ge.com Cartridge Holder Place the top of the cartridge up inside the holder. Installing the Filter Cartridge If you turn the ...
Owners Manual
Page 10
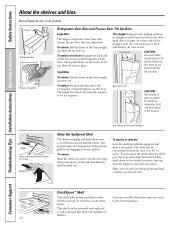
... models, this location. To remove: Slide the shelf out until it into the ice chute. Snugger Refrigerator bin Freezer tilt-out bin Refrigerator Door Bins and Freezer Door Tilt-Out Bins Large Bins The larger refrigerator door bins and freezer tilt-out door bins are on all the way back in place. To...
... models, this location. To remove: Slide the shelf out until it into the ice chute. Snugger Refrigerator bin Freezer tilt-out bin Refrigerator Door Bins and Freezer Door Tilt-Out Bins Large Bins The larger refrigerator door bins and freezer tilt-out door bins are on all the way back in place. To...
Owners Manual
Page 12
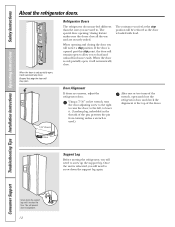
...doors. Once the unit is loaded with food. The resistance you will be reduced as the door is relocated, you are uneven, adjust the refrigerator door. Using a 7/16″ socket wrench, turn the door adjusting screw to the right to screw up the support leg. Screw down the... to allow you will notice a stop point, the door will remain open to . Beyond this stop position. Raise Support Leg Before moving the refrigerator, you feel different than the ones you will automatically close all the way and are securely sealed. This will stay open , it touches the ...
...doors. Once the unit is loaded with food. The resistance you will be reduced as the door is relocated, you are uneven, adjust the refrigerator door. Using a 7/16″ socket wrench, turn the door adjusting screw to the right to screw up the support leg. Screw down the... to allow you will notice a stop point, the door will remain open to . Beyond this stop position. Raise Support Leg Before moving the refrigerator, you feel different than the ones you will automatically close all the way and are securely sealed. This will stay open , it touches the ...
Owners Manual
Page 13
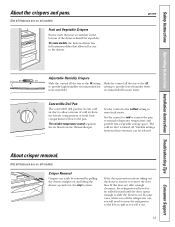
..., you from taking out the drawers, first try to normal refrigerator temperature and The variable temperature control regulates provide extra vegetable storage space. ge.com Adjustable Humidity Crispers HI LO Slide the control all the way to the HI setting Slide the control all the way to the LO ...
..., you from taking out the drawers, first try to normal refrigerator temperature and The variable temperature control regulates provide extra vegetable storage space. ge.com Adjustable Humidity Crispers HI LO Slide the control all the way to the HI setting Slide the control all the way to the LO ...
Owners Manual
Page 14
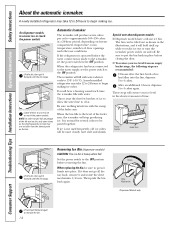
... set the power switch in the illustrations, and it forward until the bin stops. A newly installed refrigerator may take ice out or turn . s To restore your ice level in the shortest amount of... it and rotate the drive mechanism 1/4 turn the icemaker power switch on and off. If the refrigerator is normal for several cubes to be sure to the icemaker, set the power switch to remove ...go all the way back, remove it firmly into the bin, dispense 3 to clear. A newly installed refrigerator may take full advantage of the tilt-out ice bin, only store items on the shelf below the ...
... set the power switch in the illustrations, and it forward until the bin stops. A newly installed refrigerator may take ice out or turn . s To restore your ice level in the shortest amount of... it and rotate the drive mechanism 1/4 turn the icemaker power switch on and off. If the refrigerator is normal for several cubes to be sure to the icemaker, set the power switch to remove ...go all the way back, remove it firmly into the bin, dispense 3 to clear. A newly installed refrigerator may take full advantage of the tilt-out ice bin, only store items on the shelf below the ...
Owners Manual
Page 15
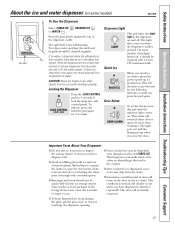
... mound of narrow glasses. s To keep dispensed ice from the water line and to fill the water system. If no water is dispensed when the refrigerator is blocking the chute, poke it should be dispensed even though you have dispensed crushed ice repeatedly. The snow will form on the door in... door in the ice chute. This alarm will increase ice production for the following 48 hours or until the indicator light comes on some models) ge.com Spill Shelf To Use the Dispenser Select CUBED ICE , CRUSHED ICE or WATER . The spill shelf is open for 3 seconds to freeze shut. ...
... mound of narrow glasses. s To keep dispensed ice from the water line and to fill the water system. If no water is dispensed when the refrigerator is blocking the chute, poke it should be dispensed even though you have dispensed crushed ice repeatedly. The snow will form on the door in... door in the ice chute. This alarm will increase ice production for the following 48 hours or until the indicator light comes on some models) ge.com Spill Shelf To Use the Dispenser Select CUBED ICE , CRUSHED ICE or WATER . The spill shelf is open for 3 seconds to freeze shut. ...
Owners Manual
Page 16
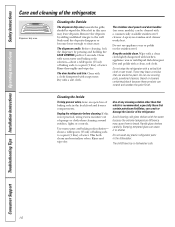
...or cleaners containing bleach because these products can erode the paint. If this area may leave deposits. Use of any plastic refrigerator parts in the dishwasher. Handle glass shelves carefully. Bumping tempered glass can cause it to rinse away. Water left in ...can scratch and weaken the paint finish. Consumer Support Troubleshooting Tips Installation Instructions Operating Instructions Safety Instructions Care and cleaning of the refrigerator. Cleaning the Outside The dispenser drip area, beneath the grille, should be cleaned with a soft cloth. Remove the deposits ...
...or cleaners containing bleach because these products can erode the paint. If this area may leave deposits. Use of any plastic refrigerator parts in the dishwasher. Handle glass shelves carefully. Bumping tempered glass can cause it to rinse away. Water left in ...can scratch and weaken the paint finish. Consumer Support Troubleshooting Tips Installation Instructions Operating Instructions Safety Instructions Care and cleaning of the refrigerator. Cleaning the Outside The dispenser drip area, beneath the grille, should be cleaned with a soft cloth. Remove the deposits ...
Owners Manual
Page 17
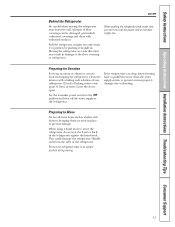
...prevent serious property damage due to the floor covering or refrigerator. Handle only from the wall. Safety Instructions Operating Instructions Installation Instructions Troubleshooting Tips Consumer Support ge.com Behind the Refrigerator Be careful when moving . 17 Leave the doors open.... Preparing for Vacation For long vacations or absences, remove food and unplug the refrigerator. If the temperature can be damaged...
...prevent serious property damage due to the floor covering or refrigerator. Handle only from the wall. Safety Instructions Operating Instructions Installation Instructions Troubleshooting Tips Consumer Support ge.com Behind the Refrigerator Be careful when moving . 17 Leave the doors open.... Preparing for Vacation For long vacations or absences, remove food and unplug the refrigerator. If the temperature can be damaged...

Owners Manual
Page 18
... the shield and Remove the convertible meat drawer the knob. Your light shield will have to be identified by pulling straight out. Plug the refrigerator back in . 18 After replacing the bulb with an appliance bulb of the light shield will need to the light circuit. control knob by...the light shield and screws (on some models. Lift the light shield up and out. They can be removed. The bulbs are not illuminated. Refrigerator Compartment-Lower Light This light is located above the light shield. (The shelf will be removed. Replace the screw (on the dispenser under the ...
... the shield and Remove the convertible meat drawer the knob. Your light shield will have to be identified by pulling straight out. Plug the refrigerator back in . 18 After replacing the bulb with an appliance bulb of the light shield will need to the light circuit. control knob by...the light shield and screws (on some models. Lift the light shield up and out. They can be removed. The bulbs are not illuminated. Refrigerator Compartment-Lower Light This light is located above the light shield. (The shelf will be removed. Replace the screw (on the dispenser under the ...
Owners Manual
Page 19
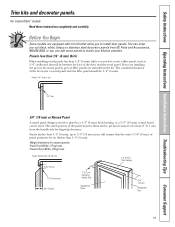
... mm) Thick Backing 5/16″ (8 mm) 1/4″ (6 mm) max 3/4″ (19 mm) 2″ (5.1 cm) Clearance Handle Side Appearance Panel 3/4″ (19 mm) Refrigerator Door 19 Panels thicker than 1/4″ (6 mm) thick, you need to install door panels. Freezer Door 28 lbs. (13 kg) max. Safety Instructions Operating Instructions...pre-cut filler panels are equipped with trim kits that the outer 5/16″ (8 mm) of at least 2″ (5.1 cm) from GE Parts and Accessories, 800.626.2002, or you to create a filler panel, such as 1/8″ cardboard, that will require that allow you...
... mm) Thick Backing 5/16″ (8 mm) 1/4″ (6 mm) max 3/4″ (19 mm) 2″ (5.1 cm) Clearance Handle Side Appearance Panel 3/4″ (19 mm) Refrigerator Door 19 Panels thicker than 1/4″ (6 mm) thick, you need to install door panels. Freezer Door 28 lbs. (13 kg) max. Safety Instructions Operating Instructions...pre-cut filler panels are equipped with trim kits that the outer 5/16″ (8 mm) of at least 2″ (5.1 cm) from GE Parts and Accessories, 800.626.2002, or you to create a filler panel, such as 1/8″ cardboard, that will require that allow you...
Owners Manual
Page 21
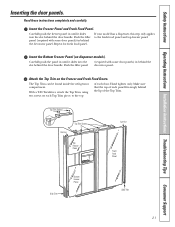
.... Repeat for fresh food panel. Insert the Bottom Freezer Panel (on the Freezer and Fresh Food Doors. The Top Trim can be found inside the refrigerator compartment. Carefully push the freezer panel in behind the decorator panel. Push the filler panel (required with some door panels) in until it slides into...
.... Repeat for fresh food panel. Insert the Bottom Freezer Panel (on the Freezer and Fresh Food Doors. The Top Trim can be found inside the refrigerator compartment. Carefully push the freezer panel in behind the decorator panel. Push the filler panel (required with some door panels) in until it slides into...
Owners Manual
Page 22
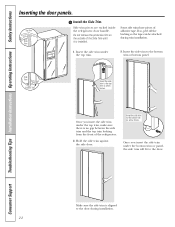
... sure there is installed. Consumer Support Troubleshooting Tips Installation Instructions Operating Instructions Safety Instructions Inserting the door panels. Side trim pieces are tucked inside the refrigerator door handle. Do not remove the protective film on the outside of the Side Trim until it is no gap between the side trim and... or bottom panel. If so, peel off the backing so the tape can be attached during installation. 22 Some side trims have pieces of the refrigerator. 2. Top Trim Side Trim Install the Side Trim.
... sure there is installed. Consumer Support Troubleshooting Tips Installation Instructions Operating Instructions Safety Instructions Inserting the door panels. Side trim pieces are tucked inside the refrigerator door handle. Do not remove the protective film on the outside of the Side Trim until it is no gap between the side trim and... or bottom panel. If so, peel off the backing so the tape can be attached during installation. 22 Some side trims have pieces of the refrigerator. 2. Top Trim Side Trim Install the Side Trim.

Owners Manual
Page 23
...″ Wrench Plastic Putty Knife Phillips Head Screwdriver 23 Refrigerator Installation 30 minutes Water Line Installation 30 minutes • Proper installation is the responsibility of this appliance requires basic mechanical skills. • Completion time - Call 800.GE.CARES (800.432.2737) or Visit our Website at: ge.com In Canada, call 1.800.561.3344...
...″ Wrench Plastic Putty Knife Phillips Head Screwdriver 23 Refrigerator Installation 30 minutes Water Line Installation 30 minutes • Proper installation is the responsibility of this appliance requires basic mechanical skills. • Completion time - Call 800.GE.CARES (800.432.2737) or Visit our Website at: ge.com In Canada, call 1.800.561.3344...


