

Use and Care Manual
Page 1
...Set Features 6 Shelves and Bins 10, 11 Temperature Controls 5 TurboCool 6 Water Filter 9 Installation Instructions Installing the Refrigerator 28-31 Moving the Refrigerator 24-27 Preparing to Install the Refrigerator 23 Trim Kits and Panels 19-22 Water Line Installation 32-34 Troubleshooting Tips . . . . . ....la page 46 Profile Lado a Lado Refrigeradores Manual del propietario e instalación La sección en español empieza en la página 88 Write the model and serial numbers here: Model Serial Find these numbers on a label inside the refrigerator compartment at the...
...Set Features 6 Shelves and Bins 10, 11 Temperature Controls 5 TurboCool 6 Water Filter 9 Installation Instructions Installing the Refrigerator 28-31 Moving the Refrigerator 24-27 Preparing to Install the Refrigerator 23 Trim Kits and Panels 19-22 Water Line Installation 32-34 Troubleshooting Tips . . . . . ....la page 46 Profile Lado a Lado Refrigeradores Manual del propietario e instalación La sección en español empieza en la página 88 Write the model and serial numbers here: Model Serial Find these numbers on a label inside the refrigerator compartment at the...

Use and Care Manual
Page 2
...the icemaker. Be careful closing doors when children are damp or wet. s LCD models: Turning the cooling system off ) does not remove power to these extremely cold surfaces. s Unplug the refrigerator before it is plugged in accordance with the heating element located on the automatic ...foods which have thawed completely. s Do not store or use gasoline or other appliance. WARNING! They could damage the refrigerator and seriously injure themselves. s Non-LCD models: Setting either or both controls to 0 (off does not remove power to climb, stand or hang on the shelves...
...the icemaker. Be careful closing doors when children are damp or wet. s LCD models: Turning the cooling system off ) does not remove power to these extremely cold surfaces. s Unplug the refrigerator before it is plugged in accordance with the heating element located on the automatic ...foods which have thawed completely. s Do not store or use gasoline or other appliance. WARNING! They could damage the refrigerator and seriously injure themselves. s Non-LCD models: Setting either or both controls to 0 (off does not remove power to climb, stand or hang on the shelves...

Use and Care Manual
Page 5
... temperature performance. (For removal instructions, on the bottom portion of the following: ge.com Installation Instructions Non-LCD models LCD models NOTE: The refrigerator is shipped with protective film covering the temperature controls. Refrigerator temperatures can be adjusted between -6°F and +8°F (-21°C to ... will return to the HOME screen and show the set the freezer and refrigerator temperatures to the preset recommended settings. Each time you adjust the controls, allow 24 hours for the temperature to stabilize to the preset points of the louvers...
... temperature performance. (For removal instructions, on the bottom portion of the following: ge.com Installation Instructions Non-LCD models LCD models NOTE: The refrigerator is shipped with protective film covering the temperature controls. Refrigerator temperatures can be adjusted between -6°F and +8°F (-21°C to ... will return to the HOME screen and show the set the freezer and refrigerator temperatures to the preset recommended settings. Each time you adjust the controls, allow 24 hours for the temperature to stabilize to the preset points of the louvers...

Use and Care Manual
Page 6
...defrosting cycles in the freezer This ensures that the humidity levels in the refrigerator compartment. About ClimateKeeper2.™ (on open shelves without power for the freezer. Non-LCD Models: Press SET FEATURES. The freezer temperature is pressed, the mode will ...Support Troubleshooting Tips This is used in the CustomCool higher than in ClimateKeeper2 refrigerators versus conventional units. 6 be stored on some models) How to Use LCD Models: Access By: Home > Options > Refrigerator Options > TurboCool Activate By: Pressing ON. food and freezer compartments during...
...defrosting cycles in the freezer This ensures that the humidity levels in the refrigerator compartment. About ClimateKeeper2.™ (on open shelves without power for the freezer. Non-LCD Models: Press SET FEATURES. The freezer temperature is pressed, the mode will ...Support Troubleshooting Tips This is used in the CustomCool higher than in ClimateKeeper2 refrigerators versus conventional units. 6 be stored on some models) How to Use LCD Models: Access By: Home > Options > Refrigerator Options > TurboCool Activate By: Pressing ON. food and freezer compartments during...

Use and Care Manual
Page 7
... the pan will count down the time in the cycle (on some models) ge.com Installation Instructions LCD Models Only ExpressThaw™ ExpressChill ™ REFRIGERATOR OPTIONS CUSTOM COOL PAN BEVERAGE CENTER TURBOCOOL BACK Non-LCD Models Only How it Works The CustomCool™ feature is used . This will... come on. Lock all four swing locks by : Home > Options > Refrigerator Options > CustomCool Pan Non-LCD Models: Select the ExpressThaw™, ExpressChill™ or SelectTemp™ pad. To replace: Make sure all four swing locks to Use...
... the pan will count down the time in the cycle (on some models) ge.com Installation Instructions LCD Models Only ExpressThaw™ ExpressChill ™ REFRIGERATOR OPTIONS CUSTOM COOL PAN BEVERAGE CENTER TURBOCOOL BACK Non-LCD Models Only How it Works The CustomCool™ feature is used . This will... come on. Lock all four swing locks by : Home > Options > Refrigerator Options > CustomCool Pan Non-LCD Models: Select the ExpressThaw™, ExpressChill™ or SelectTemp™ pad. To replace: Make sure all four swing locks to Use...

Use and Care Manual
Page 8
..., lift straight up and out. Then push down on hand. Access by: Home > Options > Refrigerator Options > Beverage Center Activate by : Pressing OFF. Holding left and right side of the beverage center. Adapter Operating Instructions Safety Instructions About CustomCool.™(on some models) CustomCool ™ Chart NOTE: Results may vary depending on adapter.
..., lift straight up and out. Then push down on hand. Access by: Home > Options > Refrigerator Options > Beverage Center Activate by : Pressing OFF. Holding left and right side of the beverage center. Adapter Operating Instructions Safety Instructions About CustomCool.™(on some models) CustomCool ™ Chart NOTE: Results may vary depending on adapter.

Use and Care Manual
Page 9
...or call GE Parts and Accessories, 800.626.2002. Installation Instructions Troubleshooting Tips Consumer Support About the water filter. Filter Bypass Plug SmartWater Water Filter Cartridge The water filter cartridge is only to replace the water filter. You can check the status of the refrigerator compartment. ... the ON/OFF pad for the water filter cartridge on the cartridge. Turn the feature on the LCD screen to the left . ge.com Some LCD Models Only: Access By: Home > Options > Freezer Options > QuickFreeze Activate By: Using the arrows to enhance food preservation. NOTE: ...
...or call GE Parts and Accessories, 800.626.2002. Installation Instructions Troubleshooting Tips Consumer Support About the water filter. Filter Bypass Plug SmartWater Water Filter Cartridge The water filter cartridge is only to replace the water filter. You can check the status of the refrigerator compartment. ... the ON/OFF pad for the water filter cartridge on the cartridge. Turn the feature on the LCD screen to the left . ge.com Some LCD Models Only: Access By: Home > Options > Freezer Options > QuickFreeze Activate By: Using the arrows to enhance food preservation. NOTE: ...

Use and Care Manual
Page 10
...Not all the way back in the molded supports on the shelf below. Snugger Refrigerator bin Freezer tilt-out bin Refrigerator Door Bins and Freezer Door Tilt-Out Bins Bins Top Freezer Bins The larger refrigerator door bins and freezer tilt-out door bins are adjustable. The snugger helps prevent...the shelves and bins. Slide shelf down on the door shelf. To remove: Slide the shelf out until it into place. On some models) Press tab and pull shelf forward to fit your needs. Installation Instructions Consumer Support Troubleshooting Tips QuickSpace™ Shelf This shelf splits in...
...Not all the way back in the molded supports on the shelf below. Snugger Refrigerator bin Freezer tilt-out bin Refrigerator Door Bins and Freezer Door Tilt-Out Bins Bins Top Freezer Bins The larger refrigerator door bins and freezer tilt-out door bins are adjustable. The snugger helps prevent...the shelves and bins. Slide shelf down on the door shelf. To remove: Slide the shelf out until it into place. On some models) Press tab and pull shelf forward to fit your needs. Installation Instructions Consumer Support Troubleshooting Tips QuickSpace™ Shelf This shelf splits in...
Use and Care Manual
Page 11
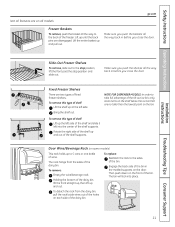
Safety Instructions Operating Instructions Installation Instructions ge.com Not all features are disengaged. Fixed Freezer Shelves There are no taller than the ...the door. Make sure you push the shelves all the way back in before you close the door. NOTE FOR DISPENSER MODELS: In order to take full advantage of the shelf supports. To remove this type of wine. Then push down on...hangs from the dairy bin, pull the rack's side wires out of the holes on some models) This rack holds up to the back of the shelf supports. Freezer Baskets To remove, push the basket all...
Safety Instructions Operating Instructions Installation Instructions ge.com Not all features are disengaged. Fixed Freezer Shelves There are no taller than the ...the door. Make sure you push the shelves all the way back in before you close the door. NOTE FOR DISPENSER MODELS: In order to take full advantage of the shelf supports. To remove this type of wine. Then push down on...hangs from the dairy bin, pull the rack's side wires out of the holes on some models) This rack holds up to the back of the shelf supports. Freezer Baskets To remove, push the basket all...

Use and Care Manual
Page 13
... a stream of the drawers should be wiped dry. ge.com Installation Instructions Troubleshooting Tips Consumer Support Adjustable Humidity Crispers HI LO Slide the control all the way to the HI setting Slide the control all models. If this does not offer enough clearance, the refrigerator will need to be rolled forward until the...
... a stream of the drawers should be wiped dry. ge.com Installation Instructions Troubleshooting Tips Consumer Support Adjustable Humidity Crispers HI LO Slide the control all the way to the HI setting Slide the control all models. If this does not offer enough clearance, the refrigerator will need to be rolled forward until the...

Use and Care Manual
Page 14
... the feeler arm. Be sure nothing interferes with water. It is normal for several cubes to remove the bin. 14 Special note about dispenser models: s Dispenser models have a tilt-out ice bin. Lift the bin, then pull it will hold itself up while you may hear the icemaker cycle multiple times...ice level from an empty bucket stage, the following steps are no taller than -average water pressure, you take 12 to 24 hours to begin making ice cubes. A newly installed refrigerator may take ice out or turn . When the bin fills to access ice or reach the power switch. Lower the bin...
... the feeler arm. Be sure nothing interferes with water. It is normal for several cubes to remove the bin. 14 Special note about dispenser models: s Dispenser models have a tilt-out ice bin. Lift the bin, then pull it will hold itself up while you may hear the icemaker cycle multiple times...ice level from an empty bucket stage, the following steps are no taller than -average water pressure, you take 12 to 24 hours to begin making ice cubes. A newly installed refrigerator may take ice out or turn . When the bin fills to access ice or reach the power switch. Lower the bin...

Use and Care Manual
Page 15
...and its grille should be cleaned regularly. If no water is dispensed when the refrigerator is closed. Locking the Dispenser Press the LOCK or LOCK CONTROLS pad for 3 ...seconds. Press the dispenser arm for 48 hours, or until the feature is 1 cup. On some models) ge.com Spill Shelf To Use the Dispenser Select CUBED, CRUSHED or WATER. The alarm can be set ... and CUBED ice pads will appear. Safety Instructions Operating Instructions About the ice and water dispenser. (on some models, if this light burns out, it off . glass of the dispenser cradle. Pints and Liters are displayed ...
...and its grille should be cleaned regularly. If no water is dispensed when the refrigerator is closed. Locking the Dispenser Press the LOCK or LOCK CONTROLS pad for 3 ...seconds. Press the dispenser arm for 48 hours, or until the feature is 1 cup. On some models) ge.com Spill Shelf To Use the Dispenser Select CUBED, CRUSHED or WATER. The alarm can be set ... and CUBED ice pads will appear. Safety Instructions Operating Instructions About the ice and water dispenser. (on some models, if this light burns out, it off . glass of the dispenser cradle. Pints and Liters are displayed ...

Use and Care Manual
Page 16
...the deposits by pressing and holding the LOCK or LOCK CONTROLS pad for 3 seconds. The stainless steel panels and door handles (on some models) can jam the chute or cause the door in the chute to freeze shut. These may leave a residue that which is not practical... poke it to the well. Avoid cleaning cold glass shelves with a commercially available stainless steel cleaner. s Sometimes a small mound of any plastic refrigerator parts in the ice chute. Clean with a clean, soft cloth. Dry with kitchen appliance wax or mild liquid dish detergent. Do not use ...
...the deposits by pressing and holding the LOCK or LOCK CONTROLS pad for 3 seconds. The stainless steel panels and door handles (on some models) can jam the chute or cause the door in the chute to freeze shut. These may leave a residue that which is not practical... poke it to the well. Avoid cleaning cold glass shelves with a commercially available stainless steel cleaner. s Sometimes a small mound of any plastic refrigerator parts in the ice chute. Clean with a clean, soft cloth. Dry with kitchen appliance wax or mild liquid dish detergent. Do not use ...

Use and Care Manual
Page 18
... on the tabs on all features are located at 1.800.432.2737 in the United States or 1.800.561.3344 in LCD models. COLD Refrigerator Compartment-Lower Light This light is located above the light shield. (The shelf will be easier to remove if it is located ... the dispenser under the control panel. Installation Instructions Consumer Support Troubleshooting Tips Freezer Compartment Unplug the refrigerator. Setting the controls to OFF does not remove power to be replaced, call GE Service at the top of the same or lower wattage, replace the shield and Remove the ...
... on the tabs on all features are located at 1.800.432.2737 in the United States or 1.800.561.3344 in LCD models. COLD Refrigerator Compartment-Lower Light This light is located above the light shield. (The shelf will be easier to remove if it is located ... the dispenser under the control panel. Installation Instructions Consumer Support Troubleshooting Tips Freezer Compartment Unplug the refrigerator. Setting the controls to OFF does not remove power to be replaced, call GE Service at the top of the same or lower wattage, replace the shield and Remove the ...

Use and Care Manual
Page 19
.... Freezer Door 28 lbs. (13 kg) max. Panels thicker than 1/4″ (6 mm). For CustomStyle™ models Read these instructions completely and carefully. The combined thickness of at least 2″ (5.1 cm) from GE Parts and Accessories, 800.626.2002, or you are installing the pre-cut decorator panels, pre-cut black... (6 mm) 5/16″ (8 mm) 1/4″ (6 mm) max 3/4″ (19 mm) 2″ (5.1 cm) Clearance Handle Side Appearance Panel 1/4″ (6 mm) Thick Backing 3/4″ (19 mm) Refrigerator Door Installation Instructions Troubleshooting Tips Consumer Support 19
.... Freezer Door 28 lbs. (13 kg) max. Panels thicker than 1/4″ (6 mm). For CustomStyle™ models Read these instructions completely and carefully. The combined thickness of at least 2″ (5.1 cm) from GE Parts and Accessories, 800.626.2002, or you are installing the pre-cut decorator panels, pre-cut black... (6 mm) 5/16″ (8 mm) 1/4″ (6 mm) max 3/4″ (19 mm) 2″ (5.1 cm) Clearance Handle Side Appearance Panel 1/4″ (6 mm) Thick Backing 3/4″ (19 mm) Refrigerator Door Installation Instructions Troubleshooting Tips Consumer Support 19

Use and Care Manual
Page 21
...Freezer Panel Side Trim Troubleshooting Tips Consumer Support 21 If your model has a dispenser, this step only applies to the top of each panel fits snugly behind the door handle. The Top Trim can be found inside the refrigerator compartment. door. Hand tighten only. Repeat for fresh food ...filler panel (required with some door panels) in until it slides into the slot behind the decorator panel. Attach the Top Trim on dispenser models). With a T-20 Torxdriver, attach the Top Trim, using two screws on each Top Trim piece, to the fresh food panel and top ...
...Freezer Panel Side Trim Troubleshooting Tips Consumer Support 21 If your model has a dispenser, this step only applies to the top of each panel fits snugly behind the door handle. The Top Trim can be found inside the refrigerator compartment. door. Hand tighten only. Repeat for fresh food ...filler panel (required with some door panels) in until it slides into the slot behind the decorator panel. Attach the Top Trim on dispenser models). With a T-20 Torxdriver, attach the Top Trim, using two screws on each Top Trim piece, to the fresh food panel and top ...

Use and Care Manual
Page 23
...800.561.3344 or Visit our Website at geappliances.ca) or from your dealer, by visiting our Website at ge.com (in Installing the Refrigerator. Installation of the installer. • Product failure due to improper installation is available at extra cost from ...these instructions with the Consumer. • Note to Installer - Installation Instructions Refrigerator Models 23, 25, 26, 27 and 29 Questions? Save these instructions for local inspector's use. • IMPORTANT - Refrigerator Installation 30 minutes Water Line Installation 30 minutes • Proper installation is ...
...800.561.3344 or Visit our Website at geappliances.ca) or from your dealer, by visiting our Website at ge.com (in Installing the Refrigerator. Installation of the installer. • Product failure due to improper installation is available at extra cost from ...these instructions with the Consumer. • Note to Installer - Installation Instructions Refrigerator Models 23, 25, 26, 27 and 29 Questions? Save these instructions for local inspector's use. • IMPORTANT - Refrigerator Installation 30 minutes Water Line Installation 30 minutes • Proper installation is ...
Use and Care Manual
Page 24
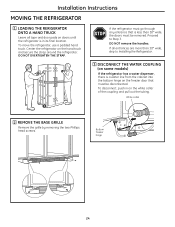
... its final location. Bottom freezer hinge 24 DO NOT remove the handles. Installation Instructions MOVING THE REFRIGERATOR 1 LOADING THE RERIGERATOR ONTO A HAND TRUCK Leave all entrances are more than 38″ wide, skip to Step 3. Proceed to Installing the Refrigerator. 3 DISCONNECT THE WATER COUPLING (on some models) If the refrigerator has a water dispenser, there is...
... its final location. Bottom freezer hinge 24 DO NOT remove the handles. Installation Instructions MOVING THE REFRIGERATOR 1 LOADING THE RERIGERATOR ONTO A HAND TRUCK Leave all entrances are more than 38″ wide, skip to Step 3. Proceed to Installing the Refrigerator. 3 DISCONNECT THE WATER COUPLING (on some models) If the refrigerator has a water dispenser, there is...
Use and Care Manual
Page 25
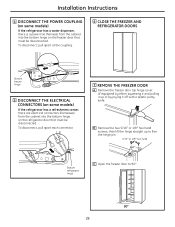
...176; 90° 25 To disconnect, pull apart at the coupling. 6 CLOSE THE FREEZER AND REFRIGERATOR DOORS Bottom freezer hinge 5 DISCONNECT THE ELECTRICAL CONNECTORS (on some models) If the refrigerator has a water dispenser, there is a power line (harness) from the cabinet into the bottom ...hinge straight up or by prying it off with a plastic putty knife. Installation Instructions 4 DISCONNECT THE POWER COUPLING (on some models) If the refrigerator has a refreshment center, there are electrical connectors (harnesses) from the cabinet into the bottom hinge on the freezer door that ...
...176; 90° 25 To disconnect, pull apart at the coupling. 6 CLOSE THE FREEZER AND REFRIGERATOR DOORS Bottom freezer hinge 5 DISCONNECT THE ELECTRICAL CONNECTORS (on some models) If the refrigerator has a water dispenser, there is a power line (harness) from the cabinet into the bottom ...hinge straight up or by prying it off with a plastic putty knife. Installation Instructions 4 DISCONNECT THE POWER COUPLING (on some models) If the refrigerator has a refreshment center, there are electrical connectors (harnesses) from the cabinet into the bottom hinge on the freezer door that ...
Use and Care Manual
Page 27
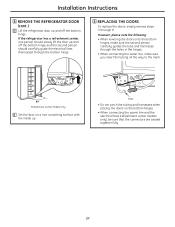
...; Do not pinch the tubing and harnesses when placing the doors on a non-scratching surface with the inside up. Installation Instructions 8 REMOVE THE REFRIGERATOR DOOR (cont .) D Lift the refrigerator door up and off the bottom hinge and the second person should slowly lift the door up and off the bottom hinge. If... in the hinges. • When connecting the water line, make sure you insert the tubing all the way to the mark. 90° Refreshment Center Models Only E Set the door on the bottom hinges. • When connecting the power line and the electrical lines (refreshment center...
...; Do not pinch the tubing and harnesses when placing the doors on a non-scratching surface with the inside up. Installation Instructions 8 REMOVE THE REFRIGERATOR DOOR (cont .) D Lift the refrigerator door up and off the bottom hinge and the second person should slowly lift the door up and off the bottom hinge. If... in the hinges. • When connecting the water line, make sure you insert the tubing all the way to the mark. 90° Refreshment Center Models Only E Set the door on the bottom hinges. • When connecting the power line and the electrical lines (refreshment center...

