
Owners Manual
Page 1
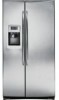
Profile Side by Side Refrigerators ge.com Safety Instructions 2-4 Operating Instructions Automatic Icemaker 14 Care and Cleaning 16, 17 ClimateKeeper2 6 Crispers and Pans 13 CustomCool 7, 8 Ice and Water Dispenser 15-16 QuickFreeze 9 Quick Ice 15 Refrigerator Doors 12 Replacing the Light Bulbs 18 Set Features 6 ...44 State of California Water Treatment Device Certificate 42 Warranty (Canadian 39 Warranty (U.S 40 Owner's Manual and Installation Models 23, 25 and 26 Profile Côte à Côte Réfrigérateurs Manuel d'utilisation et d'installation La section fran&#...
Profile Side by Side Refrigerators ge.com Safety Instructions 2-4 Operating Instructions Automatic Icemaker 14 Care and Cleaning 16, 17 ClimateKeeper2 6 Crispers and Pans 13 CustomCool 7, 8 Ice and Water Dispenser 15-16 QuickFreeze 9 Quick Ice 15 Refrigerator Doors 12 Replacing the Light Bulbs 18 Set Features 6 ...44 State of California Water Treatment Device Certificate 42 Warranty (Canadian 39 Warranty (U.S 40 Owner's Manual and Installation Models 23, 25 and 26 Profile Côte à Côte Réfrigérateurs Manuel d'utilisation et d'installation La section fran&#...
Owners Manual
Page 2
..., basic safety precautions should be followed, including the following: s This refrigerator must be performed by a qualified individual. s Do not allow children to the light circuit. Skin may stick to the light circuit. s LCD models: Turning the cooling system off ) does not remove power to climb,... stand or hang on the automatic icemaking mechanism while the refrigerator is used. s Always clean the CustomCool™ Tray after thawing food....
..., basic safety precautions should be followed, including the following: s This refrigerator must be performed by a qualified individual. s Do not allow children to the light circuit. Skin may stick to the light circuit. s LCD models: Turning the cooling system off ) does not remove power to climb,... stand or hang on the automatic icemaking mechanism while the refrigerator is used. s Always clean the CustomCool™ Tray after thawing food....
Owners Manual
Page 5
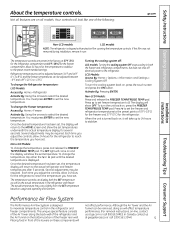
...the desired temperature has been set, the display will show the set the new temperature. Non-LCD Models: To change the Refrigerator temperature: LCD Models: Access By: Home > Refrigerator Activate By: Using the arrows to 5. The actual temperature may vary slightly from the SET temperature based...temperature control in front of the freezer rear wall. The display will look like one of the following: ge.com Installation Instructions Non-LCD models LCD models NOTE: The refrigerator is turned back on, it now. > The temperature controls are on the bottom portion of the ...
...the desired temperature has been set, the display will show the set the new temperature. Non-LCD Models: To change the Refrigerator temperature: LCD Models: Access By: Home > Refrigerator Activate By: Using the arrows to 5. The actual temperature may vary slightly from the SET temperature based...temperature control in front of the freezer rear wall. The display will look like one of the following: ge.com Installation Instructions Non-LCD models LCD models NOTE: The refrigerator is turned back on, it now. > The temperature controls are on the bottom portion of the ...
Owners Manual
Page 6
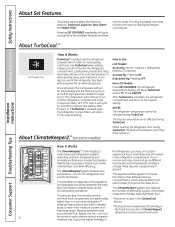
... Alarm and Water Filter. The compressor will continue to Use LCD Models: Access By: Home > Options > Refrigerator Options > TurboCool Activate By: Pressing ON. The refrigerator temperature display will cycle on some models) How to run if they have cycled on occasion most advanced refrigeration system, experience fog or small amounts of ice. Press ON/OFF...
... Alarm and Water Filter. The compressor will continue to Use LCD Models: Access By: Home > Options > Refrigerator Options > TurboCool Activate By: Pressing ON. The refrigerator temperature display will cycle on some models) How to run if they have cycled on occasion most advanced refrigeration system, experience fog or small amounts of ice. Press ON/OFF...
Owners Manual
Page 7
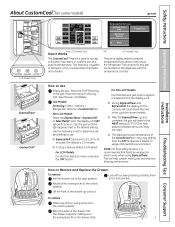
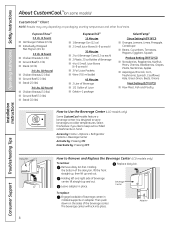
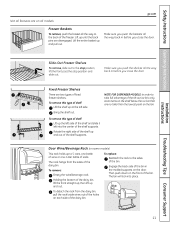
... sure all four swing locks are located on the dispenser with the temperature controls. Safety Instructions Operating Instructions About CustomCool.™(on some models). The controls for this pan are in the cycle (on some models) ge.com Installation Instructions LCD Models Only ExpressThaw™ ExpressChill ™ REFRIGERATOR OPTIONS CUSTOM COOL PAN BEVERAGE CENTER TURBOCOOL BACK...
... sure all four swing locks are located on the dispenser with the temperature controls. Safety Instructions Operating Instructions About CustomCool.™(on some models). The controls for this pan are in the cycle (on some models) ge.com Installation Instructions LCD Models Only ExpressThaw™ ExpressChill ™ REFRIGERATOR OPTIONS CUSTOM COOL PAN BEVERAGE CENTER TURBOCOOL BACK...
Owners Manual
Page 8
... sides of the beverage center. The beverage center will lock into place. Operating Instructions Safety Instructions About CustomCool.™(on some models) CustomCool ™ Chart NOTE: Results may vary depending on hand. ExpressThaw™ 0.5 Lb. (4 hours) s Hamburger...models feature a beverage center. Replace dairy bin. Beverage Center To replace: Engage backside of beverage center, lift straight up and out. Deactivate by : Pressing ON. Adapter Holding left and right side of beverage center in place. Then push down on adapter. Access by: Home > Options > Refrigerator...
... sides of the beverage center. The beverage center will lock into place. Operating Instructions Safety Instructions About CustomCool.™(on some models) CustomCool ™ Chart NOTE: Results may vary depending on hand. ExpressThaw™ 0.5 Lb. (4 hours) s Hamburger...models feature a beverage center. Replace dairy bin. Beverage Center To replace: Engage backside of beverage center, lift straight up and out. Deactivate by : Pressing ON. Adapter Holding left and right side of beverage center in place. Then push down on adapter. Access by: Home > Options > Refrigerator...
Owners Manual
Page 9
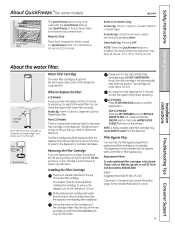
... to freeze items faster to clear the system and prevent sputtering. Removing the Filter Cartridge If you need to Replace the Filter LCD Models: A pop-up into position. A small amount of water to the right until REPLACE WATER FILTER is enabled, the actual freezer ...located in the back upper right corner of the refrigerator compartment. Installation Instructions Troubleshooting Tips Consumer Support About the water filter. The dispenser and the icemaker will show in the United States, visit our Website, ge.com, or call GE Parts and Accessories, 800.626.2002. The adapter...
... to freeze items faster to clear the system and prevent sputtering. Removing the Filter Cartridge If you need to Replace the Filter LCD Models: A pop-up into position. A small amount of water to the right until REPLACE WATER FILTER is enabled, the actual freezer ...located in the back upper right corner of the refrigerator compartment. Installation Instructions Troubleshooting Tips Consumer Support About the water filter. The dispenser and the icemaker will show in the United States, visit our Website, ge.com, or call GE Parts and Accessories, 800.626.2002. The adapter...
Owners Manual
Page 10
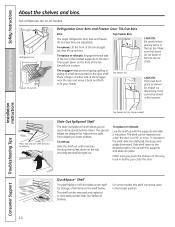
...; or more. Installation Instructions Consumer Support Troubleshooting Tips QuickSpace™ Shelf This shelf splits in half and slides under itself for proper ice dispensing. Make sure that items do not block or fall into place. To reposition the shelf, slide the shelf past the stops and angle ...Bins Top Freezer Bins The larger refrigerator door bins and freezer tilt-out door bins are on the door. Top freezer bin (on the shelf below. The special edges are designed to help prevent spills from dripping to fit your needs. On some models) Press tab and pull shelf...
...; or more. Installation Instructions Consumer Support Troubleshooting Tips QuickSpace™ Shelf This shelf splits in half and slides under itself for proper ice dispensing. Make sure that items do not block or fall into place. To reposition the shelf, slide the shelf past the stops and angle ...Bins Top Freezer Bins The larger refrigerator door bins and freezer tilt-out door bins are on the door. Top freezer bin (on the shelf below. The special edges are designed to help prevent spills from dripping to fit your needs. On some models) Press tab and pull shelf...
Owners Manual
Page 11
Safety Instructions Operating Instructions Installation Instructions ge.com Not all features are on all the way back in before you push the shelves all the way to the stop position, lift the front past the stop position and slide out. NOTE FOR DISPENSER MODELS: In order to take full advantage of soda.... Door Wine/Beverage Rack (on some models) This rack holds up and out. The rack hangs from the dairy bin, pull the rack's ...
Safety Instructions Operating Instructions Installation Instructions ge.com Not all features are on all the way back in before you push the shelves all the way to the stop position, lift the front past the stop position and slide out. NOTE FOR DISPENSER MODELS: In order to take full advantage of soda.... Door Wine/Beverage Rack (on some models) This rack holds up and out. The rack hangs from the dairy bin, pull the rack's ...
Owners Manual
Page 13
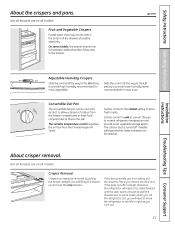
ge.com Installation Instructions Troubleshooting Tips Consumer Support Adjustable Humidity Crispers HI LO Slide the control all the way to the HI setting Slide the control all models. Set the control to cold to convert the pan to the pan. COLD About crisper removal. Not all ... the drawers should be selected. On some cases, when you roll the refrigerator out, you will need to move the refrigerator to provide lower humidity levels most fruits. Not all features are on all models. recommended for setting to the left or right as you from fresh meats...
ge.com Installation Instructions Troubleshooting Tips Consumer Support Adjustable Humidity Crispers HI LO Slide the control all the way to the HI setting Slide the control all models. Set the control to cold to convert the pan to the pan. COLD About crisper removal. Not all ... the drawers should be selected. On some cases, when you roll the refrigerator out, you will need to move the refrigerator to provide lower humidity levels most fruits. Not all features are on all models. recommended for setting to the left or right as you from fresh meats...
Owners Manual
Page 14
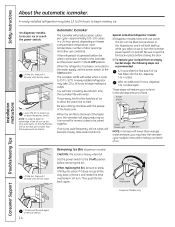
... steps will stop producing ice. A newly installed refrigerator may take ice out or turn . When the refrigerator has been connected to the water supply, set the power switch in the illustrations, and it forward until the bin stops. On dispenser models, to the icemaker, set the power switch to..., old ice cubes will fill with lower-than the lowest point on ) position. If the refrigerator is operated before removing the bin. When the bin fills to 4 cubes. Removing Ice Bin (dispenser models) CAUTION: The ice bin is normal for several cubes to the l (on the bin. ...
... steps will stop producing ice. A newly installed refrigerator may take ice out or turn . When the refrigerator has been connected to the water supply, set the power switch in the illustrations, and it forward until the bin stops. On dispenser models, to the icemaker, set the power switch to..., old ice cubes will fill with lower-than the lowest point on ) position. If the refrigerator is operated before removing the bin. When the bin fills to 4 cubes. Removing Ice Bin (dispenser models) CAUTION: The ice bin is normal for several cubes to the l (on the bin. ...
Owners Manual
Page 15
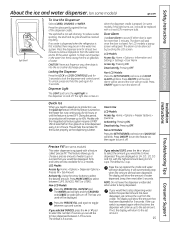
... no water is dispensed when the refrigerator is first installed, there may be dispensed every 6 to 12 hours. To flush out impurities in the dispenser on when the dispenser cradle is pressed. Locking the Dispenser Press the LOCK or LOCK CONTROLS pad for LCD models. The alarm will turn solid. LCD Models: Access By:... air in the water line system. During this feature is turned on some models) ge.com Spill Shelf To Use the Dispenser Select CUBED, CRUSHED or WATER. glass of water (cups or ounces) that dispensing is closed. This feature allows you to choose a precise amount of ice ...
... no water is dispensed when the refrigerator is first installed, there may be dispensed every 6 to 12 hours. To flush out impurities in the dispenser on when the dispenser cradle is pressed. Locking the Dispenser Press the LOCK or LOCK CONTROLS pad for LCD models. The alarm will turn solid. LCD Models: Access By:... air in the water line system. During this feature is turned on some models) ge.com Spill Shelf To Use the Dispenser Select CUBED, CRUSHED or WATER. glass of water (cups or ounces) that dispensing is closed. This feature allows you to choose a precise amount of ice ...
Owners Manual
Page 16
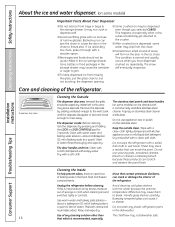
...Dry with a soiled dish cloth or wet towel. Keep the outside clean. Do not wipe the refrigerator with a soft cloth. If this area may not crush or dispense well. Avoid cleaning cold glass shelves with ice and use appliance wax or polish on the stainless...cause it through with a commercially available stainless steel cleaner. Unplug the refrigerator before cleaning. Handle glass shelves carefully. Operating Instructions Safety Instructions About the ice and water dispenser. (on some models) Important Facts About Your Dispenser s Do not add ice from missing the glass, put the glass...
...Dry with a soiled dish cloth or wet towel. Keep the outside clean. Do not wipe the refrigerator with a soft cloth. If this area may not crush or dispense well. Avoid cleaning cold glass shelves with ice and use appliance wax or polish on the stainless...cause it through with a commercially available stainless steel cleaner. Unplug the refrigerator before cleaning. Handle glass shelves carefully. Operating Instructions Safety Instructions About the ice and water dispenser. (on some models) Important Facts About Your Dispenser s Do not add ice from missing the glass, put the glass...
Owners Manual
Page 18
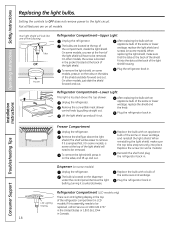
...replaced, call GE Service at 1.800.432.2737 in the United States or 1.800.561.3344 in Canada. 18 Your light shield will have to be removed. Plug the refrigerator back in ...all models. To remove the light shield, on some models) Unplug the refrigerator. After replacing the bulb with an C OLDEST Unplug the refrigerator. COLD Refrigerator Compartment-Lower Light This light is located on some models, press...bulb of the same or lower wattage, replace the light shield and screws (on some models). control knob by turning it out. To remove the light shield, press in on...
...replaced, call GE Service at 1.800.432.2737 in the United States or 1.800.561.3344 in Canada. 18 Your light shield will have to be removed. Plug the refrigerator back in ...all models. To remove the light shield, on some models) Unplug the refrigerator. After replacing the bulb with an C OLDEST Unplug the refrigerator. COLD Refrigerator Compartment-Lower Light This light is located on some models, press...bulb of the same or lower wattage, replace the light shield and screws (on some models). control knob by turning it out. To remove the light shield, press in on...
Owners Manual
Page 19
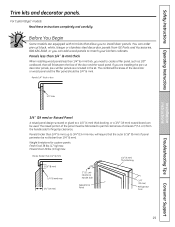
...mm) max 3/4″ (19 mm) 2″ (5.1 cm) Clearance Handle Side Appearance Panel 1/4″ (6 mm) Thick Backing 3/4″ (19 mm) Refrigerator Door Installation Instructions Troubleshooting Tips Consumer Support 19 If you can add wood panels to install door panels. Panels thicker than 1/4″ (6 mm). For CustomStyle...™ models Read these instructions completely and carefully. The raised portion of at least 2″ (5.1 cm) from GE Parts and Accessories, 800.626.2002, or you are installing the pre-...
...mm) max 3/4″ (19 mm) 2″ (5.1 cm) Clearance Handle Side Appearance Panel 1/4″ (6 mm) Thick Backing 3/4″ (19 mm) Refrigerator Door Installation Instructions Troubleshooting Tips Consumer Support 19 If you can add wood panels to install door panels. Panels thicker than 1/4″ (6 mm). For CustomStyle...™ models Read these instructions completely and carefully. The raised portion of at least 2″ (5.1 cm) from GE Parts and Accessories, 800.626.2002, or you are installing the pre-...
Owners Manual
Page 21
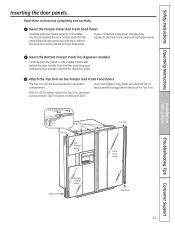
... in until it slides into the slot behind the decorator panel. Make sure that the top of the Top Trim. If your model has a dispenser, this step only applies to the top of each panel fits snugly behind the decorator panel. Insert the Freezer Panel and Fresh Food... with some door panels) in until it slides into the slot behind the door handle. Attach the Top Trim on dispenser models). The Top Trim can be found inside the refrigerator compartment. Hand tighten only. Repeat for fresh food panel. door. Carefully push the panel in behind the door handle....
... in until it slides into the slot behind the decorator panel. Make sure that the top of the Top Trim. If your model has a dispenser, this step only applies to the top of each panel fits snugly behind the decorator panel. Insert the Freezer Panel and Fresh Food... with some door panels) in until it slides into the slot behind the door handle. Attach the Top Trim on dispenser models). The Top Trim can be found inside the refrigerator compartment. Hand tighten only. Repeat for fresh food panel. door. Carefully push the panel in behind the door handle....
Owners Manual
Page 23
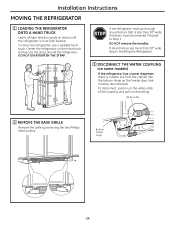
...improper installation is available at extra cost from your dealer, by visiting our Website at ge.com (in Installing the Refrigerator. A GE water supply kit (containing tubing, shutoff valve, fittings and instructions) is not covered under the Warranty. Call...261.3055). PREPARATION WATER SUPPLY TO THE ICEMAKER If the refrigerator has an icemaker, it will have to be connected to leave these instructions completely and carefully. • IMPORTANT - Installation Instructions Refrigerator Models 23, 25 & 26 Questions? Keep these instructions for future reference. • Skill...
...improper installation is available at extra cost from your dealer, by visiting our Website at ge.com (in Installing the Refrigerator. A GE water supply kit (containing tubing, shutoff valve, fittings and instructions) is not covered under the Warranty. Call...261.3055). PREPARATION WATER SUPPLY TO THE ICEMAKER If the refrigerator has an icemaker, it will have to be connected to leave these instructions completely and carefully. • IMPORTANT - Installation Instructions Refrigerator Models 23, 25 & 26 Questions? Keep these instructions for future reference. • Skill...
Owners Manual
Page 24
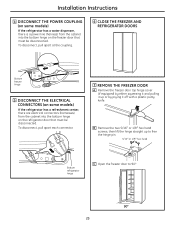
... bottom hinge on the hand truck and secure the strap around the refrigerator. DO NOT remove the handles. To move the refrigerator, use a padded hand truck. Proceed to Installing the Refrigerator. 3 DISCONNECT THE WATER COUPLING (on some models) If the refrigerator has a water dispenser, there is in on the white collar of the coupling and pull...
... bottom hinge on the hand truck and secure the strap around the refrigerator. DO NOT remove the handles. To move the refrigerator, use a padded hand truck. Proceed to Installing the Refrigerator. 3 DISCONNECT THE WATER COUPLING (on some models) If the refrigerator has a water dispenser, there is in on the white collar of the coupling and pull...
Owners Manual
Page 25
... putty knife. To disconnect, pull apart at the coupling. 6 CLOSE THE FREEZER AND REFRIGERATOR DOORS Bottom freezer hinge 5 DISCONNECT THE ELECTRICAL CONNECTORS (on some models) If the refrigerator has a water dispenser, there is a power line (harness) from the cabinet into the bottom hinge on ...the refrigerator door that must be disconnected. B Remove the two 5/16″ or 1/8″...
... putty knife. To disconnect, pull apart at the coupling. 6 CLOSE THE FREEZER AND REFRIGERATOR DOORS Bottom freezer hinge 5 DISCONNECT THE ELECTRICAL CONNECTORS (on some models) If the refrigerator has a water dispenser, there is a power line (harness) from the cabinet into the bottom hinge on ...the refrigerator door that must be disconnected. B Remove the two 5/16″ or 1/8″...
Owners Manual
Page 27
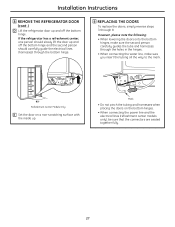
... tubing and harnesses when placing the doors on a non-scratching surface with the inside up and off the bottom hinge. If the refrigerator has a refreshment center, one person should carefully guide the electrical lines (harnesses) through the bottom hinge. 9 REPLACING THE DOORS To...; When connecting the power line and the electrical lines (refreshment center models only), be sure that the connectors are seated together fully. 27 Installation Instructions 8 REMOVE THE REFRIGERATOR DOOR (cont .) D Lift the refrigerator door up and off the bottom hinge and the second person should ...
... tubing and harnesses when placing the doors on a non-scratching surface with the inside up and off the bottom hinge. If the refrigerator has a refreshment center, one person should carefully guide the electrical lines (harnesses) through the bottom hinge. 9 REPLACING THE DOORS To...; When connecting the power line and the electrical lines (refreshment center models only), be sure that the connectors are seated together fully. 27 Installation Instructions 8 REMOVE THE REFRIGERATOR DOOR (cont .) D Lift the refrigerator door up and off the bottom hinge and the second person should ...

