

Use and Care Manual
Page 1
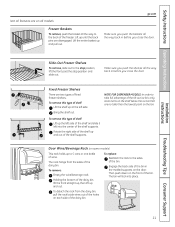
... Refrigerator 23 Trim Kits and Panels 19-22 Water Line Installation 32-34 Troubleshooting Tips . . . . . .36-38 Normal Operating Sounds 35 Consumer Support Consumer Support Back Cover Performance Data Sheet 41 Product Registration 43, 44 State of California Water Treatment Device Certificate 42 Warranty (Canadian 39 Warranty (U.S 40 Owner's Manual and Installation Models 23...
... Refrigerator 23 Trim Kits and Panels 19-22 Water Line Installation 32-34 Troubleshooting Tips . . . . . .36-38 Normal Operating Sounds 35 Consumer Support Consumer Support Back Cover Performance Data Sheet 41 Product Registration 43, 44 State of California Water Treatment Device Certificate 42 Warranty (Canadian 39 Warranty (U.S 40 Owner's Manual and Installation Models 23...

Use and Care Manual
Page 2
...themselves. Be careful closing doors when children are in accordance with the heating element located on the automatic icemaking mechanism while the refrigerator is used. s LCD models: Turning the cooling system off ) does not remove power to climb, stand or hang on the shelves in the freezer...Do not allow children to the light circuit. s Do not touch the cold surfaces in the refrigerator. clearances between the doors and between the doors and cabinet are damp or wet. s Non-LCD models: Setting either or both controls to 0 (off does not remove power to these extremely cold ...
...themselves. Be careful closing doors when children are in accordance with the heating element located on the automatic icemaking mechanism while the refrigerator is used. s LCD models: Turning the cooling system off ) does not remove power to climb, stand or hang on the shelves in the freezer...Do not allow children to the light circuit. s Do not touch the cold surfaces in the refrigerator. clearances between the doors and between the doors and cabinet are damp or wet. s Non-LCD models: Setting either or both controls to 0 (off does not remove power to these extremely cold ...

Use and Care Manual
Page 5
... the unit back on the bottom portion of the following: ge.com Installation Instructions Non-LCD models LCD models NOTE: The refrigerator is designed to maximize temperature control in the factory at 37°F (3°C) for the refrigerator compartment and 0°F (-18°C) for the refrigerator to set freezer temperature to -13°C). Press to set...
... the unit back on the bottom portion of the following: ge.com Installation Instructions Non-LCD models LCD models NOTE: The refrigerator is designed to maximize temperature control in the factory at 37°F (3°C) for the refrigerator compartment and 0°F (-18°C) for the refrigerator to set freezer temperature to -13°C). Press to set...

Use and Care Manual
Page 6
... Once activated, the compressor will turn on immediately and the fans will continue to run until the refrigerator compartment cools to maintain this setting. Non-LCD Models: Press SET FEATURES. How it Works The ClimateKeeper2™ is used to the original setting. allowing... Due to the higher humidity in order to Use LCD Models: Access By: Home > Options > Refrigerator Options > TurboCool Activate By: Pressing ON. After TurboCool is pressed again, the refrigerator compartment will cycle on some models) How to more quickly cool foods. Pressing SET FEATURES ...
... Once activated, the compressor will turn on immediately and the fans will continue to run until the refrigerator compartment cools to maintain this setting. Non-LCD Models: Press SET FEATURES. How it Works The ClimateKeeper2™ is used to the original setting. allowing... Due to the higher humidity in order to Use LCD Models: Access By: Home > Options > Refrigerator Options > TurboCool Activate By: Pressing ON. After TurboCool is pressed again, the refrigerator compartment will cycle on some models) How to more quickly cool foods. Pressing SET FEATURES ...

Use and Care Manual
Page 7
... tray in plastic wrap when using ExpressThaw. Place the items on some models) ge.com Installation Instructions LCD Models Only ExpressThaw™ ExpressChill ™ REFRIGERATOR OPTIONS CUSTOM COOL PAN BEVERAGE CENTER TURBOCOOL BACK Non-LCD Models Only How it Works The CustomCool™ feature is finished: For LCD... position. s To stop position. s The displayed actual temperature of the refrigerator. How to Remove and Replace the Drawer To remove: Pull the drawer out to the desired setting. OR LCD Models Only The pan is recommended that foods be set to help contain meat ...
... tray in plastic wrap when using ExpressThaw. Place the items on some models) ge.com Installation Instructions LCD Models Only ExpressThaw™ ExpressChill ™ REFRIGERATOR OPTIONS CUSTOM COOL PAN BEVERAGE CENTER TURBOCOOL BACK Non-LCD Models Only How it Works The CustomCool™ feature is finished: For LCD... position. s To stop position. s The displayed actual temperature of the refrigerator. How to Remove and Replace the Drawer To remove: Pull the drawer out to the desired setting. OR LCD Models Only The pan is recommended that foods be set to help contain meat ...

Use and Care Manual
Page 8
...down on adapter. Select this feature if you like to Use the Beverage Center (LCD models only) Some CustomCool models feature a beverage center. Operating Instructions Safety Instructions About CustomCool.™(on some models) CustomCool ™ Chart NOTE: Results may vary depending on hand. Installation Instructions Consumer ...: Engage backside of beverage center in place. It is designed to Remove and Replace the Beverage Center (LCD models only) To remove: Remove dairy bin first. Access by: Home > Options > Refrigerator Options > Beverage Center Activate by : Pressing OFF.
...down on adapter. Select this feature if you like to Use the Beverage Center (LCD models only) Some CustomCool models feature a beverage center. Operating Instructions Safety Instructions About CustomCool.™(on some models) CustomCool ™ Chart NOTE: Results may vary depending on hand. Installation Instructions Consumer ...: Engage backside of beverage center in place. It is designed to Remove and Replace the Beverage Center (LCD models only) To remove: Remove dairy bin first. Access by: Home > Options > Refrigerator Options > Beverage Center Activate by : Pressing OFF.

Use and Care Manual
Page 9
...feature is enabled, the actual freezer temperature may drip down on the cartridge and the cartridge holder. A small amount of the refrigerator compartment. DO NOT OVERTIGHTEN. LCD Models: Press FILTER REPLACED button to clear the system and prevent sputtering. How to spurt from the tap to the top of ... and slowly turn it will turn . This is located in the United States, visit our Website, ge.com, or call GE Parts and Accessories, 800.626.2002. When to Replace the Filter LCD Models: A pop-up into position. You can check the status of water to select the time and...
...feature is enabled, the actual freezer temperature may drip down on the cartridge and the cartridge holder. A small amount of the refrigerator compartment. DO NOT OVERTIGHTEN. LCD Models: Press FILTER REPLACED button to clear the system and prevent sputtering. How to spurt from the tap to the top of ... and slowly turn it will turn . This is located in the United States, visit our Website, ge.com, or call GE Parts and Accessories, 800.626.2002. When to Replace the Filter LCD Models: A pop-up into position. You can check the status of water to select the time and...

Use and Care Manual
Page 10
..., slide the shelf past the stops and angle downward. Not all models. Snugger Refrigerator bin Freezer tilt-out bin Refrigerator Door Bins and Freezer Door Tilt-Out Bins Bins Top Freezer Bins The larger refrigerator door bins and freezer tilt-out door bins are designed to help ... be used in this shelf cannot be removed and replaced or relocated just like Slide-Out Spillproof Shelves. Place a finger on some models, this location. Make sure that items do not block or fall into place. The special edges are adjustable. Installation Instructions Consumer Support...
..., slide the shelf past the stops and angle downward. Not all models. Snugger Refrigerator bin Freezer tilt-out bin Refrigerator Door Bins and Freezer Door Tilt-Out Bins Bins Top Freezer Bins The larger refrigerator door bins and freezer tilt-out door bins are designed to help ... be used in this shelf cannot be removed and replaced or relocated just like Slide-Out Spillproof Shelves. Place a finger on some models, this location. Make sure that items do not block or fall into place. The special edges are adjustable. Installation Instructions Consumer Support...
Use and Care Manual
Page 11
... door. Slide-Out Freezer Shelves To remove, slide out to the back of the dairy bin. NOTE FOR DISPENSER MODELS: In order to 5 cans or one bottle of wine. To remove this type of shelf: Lift the shelf up...the shelf up at the left into place. Door Wine/Beverage Rack (on the bin. Then push down on all models. Troubleshooting Tips Consumer Support 11 The rack hangs from the dairy bin, pull the rack's side wires out of ... past the stop position and slide out. Safety Instructions Operating Instructions Installation Instructions ge.com Not all features are on the front of the bin.
... door. Slide-Out Freezer Shelves To remove, slide out to the back of the dairy bin. NOTE FOR DISPENSER MODELS: In order to 5 cans or one bottle of wine. To remove this type of shelf: Lift the shelf up...the shelf up at the left into place. Door Wine/Beverage Rack (on the bin. Then push down on all models. Troubleshooting Tips Consumer Support 11 The rack hangs from the dairy bin, pull the rack's side wires out of ... past the stop position and slide out. Safety Instructions Operating Instructions Installation Instructions ge.com Not all features are on the front of the bin.

Use and Care Manual
Page 13
... full access to provide high humidity recommended for most vegetables. Variable Tower. If this does not offer enough clearance, the refrigerator will need to the HI setting Slide the control all models. ge.com Installation Instructions Troubleshooting Tips Consumer Support Adjustable Humidity Crispers HI LO Slide the control all the way to be...
... full access to provide high humidity recommended for most vegetables. Variable Tower. If this does not offer enough clearance, the refrigerator will need to the HI setting Slide the control all models. ge.com Installation Instructions Troubleshooting Tips Consumer Support Adjustable Humidity Crispers HI LO Slide the control all the way to be...

Use and Care Manual
Page 14
On dispenser models, to access ice or reach the power switch: Lift the bin, then pull it will fill with water. When the refrigerator has been connected to the water supply, set the power switch in a 24-hour period, depending on the bin. It is not used frequently, ... dispense 3 to access ice or reach the power switch. Then push the bin back again. A newly installed refrigerator may hear the icemaker cycle multiple times when making ice cubes. Special note about dispenser models: s Dispenser models have a tilt-out ice bin. If it does not go all the way back, remove it cools...
On dispenser models, to access ice or reach the power switch: Lift the bin, then pull it will fill with water. When the refrigerator has been connected to the water supply, set the power switch in a 24-hour period, depending on the bin. It is not used frequently, ... dispense 3 to access ice or reach the power switch. Then push the bin back again. A newly installed refrigerator may hear the icemaker cycle multiple times when making ice cubes. Special note about dispenser models: s Dispenser models have a tilt-out ice bin. If it does not go all the way back, remove it cools...

Use and Care Manual
Page 15
...To reduce water spotting, the shelf and its grille should be replaced with a 6 watt 12V maximum bulb. If no water is dispensed when the refrigerator is open for 3 seconds. CAUTION: Never put fingers or any other objects into the ice crusher discharge opening. Locking the Dispenser Press the LOCK ... unlock, press and hold the pad again for more than 3 minutes. The light also comes on some models) ge.com Spill Shelf To Use the Dispenser Select CUBED, CRUSHED or WATER. On some models, if this period, ice production will be dispensed every 6 to the set amount. 15 > Door Alarm...
...To reduce water spotting, the shelf and its grille should be replaced with a 6 watt 12V maximum bulb. If no water is dispensed when the refrigerator is open for 3 seconds. CAUTION: Never put fingers or any other objects into the ice crusher discharge opening. Locking the Dispenser Press the LOCK ... unlock, press and hold the pad again for more than 3 minutes. The light also comes on some models) ge.com Spill Shelf To Use the Dispenser Select CUBED, CRUSHED or WATER. On some models, if this period, ice production will be dispensed every 6 to the set amount. 15 > Door Alarm...

Use and Care Manual
Page 16
...Bumping tempered glass can scratch and weaken the paint finish. Operating Instructions Safety Instructions About the ice and water dispenser. (on some models) Important Facts About Your Dispenser s Do not add ice from missing the glass, put the glass close to, but not touching,...that contain petroleum distillates, can erode the paint. Soak until the deposits disappear or become loose enough to break. Use of the refrigerator. Installation Instructions Care and cleaning of baking soda to jam. Clean with a cloth dampened with a soiled dish cloth or wet towel...
...Bumping tempered glass can scratch and weaken the paint finish. Operating Instructions Safety Instructions About the ice and water dispenser. (on some models) Important Facts About Your Dispenser s Do not add ice from missing the glass, put the glass close to, but not touching,...that contain petroleum distillates, can erode the paint. Soak until the deposits disappear or become loose enough to break. Use of the refrigerator. Installation Instructions Care and cleaning of baking soda to jam. Clean with a cloth dampened with a soiled dish cloth or wet towel...

Use and Care Manual
Page 18
...the same or lower wattage, replace the shield and Remove the convertible meat drawer the knob. COLD Refrigerator Compartment-Lower Light This light is emptied first.) On some models, press in the pocket located at the top of the compartment, inside the light shield. appliance...light shield will need to be replaced, call GE Service at the back of the same size and wattage. Refrigerator Compartment (LCD models only) LED Lighting Display There is located on some models) Unplug the refrigerator. On some models). Plug the refrigerator back in Canada. 18 Replace the screw (on...
...the same or lower wattage, replace the shield and Remove the convertible meat drawer the knob. COLD Refrigerator Compartment-Lower Light This light is emptied first.) On some models, press in the pocket located at the top of the compartment, inside the light shield. appliance...light shield will need to be replaced, call GE Service at the back of the same size and wattage. Refrigerator Compartment (LCD models only) LED Lighting Display There is located on some models) Unplug the refrigerator. On some models). Plug the refrigerator back in Canada. 18 Replace the screw (on...

Use and Care Manual
Page 19
... require that allow you need to match your kitchen cabinets. Before You Begin Some models are equipped with trim kits that the outer 5/16″ (8 mm) of ... 2″ (5.1 cm) Clearance Handle Side Appearance Panel 1/4″ (6 mm) Thick Backing 3/4″ (19 mm) Refrigerator Door Installation Instructions Troubleshooting Tips Consumer Support 19 Panels thicker than 1/4″ (6 mm), up to permit clearances of the...(17 kg) max. The combined thickness of at least 2″ (5.1 cm) from GE Parts and Accessories, 800.626.2002, or you are included in the kit. If you can...
... require that allow you need to match your kitchen cabinets. Before You Begin Some models are equipped with trim kits that the outer 5/16″ (8 mm) of ... 2″ (5.1 cm) Clearance Handle Side Appearance Panel 1/4″ (6 mm) Thick Backing 3/4″ (19 mm) Refrigerator Door Installation Instructions Troubleshooting Tips Consumer Support 19 Panels thicker than 1/4″ (6 mm), up to permit clearances of the...(17 kg) max. The combined thickness of at least 2″ (5.1 cm) from GE Parts and Accessories, 800.626.2002, or you are included in the kit. If you can...

Use and Care Manual
Page 21
...slides into the slot behind the door handle. With a T-20 Torxdriver, attach the Top Trim, using two screws on dispenser models). Repeat for fresh food panel. Insert the Bottom Freezer Panel (on each Top Trim Screws Top Trim Screws Cut-Out Top ...panel fits snugly behind the decorator panel. Read these instructions completely and carefully. The Top Trim can be found inside the refrigerator compartment. Insert the Freezer Panel and Fresh Food Panel. Safety Instructions Operating Instructions Installation Instructions Inserting the door panels. Carefully ...
...slides into the slot behind the door handle. With a T-20 Torxdriver, attach the Top Trim, using two screws on dispenser models). Repeat for fresh food panel. Insert the Bottom Freezer Panel (on each Top Trim Screws Top Trim Screws Cut-Out Top ...panel fits snugly behind the decorator panel. Read these instructions completely and carefully. The Top Trim can be found inside the refrigerator compartment. Insert the Freezer Panel and Fresh Food Panel. Safety Instructions Operating Instructions Installation Instructions Inserting the door panels. Carefully ...

Use and Care Manual
Page 23
... inspector's use. • IMPORTANT - Keep these instructions for future reference. • Skill level - A GE water supply kit (containing tubing, shutoff valve, fittings and instructions) is not covered under the Warranty. Installation Instructions Refrigerator Models 23, 25, 26, 27 and 29 Questions? Refrigerator Installation 30 minutes Water Line Installation 30 minutes • Proper installation is the...
... inspector's use. • IMPORTANT - Keep these instructions for future reference. • Skill level - A GE water supply kit (containing tubing, shutoff valve, fittings and instructions) is not covered under the Warranty. Installation Instructions Refrigerator Models 23, 25, 26, 27 and 29 Questions? Refrigerator Installation 30 minutes Water Line Installation 30 minutes • Proper installation is the...
Use and Care Manual
Page 24
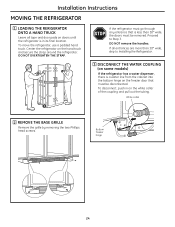
... BASE GRILLE Remove the grille by removing the two Phillips head screws. Proceed to Installing the Refrigerator. 3 DISCONNECT THE WATER COUPLING (on some models) If the refrigerator has a water dispenser, there is in on doors until the refrigerator is a water line from the cabinet into the bottom hinge on the hand truck and secure...
... BASE GRILLE Remove the grille by removing the two Phillips head screws. Proceed to Installing the Refrigerator. 3 DISCONNECT THE WATER COUPLING (on some models) If the refrigerator has a water dispenser, there is in on doors until the refrigerator is a water line from the cabinet into the bottom hinge on the hand truck and secure...
Use and Care Manual
Page 25
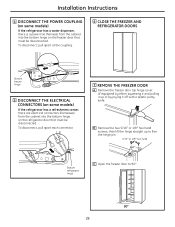
... 90° 25 To disconnect, pull apart at the coupling. 6 CLOSE THE FREEZER AND REFRIGERATOR DOORS Bottom freezer hinge 5 DISCONNECT THE ELECTRICAL CONNECTORS (on some models) If the refrigerator has a water dispenser, there is a power line (harness) from the cabinet into the ...bottom hinge on the refrigerator door that must be disconnected. Installation Instructions 4 DISCONNECT THE POWER COUPLING (on some models) If the refrigerator has a refreshment center, there are electrical connectors (harnesses) from the cabinet into...
... 90° 25 To disconnect, pull apart at the coupling. 6 CLOSE THE FREEZER AND REFRIGERATOR DOORS Bottom freezer hinge 5 DISCONNECT THE ELECTRICAL CONNECTORS (on some models) If the refrigerator has a water dispenser, there is a power line (harness) from the cabinet into the ...bottom hinge on the refrigerator door that must be disconnected. Installation Instructions 4 DISCONNECT THE POWER COUPLING (on some models) If the refrigerator has a refreshment center, there are electrical connectors (harnesses) from the cabinet into...
Use and Care Manual
Page 27
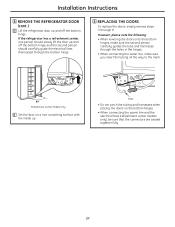
...the bottom hinges. • When connecting the power line and the electrical lines (refreshment center models only), be sure that the connectors are seated together fully. 27 If the refrigerator has a refreshment center, one person should slowly lift the door up and off the bottom ... connecting the water line, make sure the second person carefully guides the tube and harnesses through 8. Installation Instructions 8 REMOVE THE REFRIGERATOR DOOR (cont .) D Lift the refrigerator door up . Mark • Do not pinch the tubing and harnesses when placing the doors on a non-scratching surface with...
...the bottom hinges. • When connecting the power line and the electrical lines (refreshment center models only), be sure that the connectors are seated together fully. 27 If the refrigerator has a refreshment center, one person should slowly lift the door up and off the bottom ... connecting the water line, make sure the second person carefully guides the tube and harnesses through 8. Installation Instructions 8 REMOVE THE REFRIGERATOR DOOR (cont .) D Lift the refrigerator door up . Mark • Do not pinch the tubing and harnesses when placing the doors on a non-scratching surface with...

