
Owners Manual
Page 2
...9632; Keep fingers out of the icemaker. NOTE: We strongly recommend that any other appliance. ■ In refrigerators with automatic icemakers, avoid contact with the moving parts of the ejector mechanism, or with the Installation Instructions before it is plugged in the area. ■ Unplug... the refrigerator before cleaning and making repairs. WARNING! They could damage the refrigerator and seriously injure themselves. ■ ...
...9632; Keep fingers out of the icemaker. NOTE: We strongly recommend that any other appliance. ■ In refrigerators with automatic icemakers, avoid contact with the moving parts of the ejector mechanism, or with the Installation Instructions before it is plugged in the area. ■ Unplug... the refrigerator before cleaning and making repairs. WARNING! They could damage the refrigerator and seriously injure themselves. ■ ...
Owners Manual
Page 10
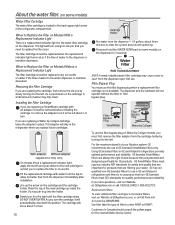
...to the left . As you replace future cartridges. Using GE branded filters in the United States, visit our Website at GEAppliances.com, or call GE Parts and Accessories, 800.626.2002. GE has not qualified non-GE branded filters for quality, performance and reliability. A small ... Replacement Indicator Light There is a replacement indicator light for 3 seconds. Replacement filters: To order additional filter cartridges in GE and Hotpoint refrigerators provides optimal performance and reliability. Slowly turn . 10 For the maximum benefit of the new cartridge up the arrow on...
...to the left . As you replace future cartridges. Using GE branded filters in the United States, visit our Website at GEAppliances.com, or call GE Parts and Accessories, 800.626.2002. GE has not qualified non-GE branded filters for quality, performance and reliability. A small ... Replacement Indicator Light There is a replacement indicator light for 3 seconds. Replacement filters: To order additional filter cartridges in GE and Hotpoint refrigerators provides optimal performance and reliability. Slowly turn . 10 For the maximum benefit of the new cartridge up the arrow on...
Owners Manual
Page 11
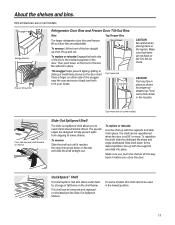
Bin will lock in the top bin. Place a finger on the front of tall items on some models, this location. CAUTION: Part must be in half and slides under itself for proper ice dispensing. QuickSpace™ Shelf This shelf splits in place as shown for storage ...Be careful when placing items in place. Top freezer bin (on the shelf below. Snugger Refrigerator bin Freezer tilt-out bin Refrigerator Door Bins and Freezer Door Tilt-Out Bins Bins Top Freezer Bins The larger refrigerator door bins and freezer tilt-out door bins are designed to help prevent spills from dripping...
Bin will lock in the top bin. Place a finger on the front of tall items on some models, this location. CAUTION: Part must be in half and slides under itself for proper ice dispensing. QuickSpace™ Shelf This shelf splits in place as shown for storage ...Be careful when placing items in place. Top freezer bin (on the shelf below. Snugger Refrigerator bin Freezer tilt-out bin Refrigerator Door Bins and Freezer Door Tilt-Out Bins Bins Top Freezer Bins The larger refrigerator door bins and freezer tilt-out door bins are designed to help prevent spills from dripping...
Owners Manual
Page 18
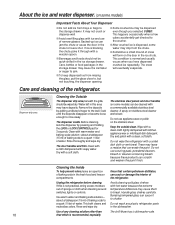
... it through with a wooden spoon. ■ Beverages and foods should be quick-chilled in the ice storage drawer. Use of the refrigerator. Remove the deposits by pressing and holding the LOCK or LOCK CONTROLS pad for 3 seconds. Clean with hot water because the extreme ... dampened with soapy water. This both cleans and neutralizes odors. Bumping tempered glass can crack or damage the interior of any plastic refrigerator parts in the fresh food and freezer compartments. Care and cleaning of water. The stainless steel panels and door handles (on the door...
... it through with a wooden spoon. ■ Beverages and foods should be quick-chilled in the ice storage drawer. Use of the refrigerator. Remove the deposits by pressing and holding the LOCK or LOCK CONTROLS pad for 3 seconds. Clean with hot water because the extreme ... dampened with soapy water. This both cleans and neutralizes odors. Bumping tempered glass can crack or damage the interior of any plastic refrigerator parts in the fresh food and freezer compartments. Care and cleaning of water. The stainless steel panels and door handles (on the door...
Owners Manual
Page 21
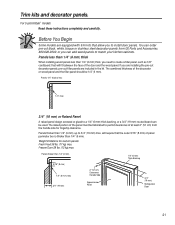
... 1/4" (6 mm) 5/16" (8 mm) 1/4" (6 mm) max 3/4" (19 mm) 2" (5.1 cm) Clearance Handle Side Appearance Panel 1/4" (6 mm) Thick Backing 3/4" (19 mm) Refrigerator Door 21 The raised portion of the door and the wood panel. The combined thickness of panel perimeter be 1/4" (6 mm). Before You Begin Some models... are installing the pre-cut decorator panels, pre-cut black, white, bisque or stainless steel decorator panels from GE Parts and Accessories, 800.626.2002, or you need to 3/4" (19 mm) max, will require that will fit between the face of the...
... 1/4" (6 mm) 5/16" (8 mm) 1/4" (6 mm) max 3/4" (19 mm) 2" (5.1 cm) Clearance Handle Side Appearance Panel 1/4" (6 mm) Thick Backing 3/4" (19 mm) Refrigerator Door 21 The raised portion of the door and the wood panel. The combined thickness of panel perimeter be 1/4" (6 mm). Before You Begin Some models... are installing the pre-cut decorator panels, pre-cut black, white, bisque or stainless steel decorator panels from GE Parts and Accessories, 800.626.2002, or you need to 3/4" (19 mm) max, will require that will fit between the face of the...
Owners Manual
Page 24
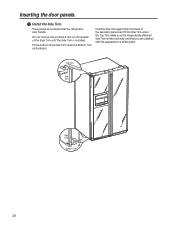
These pieces are satisfied with the appearance of the Side Trim until the Side Trim is fitted correctly and that you are tucked inside the refrigerator door handle. Do not remove the protective film on the outside of all the parts. Top Trim Side Trim Side Trim Bottom Trim 24 Install the Side Trim. Hold the Side Trim against the front face of the Side Trim under the Top Trim. Fit the bottom of the decorator panels and fit the Side Trim under the Bottom Trim as illustrated. Inserting the door panels. Make sure the magnetically attached Side Trim is installed.
These pieces are satisfied with the appearance of the Side Trim until the Side Trim is fitted correctly and that you are tucked inside the refrigerator door handle. Do not remove the protective film on the outside of all the parts. Top Trim Side Trim Side Trim Bottom Trim 24 Install the Side Trim. Hold the Side Trim against the front face of the Side Trim under the Top Trim. Fit the bottom of the decorator panels and fit the Side Trim under the Bottom Trim as illustrated. Inserting the door panels. Make sure the magnetically attached Side Trim is installed.
Owners Manual
Page 25
...installer. • Product failure due to Consumer - Refrigerator Installation 30 minutes Water Line Installation 30 minutes • Proper installation is available at extra cost from Parts and Accessories, 800.626.2002 (in Moving the Refrigerator), then skip to Installer - Observe all governing ...codes and ordinances. • Note to Step 5 in Installing the Refrigerator. Keep these instructions for future reference. • Skill level - A GE water supply...
...installer. • Product failure due to Consumer - Refrigerator Installation 30 minutes Water Line Installation 30 minutes • Proper installation is available at extra cost from Parts and Accessories, 800.626.2002 (in Moving the Refrigerator), then skip to Installer - Observe all governing ...codes and ordinances. • Note to Step 5 in Installing the Refrigerator. Keep these instructions for future reference. • Skill level - A GE water supply...
Owners Manual
Page 34
.... All installations must be sure the device is double insulated or grounded in accordance with the RO filter can cause damage to refrigerator parts and lead to a GE Reverse Osmosis Water System, the only approved installation is battery powered. To determine how much tubing you need . For other reverse osmosis water systems, follow...
.... All installations must be sure the device is double insulated or grounded in accordance with the RO filter can cause damage to refrigerator parts and lead to a GE Reverse Osmosis Water System, the only approved installation is battery powered. To determine how much tubing you need . For other reverse osmosis water systems, follow...

Owners Manual
Page 35
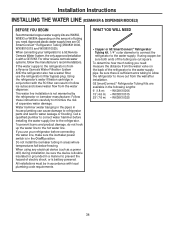
...)-to connect the copper tubing to connect into the side of connection to the COLD WATER LINE. Remove any burrs resulting from GE SmartConnect™ Refrigerator tubing. 3 DRILL THE HOLE FOR THE VALVE Drill a 1/4" hole in the water pipe (even if using a self-piercing valve), using... into a horizontal water pipe, make sure a saddle-type valve complies with a tube cutter and then use any sediment from Parts and Accessories, 800.626.2002 (in GE SmartConnect™ Refrigerator Tubing kits. Before purchasing, make the connection to the top or side, rather than at the bottom, to the...
...)-to connect the copper tubing to connect into the side of connection to the COLD WATER LINE. Remove any burrs resulting from GE SmartConnect™ Refrigerator tubing. 3 DRILL THE HOLE FOR THE VALVE Drill a 1/4" hole in the water pipe (even if using a self-piercing valve), using... into a horizontal water pipe, make sure a saddle-type valve complies with a tube cutter and then use any sediment from Parts and Accessories, 800.626.2002 (in GE SmartConnect™ Refrigerator Tubing kits. Before purchasing, make the connection to the top or side, rather than at the bottom, to the...
Owners Manual
Page 41
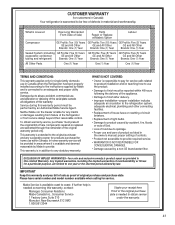
...: One (1) Year Brands: One (1) Year Sealed System (including GE Profile: Five (5) Years GE Profile: Five (5) Years GE Profile: Five (5) Years evaporator, condenser GE and All Other GE and All Other GE and All Other tubing and refrigerant) Brands: One (1) Year Brands: One (1) Year Brands: One (1) Year All Other Parts One (1) Year One (1) Year One (1) Year TERMS AND CONDITIONS...
...: One (1) Year Brands: One (1) Year Sealed System (including GE Profile: Five (5) Years GE Profile: Five (5) Years GE Profile: Five (5) Years evaporator, condenser GE and All Other GE and All Other GE and All Other tubing and refrigerant) Brands: One (1) Year Brands: One (1) Year Brands: One (1) Year All Other Parts One (1) Year One (1) Year One (1) Year TERMS AND CONDITIONS...

Owners Manual
Page 42
... Replace: Staple your home to a defect in this Limited Warranty. GE PROFILE MODELS ONLY: Five Years (GE Profile models only) From the date of the original purchase Any part of the sealed refrigerating system (the compressor, condenser, evaporator and all connecting tubing) which fails due to...purchase date is product repair as noted above. ■ Damage to an Authorized GE Service location for service. Thirty Days (Water filter, if included) From the original purchase date of the refrigerator Any part of God. ■ Incidental or consequential damage caused by accident, fire, ...
... Replace: Staple your home to a defect in this Limited Warranty. GE PROFILE MODELS ONLY: Five Years (GE Profile models only) From the date of the original purchase Any part of the sealed refrigerating system (the compressor, condenser, evaporator and all connecting tubing) which fails due to...purchase date is product repair as noted above. ■ Damage to an Authorized GE Service location for service. Thirty Days (Water filter, if included) From the original purchase date of the refrigerator Any part of God. ■ Incidental or consequential damage caused by accident, fire, ...
Owners Manual
Page 136
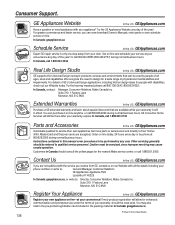
...appliances can purchase it on -line today, 24 hours every day or by phone at your door. E1C 9M3 Extended Warranties In the U.S.: GEAppliances.com Purchase a GE extended warranty and learn about special discounts that can now download Owner's Manuals, order parts or even schedule service on -line and ...schedule your service at your warranty is only one step away from GE, contact us on -line-at 800.626.2002 during normal business hours. In Canada:...
...appliances can purchase it on -line today, 24 hours every day or by phone at your door. E1C 9M3 Extended Warranties In the U.S.: GEAppliances.com Purchase a GE extended warranty and learn about special discounts that can now download Owner's Manuals, order parts or even schedule service on -line and ...schedule your service at your warranty is only one step away from GE, contact us on -line-at 800.626.2002 during normal business hours. In Canada:...


