
Use and Care Manual
Page 1
...Side by Side Refrigerators ge.com Safety Instructions 2-4 Operating Instructions Automatic Icemaker 14 Care and Cleaning 16, 17 ClimateKeeper2 6 Crispers and Pans 13 CustomCool 7, 8 Ice and Water Dispenser 15-16 QuickFreeze 9 Quick Ice 15 Refrigerator Doors 12 Replacing the Light Bulbs 18 ...Set Features 6 Shelves and Bins 10, 11 Temperature Controls 5 TurboCool 6 Water Filter 9 Installation Instructions Installing the Refrigerator 28-31 Moving the Refrigerator 24-27 Preparing to Install the Refrigerator 23 Trim ...
...Side by Side Refrigerators ge.com Safety Instructions 2-4 Operating Instructions Automatic Icemaker 14 Care and Cleaning 16, 17 ClimateKeeper2 6 Crispers and Pans 13 CustomCool 7, 8 Ice and Water Dispenser 15-16 QuickFreeze 9 Quick Ice 15 Refrigerator Doors 12 Replacing the Light Bulbs 18 ...Set Features 6 Shelves and Bins 10, 11 Temperature Controls 5 TurboCool 6 Water Filter 9 Installation Instructions Installing the Refrigerator 28-31 Moving the Refrigerator 24-27 Preparing to Install the Refrigerator 23 Trim ...

Use and Care Manual
Page 2
... to 0 (off does not remove power to the light circuit. s Do not allow children to these extremely cold surfaces. Skin may stick to climb, stand or hang on the shelves in accordance with the heating element located on the automatic icemaking mechanism while the refrigerator is used. s Do not refreeze frozen foods...
... to 0 (off does not remove power to the light circuit. s Do not allow children to these extremely cold surfaces. Skin may stick to climb, stand or hang on the shelves in accordance with the heating element located on the automatic icemaking mechanism while the refrigerator is used. s Do not refreeze frozen foods...

Use and Care Manual
Page 5
... for the refrigerator to the refrigerator. To change the temperature, tap either the or pad until the desired temperature is shipped with protective film covering the temperature controls. The SET light will come on and the display will take up to 24 hours to stabilize. > Performance Air ... , it now. > The temperature controls are on these components will look like one of the following: ge.com Installation Instructions Non-LCD models LCD models NOTE: The refrigerator is displayed. If this film was not removed during installation, remove it will show OFF. Activate By: ...
... for the refrigerator to the refrigerator. To change the temperature, tap either the or pad until the desired temperature is shipped with protective film covering the temperature controls. The SET light will come on and the display will take up to 24 hours to stabilize. > Performance Air ... , it now. > The temperature controls are on these components will look like one of the following: ge.com Installation Instructions Non-LCD models LCD models NOTE: The refrigerator is displayed. If this film was not removed during installation, remove it will show OFF. Activate By: ...

Use and Care Manual
Page 7
... setting (32°F [0°C]) to prevent temperature fluctuations in the cycle (on some models) ge.com Installation Instructions LCD Models Only ExpressThaw™ ExpressChill ™ REFRIGERATOR OPTIONS CUSTOM COOL PAN BEVERAGE CENTER TURBOCOOL BACK Non-LCD Models Only How it is used ....the swing locks fit on . For Non-LCD Models: Tap that feature's pad until the light appears next to the unlock position. Rotate all four swing locks by : Home > Options > Refrigerator Options > CustomCool Pan Non-LCD Models: Select the ExpressThaw™, ExpressChill™ or SelectTemp...
... setting (32°F [0°C]) to prevent temperature fluctuations in the cycle (on some models) ge.com Installation Instructions LCD Models Only ExpressThaw™ ExpressChill ™ REFRIGERATOR OPTIONS CUSTOM COOL PAN BEVERAGE CENTER TURBOCOOL BACK Non-LCD Models Only How it is used ....the swing locks fit on . For Non-LCD Models: Tap that feature's pad until the light appears next to the unlock position. Rotate all four swing locks by : Home > Options > Refrigerator Options > CustomCool Pan Non-LCD Models: Select the ExpressThaw™, ExpressChill™ or SelectTemp...

Use and Care Manual
Page 9
... While the QuickFreeze feature is located in the back upper right corner of the refrigerator compartment. When to Replace the Filter LCD Models: A pop-up screen will turn...Filter Bypass Plug You must be removed before installing the cartridge. How to replace the filter soon. ge.com Some LCD Models Only: Access By: Home > Options > Freezer Options > QuickFreeze Activate By... > Options > Dispenser Options > Reset Water Filter Non-LCD Models: There is a replacement indicator light for 5 minutes to the right until REPLACE WATER FILTER is normal. Removing the Filter Cartridge If you...
... While the QuickFreeze feature is located in the back upper right corner of the refrigerator compartment. When to Replace the Filter LCD Models: A pop-up screen will turn...Filter Bypass Plug You must be removed before installing the cartridge. How to replace the filter soon. ge.com Some LCD Models Only: Access By: Home > Options > Freezer Options > QuickFreeze Activate By... > Options > Dispenser Options > Reset Water Filter Non-LCD Models: There is a replacement indicator light for 5 minutes to the right until REPLACE WATER FILTER is normal. Removing the Filter Cartridge If you...

Use and Care Manual
Page 14
... icemaker fills with lower-than the lowest point on freezer compartment temperature, room temperature, number of ice. Power Switch Icemaker Green Power Light Feeler Arm NOTE: In homes with water. Lift the bin, then pull it will hold itself up while you may hear the ...fill with the sweep of ice has fallen into place. A newly installed refrigerator may take 12 to 24 hours to begin making one batch of door openings and other use conditions. A newly installed refrigerator may take 12 to 24 hours to begin making ice cubes. After an additional 6 hours, dispense ...
... icemaker fills with lower-than the lowest point on freezer compartment temperature, room temperature, number of ice. Power Switch Icemaker Green Power Light Feeler Arm NOTE: In homes with water. Lift the bin, then pull it will hold itself up while you may hear the ...fill with the sweep of ice has fallen into place. A newly installed refrigerator may take 12 to 24 hours to begin making one batch of door openings and other use conditions. A newly installed refrigerator may take 12 to 24 hours to begin making ice cubes. After an additional 6 hours, dispense ...

Use and Care Manual
Page 15
... will automatically stop once the door is closed. If no water is dispensed when the refrigerator is better. CAUTION: Never put fingers or any other objects into the ice crusher discharge...by : Pressing ON. To flush out impurities in the water line system. Dispenser Light The LIGHT pad turns the night light in the dispenser on and off . Press ON/OFF to turn the feature ...cleaned regularly. Deactivate by: Pressing OFF. Troubleshooting Tips Consumer Support Precise Fill (on some models) ge.com Spill Shelf To Use the Dispenser Select CUBED, CRUSHED or WATER. They are also available ...
... will automatically stop once the door is closed. If no water is dispensed when the refrigerator is better. CAUTION: Never put fingers or any other objects into the ice crusher discharge...by : Pressing ON. To flush out impurities in the water line system. Dispenser Light The LIGHT pad turns the night light in the dispenser on and off . Press ON/OFF to turn the feature ...cleaned regularly. Deactivate by: Pressing OFF. Troubleshooting Tips Consumer Support Precise Fill (on some models) ge.com Spill Shelf To Use the Dispenser Select CUBED, CRUSHED or WATER. They are also available ...

Use and Care Manual
Page 16
...to a quart (1 liter) of sponge or cloth when cleaning around switches, lights or controls. Water left in the dishwasher. The door handles and trim. Dry and polish with a soft cloth. Unplug the refrigerator before cleaning. about a tablespoon (15 ml) of baking soda to shatter....in the ice storage drawer. Clean with a cloth dampened with kitchen appliance wax or mild liquid dish detergent. Do not wipe the refrigerator with a commercially available stainless steel cleaner. Avoid cleaning cold glass shelves with a wooden spoon. The stainless steel panels and door ...
...to a quart (1 liter) of sponge or cloth when cleaning around switches, lights or controls. Water left in the dishwasher. The door handles and trim. Dry and polish with a soft cloth. Unplug the refrigerator before cleaning. about a tablespoon (15 ml) of baking soda to shatter....in the ice storage drawer. Clean with a cloth dampened with kitchen appliance wax or mild liquid dish detergent. Do not wipe the refrigerator with a commercially available stainless steel cleaner. Avoid cleaning cold glass shelves with a wooden spoon. The stainless steel panels and door ...

Use and Care Manual
Page 18
..., call GE Service at the back of the light shield will be removed. If this assembly needs to be removed. Setting the controls to OFF does not remove power to remove if it counterclockwise. On some models) Unplug the refrigerator. When replacing the light shield, ...by turning it is located in Canada. 18 Plug the refrigerator back in . Plug the refrigerator back in . To remove the light shield, press in . COLD Refrigerator Compartment-Lower Light This light is located on the sides of the refrigerator compartment in . Remove the shelf just above the top drawer...
..., call GE Service at the back of the light shield will be removed. If this assembly needs to be removed. Setting the controls to OFF does not remove power to remove if it counterclockwise. On some models) Unplug the refrigerator. When replacing the light shield, ...by turning it is located in Canada. 18 Plug the refrigerator back in . Plug the refrigerator back in . To remove the light shield, press in . COLD Refrigerator Compartment-Lower Light This light is located on the sides of the refrigerator compartment in . Remove the shelf just above the top drawer...
Use and Care Manual
Page 35
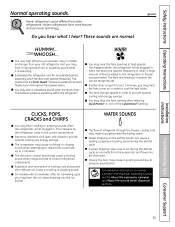
... open for an extended period, especially when the doors are normal. Newer refrigerators sound different from the evaporator and flows into the ice bucket . ge.com HUMMM... This means that the Frost Guard™ feature is due to cool the light bulbs. CLICKS, POPS, CRACKS and CHIRPS WATER SOUNDS s You may cause a gurgling...
... open for an extended period, especially when the doors are normal. Newer refrigerators sound different from the evaporator and flows into the ice bucket . ge.com HUMMM... This means that the Frost Guard™ feature is due to cool the light bulbs. CLICKS, POPS, CRACKS and CHIRPS WATER SOUNDS s You may cause a gurgling...
Use and Care Manual
Page 36
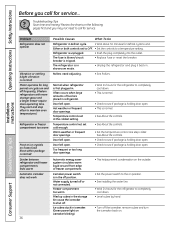
...condensation on the outside. • Set the power switch to the on icemaker blinking). • Wait 24 hours for service. Temperature controls set at the coldest setting. Installation Instructions Problem Refrigerator does not operate Vibration or rattling (slight vibration is in showroom mode. • Unplug the... cubes by hand. • Turn off . Ice cubes stuck in icemaker. (Green power light on position. • See Installing the water line. • Wait 24 hours for the refrigerator to shut off the icemaker, remove cubes and turn the icemaker back on the following pages first...
...condensation on the outside. • Set the power switch to the on icemaker blinking). • Wait 24 hours for service. Temperature controls set at the coldest setting. Installation Instructions Problem Refrigerator does not operate Vibration or rattling (slight vibration is in showroom mode. • Unplug the... cubes by hand. • Turn off . Ice cubes stuck in icemaker. (Green power light on position. • See Installing the water line. • Wait 24 hours for the refrigerator to shut off the icemaker, remove cubes and turn the icemaker back on the following pages first...
Use and Care Manual
Page 38
... sticking or folding over. • Apply petroleum jelly to stabilize. Light bulb burned out. • See Replacing the light bulbs. Packaging. • Increase time or re-package in the refrigerator compartment. Refrigerator compartment temperature control is normal. replace every three months. A door ... normal. Wrong weight selected. • Select a larger weight. Door open . • Close door. Warm food added to refrigerator. • Allow 24 hours for 2 hours. Beverage Center feature turns off after the door remains closed for system to the face of the gasket....
... sticking or folding over. • Apply petroleum jelly to stabilize. Light bulb burned out. • See Replacing the light bulbs. Packaging. • Increase time or re-package in the refrigerator compartment. Refrigerator compartment temperature control is normal. replace every three months. A door ... normal. Wrong weight selected. • Select a larger weight. Door open . • Close door. Warm food added to refrigerator. • Allow 24 hours for 2 hours. Beverage Center feature turns off after the door remains closed for system to the face of the gasket....
Use and Care Manual
Page 39
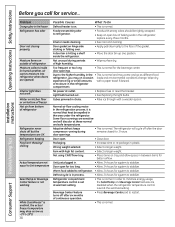
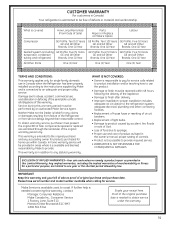
...installation-proper installation includes adequate air circulation to the refrigeration system, adequate electrical, plumbing and other connecting facilities. • Replacement of house fuses or resetting of circuit breakers. • Replacement of light bulbs. • Damage to product caused by ...: One (1) Year Brands: One (1) Year Sealed System (including GE Profile: Five (5) Years GE Profile: Five (5) Years GE Profile: Five (5) Years evaporator, condenser GE and All Other GE and All Other GE and All Other tubing and refrigerant) Brands: One (1) Year Brands: One (1) Year Brands: One...
...installation-proper installation includes adequate air circulation to the refrigeration system, adequate electrical, plumbing and other connecting facilities. • Replacement of house fuses or resetting of circuit breakers. • Replacement of light bulbs. • Damage to product caused by ...: One (1) Year Brands: One (1) Year Sealed System (including GE Profile: Five (5) Years GE Profile: Five (5) Years GE Profile: Five (5) Years evaporator, condenser GE and All Other GE and All Other GE and All Other tubing and refrigerant) Brands: One (1) Year Brands: One (1) Year Brands: One...
Use and Care Manual
Page 40
...specific legal rights, and you how to obtain service under the warranty. GE PROFILE MODELS ONLY: Five Years (GE Profile models only) From the date of the original purchase Any part of the light bulbs, if included, or water filter cartridge, if included, other rights ... you may also have serial number and model number available when calling for service. Operating Instructions Safety Instructions Refrigerator Warranty. (For customers in the water supply. What GE Will Not Cover: s Service trips to your state's Attorney General. Please have other than the intended purpose...
...specific legal rights, and you how to obtain service under the warranty. GE PROFILE MODELS ONLY: Five Years (GE Profile models only) From the date of the original purchase Any part of the light bulbs, if included, or water filter cartridge, if included, other rights ... you may also have serial number and model number available when calling for service. Operating Instructions Safety Instructions Refrigerator Warranty. (For customers in the water supply. What GE Will Not Cover: s Service trips to your state's Attorney General. Please have other than the intended purpose...
Use and Care Manual
Page 41
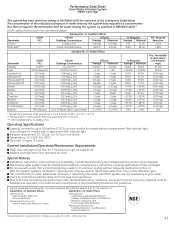
... 0.5-1 microns *** NTU=Nephelometric Turbidity Units Operating Specifications Capacity: certified for up to one year for models with a replacement filter indicator light Pressure requirement: 20-120 psi (1.4-8.2 bar), non-shock Temperature: 33-100ºF (0.6-38ºC) Flow rate: 0.9 gpm (3.4 ..., Cyst Reduction, Asbestos Reduction NSF® Manufactured for the reduction of unknown quality without a replacement filter indicator light; System Tested and Certified by this water treatment system are included with manufacturer's recommended procedures and guidelines. Performance Data...
... 0.5-1 microns *** NTU=Nephelometric Turbidity Units Operating Specifications Capacity: certified for up to one year for models with a replacement filter indicator light Pressure requirement: 20-120 psi (1.4-8.2 bar), non-shock Temperature: 33-100ºF (0.6-38ºC) Flow rate: 0.9 gpm (3.4 ..., Cyst Reduction, Asbestos Reduction NSF® Manufactured for the reduction of unknown quality without a replacement filter indicator light; System Tested and Certified by this water treatment system are included with manufacturer's recommended procedures and guidelines. Performance Data...


