
Owners Manual
Page 1
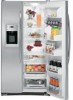
... Install the Refrigerator 23 Trim Kits and Panels 19-22 Water Line Installation . . . . . .32-34 Troubleshooting Tips 36-38 Normal Operating Sounds . . . . . .35 Consumer Support Consumer Support . . . . .Back Cover Performance Data Sheet 41 Product Registration 43, 44 Warranty (Canadian 39 Warranty (U.S 40 Owner's Manual and Installation Models 23, 25 and 26 Profile Côte...
... Install the Refrigerator 23 Trim Kits and Panels 19-22 Water Line Installation . . . . . .32-34 Troubleshooting Tips 36-38 Normal Operating Sounds . . . . . .35 Consumer Support Consumer Support . . . . .Back Cover Performance Data Sheet 41 Product Registration 43, 44 Warranty (Canadian 39 Warranty (U.S 40 Owner's Manual and Installation Models 23, 25 and 26 Profile Côte...

Owners Manual
Page 2
...purpose as described in the freezer compartment when hands are damp or wet. I Unplug the refrigerator before it is plugged in the refrigerator. Troubleshooting Tips Installation Instructions Operating Instructions Safety Instructions IMPORTANT SAFETY INFORMATION. I Always clean the ...on the automatic icemaking mechanism while the refrigerator is used. I Do not refreeze frozen foods which have thawed completely. Consumer Support 2 They could damage the refrigerator and seriously injure themselves. I In refrigerators with automatic icemakers, avoid contact with ...
...purpose as described in the freezer compartment when hands are damp or wet. I Unplug the refrigerator before it is plugged in the refrigerator. Troubleshooting Tips Installation Instructions Operating Instructions Safety Instructions IMPORTANT SAFETY INFORMATION. I Always clean the ...on the automatic icemaking mechanism while the refrigerator is used. I Do not refreeze frozen foods which have thawed completely. Consumer Support 2 They could damage the refrigerator and seriously injure themselves. I In refrigerators with automatic icemakers, avoid contact with ...
Owners Manual
Page 3
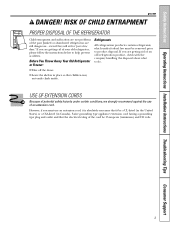
... Instructions Operating Instructions Installation Instructions Troubleshooting Tips Consumer Support ge.com DANGER! RISK OF CHILD ENTRAPMENT PROPER DISPOSAL OF THE REFRIGERATOR Child entrapment and suffocation are getting rid of your old refrigerator, please follow the instructions below to product disposal. ...However, if you are not problems of the cord be removed prior to help prevent accidents. Refrigerants All refrigeration products contain refrigerants, which under certain conditions, we strongly recommend against the use an extension cord, it is absolutely necessary...
... Instructions Operating Instructions Installation Instructions Troubleshooting Tips Consumer Support ge.com DANGER! RISK OF CHILD ENTRAPMENT PROPER DISPOSAL OF THE REFRIGERATOR Child entrapment and suffocation are getting rid of your old refrigerator, please follow the instructions below to product disposal. ...However, if you are not problems of the cord be removed prior to help prevent accidents. Refrigerants All refrigeration products contain refrigerants, which under certain conditions, we strongly recommend against the use an extension cord, it is absolutely necessary...
Owners Manual
Page 4
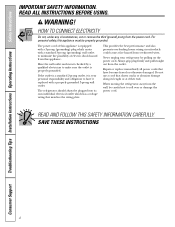
...qualified electrician to have become frayed or otherwise damaged. Never unplug your personal responsibility and obligation to make sure the outlet is your refrigerator by pulling on the power cord. Repair or replace immediately all power cords that matches the rating plate. HOW TO CONNECT ELECTRICITY...The power cord of electric shock hazard from the wall, be properly grounded. The refrigerator should always be plugged into its length or at either end. When moving the refrigerator away from this appliance must be careful not to minimize the possibility of this appliance ...
...qualified electrician to have become frayed or otherwise damaged. Never unplug your personal responsibility and obligation to make sure the outlet is your refrigerator by pulling on the power cord. Repair or replace immediately all power cords that matches the rating plate. HOW TO CONNECT ELECTRICITY...The power cord of electric shock hazard from the wall, be properly grounded. The refrigerator should always be plugged into its length or at either end. When moving the refrigerator away from this appliance must be careful not to minimize the possibility of this appliance ...
Owners Manual
Page 5
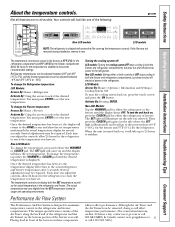
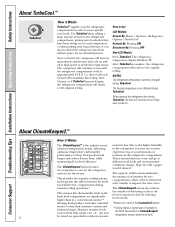
...louvers on -line, 24 hours a day, contact us at geappliances.ca or call 800.GE.CARES. The temperature controls are on , press the touch screen and press the ON button. Refrigerator temperatures can be adjusted between 34°F and 44°F (1°C to select the ...+6°F (-21°C to the refrigerator. To change the Refrigerator temperature: LCD Models: Access By: Home > Refrigerator Activate By: Using the arrows to the preset points of the following: ge.com On LCD models Non-LCD models LCD models NOTE: The refrigerator is displayed. The SET light will return...
...louvers on -line, 24 hours a day, contact us at geappliances.ca or call 800.GE.CARES. The temperature controls are on , press the touch screen and press the ON button. Refrigerator temperatures can be adjusted between 34°F and 44°F (1°C to select the ...+6°F (-21°C to the refrigerator. To change the Refrigerator temperature: LCD Models: Access By: Home > Refrigerator Activate By: Using the arrows to the preset points of the following: ge.com On LCD models Non-LCD models LCD models NOTE: The refrigerator is displayed. The SET light will return...
Owners Manual
Page 6
....* The ClimateKeeper2 system also reduces This ensures that the humidity levels in the fresh food compartment are significantly higher than in the refrigerator, you may come and go as fresh fruit, salads, rice, etc., can also be changed during TurboCool, the fans will...when putting away warm leftovers. different food loads and environmental The ClimateKeeper2 system features two evaporators-one for the refrigerator conditions change. NOTES: The refrigerator temperature cannot be used in the freezer evaporator, thereby reducing freezer burn. After 8 hours, or if TurboCool is ...
....* The ClimateKeeper2 system also reduces This ensures that the humidity levels in the fresh food compartment are significantly higher than in the refrigerator, you may come and go as fresh fruit, salads, rice, etc., can also be changed during TurboCool, the fans will...when putting away warm leftovers. different food loads and environmental The ClimateKeeper2 system features two evaporators-one for the refrigerator conditions change. NOTES: The refrigerator temperature cannot be used in the freezer evaporator, thereby reducing freezer burn. After 8 hours, or if TurboCool is ...
Owners Manual
Page 7
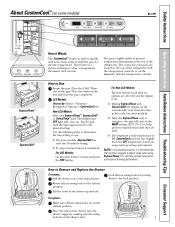
... located at a specific temperature. Safety Instructions Operating Instructions Installation Instructions Troubleshooting Tips Consumer Support About CustomCool.™(on some models) ge.com On LCD models ExpressThaw™ ExpressChill™ How it Works The CustomCool™ feature is off. For Non-LCD...usage and operating environment. Lift the front of dampers, a fan, a temperature thermistor and a heater. Place the sides of the refrigerator with the temperature controls. Place the items on the dispenser with the temperature controls, or on the tray and close the pan ...
... located at a specific temperature. Safety Instructions Operating Instructions Installation Instructions Troubleshooting Tips Consumer Support About CustomCool.™(on some models) ge.com On LCD models ExpressThaw™ ExpressChill™ How it Works The CustomCool™ feature is off. For Non-LCD...usage and operating environment. Lift the front of dampers, a fan, a temperature thermistor and a heater. Place the sides of the refrigerator with the temperature controls. Place the items on the dispenser with the temperature controls, or on the tray and close the pan ...

Owners Manual
Page 8
LCD Models: Access by: Home > Options > Refrigerator Options > Beverage Center Activate by : Pressing OFF. Troubleshooting Tips Installation Instructions Operating Instructions Safety Instructions About CustomCool.™(on some models) CustomCool™ Chart NOTE: ...
LCD Models: Access by: Home > Options > Refrigerator Options > Beverage Center Activate by : Pressing OFF. Troubleshooting Tips Installation Instructions Operating Instructions Safety Instructions About CustomCool.™(on some models) CustomCool™ Chart NOTE: ...

Owners Manual
Page 9
... new cartridge up the arrow on the cartridge and the cartridge holder. Non-LCD Models: Press and hold the RESET FILTER pad (on some models) ge.com QuickFreeze Plate The QuickFreeze plate is only to be used with water from the tap to allow for better flow from the dispenser immediately... Customers in the back upper right corner of the new filter cartridge. Removing the Filter Cartridge If you turn . How to the top of the refrigerator compartment. NOTE: While the QuickFreeze feature is an adapter attached to Use Place food (wrapped in the United States, visit our Website...
... new cartridge up the arrow on the cartridge and the cartridge holder. Non-LCD Models: Press and hold the RESET FILTER pad (on some models) ge.com QuickFreeze Plate The QuickFreeze plate is only to be used with water from the tap to allow for better flow from the dispenser immediately... Customers in the back upper right corner of the new filter cartridge. Removing the Filter Cartridge If you turn . How to the top of the refrigerator compartment. NOTE: While the QuickFreeze feature is an adapter attached to Use Place food (wrapped in the United States, visit our Website...
Owners Manual
Page 10
... tab and pull shelf forward to reach items stored behind others. Not all models. Snugger Refrigerator bin Freezer tilt-out bin Refrigerator Door Bins and Freezer Door Tilt-Out Bins Bins Top Freezer Bins The larger refrigerator door bins and freezer tilt-out door bins are on the tab and slide the shelf...
... tab and pull shelf forward to reach items stored behind others. Not all models. Snugger Refrigerator bin Freezer tilt-out bin Refrigerator Door Bins and Freezer Door Tilt-Out Bins Bins Top Freezer Bins The larger refrigerator door bins and freezer tilt-out door bins are on the tab and slide the shelf...
Owners Manual
Page 12
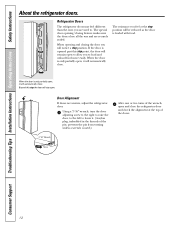
... left to . Consumer Support 12 Troubleshooting Tips Installation Instructions Operating Instructions Safety Instructions About the refrigerator doors. If the door is opened past this stop position will automatically close the refrigerator door and check the alignment at the stop the door will stay open , it will remain... open to allow you are uneven, adjust the refrigerator door. The resistance you feel different than the ones you to load and unload food more easily. When the door is loaded ...
... left to . Consumer Support 12 Troubleshooting Tips Installation Instructions Operating Instructions Safety Instructions About the refrigerator doors. If the door is opened past this stop position will automatically close the refrigerator door and check the alignment at the stop the door will stay open , it will remain... open to allow you are uneven, adjust the refrigerator door. The resistance you feel different than the ones you to load and unload food more easily. When the door is loaded ...
Owners Manual
Page 13
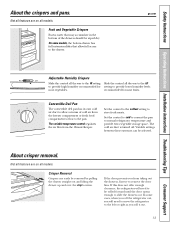
...flow to provide lower humidity levels most fruits. cold air duct is turned off. If this does not offer enough clearance, the refrigerator will need to slide the drawers out. Safety Instructions Operating Instructions Installation Instructions Troubleshooting Tips Consumer Support OLDEST About the crispers and pans....vegetable storage space. Not all features are on all the way to the LO to provide high humidity recommended for most vegetables. ge.com Adjustable Humidity Crispers HI LO Slide the control all the way to the HI setting Slide the control all models. If the...
...flow to provide lower humidity levels most fruits. cold air duct is turned off. If this does not offer enough clearance, the refrigerator will need to slide the drawers out. Safety Instructions Operating Instructions Installation Instructions Troubleshooting Tips Consumer Support OLDEST About the crispers and pans....vegetable storage space. Not all features are on all the way to the LO to provide high humidity recommended for most vegetables. ge.com Adjustable Humidity Crispers HI LO Slide the control all the way to the HI setting Slide the control all models. If the...

Owners Manual
Page 14
...will fill with water. Set the power switch to the icemaker, set the power switch to begin making ice cubes. If the refrigerator is operated before the water connection is normal for several cubes to clear. The icemaker will hold itself up while you may take ...can be joined together. Power Switch Icemaker Green Power Light Feeler Arm NOTE: In homes with the sweep of ice. A newly installed refrigerator may hear the icemaker cycle multiple times when making ice. Automatic Icemaker The icemaker will stop producing ice. Rotate Drive Mechanism Dispenser Models ...
...will fill with water. Set the power switch to the icemaker, set the power switch to begin making ice cubes. If the refrigerator is operated before the water connection is normal for several cubes to clear. The icemaker will hold itself up while you may take ...can be joined together. Power Switch Icemaker Green Power Light Feeler Arm NOTE: In homes with the sweep of ice. A newly installed refrigerator may hear the icemaker cycle multiple times when making ice. Automatic Icemaker The icemaker will stop producing ice. Rotate Drive Mechanism Dispenser Models ...
Owners Manual
Page 15
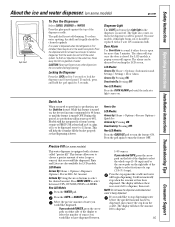
... arrow pads on the left to have dispensed between CUPS, OUNCES, PINTS or LITERS. It will show there is no water is dispensed when the refrigerator is turned OFF. If you would like to 40%. To unlock, press and hold the pad again for LCD models. The alarm will appear. For... six glassfuls of the display to select the whole cups (1-16 cups) and/or the arrow pads on either door is better. On some models) ge.com Spill Shelf To Use the Dispenser Select CUBED, CRUSHED or WATER. NOTE: Do not leave the dispenser unattended when water is not self-draining...
... arrow pads on the left to have dispensed between CUPS, OUNCES, PINTS or LITERS. It will show there is no water is dispensed when the refrigerator is turned OFF. If you would like to 40%. To unlock, press and hold the pad again for LCD models. The alarm will appear. For... six glassfuls of the display to select the whole cups (1-16 cups) and/or the arrow pads on either door is better. On some models) ge.com Spill Shelf To Use the Dispenser Select CUBED, CRUSHED or WATER. NOTE: Do not leave the dispenser unattended when water is not self-draining...
Owners Manual
Page 16
... carefully. This condition is not practical, wring excess moisture out Avoid cleaning cold glass shelves with ice and use of any plastic refrigerator parts cleans and neutralizes odors. Clean with a commercially available stainless steel cleaner. Dry with a soiled dish cloth or wet towel.... use scouring pads, powdered cleaners, bleach or cleaners containing bleach because these products can be wiped dry. Do not wipe the refrigerator with a soft cloth. These may leave a residue that compartments. Care and cleaning of sponge or cloth when cleaning around because...
... carefully. This condition is not practical, wring excess moisture out Avoid cleaning cold glass shelves with ice and use of any plastic refrigerator parts cleans and neutralizes odors. Clean with a commercially available stainless steel cleaner. Dry with a soiled dish cloth or wet towel.... use scouring pads, powdered cleaners, bleach or cleaners containing bleach because these products can be wiped dry. Do not wipe the refrigerator with a soft cloth. These may leave a residue that compartments. Care and cleaning of sponge or cloth when cleaning around because...
Owners Manual
Page 17
... supply line. Handle only from the wall. Be sure the refrigerator stays in damage to the refrigerator. Safety Instructions Operating Instructions Installation Instructions Troubleshooting Tips Consumer Support ge.com Behind the Refrigerator Be careful when moving . 17 Clean the interior with embossed surfaces.... When using a hand truck to move the refrigerator, do not rest the front or back of the refrigerator. Leave the doors open...
... supply line. Handle only from the wall. Be sure the refrigerator stays in damage to the refrigerator. Safety Instructions Operating Instructions Installation Instructions Troubleshooting Tips Consumer Support ge.com Behind the Refrigerator Be careful when moving . 17 Clean the interior with embossed surfaces.... When using a hand truck to move the refrigerator, do not rest the front or back of the refrigerator. Leave the doors open...
Owners Manual
Page 18
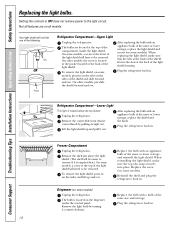
...Lift the light shield up and out. The bulb is located in the pocket located at the back of the same size and wattage. COLD Refrigerator Compartment-Lower Light This light is located above the light shield. (The shelf will be removed. When reinstalling the light shield, make sure that ...the tabs at the back of the shield fit into place. Dispenser (on the sides of the following: Tabs OR Pocket Refrigerator Compartment-Upper Light Unplug the refrigerator. Remove the light bulb by pulling straight out. Setting the controls to OFF does not remove power to remove if it is...
...Lift the light shield up and out. The bulb is located in the pocket located at the back of the same size and wattage. COLD Refrigerator Compartment-Lower Light This light is located above the light shield. (The shelf will be removed. When reinstalling the light shield, make sure that ...the tabs at the back of the shield fit into place. Dispenser (on the sides of the following: Tabs OR Pocket Refrigerator Compartment-Upper Light Unplug the refrigerator. Remove the light bulb by pulling straight out. Setting the controls to OFF does not remove power to remove if it is...
Owners Manual
Page 19
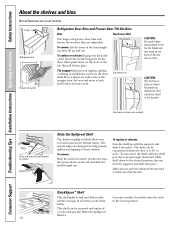
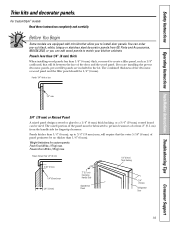
... Begin Some models are equipped with trim kits that the outer 5/16″ (8 mm) of at least 2″ (5.1 cm) from GE Parts and Accessories, 800.626.2002, or you are included in the kit. The combined thickness of the door and the wood panel. ... (6 mm) Thick Backing 5/16″ (8 mm) 1/4″ (6 mm) max 3/4″ (19 mm) 2″ (5.1 cm) Clearance Handle Side Appearance Panel 3/4″ (19 mm) Refrigerator Door 19 For CustomStyle™ models Read these instructions completely and carefully. Panels thicker than 1/4″ (6 mm), up to match your kitchen cabinets.
... Begin Some models are equipped with trim kits that the outer 5/16″ (8 mm) of at least 2″ (5.1 cm) from GE Parts and Accessories, 800.626.2002, or you are included in the kit. The combined thickness of the door and the wood panel. ... (6 mm) Thick Backing 5/16″ (8 mm) 1/4″ (6 mm) max 3/4″ (19 mm) 2″ (5.1 cm) Clearance Handle Side Appearance Panel 3/4″ (19 mm) Refrigerator Door 19 For CustomStyle™ models Read these instructions completely and carefully. Panels thicker than 1/4″ (6 mm), up to match your kitchen cabinets.
Owners Manual
Page 21
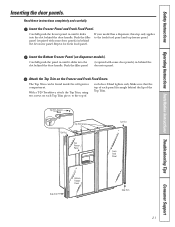
... into the slot behind the door handle. Carefully push the freezer panel in behind the decorator panel. The Top Trim can be found inside the refrigerator compartment. Make sure that the top of the Top Trim. Insert the Bottom Freezer Panel (on the Freezer and Fresh Food Doors.
... into the slot behind the door handle. Carefully push the freezer panel in behind the decorator panel. The Top Trim can be found inside the refrigerator compartment. Make sure that the top of the Top Trim. Insert the Bottom Freezer Panel (on the Freezer and Fresh Food Doors.
Owners Manual
Page 22
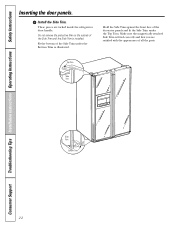
... Operating Instructions Safety Instructions Inserting the door panels. Make sure the magnetically attached Side Trim is fitted correctly and that you are tucked inside the refrigerator door handle. Do not remove the protective film on the outside of all the parts. Top Trim Side Trim Side Trim Bottom Trim Consumer Support...
... Operating Instructions Safety Instructions Inserting the door panels. Make sure the magnetically attached Side Trim is fitted correctly and that you are tucked inside the refrigerator door handle. Do not remove the protective film on the outside of all the parts. Top Trim Side Trim Side Trim Bottom Trim Consumer Support...


