Use and Care Manual
Page 1
...Shelves and Bins 7 Temperature Controls 5 Water Filter 6 Installation Instructions Anti-Tip Brackets 34 Dimensions, Clearances 17 Door, Grille Panels 36-38 Installation Space 17 Leveling 35 Panel Dimensions 21-30 Water Line 33, 34 Water Supply 39 Troubleshooting Tips . . . . . .42-44 Normal ... State of California Water Treatment Device Certificate 48 Warranty (Canadian 45 Warranty (U.S 46 Owner's Manual and Installation Instructions Model 42, 48 GE Profile Côte à Côte Réfrigérateurs Manuel d'utilisation et d'installation La section française commence ...
...Shelves and Bins 7 Temperature Controls 5 Water Filter 6 Installation Instructions Anti-Tip Brackets 34 Dimensions, Clearances 17 Door, Grille Panels 36-38 Installation Space 17 Leveling 35 Panel Dimensions 21-30 Water Line 33, 34 Water Supply 39 Troubleshooting Tips . . . . . .42-44 Normal ... State of California Water Treatment Device Certificate 48 Warranty (Canadian 45 Warranty (U.S 46 Owner's Manual and Installation Instructions Model 42, 48 GE Profile Côte à Côte Réfrigérateurs Manuel d'utilisation et d'installation La section française commence ...
Use and Care Manual
Page 6
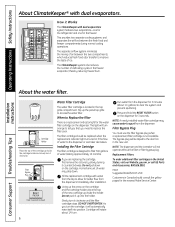
...compartments, which reduces fresh food odor transfer to access the water filter. Do not pull down . Do not push it up the panel top grille to improve the taste of ice. Cartridge will automatically raise itself into the holder. Filter Bypass Plug You must use ... during normal cooling operations. The separate airflow system minimizes the mixing of defrosting cycles in the United States, visit our Website, ge.com, or call GE Parts and Accessories, 800.626.2002. Filter Bypass Plug 6 Water Filter Cartridge The water filter cartridge is not available. NOTE:...
...compartments, which reduces fresh food odor transfer to access the water filter. Do not pull down . Do not push it up the panel top grille to improve the taste of ice. Cartridge will automatically raise itself into the holder. Filter Bypass Plug You must use ... during normal cooling operations. The separate airflow system minimizes the mixing of defrosting cycles in the United States, visit our Website, ge.com, or call GE Parts and Accessories, 800.626.2002. Filter Bypass Plug 6 Water Filter Cartridge The water filter cartridge is not available. NOTE:...
Use and Care Manual
Page 11
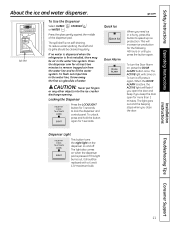
... Troubleshooting Tips Consumer Support 11 Press the dispenser arm for 3 seconds to lock the dispenser and control panel. To reduce water spotting, the shelf and its grille should be replaced with a 6 watt 12V maximum bulb. ge.com When you press the button again. To turn the Door Alarm on . The spill shelf...
... Troubleshooting Tips Consumer Support 11 Press the dispenser arm for 3 seconds to lock the dispenser and control panel. To reduce water spotting, the shelf and its grille should be replaced with a 6 watt 12V maximum bulb. ge.com When you press the button again. To turn the Door Alarm on . The spill shelf...
Use and Care Manual
Page 14
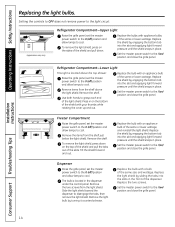
... the light shield. Consumer Support Troubleshooting Tips 14 Replace the bulbs with a bulb of the same or lower wattage. Dispenser Raise the grille panel, set the master power switch to the O (off ) position and allow lamps to cool. Replace the bulb with your thumbs while rotating.... Setting the controls to OFF does not remove power to the light circuit. (appearance may vary) Refrigerator Compartment-Upper Light Raise the grille panel, set the master power switch to the O (off ) position and allow lamps to cool. Use both hands to disengage the tabs, ...
... the light shield. Consumer Support Troubleshooting Tips 14 Replace the bulbs with a bulb of the same or lower wattage. Dispenser Raise the grille panel, set the master power switch to the O (off ) position and allow lamps to cool. Replace the bulb with your thumbs while rotating.... Setting the controls to OFF does not remove power to the light circuit. (appearance may vary) Refrigerator Compartment-Upper Light Raise the grille panel, set the master power switch to the O (off ) position and allow lamps to cool. Use both hands to disengage the tabs, ...
Use and Care Manual
Page 16
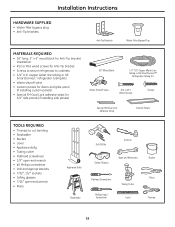
...#14 wood screws for 1/4″ side panels (if installing side panels) 36″ Wood Block 1/4″ O.D. copper water line tubing or GE SmartConnect™ refrigerator tubing kits • Water shutoff valve • Custom panels for doors and grille panel (if installing custom panels) • Special 3M Dual Lock adhesive... Screwdriver Phillips Head Screwdriver Tubing Cutter Level Bucket Pliers Tinsnips 16 Copper Water Line Tubing or GE SmartConnect™ Refrigerator Tubing Kit Water Shutoff Valve #12 or #14 Wood Screws Screws Special 3M Dual Lock Adhesive Strips ...
...#14 wood screws for 1/4″ side panels (if installing side panels) 36″ Wood Block 1/4″ O.D. copper water line tubing or GE SmartConnect™ refrigerator tubing kits • Water shutoff valve • Custom panels for doors and grille panel (if installing custom panels) • Special 3M Dual Lock adhesive... Screwdriver Phillips Head Screwdriver Tubing Cutter Level Bucket Pliers Tinsnips 16 Copper Water Line Tubing or GE SmartConnect™ Refrigerator Tubing Kit Water Shutoff Valve #12 or #14 Wood Screws Screws Special 3M Dual Lock Adhesive Strips ...
Use and Care Manual
Page 18
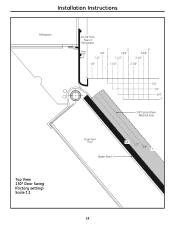
Installation Instructions Refrigerator Top View 130° Door Swing (factory setting) Scale 1:1 23-7/8" From Rear of Refrigerator Case Trim 1" 3/4" 2" 1-3/4" 3" 2-3/4" 1/2" 1-1/2" 2-1/2" 1/4" 1-1/4" 2-1/4" 1/4" 1/2" 3/4" 1" 3/4" Custom Panel (Nominal Size) Fresh Food Door Backer Panel 1/4" 1/2" 3/4" 1" 18
Installation Instructions Refrigerator Top View 130° Door Swing (factory setting) Scale 1:1 23-7/8" From Rear of Refrigerator Case Trim 1" 3/4" 2" 1-3/4" 3" 2-3/4" 1/2" 1-1/2" 2-1/2" 1/4" 1-1/4" 2-1/4" 1/4" 1/2" 3/4" 1" 3/4" Custom Panel (Nominal Size) Fresh Food Door Backer Panel 1/4" 1/2" 3/4" 1" 18
Use and Care Manual
Page 19
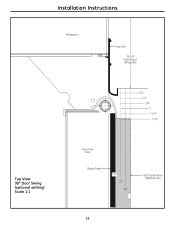
Installation Instructions Refrigerator Case Trim 23-7/8" From Rear of Refrigerator 1/4" 1/2" 3/4" 1" 1-1/4" 1-1/2" Top View 90° Door Swing (optional setting) Scale 1:1 Fresh Food Door Backer Panel 1/4" 1/2" 3/4" 1" 3/4" Custom Panel (Nominal Size) 19
Installation Instructions Refrigerator Case Trim 23-7/8" From Rear of Refrigerator 1/4" 1/2" 3/4" 1" 1-1/4" 1-1/2" Top View 90° Door Swing (optional setting) Scale 1:1 Fresh Food Door Backer Panel 1/4" 1/2" 3/4" 1" 3/4" Custom Panel (Nominal Size) 19
Use and Care Manual
Page 20
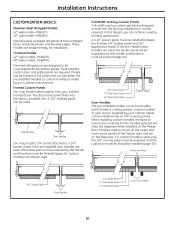
...wide models-PSB42YG 48″ wide models-PSB48YG Trimmed refrigerators are used, the backer panel will be exposed near the handle and therefore must be installed (page 38). 3/4" Custom Panel Door Handles 20 If the pre-installed door handles are designed to be installed only...Custom handles can accommodate both framed or overlay panels. A 0.10″ spacer panel must be finished (page 24). 3/4" Overlay Panel .10" Thick Spacer Panel 1/4" Thick Backer Panel Door Handles The pre-installed handles can also be finished (page 24). Panels can be framed or full-width and can ...
...wide models-PSB42YG 48″ wide models-PSB48YG Trimmed refrigerators are used, the backer panel will be exposed near the handle and therefore must be installed (page 38). 3/4" Custom Panel Door Handles 20 If the pre-installed door handles are designed to be installed only...Custom handles can accommodate both framed or overlay panels. A 0.10″ spacer panel must be finished (page 24). 3/4" Overlay Panel .10" Thick Spacer Panel 1/4" Thick Backer Panel Door Handles The pre-installed handles can also be finished (page 24). Panels can be framed or full-width and can ...
Use and Care Manual
Page 21
...doors and grille. 5/16" Trim Door Reveal 1/4" Panel IMPORTANT NOTE: Maximum weight is 70 pounds for the Fresh Food panel, 45 pounds total for Freezer panels and 15 pounds for the grille panel. A Grille Panel B G Dispenser Cutout C F Freezer Panel Fresh Food Panel E D Front Panel Dimensions (in inches) A B C 42″... refrigerator is supplied with factory installed dispenser trim. • If panel is more than 1/4″ thick, the panel will slide into the frame on the door to improve the fit. • If panel is less than 1/4″ thick, a noticeable gap will be cut...
...doors and grille. 5/16" Trim Door Reveal 1/4" Panel IMPORTANT NOTE: Maximum weight is 70 pounds for the Fresh Food panel, 45 pounds total for Freezer panels and 15 pounds for the grille panel. A Grille Panel B G Dispenser Cutout C F Freezer Panel Fresh Food Panel E D Front Panel Dimensions (in inches) A B C 42″... refrigerator is supplied with factory installed dispenser trim. • If panel is more than 1/4″ thick, the panel will slide into the frame on the door to improve the fit. • If panel is less than 1/4″ thick, a noticeable gap will be cut...
Use and Care Manual
Page 22
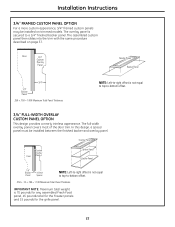
...-right offset is 70 pounds for any assembled Fresh Food panel, 45 pounds total for the Freezer panels and 15 pounds for the grille panel. 22 In this design, a spacer panel must be installed on page 37. Overlay Panel Custom Overlay Door Panel Spacer Panel Backer Panel 1/4" Backer Panel .10 Inch Spacer NOTE: Left-to-right offset is not...
...-right offset is 70 pounds for any assembled Fresh Food panel, 45 pounds total for the Freezer panels and 15 pounds for the grille panel. 22 In this design, a spacer panel must be installed on page 37. Overlay Panel Custom Overlay Door Panel Spacer Panel Backer Panel 1/4" Backer Panel .10 Inch Spacer NOTE: Left-to-right offset is not...
Use and Care Manual
Page 23
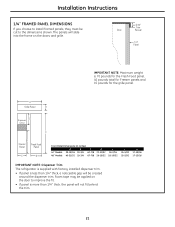
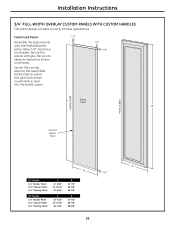
This design provides a framed appearance. or 3/4" Plus 1/4" Backer 3/8" 5/16" Required for Optimal Handle Clearance 1/4" Max. 3-1/8" Min. 2-1/2" B 42″ Models 1/4″ Backer Panel 3/4″ Overlay Panel 48″ Models 1/4″ Backer Panel 3/4″ Overlay Panel A 22-5/16″ 18-13/16″ A 26-7/16″ 22-15/16″ B 67-7/8″ 67-1/4″ B 67-7/8″ 67...
This design provides a framed appearance. or 3/4" Plus 1/4" Backer 3/8" 5/16" Required for Optimal Handle Clearance 1/4" Max. 3-1/8" Min. 2-1/2" B 42″ Models 1/4″ Backer Panel 3/4″ Overlay Panel 48″ Models 1/4″ Backer Panel 3/4″ Overlay Panel A 22-5/16″ 18-13/16″ A 26-7/16″ 22-15/16″ B 67-7/8″ 67-1/4″ B 67-7/8″ 67...
Use and Care Manual
Page 24
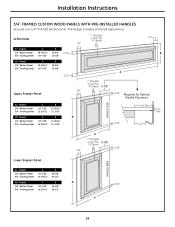
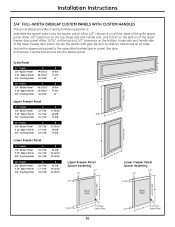
...-15/16″ 10-3/4″ 5/16" B 3/4″ Overlay Panel 39-7/16″ 10-1/8″ 48″ Models A B 1/4″ Backer Panel 45-15/16″ 10-3/4″ 3/4″ Overlay Panel 45-7/16″ 10-1/8″ A 5/16" Upper Freezer Panel 1" Thick Max. Installation Instructions 3/4″ FRAMED CUSTOM WOOD PANELS WITH PRE-INSTALLED HANDLES Secured to a 1/4″ finished...
...-15/16″ 10-3/4″ 5/16" B 3/4″ Overlay Panel 39-7/16″ 10-1/8″ 48″ Models A B 1/4″ Backer Panel 45-15/16″ 10-3/4″ 3/4″ Overlay Panel 45-7/16″ 10-1/8″ A 5/16" Upper Freezer Panel 1" Thick Max. Installation Instructions 3/4″ FRAMED CUSTOM WOOD PANELS WITH PRE-INSTALLED HANDLES Secured to a 1/4″ finished...
Use and Care Manual
Page 25
Use glue and screws. Countersink screws into the backer panel. 1/2" 1/2" Required for Optimal Handle Clearance 3-1/8" Min. 1/4" Max. 2-1/2" 3-1/8" Spacer Panel B Finished Backer Panel 1/2" A 42″ Models 1/4″ Backer Panel 0.10″ Spacer Panel 3/4″ Overlay Panel 48″ Models 1/4″ Backer Panel 0.10″ Spacer Panel 3/4″ Overlay Panel A 22-5/16″ 18-3/16″ 19-5/16″ A 26-7/16″...
Use glue and screws. Countersink screws into the backer panel. 1/2" 1/2" Required for Optimal Handle Clearance 3-1/8" Min. 1/4" Max. 2-1/2" 3-1/8" Spacer Panel B Finished Backer Panel 1/2" A 42″ Models 1/4″ Backer Panel 0.10″ Spacer Panel 3/4″ Overlay Panel 48″ Models 1/4″ Backer Panel 0.10″ Spacer Panel 3/4″ Overlay Panel A 22-5/16″ 18-3/16″ 19-5/16″ A 26-7/16″...
Use and Care Manual
Page 26
... trimless appearance. Allow 1/2″ clearance on all four sides of the upper freezer door panel. Be sure to the assembled backer/spacer panel. Grille Panel 42″ Models 1/4″ Backer Panel 0.10″ Spacer Panel 3/4″ Overlay Panel A 39-15/16″ 38-15/16″ 40-3/16″ B 10-3/4″...12-5/16″ 13-7/16″ B 35-1/8″ 33-11/16″ 34-15/16″ 48″ Models 1/4″ Backer Panel 0.10″ Spacer Panel 3/4″ Overlay Panel A 18-7/16″ 14-5/16″ 15-7/16″ B 35-1/8″ 33-11/16″ 34-15/16″ B 5/16...
... trimless appearance. Allow 1/2″ clearance on all four sides of the upper freezer door panel. Be sure to the assembled backer/spacer panel. Grille Panel 42″ Models 1/4″ Backer Panel 0.10″ Spacer Panel 3/4″ Overlay Panel A 39-15/16″ 38-15/16″ 40-3/16″ B 10-3/4″...12-5/16″ 13-7/16″ B 35-1/8″ 33-11/16″ 34-15/16″ 48″ Models 1/4″ Backer Panel 0.10″ Spacer Panel 3/4″ Overlay Panel A 18-7/16″ 14-5/16″ 15-7/16″ B 35-1/8″ 33-11/16″ 34-15/16″ B 5/16...
Use and Care Manual
Page 27
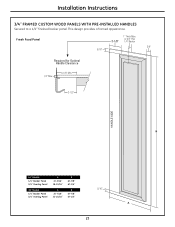
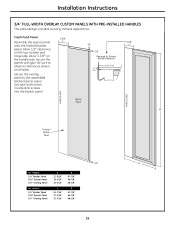
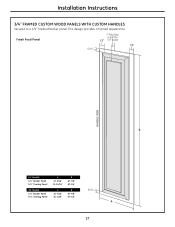
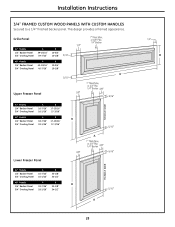
Installation Instructions 3/4″ FRAMED CUSTOM WOOD PANELS WITH CUSTOM HANDLES Secured to a 1/4″ finished backer panel. This design provides a framed appearance. Fresh Food Panel 42″ Models 1/4″ Backer Panel 3/4″ Overlay Panel 48″ Models 1/4″ Backer Panel 3/4″ Overlay Panel A 22-5/16″ 21-15/16″ A 26-7/16″ 26-1/16″ B 67-7/8″ 67-1/4″ B 67-7/8″ 67-1/4″ 27
Installation Instructions 3/4″ FRAMED CUSTOM WOOD PANELS WITH CUSTOM HANDLES Secured to a 1/4″ finished backer panel. This design provides a framed appearance. Fresh Food Panel 42″ Models 1/4″ Backer Panel 3/4″ Overlay Panel 48″ Models 1/4″ Backer Panel 3/4″ Overlay Panel A 22-5/16″ 21-15/16″ A 26-7/16″ 26-1/16″ B 67-7/8″ 67-1/4″ B 67-7/8″ 67-1/4″ 27
Use and Care Manual
Page 28
... 48″ Models 1/4″ Backer Panel 3/4″ Overlay Panel A 45-15/16″ 45-7/16″ B 10-3/4″ 10-1/8″ Upper Freezer Panel 42″ Models 1/4″ Backer Panel 3/4″ Overlay Panel 48″ Models 1/4″ Backer Panel 3/4″ Overlay Panel A 16-7/16″ 16-1/16″...16″ 18-1/16″ B 17-13/16″ 17-3/16″ Lower Freezer Panel 42″ Models 1/4″ Backer Panel 3/4″ Overlay Panel 48″ Models 1/4″ Backer Panel 3/4″ Overlay Panel A 16-7/16″ 16-1/16″ A 18-7/16″ 18-1/16″ B...
... 48″ Models 1/4″ Backer Panel 3/4″ Overlay Panel A 45-15/16″ 45-7/16″ B 10-3/4″ 10-1/8″ Upper Freezer Panel 42″ Models 1/4″ Backer Panel 3/4″ Overlay Panel 48″ Models 1/4″ Backer Panel 3/4″ Overlay Panel A 16-7/16″ 16-1/16″...16″ 18-1/16″ B 17-13/16″ 17-3/16″ Lower Freezer Panel 42″ Models 1/4″ Backer Panel 3/4″ Overlay Panel 48″ Models 1/4″ Backer Panel 3/4″ Overlay Panel A 16-7/16″ 16-1/16″ A 18-7/16″ 18-1/16″ B...
Use and Care Manual
Page 29
... provides a nearly trimless appearance. Be sure to the assembled backer/spacer panel. Spacer Panel Finished Backer Panel 42″ Models 1/4″ Backer Panel 0.10″ Spacer Panel 3/4″ Overlay Panel 48″ Models 1/4″ Backer Panel 0.10″ Spacer Panel 3/4″ Overlay Panel A 22-5/16″ 21-13/16″ 22-5/16″ A 26-7/...″ B 67-7/8″ 66-7/8″ 68-1/8″ B 67-7/8″ 66-7/8″ 68-1/8″ 29 Use glue and screws. Secure the panels with glue. Allow 1/2″ clearance on all sides. Countersink screws into the backer...
... provides a nearly trimless appearance. Be sure to the assembled backer/spacer panel. Spacer Panel Finished Backer Panel 42″ Models 1/4″ Backer Panel 0.10″ Spacer Panel 3/4″ Overlay Panel 48″ Models 1/4″ Backer Panel 0.10″ Spacer Panel 3/4″ Overlay Panel A 22-5/16″ 21-13/16″ 22-5/16″ A 26-7/...″ B 67-7/8″ 66-7/8″ 68-1/8″ B 67-7/8″ 66-7/8″ 68-1/8″ 29 Use glue and screws. Secure the panels with glue. Allow 1/2″ clearance on all sides. Countersink screws into the backer...
Use and Care Manual
Page 30
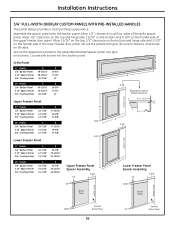
... 15/16″ on all sides. Countersink screws into the backer panel. Be sure to the assembled backer/spacer panel. Grille Panel 42″ Models 1/4″ Backer Panel 0.10″ Spacer Panel 3/4″ Overlay Panel A 39-15/16″ 38-15/16″ 40-3/16&#... B 5/16" 5/16" B Upper Freezer Panel Spacer Assembly B A A A Lower Freezer Panel Spacer Assembly Spacer Panel Finished Backer Panel 30 Spacer Panel Finished Backer Panel Allow 1/2″ clearance on the bottom of the grille spacer panel. Secure the appearance panel to observe clearances on the bottom, hinge side...
... 15/16″ on all sides. Countersink screws into the backer panel. Be sure to the assembled backer/spacer panel. Grille Panel 42″ Models 1/4″ Backer Panel 0.10″ Spacer Panel 3/4″ Overlay Panel A 39-15/16″ 38-15/16″ 40-3/16&#... B 5/16" 5/16" B Upper Freezer Panel Spacer Assembly B A A A Lower Freezer Panel Spacer Assembly Spacer Panel Finished Backer Panel 30 Spacer Panel Finished Backer Panel Allow 1/2″ clearance on the bottom of the grille spacer panel. Secure the appearance panel to observe clearances on the bottom, hinge side...

Use and Care Manual
Page 31
...of the cardboard carton and place under the refrigerator where you are working. Cut a large section of the flooring. Installation Instructions SIDE PANELS Side panels (not supplied) must be placed on installation height. 24" *84" *3" to 4" 1-1/2" FLOORING For proper installation, this refrigerator...loaded refrigerator, or approximately 1500 lb. DO NOT USE AN EXTENSION CORD WITH THIS APPLIANCE. 31 Order side panels from this appliance is properly grounded. GROUNDING THE REFRIGERATOR IMPORTANT-Please read carefully FOR PERSONAL SAFETY, THIS APPLIANCE MUST BE PROPERLY ...
...of the cardboard carton and place under the refrigerator where you are working. Cut a large section of the flooring. Installation Instructions SIDE PANELS Side panels (not supplied) must be placed on installation height. 24" *84" *3" to 4" 1-1/2" FLOORING For proper installation, this refrigerator...loaded refrigerator, or approximately 1500 lb. DO NOT USE AN EXTENSION CORD WITH THIS APPLIANCE. 31 Order side panels from this appliance is properly grounded. GROUNDING THE REFRIGERATOR IMPORTANT-Please read carefully FOR PERSONAL SAFETY, THIS APPLIANCE MUST BE PROPERLY ...

Use and Care Manual
Page 34
... a 2″ x 4″ wood block 36″ long, and secure the block to the mounting 36" brackets provided, using 1/4″ side panels, they should be level and plumb with the 3M Dual Lock adhesive strips before setting refrigerator in hollow ice cubes. The top case trim at... Filter 4A ALTERNATE ANTI-TIP PRECAUTIONS SKIP THIS STEP WHEN USING ANTI-TIP BRACKETS All GE Profile™ built-in place. 3 INSTALL SIDE PANELS SKIP THIS STEP WHEN NOT USING SIDE PANELS If you are Top-Heavy. Rotate the filtration cartridge counterclockwise until tightly secured in refrigerators...
... a 2″ x 4″ wood block 36″ long, and secure the block to the mounting 36" brackets provided, using 1/4″ side panels, they should be level and plumb with the 3M Dual Lock adhesive strips before setting refrigerator in hollow ice cubes. The top case trim at... Filter 4A ALTERNATE ANTI-TIP PRECAUTIONS SKIP THIS STEP WHEN USING ANTI-TIP BRACKETS All GE Profile™ built-in place. 3 INSTALL SIDE PANELS SKIP THIS STEP WHEN NOT USING SIDE PANELS If you are Top-Heavy. Rotate the filtration cartridge counterclockwise until tightly secured in refrigerators...


