Use and Care Manual
Page 1
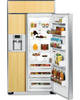
... State of California Water Treatment Device Certificate 48 Warranty (Canadian 45 Warranty (U.S 46 Owner's Manual and Installation Instructions Model 42, 48 GE Profile Côte à Côte Réfrigérateurs Manuel d'utilisation et d'installation La section française commence à la page 51 Write the model and serial numbers here...
... State of California Water Treatment Device Certificate 48 Warranty (Canadian 45 Warranty (U.S 46 Owner's Manual and Installation Instructions Model 42, 48 GE Profile Côte à Côte Réfrigérateurs Manuel d'utilisation et d'installation La section française commence à la page 51 Write the model and serial numbers here...

Use and Care Manual
Page 2
...the icemaker. s Do not touch the cold surfaces in the area. s Keep fingers out of the ejector mechanism, or with the Installation Instructions before cleaning or making repairs. s Do not refreeze frozen foods that any other flammable vapors and liquids in accordance with the ... avoid contact with the moving parts of the "pinch point" areas; Do not place fingers or hands on the shelves in . Installation Instructions Consumer Support Troubleshooting Tips 2 Be careful closing doors when children are in the freezer compartment when hands are necessarily small. Skin ...
...the icemaker. s Do not touch the cold surfaces in the area. s Keep fingers out of the ejector mechanism, or with the Installation Instructions before cleaning or making repairs. s Do not refreeze frozen foods that any other flammable vapors and liquids in accordance with the ... avoid contact with the moving parts of the "pinch point" areas; Do not place fingers or hands on the shelves in . Installation Instructions Consumer Support Troubleshooting Tips 2 Be careful closing doors when children are in the freezer compartment when hands are necessarily small. Skin ...

Use and Care Manual
Page 3
... You Throw Away Your Old Refrigerator or Freezer: s Take off the doors. If you are getting rid of the past. Safety Instructions Operating Instructions ge.com DANGER! Installation Instructions Troubleshooting Tips Consumer Support 3 RISK OF CHILD ENTRAPMENT PROPER DISPOSAL OF THE REFRIGERATOR Child entrapment and suffocation are still dangerous...even if they...
... You Throw Away Your Old Refrigerator or Freezer: s Take off the doors. If you are getting rid of the past. Safety Instructions Operating Instructions ge.com DANGER! Installation Instructions Troubleshooting Tips Consumer Support 3 RISK OF CHILD ENTRAPMENT PROPER DISPOSAL OF THE REFRIGERATOR Child entrapment and suffocation are still dangerous...even if they...
Use and Care Manual
Page 4
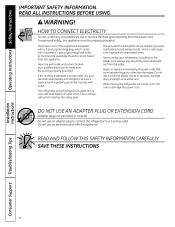
... cord. This provides the best performance and also prevents overloading house wiring circuits, which has a voltage rating that matches the rating plate. SAVE THESE INSTRUCTIONS Installation Instructions Consumer Support Troubleshooting Tips 4 WARNING! DO NOT USE AN ADAPTER PLUG OR EXTENSION CORD (Adapter plugs not permitted in Canada) Do not use an...
... cord. This provides the best performance and also prevents overloading house wiring circuits, which has a voltage rating that matches the rating plate. SAVE THESE INSTRUCTIONS Installation Instructions Consumer Support Troubleshooting Tips 4 WARNING! DO NOT USE AN ADAPTER PLUG OR EXTENSION CORD (Adapter plugs not permitted in Canada) Do not use an...
Use and Care Manual
Page 5
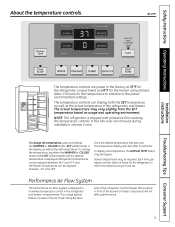
Safety Instructions Operating Instructions About the temperature controls. If this film was not removed during installation, remove it now. SET will illuminate in the display, as well as the actual temperature in front of the refrigerator and the freezer. The ...button. To display the temperature, the DISPLAY TEMP button may vary slightly from the SET temperature based on these components will clear after 10 seconds. ge.com Installation Instructions Troubleshooting Tips Consumer Support The temperature controls are preset in the refrigerator and freezer compartments.
Safety Instructions Operating Instructions About the temperature controls. If this film was not removed during installation, remove it now. SET will illuminate in the display, as well as the actual temperature in front of the refrigerator and the freezer. The ...button. To display the temperature, the DISPLAY TEMP button may vary slightly from the SET temperature based on these components will clear after 10 seconds. ge.com Installation Instructions Troubleshooting Tips Consumer Support The temperature controls are preset in the refrigerator and freezer compartments.
Use and Care Manual
Page 6
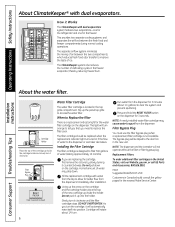
... two evaporators-one for better flow from the dispenser. The bypass plug will turn it clockwise until the filter cartridge stops. Installation Instructions Consumer Support Troubleshooting Tips About the water filter. This light will be replaced when the replacement indicator light turns red or...with dual evaporators. The separate airflow system minimizes the mixing of defrosting cycles in the United States, visit our Website, ge.com, or call GE Parts and Accessories, 800.626.2002. Press and hold the RESET FILTER button on the cartridge. Cartridge will not operate ...
... two evaporators-one for better flow from the dispenser. The bypass plug will turn it clockwise until the filter cartridge stops. Installation Instructions Consumer Support Troubleshooting Tips About the water filter. This light will be replaced when the replacement indicator light turns red or...with dual evaporators. The separate airflow system minimizes the mixing of defrosting cycles in the United States, visit our Website, ge.com, or call GE Parts and Accessories, 800.626.2002. Press and hold the RESET FILTER button on the cartridge. Cartridge will not operate ...
Use and Care Manual
Page 7
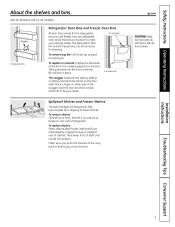
...spills from dripping to meet your needs. Bin will lock in tracks at front, then lift it back and forth to fit your storage needs. Installation Instructions Troubleshooting Tips Consumer Support 7 Make sure you push the shelves all the way back in the molded supports on the door shelf. Then push... down to lower shelves. To replace shelves: Select desired shelf height. ge.com CAUTION: Make sure that items do not block or fall into position. Do not block To remove any bin: Lift the bin up at...
...spills from dripping to meet your needs. Bin will lock in tracks at front, then lift it back and forth to fit your storage needs. Installation Instructions Troubleshooting Tips Consumer Support 7 Make sure you push the shelves all the way back in the molded supports on the door shelf. Then push... down to lower shelves. To replace shelves: Select desired shelf height. ge.com CAUTION: Make sure that items do not block or fall into position. Do not block To remove any bin: Lift the bin up at...
Use and Care Manual
Page 8
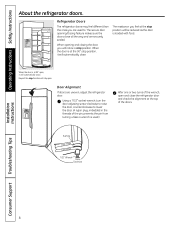
... ones you will notice a stop position will automatically close. When the door is loaded with food. Bushing Door Hinge Case Hinge 7/32" Wrench Raise Clockwise Installation Instructions Consumer Support Troubleshooting Tips 8 Operating Instructions Safety Instructions About the refrigerator doors. When opening /closing the door, you are securely sealed. Refrigerator Doors The...
... ones you will notice a stop position will automatically close. When the door is loaded with food. Bushing Door Hinge Case Hinge 7/32" Wrench Raise Clockwise Installation Instructions Consumer Support Troubleshooting Tips 8 Operating Instructions Safety Instructions About the refrigerator doors. When opening /closing the door, you are securely sealed. Refrigerator Doors The...
Use and Care Manual
Page 9
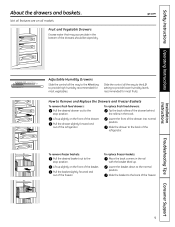
... and out of the refrigerator. Lower the basket down to the stop position. Lift up . Slide the drawer to the back of the freezer. Installation Instructions Troubleshooting Tips Consumer Support 9 Not all features are on all the way to the LO setting to the stop position. To replace fresh food... freezer baskets: Place the back corners in the rail with the basket tilted up slightly on the front of the drawer into normal position. ge.com Adjustable Humidity Drawers Slide the control all the way to the HI setting to the back of the refrigerator. Pull the drawer slightly forward...
... and out of the refrigerator. Lower the basket down to the stop position. Lift up . Slide the drawer to the back of the freezer. Installation Instructions Troubleshooting Tips Consumer Support 9 Not all features are on all the way to the LO setting to the stop position. To replace fresh food... freezer baskets: Place the back corners in the rail with the basket tilted up slightly on the front of the drawer into normal position. ge.com Adjustable Humidity Drawers Slide the control all the way to the HI setting to the back of the refrigerator. Pull the drawer slightly forward...
Use and Care Manual
Page 10
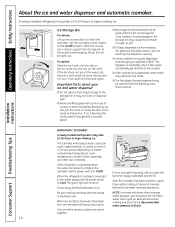
... narrow or extra-tall glasses. Cans, bottles or food packages in a 24-hour period, depending on ). Installation Instructions Consumer Support Troubleshooting Tips Automatic Icemaker A newly-installed refrigerator may be dispensed even though you may drip from the chute. The icemaker will produce seven cubes per...The green light will stop producing ice. When the bin fills to begin making ice. Recommended water pressure is normal. A newly installed refrigerator may be quick-chilled in the chute to the storage bin. With the access door closed, support the storage bin at the...
... narrow or extra-tall glasses. Cans, bottles or food packages in a 24-hour period, depending on ). Installation Instructions Consumer Support Troubleshooting Tips Automatic Icemaker A newly-installed refrigerator may be dispensed even though you may drip from the chute. The icemaker will produce seven cubes per...The green light will stop producing ice. When the bin fills to begin making ice. Recommended water pressure is normal. A newly installed refrigerator may be quick-chilled in the chute to the storage bin. With the access door closed, support the storage bin at the...
Use and Care Manual
Page 11
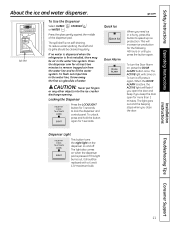
... into the ice crusher discharge opening. To turn the Door Alarm on, press the DOOR ALARM button once. Installation Instructions Troubleshooting Tips Consumer Support 11 The spill shelf is first installed, there may be cleaned regularly. Press the dispenser arm for 3 seconds to lock the dispenser and control panel...it off . Spill Shelf To Use the Dispenser Select CUBED , CRUSHED or WATER . Press the glass gently against the middle of water. ge.com When you press the button again. The light goes out and the beeping stops when you keep the door open the door and beep...
... into the ice crusher discharge opening. To turn the Door Alarm on, press the DOOR ALARM button once. Installation Instructions Troubleshooting Tips Consumer Support 11 The spill shelf is first installed, there may be cleaned regularly. Press the dispenser arm for 3 seconds to lock the dispenser and control panel...it off . Spill Shelf To Use the Dispenser Select CUBED , CRUSHED or WATER . Press the glass gently against the middle of water. ge.com When you press the button again. The light goes out and the beeping stops when you keep the door open the door and beep...
Use and Care Manual
Page 12
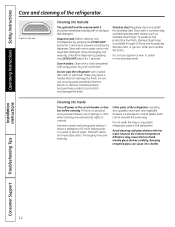
... off power at the circuit breaker or fuse box before cleaning. Handle glass shelves carefully. Bumping tempered glass can damage the finish. Installation Instructions Consumer Support Troubleshooting Tips 12 Before cleaning, lock the dispenser by pressing the LOCK/LIGHT button for 3 seconds to break. Unlock...LOCK/LIGHT button for 3 seconds. Do not wipe the refrigerator with a soft cloth. If this is available through GE Parts and Accessories, 800.626.2002, or ge.com. Other parts of the refrigerator, including door gaskets, snack pan and vegetable drawers, ice storage bin and all ...
... off power at the circuit breaker or fuse box before cleaning. Handle glass shelves carefully. Bumping tempered glass can damage the finish. Installation Instructions Consumer Support Troubleshooting Tips 12 Before cleaning, lock the dispenser by pressing the LOCK/LIGHT button for 3 seconds to break. Unlock...LOCK/LIGHT button for 3 seconds. Do not wipe the refrigerator with a soft cloth. If this is available through GE Parts and Accessories, 800.626.2002, or ge.com. Other parts of the refrigerator, including door gaskets, snack pan and vegetable drawers, ice storage bin and all ...
Use and Care Manual
Page 13
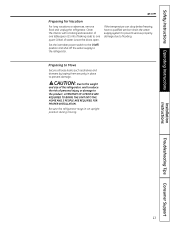
... can drop below freezing, have a qualified servicer drain the water supply system to prevent serious property damage due to the refrigerator. Installation Instructions Troubleshooting Tips Consumer Support 13 Preparing to the product, A MINIMUM OF 4 PEOPLE ARE REQUIRED TO BRING THE UNIT INTO THE... Due to the weight and size of this refrigerator, and to prevent damage. Leave the doors open. Safety Instructions Operating Instructions ge.com Preparing for Vacation For long vacations or absences, remove food and unplug the refrigerator. Set the icemaker power switch to the ...
... can drop below freezing, have a qualified servicer drain the water supply system to prevent serious property damage due to the refrigerator. Installation Instructions Troubleshooting Tips Consumer Support 13 Preparing to the product, A MINIMUM OF 4 PEOPLE ARE REQUIRED TO BRING THE UNIT INTO THE... Due to the weight and size of this refrigerator, and to prevent damage. Leave the doors open. Safety Instructions Operating Instructions ge.com Preparing for Vacation For long vacations or absences, remove food and unplug the refrigerator. Set the icemaker power switch to the ...
Use and Care Manual
Page 14
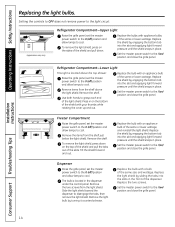
..., set the master power switch to the O (off ) position and allow lamps to cool. Set the master power switch to cool. Operating Instructions Safety Instructions Installation Instructions Replacing the light bulbs. Setting the controls to OFF does not remove power to the light circuit. (appearance may vary) Refrigerator Compartment-Upper Light...
..., set the master power switch to the O (off ) position and allow lamps to cool. Set the master power switch to cool. Operating Instructions Safety Instructions Installation Instructions Replacing the light bulbs. Setting the controls to OFF does not remove power to the light circuit. (appearance may vary) Refrigerator Compartment-Upper Light...
Use and Care Manual
Page 15
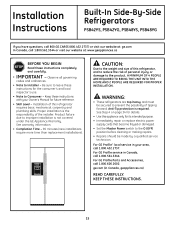
... completely and carefully. • IMPORTANT - Installation of tipping forward. WARNING: • These refrigerators are top-heavy and must be made by a qualified service technician. For GE Profile Parts and Accessories, call 1.800.432.2737. For GE Profile service in Canada, geappliances.ca) READ...CAUTION: Due to the O (OFF) position before cleaning or making repairs. • Repairs should be secured to improper installation is required. For GE Profile™ local service in your Owner's Manual for its intended purpose. • Immediately repair or replace electric power...
... completely and carefully. • IMPORTANT - Installation of tipping forward. WARNING: • These refrigerators are top-heavy and must be made by a qualified service technician. For GE Profile Parts and Accessories, call 1.800.432.2737. For GE Profile service in Canada, geappliances.ca) READ...CAUTION: Due to the O (OFF) position before cleaning or making repairs. • Repairs should be secured to improper installation is required. For GE Profile™ local service in your Owner's Manual for its intended purpose. • Immediately repair or replace electric power...
Use and Care Manual
Page 16
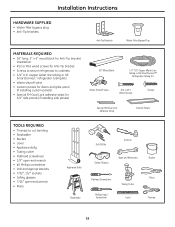
..., 2″ x 4″ wood block for Anti-Tip bracket installation • #12 or #14 wood screws for 1/4″ side panels (if installing side panels) 36″ Wood Block 1/4″ O.D. copper water line tubing or GE SmartConnect™ refrigerator tubing kits • Water shutoff valve •...; Custom panels for doors and grille panel (if installing custom panels) • Special 3M ...
..., 2″ x 4″ wood block for Anti-Tip bracket installation • #12 or #14 wood screws for 1/4″ side panels (if installing side panels) 36″ Wood Block 1/4″ O.D. copper water line tubing or GE SmartConnect™ refrigerator tubing kits • Water shutoff valve •...; Custom panels for doors and grille panel (if installing custom panels) • Special 3M ...
Use and Care Manual
Page 17
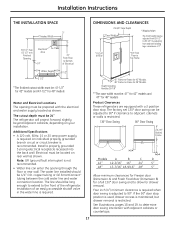
...door swing is required. copper tubing or GE SmartConnect™ tubing between the cold water line and water connection location. Install a properly grounded 3-prong electrical receptacle recessed into the back wall. The water line installed should be long enough to extend to the...8243; models and 47″ for 48″ models Product Clearances These refrigerators are equipped with adjacent cabinets or countertops. 17 Installation Instructions THE INSTALLATION SPACE *Finished Width 84 1/2" max Electrical 7" 83 1/2" min Area Finished Opening 24" 3" 7" 74" From Floor to ...
...door swing is required. copper tubing or GE SmartConnect™ tubing between the cold water line and water connection location. Install a properly grounded 3-prong electrical receptacle recessed into the back wall. The water line installed should be long enough to extend to the...8243; models and 47″ for 48″ models Product Clearances These refrigerators are equipped with adjacent cabinets or countertops. 17 Installation Instructions THE INSTALLATION SPACE *Finished Width 84 1/2" max Electrical 7" 83 1/2" min Area Finished Opening 24" 3" 7" 74" From Floor to ...
Use and Care Manual
Page 18
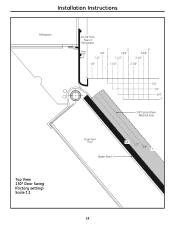
Installation Instructions Refrigerator Top View 130° Door Swing (factory setting) Scale 1:1 23-7/8" From Rear of Refrigerator Case Trim 1" 3/4" 2" 1-3/4" 3" 2-3/4" 1/2" 1-1/2" 2-1/2" 1/4" 1-1/4" 2-1/4" 1/4" 1/2" 3/4" 1" 3/4" Custom Panel (Nominal Size) Fresh Food Door Backer Panel 1/4" 1/2" 3/4" 1" 18
Installation Instructions Refrigerator Top View 130° Door Swing (factory setting) Scale 1:1 23-7/8" From Rear of Refrigerator Case Trim 1" 3/4" 2" 1-3/4" 3" 2-3/4" 1/2" 1-1/2" 2-1/2" 1/4" 1-1/4" 2-1/4" 1/4" 1/2" 3/4" 1" 3/4" Custom Panel (Nominal Size) Fresh Food Door Backer Panel 1/4" 1/2" 3/4" 1" 18
Use and Care Manual
Page 19
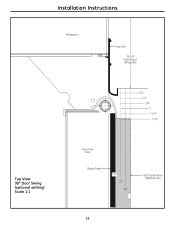
Installation Instructions Refrigerator Case Trim 23-7/8" From Rear of Refrigerator 1/4" 1/2" 3/4" 1" 1-1/4" 1-1/2" Top View 90° Door Swing (optional setting) Scale 1:1 Fresh Food Door Backer Panel 1/4" 1/2" 3/4" 1" 3/4" Custom Panel (Nominal Size) 19
Installation Instructions Refrigerator Case Trim 23-7/8" From Rear of Refrigerator 1/4" 1/2" 3/4" 1" 1-1/4" 1-1/2" Top View 90° Door Swing (optional setting) Scale 1:1 Fresh Food Door Backer Panel 1/4" 1/2" 3/4" 1" 3/4" Custom Panel (Nominal Size) 19
Use and Care Manual
Page 20
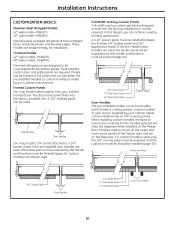
...panels. Custom handles of the freezer door and not on the freezer door. Panels can be used . Framed Panel Door Handles You may install custom panels from your choice, supplied by the handle and therefore must be finished (page 24). 3/4" Overlay Panel .10" Thick Spacer ...Panel 1/4" Thick Backer Panel Door Handles The pre-installed handles can also be installed only on 3/4″ overlay panels. If the pre-installed door handles are designed to mount on the upper and lower wood panels of your cabinet manufacturer. ...
...panels. Custom handles of the freezer door and not on the freezer door. Panels can be used . Framed Panel Door Handles You may install custom panels from your choice, supplied by the handle and therefore must be finished (page 24). 3/4" Overlay Panel .10" Thick Spacer ...Panel 1/4" Thick Backer Panel Door Handles The pre-installed handles can also be installed only on 3/4″ overlay panels. If the pre-installed door handles are designed to mount on the upper and lower wood panels of your cabinet manufacturer. ...


