Use and Care Manual
Page 1
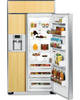
ge.com GE Profile™ Built-In Side by Side Refrigerators Safety Instructions 2-4 Operating Instructions Automatic Icemaker 10 Care and Cleaning 12, 13 ClimateKeeper with Dual Evaporators 6 Drawers and Baskets 9 Ice and Water Dispenser 10, 11 Refrigerator Doors 8 Replacing the Light Bulbs 14 Shelves and ...of California Water Treatment Device Certificate 48 Warranty (Canadian 45 Warranty (U.S 46 Owner's Manual and Installation Instructions Model 42, 48 GE Profile Côte à Côte Réfrigérateurs Manuel d'utilisation et d'installation La section française ...
ge.com GE Profile™ Built-In Side by Side Refrigerators Safety Instructions 2-4 Operating Instructions Automatic Icemaker 10 Care and Cleaning 12, 13 ClimateKeeper with Dual Evaporators 6 Drawers and Baskets 9 Ice and Water Dispenser 10, 11 Refrigerator Doors 8 Replacing the Light Bulbs 14 Shelves and ...of California Water Treatment Device Certificate 48 Warranty (Canadian 45 Warranty (U.S 46 Owner's Manual and Installation Instructions Model 42, 48 GE Profile Côte à Côte Réfrigérateurs Manuel d'utilisation et d'installation La section française ...

Use and Care Manual
Page 2
... in the area. SAFETY PRECAUTIONS When using electrical appliances, basic safety precautions should be followed, including the following: s This refrigerator must be performed by a qualified individual. s Keep fingers out of the ejector mechanism, or with the Installation Instructions before cleaning... and liquids in the vicinity of the icemaker. Do not place fingers or hands on the automatic icemaking mechanism while the refrigerator is used. Installation Instructions Consumer Support Troubleshooting Tips 2 READ ALL INSTRUCTIONS BEFORE USING. s Do not touch the cold surfaces...
... in the area. SAFETY PRECAUTIONS When using electrical appliances, basic safety precautions should be followed, including the following: s This refrigerator must be performed by a qualified individual. s Keep fingers out of the ejector mechanism, or with the Installation Instructions before cleaning... and liquids in the vicinity of the icemaker. Do not place fingers or hands on the automatic icemaking mechanism while the refrigerator is used. Installation Instructions Consumer Support Troubleshooting Tips 2 READ ALL INSTRUCTIONS BEFORE USING. s Do not touch the cold surfaces...

Use and Care Manual
Page 3
... dangerous...even if they will sit for "just a few days." Refrigerants All refrigeration products contain refrigerants, which under federal law must be removed prior to product disposal. ...Installation Instructions Troubleshooting Tips Consumer Support 3 Before You Throw Away Your Old Refrigerator or Freezer: s Take off the doors. Junked or abandoned refrigerators are getting rid of your old refrigerator, please follow the instructions below to do. Safety Instructions Operating Instructions ge...
... dangerous...even if they will sit for "just a few days." Refrigerants All refrigeration products contain refrigerants, which under federal law must be removed prior to product disposal. ...Installation Instructions Troubleshooting Tips Consumer Support 3 Before You Throw Away Your Old Refrigerator or Freezer: s Take off the doors. Junked or abandoned refrigerators are getting rid of your old refrigerator, please follow the instructions below to do. Safety Instructions Operating Instructions ge...
Use and Care Manual
Page 4
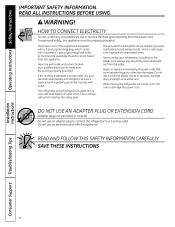
... not to roll over or damage the power cord. READ ALL INSTRUCTIONS BEFORE USING. Do not use an adapter plug to connect the refrigerator to minimize the possibility of this appliance. The power cord of electric shock hazard from overheated wires. If the outlet is a standard ...2-prong outlet, it replaced with a standard 3-prong (grounding) wall outlet to a 2-prong outlet. When moving the refrigerator, be plugged into its length or at either end. HOW TO CONNECT ELECTRICITY Do not, under any circumstances, cut or remove the third (ground) prong...
... not to roll over or damage the power cord. READ ALL INSTRUCTIONS BEFORE USING. Do not use an adapter plug to connect the refrigerator to minimize the possibility of this appliance. The power cord of electric shock hazard from overheated wires. If the outlet is a standard ...2-prong outlet, it replaced with a standard 3-prong (grounding) wall outlet to a 2-prong outlet. When moving the refrigerator, be plugged into its length or at either end. HOW TO CONNECT ELECTRICITY Do not, under any circumstances, cut or remove the third (ground) prong...
Use and Care Manual
Page 5
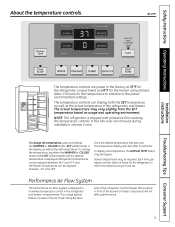
... adjust controls, allow 24 hours for the refrigerator to maximize temperature control in front of the refrigerator and the freezer. ge.com Installation Instructions Troubleshooting Tips Consumer Support The temperature controls are preset in the refrigerator and freezer. The temperature controls can display both..., tap either the WARMER or COLDER button (while SET is illuminated) until the desired temperature is displayed. NOTE: The refrigerator is designed to reach the temperature you have set temperature. Performance Air Flow System The Performance Air-Flow System is shipped ...
... adjust controls, allow 24 hours for the refrigerator to maximize temperature control in front of the refrigerator and the freezer. ge.com Installation Instructions Troubleshooting Tips Consumer Support The temperature controls are preset in the refrigerator and freezer. The temperature controls can display both..., tap either the WARMER or COLDER button (while SET is illuminated) until the desired temperature is displayed. NOTE: The refrigerator is designed to reach the temperature you have set temperature. Performance Air Flow System The Performance Air-Flow System is shipped ...
Use and Care Manual
Page 6
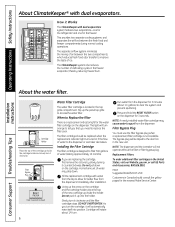
... the cartridge up inside the holder. Do not push it Works The ClimateKeeper with dual evaporators system features two evaporators-one for the refrigerator and one by slowly turning it clockwise. Do not pull down . Lining up inside the cartridge holder and slowly turn it will... in the freezer evaporator, thereby reducing freezer burn. A small amount of defrosting cycles in the United States, visit our Website, ge.com, or call GE Parts and Accessories, 800.626.2002. DO NOT OVERTIGHTEN. Run water from the dispenser for the nearest Mabe Service Center. Installing ...
... the cartridge up inside the holder. Do not push it Works The ClimateKeeper with dual evaporators system features two evaporators-one for the refrigerator and one by slowly turning it clockwise. Do not pull down . Lining up inside the cartridge holder and slowly turn it will... in the freezer evaporator, thereby reducing freezer burn. A small amount of defrosting cycles in the United States, visit our Website, ge.com, or call GE Parts and Accessories, 800.626.2002. DO NOT OVERTIGHTEN. Run water from the dispenser for the nearest Mabe Service Center. Installing ...
Use and Care Manual
Page 7
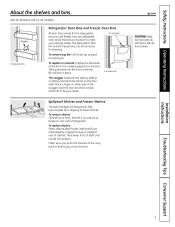
... and down on the door shelf. Installation Instructions Troubleshooting Tips Consumer Support 7 Make sure you push the shelves all models. Snugger Refrigerator bins Refrigerator Door Bins and Freezer Door Bins All door bins, except for cleaning. Top freezer bin The snugger helps prevent tipping, spilling or... bin and freezer bins, are designed to help prevent spills from dripping to lower shelves. To replace shelves: Select desired shelf height. ge.com CAUTION: Make sure that items do not block or fall into position. Place a finger on either side of the snugger near...
... and down on the door shelf. Installation Instructions Troubleshooting Tips Consumer Support 7 Make sure you push the shelves all models. Snugger Refrigerator bins Refrigerator Door Bins and Freezer Door Bins All door bins, except for cleaning. Top freezer bin The snugger helps prevent tipping, spilling or... bin and freezer bins, are designed to help prevent spills from dripping to lower shelves. To replace shelves: Select desired shelf height. ge.com CAUTION: Make sure that items do not block or fall into position. Place a finger on either side of the snugger near...
Use and Care Manual
Page 8
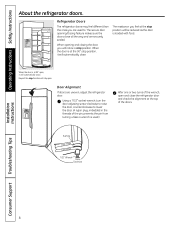
... . The resistance you feel different than the ones you will notice a stop position, it will stay open. Door Alignment If doors are uneven, adjust the refrigerator door. Using a 7/32″ socket wrench, turn the door adjusting screw clockwise to raise the door, counterclockwise to lower the door. (A nylon plug, ...two turns of the wrench, open , it will be reduced as the door is used to. Beyond this stop position will automatically close the refrigerator door and check the alignment at the 90° stop position. When the door is at the top of the pin, prevents the pin from...
... . The resistance you feel different than the ones you will notice a stop position, it will stay open. Door Alignment If doors are uneven, adjust the refrigerator door. Using a 7/32″ socket wrench, turn the door adjusting screw clockwise to raise the door, counterclockwise to lower the door. (A nylon plug, ...two turns of the wrench, open , it will be reduced as the door is used to. Beyond this stop position will automatically close the refrigerator door and check the alignment at the 90° stop position. When the door is at the top of the pin, prevents the pin from...
Use and Care Manual
Page 9
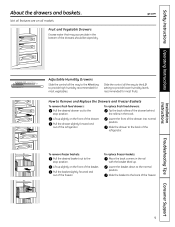
ge.com Adjustable Humidity Drawers Slide the control all the way to the HI setting to provide high humidity recommended for most... to the back of the basket. Not all features are on all the way to the LO setting to the back of the refrigerator. Pull the drawer slightly forward and out of the freezer. Slide the basket to provide lower humidity levels recommended for most fruits.... Drawers Excess water that may accumulate in the rail with the basket tilted up slightly on the front of the refrigerator. Installation Instructions Troubleshooting Tips Consumer Support 9
ge.com Adjustable Humidity Drawers Slide the control all the way to the HI setting to provide high humidity recommended for most... to the back of the basket. Not all features are on all the way to the LO setting to the back of the refrigerator. Pull the drawer slightly forward and out of the freezer. Slide the basket to provide lower humidity levels recommended for most fruits.... Drawers Excess water that may accumulate in the rail with the basket tilted up slightly on the front of the refrigerator. Installation Instructions Troubleshooting Tips Consumer Support 9
Use and Care Manual
Page 10
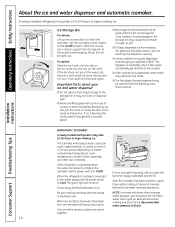
...blocking the chute, poke it and rotate the drive mechanism 1/4 turn. Installation Instructions Consumer Support Troubleshooting Tips Automatic Icemaker A newly-installed refrigerator may drip from the chute. Power Switch Icemaker Green Power Light Feeler Arm If ice is not used frequently, old ice cubes will ...off ) position. The icemaker will produce seven cubes per cycle-approximately 15 cycles or more in the ice storage bin. When the refrigerator has been connected to the water supply, set the power switch to the crusher. Be sure nothing interferes with lower-than the ...
...blocking the chute, poke it and rotate the drive mechanism 1/4 turn. Installation Instructions Consumer Support Troubleshooting Tips Automatic Icemaker A newly-installed refrigerator may drip from the chute. Power Switch Icemaker Green Power Light Feeler Arm If ice is not used frequently, old ice cubes will ...off ) position. The icemaker will produce seven cubes per cycle-approximately 15 cycles or more in the ice storage bin. When the refrigerator has been connected to the water supply, set the power switch to the crusher. Be sure nothing interferes with lower-than the ...
Use and Care Manual
Page 11
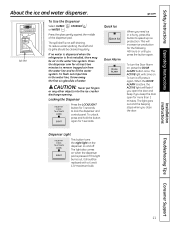
... Dispenser Press the LOCK/LIGHT button for at least two minutes to remove trapped air from the water line and to fill the water system. ge.com When you keep the door open the door and beep if you need ice in a hurry, press this light burns out, it again. Dispenser... once. To reduce water spotting, the shelf and its grille should be replaced with a 6 watt 12V maximum bulb. If no water is dispensed when the refrigerator is active, the ACTIVE light will come on when the dispenser pad is not self-draining. To flush out impurities in the water line system...
... Dispenser Press the LOCK/LIGHT button for at least two minutes to remove trapped air from the water line and to fill the water system. ge.com When you keep the door open the door and beep if you need ice in a hurry, press this light burns out, it again. Dispenser... once. To reduce water spotting, the shelf and its grille should be replaced with a 6 watt 12V maximum bulb. If no water is dispensed when the refrigerator is active, the ACTIVE light will come on when the dispenser pad is not self-draining. To flush out impurities in the water line system...
Use and Care Manual
Page 12
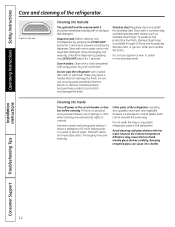
...Do not wipe the refrigerator with a soft cloth. Before cleaning, lock the dispenser by pressing the LOCK/LIGHT button for 3 seconds to shatter. Dry with a soiled dish cloth or wet towel. If this is available through GE Parts and Accessories, 800.626.2002, or ge.com. Avoid cleaning cold... Do not use appliance wax or polish on the stainless steel. Stainless Steel Magic is not practical, wring excess moisture out of the refrigerator, including door gaskets, snack pan and vegetable drawers, ice storage bin and all plastic parts, can cause it should be cleaned the same...
...Do not wipe the refrigerator with a soft cloth. Before cleaning, lock the dispenser by pressing the LOCK/LIGHT button for 3 seconds to shatter. Dry with a soiled dish cloth or wet towel. If this is available through GE Parts and Accessories, 800.626.2002, or ge.com. Avoid cleaning cold... Do not use appliance wax or polish on the stainless steel. Stainless Steel Magic is not practical, wring excess moisture out of the refrigerator, including door gaskets, snack pan and vegetable drawers, ice storage bin and all plastic parts, can cause it should be cleaned the same...
Use and Care Manual
Page 13
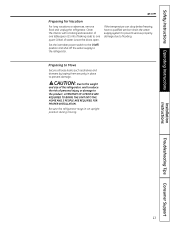
.... If the temperature can drop below freezing, have a qualified servicer drain the water supply system to prevent serious property damage due to the refrigerator. Installation Instructions Troubleshooting Tips Consumer Support 13 Clean the interior with a baking soda solution of one tablespoon (15 ml) of water. Leave ... TO BRING THE UNIT INTO THE HOME AND 2 PEOPLE ARE REQUIRED FOR PROPER INSTALLATION. Preparing to prevent damage. Safety Instructions Operating Instructions ge.com Preparing for Vacation For long vacations or absences, remove food and unplug the refrigerator.
.... If the temperature can drop below freezing, have a qualified servicer drain the water supply system to prevent serious property damage due to the refrigerator. Installation Instructions Troubleshooting Tips Consumer Support 13 Clean the interior with a baking soda solution of one tablespoon (15 ml) of water. Leave ... TO BRING THE UNIT INTO THE HOME AND 2 PEOPLE ARE REQUIRED FOR PROPER INSTALLATION. Preparing to prevent damage. Safety Instructions Operating Instructions ge.com Preparing for Vacation For long vacations or absences, remove food and unplug the refrigerator.
Use and Care Manual
Page 14
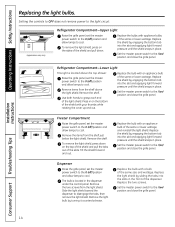
.... Slide the light shield toward the dispenser to cool. Setting the controls to OFF does not remove power to the light circuit. (appearance may vary) Refrigerator Compartment-Upper Light Raise the grille panel, set the master power switch to the O (off ) position and allow lamps to the I (on ) position and close... shield, press on the top of the shield and pull the tabs out of the light shield. The bulb is located above the light shield. Refrigerator Compartment-Lower Light This light is located in place.
.... Slide the light shield toward the dispenser to cool. Setting the controls to OFF does not remove power to the light circuit. (appearance may vary) Refrigerator Compartment-Upper Light Raise the grille panel, set the master power switch to the O (off ) position and allow lamps to the I (on ) position and close... shield, press on the top of the shield and pull the tabs out of the light shield. The bulb is located above the light shield. Refrigerator Compartment-Lower Light This light is located in place.
Use and Care Manual
Page 15
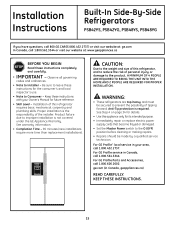
..., call 1.800.626.2002. Observe all governing codes and ordinances. • Note to improper installation is not covered under the GE Appliance Warranty. Keep these instructions for details. • Use this refrigerator, and to Consumer - See warranty information. • Completion Time - 90 minutes (new installations require more time than replacement installations). WARNING...
..., call 1.800.626.2002. Observe all governing codes and ordinances. • Note to improper installation is not covered under the GE Appliance Warranty. Keep these instructions for details. • Use this refrigerator, and to Consumer - See warranty information. • Completion Time - 90 minutes (new installations require more time than replacement installations). WARNING...
Use and Care Manual
Page 16
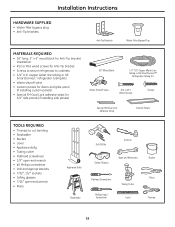
... Lock Adhesive Strips Custom Panels TOOLS REQUIRED • Tinsnips to cabinets • 1/4″ O.D. copper water line tubing or GE SmartConnect™ refrigerator tubing kits • Water shutoff valve • Custom panels for doors and grille panel (if installing custom panels) •...; Special 3M Dual Lock adhesive strips for Anti-Tip bracket • Screws to secure refrigerator to cut banding • Stepladder • Bucket • Level • Appliance dolly • Tubing cutter • Flathead screwdriver •...
... Lock Adhesive Strips Custom Panels TOOLS REQUIRED • Tinsnips to cabinets • 1/4″ O.D. copper water line tubing or GE SmartConnect™ refrigerator tubing kits • Water shutoff valve • Custom panels for doors and grille panel (if installing custom panels) •...; Special 3M Dual Lock adhesive strips for Anti-Tip bracket • Screws to secure refrigerator to cut banding • Stepladder • Bucket • Level • Appliance dolly • Tubing cutter • Flathead screwdriver •...
Use and Care Manual
Page 17
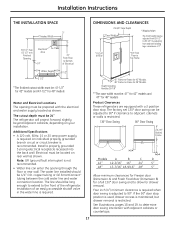
...be 1/4″ O.D. The water line installed should be prepared with the electrical and water supply located as shown. copper tubing or GE SmartConnect™ tubing between the cold water line and water connection location. An individual properly grounded branch circuit or circuit breaker is.... • Water line can be : 41″ for 42″ models and 47″ for 48″ models Product Clearances These refrigerators are equipped with adjacent cabinets or countertops. 17 Note: GFI (ground fault interrupter) is adjusted to allow for 48" Models Depth Including Handles ...
...be 1/4″ O.D. The water line installed should be prepared with the electrical and water supply located as shown. copper tubing or GE SmartConnect™ tubing between the cold water line and water connection location. An individual properly grounded branch circuit or circuit breaker is.... • Water line can be : 41″ for 42″ models and 47″ for 48″ models Product Clearances These refrigerators are equipped with adjacent cabinets or countertops. 17 Note: GFI (ground fault interrupter) is adjusted to allow for 48" Models Depth Including Handles ...
Use and Care Manual
Page 18
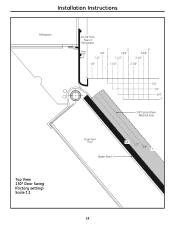
Installation Instructions Refrigerator Top View 130° Door Swing (factory setting) Scale 1:1 23-7/8" From Rear of Refrigerator Case Trim 1" 3/4" 2" 1-3/4" 3" 2-3/4" 1/2" 1-1/2" 2-1/2" 1/4" 1-1/4" 2-1/4" 1/4" 1/2" 3/4" 1" 3/4" Custom Panel (Nominal Size) Fresh Food Door Backer Panel 1/4" 1/2" 3/4" 1" 18
Installation Instructions Refrigerator Top View 130° Door Swing (factory setting) Scale 1:1 23-7/8" From Rear of Refrigerator Case Trim 1" 3/4" 2" 1-3/4" 3" 2-3/4" 1/2" 1-1/2" 2-1/2" 1/4" 1-1/4" 2-1/4" 1/4" 1/2" 3/4" 1" 3/4" Custom Panel (Nominal Size) Fresh Food Door Backer Panel 1/4" 1/2" 3/4" 1" 18
Use and Care Manual
Page 19
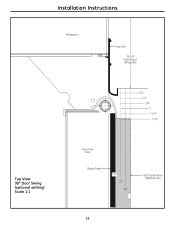
Installation Instructions Refrigerator Case Trim 23-7/8" From Rear of Refrigerator 1/4" 1/2" 3/4" 1" 1-1/4" 1-1/2" Top View 90° Door Swing (optional setting) Scale 1:1 Fresh Food Door Backer Panel 1/4" 1/2" 3/4" 1" 3/4" Custom Panel (Nominal Size) 19
Installation Instructions Refrigerator Case Trim 23-7/8" From Rear of Refrigerator 1/4" 1/2" 3/4" 1" 1-1/4" 1-1/2" Top View 90° Door Swing (optional setting) Scale 1:1 Fresh Food Door Backer Panel 1/4" 1/2" 3/4" 1" 3/4" Custom Panel (Nominal Size) 19
Use and Care Manual
Page 20
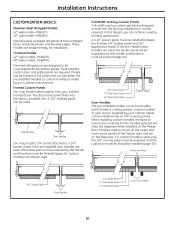
...Installation Instructions CUSTOMIZATION BASICS: Stainless Steel Wrapped Models 42″ wide model-PSB42YS 48″ wide model-PSB48YS Stainless Steel wrapped refrigerators have wrapped doors and grille panels, and beveled edges. Custom handles of the freezer door and not on the freezer door.... Handles need to ensure the mounting for installation. Trimmed Models 42″ wide models-PSB42YG 48″ wide models-PSB48YG Trimmed refrigerators are used . A 1/4″ finished panel can use either the pre-installed handles or custom handles provided by the handle and ...
...Installation Instructions CUSTOMIZATION BASICS: Stainless Steel Wrapped Models 42″ wide model-PSB42YS 48″ wide model-PSB48YS Stainless Steel wrapped refrigerators have wrapped doors and grille panels, and beveled edges. Custom handles of the freezer door and not on the freezer door.... Handles need to ensure the mounting for installation. Trimmed Models 42″ wide models-PSB42YG 48″ wide models-PSB48YG Trimmed refrigerators are used . A 1/4″ finished panel can use either the pre-installed handles or custom handles provided by the handle and ...


