
Use and Care Manual
Page 1
...Registration 49, 50 State of California Water Treatment Device Certificate 48 Warranty (Canadian 45 Warranty (U.S 46 Owner's Manual and Installation Instructions Model 42, 48 GE Profile Côte à Côte Réfrigérateurs Manuel d'utilisation et d'installation La section française ...commence à la page 51 Write the model and serial numbers here: Model Serial Find these numbers on a label inside the refrigerator compartment ...
...Registration 49, 50 State of California Water Treatment Device Certificate 48 Warranty (Canadian 45 Warranty (U.S 46 Owner's Manual and Installation Instructions Model 42, 48 GE Profile Côte à Côte Réfrigérateurs Manuel d'utilisation et d'installation La section française ...commence à la page 51 Write the model and serial numbers here: Model Serial Find these numbers on a label inside the refrigerator compartment ...
Use and Care Manual
Page 7
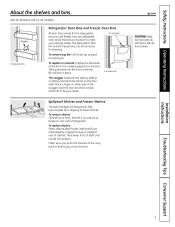
... in tracks at front, then lift it back and forth to fit your storage needs. ge.com CAUTION: Make sure that items do not block or fall into position. Then push down to lower shelves. Not all models. Bin will lock in the molded supports on the front of refrigerator. Installation Instructions...
... in tracks at front, then lift it back and forth to fit your storage needs. ge.com CAUTION: Make sure that items do not block or fall into position. Then push down to lower shelves. Not all models. Bin will lock in the molded supports on the front of refrigerator. Installation Instructions...
Use and Care Manual
Page 9
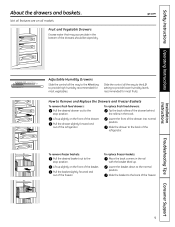
... in the rail with the basket tilted up slightly on all the way to the LO setting to the back of the freezer. Lift up . ge.com Adjustable Humidity Drawers Slide the control all the way to the HI setting to the stop position. How to Remove and Replace the Drawers.... To remove freezer baskets: Pull the desired basket out to the normal position. Lower the basket down to the stop position. Slide the control all models. Slide the drawer to provide lower humidity levels recommended for most fruits. Not all features are on the front of the drawer behind the rollers...
... in the rail with the basket tilted up slightly on all the way to the LO setting to the back of the freezer. Lift up . ge.com Adjustable Humidity Drawers Slide the control all the way to the HI setting to the stop position. How to Remove and Replace the Drawers.... To remove freezer baskets: Pull the desired basket out to the normal position. Lower the basket down to the stop position. Slide the control all models. Slide the drawer to provide lower humidity levels recommended for most fruits. Not all features are on the front of the drawer behind the rollers...
Use and Care Manual
Page 17
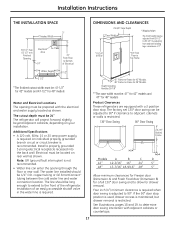
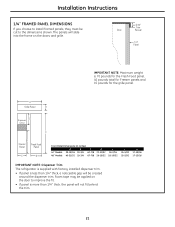
...be: 41-1/2″ for 42″ models and 47-1/2″ for 48″ models Water and Electrical Locations The opening through...″ for 42″ models and 47″ for 48″ models Product Clearances These refrigerators are...removal is adjusted to -Frame for 48" Models Depth Including Handles 26-7/8" **The case width ... Door Swing 90° Door Swing A B 23-7/8" Behind Frame D Models A B C 42″ 12-3/16″ 16″ 24″... door (Dimension A) and Fresh Food door (Dimension B) for 42" Models 48" Frame-to 90°. Install a properly grounded 3-prong electrical ...
...be: 41-1/2″ for 42″ models and 47-1/2″ for 48″ models Water and Electrical Locations The opening through...″ for 42″ models and 47″ for 48″ models Product Clearances These refrigerators are...removal is adjusted to -Frame for 48" Models Depth Including Handles 26-7/8" **The case width ... Door Swing 90° Door Swing A B 23-7/8" Behind Frame D Models A B C 42″ 12-3/16″ 16″ 24″... door (Dimension A) and Fresh Food door (Dimension B) for 42" Models 48" Frame-to 90°. Install a properly grounded 3-prong electrical ...
Use and Care Manual
Page 20
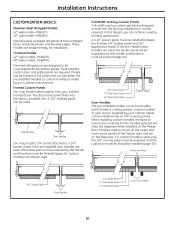
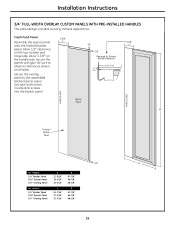
... Stainless Steel wrapped refrigerators have wrapped doors and grille panels, and beveled edges. These models are required. Field installed custom door and grille panels are shipped ready for the handles selected will clear the dispenser when installed on...exposed, and the custom trim pieces should be installed between the finished 1/4″ backer panel and 3/4″ appearance panel. Trimmed Models 42″ wide models-PSB42YG 48″ wide models-PSB48YG Trimmed refrigerators are used , only the 3/4″ overlay panel must be installed (page 38). 3/4" Custom Panel Door Handles...
... Stainless Steel wrapped refrigerators have wrapped doors and grille panels, and beveled edges. These models are required. Field installed custom door and grille panels are shipped ready for the handles selected will clear the dispenser when installed on...exposed, and the custom trim pieces should be installed between the finished 1/4″ backer panel and 3/4″ appearance panel. Trimmed Models 42″ wide models-PSB42YG 48″ wide models-PSB48YG Trimmed refrigerators are used , only the 3/4″ overlay panel must be installed (page 38). 3/4" Custom Panel Door Handles...
Use and Care Manual
Page 21
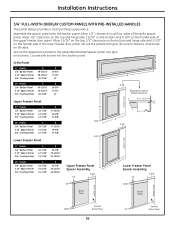
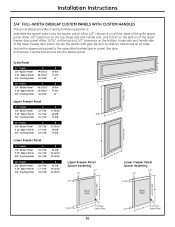
... created around the dispenser trim. A Grille Panel B G Dispenser Cutout C F Freezer Panel Fresh Food Panel E D Front Panel Dimensions (in inches) A B C 42″ Models 39-15/16 10-3/4 67-7/8 48″ Models 45-31/32 10-3/4 67-7/8 D 22-11/32 26-15/32 E 16-7/16 18-15/32 F 35-5/32 35-5/32 G 17-13...
... created around the dispenser trim. A Grille Panel B G Dispenser Cutout C F Freezer Panel Fresh Food Panel E D Front Panel Dimensions (in inches) A B C 42″ Models 39-15/16 10-3/4 67-7/8 48″ Models 45-31/32 10-3/4 67-7/8 D 22-11/32 26-15/32 E 16-7/16 18-15/32 F 35-5/32 35-5/32 G 17-13...
Use and Care Manual
Page 22
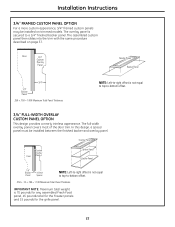
... panels and 15 pounds for the grille panel. 22 The assembled custom panel then slides into the trim with the same procedure described on trimmed models. Installation Instructions 3/4″ FRAMED CUSTOM PANEL OPTION For a more custom appearance, 3/4″ framed custom panels may be installed between the finished backer and overlay panel...
... panels and 15 pounds for the grille panel. 22 The assembled custom panel then slides into the trim with the same procedure described on trimmed models. Installation Instructions 3/4″ FRAMED CUSTOM PANEL OPTION For a more custom appearance, 3/4″ framed custom panels may be installed between the finished backer and overlay panel...
Use and Care Manual
Page 23
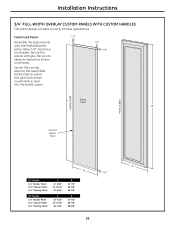
Fresh Food Panel 3-1/8" 1" Thick Max. or 3/4" Plus 1/4" Backer 3/8" 5/16" Required for Optimal Handle Clearance 1/4" Max. 3-1/8" Min. 2-1/2" B 42″ Models 1/4″ Backer Panel 3/4″ Overlay Panel 48″ Models 1/4″ Backer Panel 3/4″ Overlay Panel A 22-5/16″ 18-13/16″ A 26-7/16″ 22-15/16″ B 67-7/8″ 67-1/4″ B 67...
Fresh Food Panel 3-1/8" 1" Thick Max. or 3/4" Plus 1/4" Backer 3/8" 5/16" Required for Optimal Handle Clearance 1/4" Max. 3-1/8" Min. 2-1/2" B 42″ Models 1/4″ Backer Panel 3/4″ Overlay Panel 48″ Models 1/4″ Backer Panel 3/4″ Overlay Panel A 22-5/16″ 18-13/16″ A 26-7/16″ 22-15/16″ B 67-7/8″ 67-1/4″ B 67...
Use and Care Manual
Page 24
...; Backer Panel 3/4″ Overlay Panel A 16-7/16″ 12-15/16″ B 17-13/16″ 17-3/16″ 48″ Models A B B 1/4″ Backer Panel 18-7/16″ 17-13/16″ 3/4″ Overlay Panel 14-15/16″ 17-3/16″ 3-1/8" Min. 1/4" Max. 5/16" 2-1/2" A 1" ...Thick Max. or 3/4" Plus 3-1/8" 1/4" Backer 5/16" 3/8" Lower Freezer Panel 42″ Models 1/4″ Backer Panel 3/4″ Overlay Panel A 16-7/16″ 12-15/16″ B 35-1/8″ 34-1/2″ 48″...
...; Backer Panel 3/4″ Overlay Panel A 16-7/16″ 12-15/16″ B 17-13/16″ 17-3/16″ 48″ Models A B B 1/4″ Backer Panel 18-7/16″ 17-13/16″ 3/4″ Overlay Panel 14-15/16″ 17-3/16″ 3-1/8" Min. 1/4" Max. 5/16" 2-1/2" A 1" ...Thick Max. or 3/4" Plus 3-1/8" 1/4" Backer 5/16" 3/8" Lower Freezer Panel 42″ Models 1/4″ Backer Panel 3/4″ Overlay Panel A 16-7/16″ 12-15/16″ B 35-1/8″ 34-1/2″ 48″...
Use and Care Manual
Page 25
... screws into the backer panel. 1/2" 1/2" Required for Optimal Handle Clearance 3-1/8" Min. 1/4" Max. 2-1/2" 3-1/8" Spacer Panel B Finished Backer Panel 1/2" A 42″ Models 1/4″ Backer Panel 0.10″ Spacer Panel 3/4″ Overlay Panel 48″ Models 1/4″ Backer Panel 0.10″ Spacer Panel 3/4″ Overlay Panel A 22-5/16″ 18-3/16″ 19-5/16″...
... screws into the backer panel. 1/2" 1/2" Required for Optimal Handle Clearance 3-1/8" Min. 1/4" Max. 2-1/2" 3-1/8" Spacer Panel B Finished Backer Panel 1/2" A 42″ Models 1/4″ Backer Panel 0.10″ Spacer Panel 3/4″ Overlay Panel 48″ Models 1/4″ Backer Panel 0.10″ Spacer Panel 3/4″ Overlay Panel A 22-5/16″ 18-3/16″ 19-5/16″...
Use and Care Manual
Page 26
... Backer Panel 26 Finished 1/2" Backer Panel Secure the panels with glue. Secure the appearance panel to observe clearances on all sides. Grille Panel 42″ Models 1/4″ Backer Panel 0.10″ Spacer Panel 3/4″ Overlay Panel A 39-15/16″ 38-15/16″ 40-3/16″ B 10...-3/4″ 9-3/4″ 11″ 48″ Models 1/4″ Backer Panel 0.10″ Spacer Panel 3/4″ Overlay Panel A 45-15/16″ 44-15/16″ 46-3/16″ B 10-3/4″ 9-3/4&#...
... Backer Panel 26 Finished 1/2" Backer Panel Secure the panels with glue. Secure the appearance panel to observe clearances on all sides. Grille Panel 42″ Models 1/4″ Backer Panel 0.10″ Spacer Panel 3/4″ Overlay Panel A 39-15/16″ 38-15/16″ 40-3/16″ B 10...-3/4″ 9-3/4″ 11″ 48″ Models 1/4″ Backer Panel 0.10″ Spacer Panel 3/4″ Overlay Panel A 45-15/16″ 44-15/16″ 46-3/16″ B 10-3/4″ 9-3/4&#...
Use and Care Manual
Page 27
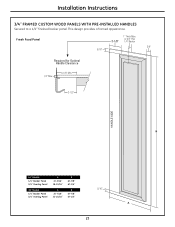
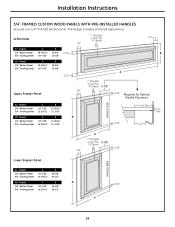
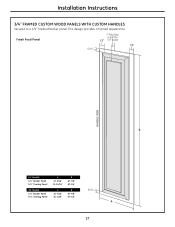
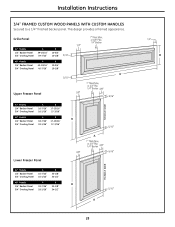
Fresh Food Panel 42″ Models 1/4″ Backer Panel 3/4″ Overlay Panel 48″ Models 1/4″ Backer Panel 3/4″ Overlay Panel A 22-5/16″ 21-15/16″ A 26-7/16″ 26-1/16″ B 67-7/8″ 67-1/4″ B 67-7/8″ 67-1/4″ 27 Installation Instructions 3/4″ FRAMED CUSTOM WOOD PANELS WITH CUSTOM HANDLES Secured to a 1/4″ finished backer panel. This design provides a framed appearance.
Fresh Food Panel 42″ Models 1/4″ Backer Panel 3/4″ Overlay Panel 48″ Models 1/4″ Backer Panel 3/4″ Overlay Panel A 22-5/16″ 21-15/16″ A 26-7/16″ 26-1/16″ B 67-7/8″ 67-1/4″ B 67-7/8″ 67-1/4″ 27 Installation Instructions 3/4″ FRAMED CUSTOM WOOD PANELS WITH CUSTOM HANDLES Secured to a 1/4″ finished backer panel. This design provides a framed appearance.
Use and Care Manual
Page 28
...8243; Overlay Panel A 45-15/16″ 45-7/16″ B 10-3/4″ 10-1/8″ Upper Freezer Panel 42″ Models 1/4″ Backer Panel 3/4″ Overlay Panel 48″ Models 1/4″ Backer Panel 3/4″ Overlay Panel A 16-7/16″ 16-1/16″ B 17-13/16″ 17-3/16″...; A 18-7/16″ 18-1/16″ B 17-13/16″ 17-3/16″ Lower Freezer Panel 42″ Models 1/4″ Backer Panel 3/4″ Overlay Panel 48″ Models 1/4″ Backer Panel 3/4″ Overlay Panel A 16-7/16″ 16-1/16″ A 18-7/16″ 18-1/16″...
...8243; Overlay Panel A 45-15/16″ 45-7/16″ B 10-3/4″ 10-1/8″ Upper Freezer Panel 42″ Models 1/4″ Backer Panel 3/4″ Overlay Panel 48″ Models 1/4″ Backer Panel 3/4″ Overlay Panel A 16-7/16″ 16-1/16″ B 17-13/16″ 17-3/16″...; A 18-7/16″ 18-1/16″ B 17-13/16″ 17-3/16″ Lower Freezer Panel 42″ Models 1/4″ Backer Panel 3/4″ Overlay Panel 48″ Models 1/4″ Backer Panel 3/4″ Overlay Panel A 16-7/16″ 16-1/16″ A 18-7/16″ 18-1/16″...
Use and Care Manual
Page 29
... observe clearances shown on all sides. Allow 1/2″ clearance on all sides. Spacer Panel Finished Backer Panel 42″ Models 1/4″ Backer Panel 0.10″ Spacer Panel 3/4″ Overlay Panel 48″ Models 1/4″ Backer Panel 0.10″ Spacer Panel 3/4″ Overlay Panel A 22-5/16″ 21-13/16″ 22-5/16...
... observe clearances shown on all sides. Allow 1/2″ clearance on all sides. Spacer Panel Finished Backer Panel 42″ Models 1/4″ Backer Panel 0.10″ Spacer Panel 3/4″ Overlay Panel 48″ Models 1/4″ Backer Panel 0.10″ Spacer Panel 3/4″ Overlay Panel A 22-5/16″ 21-13/16″ 22-5/16...
Use and Care Manual
Page 30
...″ Spacer Panel 3/4″ Overlay Panel A 39-15/16″ 38-15/16″ 40-3/16″ B 10-3/4″ 9-3/4″ 11″ 48″ Models 1/4″ Backer Panel 0.10″ Spacer Panel 3/4″ Overlay Panel A 45-15/16″ 44-15/16″ 46-3/16″ B 10-3/4″ 9-3/4″... 11″ Upper Freezer Panel 42″ Models 1/4″ Backer Panel 0.10″ Spacer Panel 3/4″ Overlay Panel A 16-7/16″ 15-7/16″ 16-7/16″ B 17-13/16″ 16...
...″ Spacer Panel 3/4″ Overlay Panel A 39-15/16″ 38-15/16″ 40-3/16″ B 10-3/4″ 9-3/4″ 11″ 48″ Models 1/4″ Backer Panel 0.10″ Spacer Panel 3/4″ Overlay Panel A 45-15/16″ 44-15/16″ 46-3/16″ B 10-3/4″ 9-3/4″... 11″ Upper Freezer Panel 42″ Models 1/4″ Backer Panel 0.10″ Spacer Panel 3/4″ Overlay Panel A 16-7/16″ 15-7/16″ 16-7/16″ B 17-13/16″ 16...
Use and Care Manual
Page 35
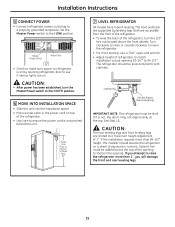
... installation requires more than 1″, you attempt to 84-1/2″. Cabinet trim could be added across the top of Wood Block 82" 7 LEVEL REFRIGERATOR All models have 4-point leveling.
... installation requires more than 1″, you attempt to 84-1/2″. Cabinet trim could be added across the top of Wood Block 82" 7 LEVEL REFRIGERATOR All models have 4-point leveling.
Use and Care Manual
Page 45
... Warranted (From Date of Sale) Parts Repair or Replace at Mabe's Option Labour Compressor GE Profile™: Ten (10) Years GE Profile: Ten (10) Years GE Profile: Five (5) Years GE and All Other GE and All Other GE and All Other Brands: One (1) Year Brands: One (1) Year Brands: One (1) Year...WARRANTY (for customers in Canada) Your refrigerator is warranted to be free of defects in this Limited Warranty. Please have serial number and model number available when calling for a particular purpose, are warranted through the remainder of Sale. Proof of the original purchase date is needed...
... Warranted (From Date of Sale) Parts Repair or Replace at Mabe's Option Labour Compressor GE Profile™: Ten (10) Years GE Profile: Ten (10) Years GE Profile: Five (5) Years GE and All Other GE and All Other GE and All Other Brands: One (1) Year Brands: One (1) Year Brands: One (1) Year...WARRANTY (for customers in Canada) Your refrigerator is warranted to be free of defects in this Limited Warranty. Please have serial number and model number available when calling for a particular purpose, are warranted through the remainder of Sale. Proof of the original purchase date is needed...
Use and Care Manual
Page 46
... a defect in the sealed refrigerating system. Louisville, KY 40225 46 To schedule service, on-line, visit us at ge.com, or call 800.GE.CARES (800.432.2737). GE PROFILE MODELS ONLY: Five Years (GE Profile models only) From the date of the original purchase Any part of the water filter cartridge, if included, due to...
... a defect in the sealed refrigerating system. Louisville, KY 40225 46 To schedule service, on-line, visit us at ge.com, or call 800.GE.CARES (800.432.2737). GE PROFILE MODELS ONLY: Five Years (GE Profile models only) From the date of the original purchase Any part of the water filter cartridge, if included, due to...
Use and Care Manual
Page 47
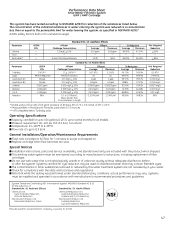
.... Systems certified for cyst reduction may be used were 0.5-1 microns *** NTU=Nephelometric Turbidity units Operating Specifications Capacity: certified for up to twelve months for all models Pressure requirement: 40-120 psi (2.8-8.2 bar), non-shock Temperature: 33-100ºF (0.6-38ºC) Flow rate: 0.5 gpm (1.9 lpm) General Installation/Operation/Maintenance Requirements Flush new...
.... Systems certified for cyst reduction may be used were 0.5-1 microns *** NTU=Nephelometric Turbidity units Operating Specifications Capacity: certified for up to twelve months for all models Pressure requirement: 40-120 psi (2.8-8.2 bar), non-shock Temperature: 33-100ºF (0.6-38ºC) Flow rate: 0.5 gpm (1.9 lpm) General Installation/Operation/Maintenance Requirements Flush new...
Use and Care Manual
Page 50
... DIMINISH YOUR WARRANTY RIGHTS. Have the peace of mind of knowing we can contact you in a safe place. It will need should you require service. Model Number Serial Number First Name Mr. s Ms. s Mrs. s Miss s Street Address Last Name Apt. # City Date Placed In Use Month E-mail Address* State Zip... and click on "Privacy Policy" or call 800.626.2224. 50 Our service number is registered, or register online at ge.com. Model Number Serial Number Important: If you did not get a registration card with your product, detach and return the form below , store this document in the...
... DIMINISH YOUR WARRANTY RIGHTS. Have the peace of mind of knowing we can contact you in a safe place. It will need should you require service. Model Number Serial Number First Name Mr. s Ms. s Mrs. s Miss s Street Address Last Name Apt. # City Date Placed In Use Month E-mail Address* State Zip... and click on "Privacy Policy" or call 800.626.2224. 50 Our service number is registered, or register online at ge.com. Model Number Serial Number Important: If you did not get a registration card with your product, detach and return the form below , store this document in the...

