Installation Instructions
Page 7
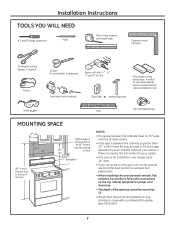
Your Owner's Manual contains the kit number for your model. • This oven is greater than 60000 BTU. 7 Backsplash 66″ or more than 13″. • The ...
Your Owner's Manual contains the kit number for your model. • This oven is greater than 60000 BTU. 7 Backsplash 66″ or more than 13″. • The ...

Installation Instructions
Page 11
... Ductless) NOTE: This oven is required for the non-vented exhaust. (See your installation and proceed to the following 3 types of ventilation required for your Owner's Manual for Outside Top Exhaust.
... Ductless) NOTE: This oven is required for the non-vented exhaust. (See your installation and proceed to the following 3 types of ventilation required for your Owner's Manual for Outside Top Exhaust.
Installation Instructions
Page 14
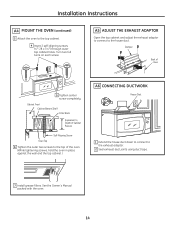
... top cabinet and adjust the exhaust adaptor to connect to the exhaust adaptor. 2 Seal exhaust duct joints using duct tape. 7 Install grease filters. See the Owner's Manual packed with the oven. 14 Installation Instructions A4 MOUNT THE OVEN (continued) 3 Attach the oven to the top cabinet. 4 Insert 2 self-aligning screws (1⁄ 4″...
... top cabinet and adjust the exhaust adaptor to connect to the exhaust adaptor. 2 Seal exhaust duct joints using duct tape. 7 Install grease filters. See the Owner's Manual packed with the oven. 14 Installation Instructions A4 MOUNT THE OVEN (continued) 3 Attach the oven to the top cabinet. 4 Insert 2 self-aligning screws (1⁄ 4″...
Installation Instructions
Page 18
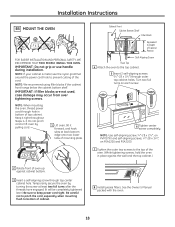
... at least two full turns after the threads have engaged. (It will be completely tightened later.) Be sure to keep power cord tight. See the Owner's Manual packed with the oven. 18 NOTE: When mounting the oven, thread power cord through hole in place against the wall and the top cabinet.) 2 Rotate...
... at least two full turns after the threads have engaged. (It will be completely tightened later.) Be sure to keep power cord tight. See the Owner's Manual packed with the oven. 18 NOTE: When mounting the oven, thread power cord through hole in place against the wall and the top cabinet.) 2 Rotate...
Installation Instructions
Page 22
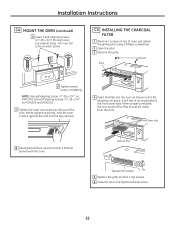
... 2 top screws. 6 Close the door and replace left side screw. 22 Screws Grille 6 Tighten center screw completely. Front lower tabs 8 Install grease filters. See the Owner's Manual packed with the oven. Installation Instructions C4 MOUNT THE OVEN (continued) 5 Insert 2 self-aligning screws (1⁄ 4″-28 x 31⁄ 4″) through outer top cabinet...
... 2 top screws. 6 Close the door and replace left side screw. 22 Screws Grille 6 Tighten center screw completely. Front lower tabs 8 Install grease filters. See the Owner's Manual packed with the oven. Installation Instructions C4 MOUNT THE OVEN (continued) 5 Insert 2 self-aligning screws (1⁄ 4″-28 x 31⁄ 4″) through outer top cabinet...

Installation Instructions
Page 23
Ensure proper ground exists before use . 6 Read the Owner's Manual. 5 120 V and 1790 Models: Plug power cord into a dedicated 15- Ensure proper ground exists before use . to have it is NEMA #14-30R and accepts ...
Ensure proper ground exists before use . 6 Read the Owner's Manual. 5 120 V and 1790 Models: Plug power cord into a dedicated 15- Ensure proper ground exists before use . to have it is NEMA #14-30R and accepts ...
Use and Care Manual
Page 1
GE Profile™ and Cafe™ Advantium® Oven GEAppliances.com Advantium Cooking controls 12 Getting to know the Advantium.........10 Oven features 11...31 Reminder 29 Repeat last 28 Resume feature 29 Surface Light 32 Temperature Units 30 Timer 31 Turntable On/Off 30 Vent Fan 32 Owner's Manual PSA1200 PSA1201 CSA1201 Care and Cleaning Cleaning the inside 32 Cleaning the outside 34 Cooking trays and wire oven rack 33 Removable turntable ...Write the model and serial numbers here: Model Serial Find these numbers on a label inside the oven. MFL38211612 49-40624 03-10 GE
GE Profile™ and Cafe™ Advantium® Oven GEAppliances.com Advantium Cooking controls 12 Getting to know the Advantium.........10 Oven features 11...31 Reminder 29 Repeat last 28 Resume feature 29 Surface Light 32 Temperature Units 30 Timer 31 Turntable On/Off 30 Vent Fan 32 Owner's Manual PSA1200 PSA1201 CSA1201 Care and Cleaning Cleaning the inside 32 Cleaning the outside 34 Cooking trays and wire oven rack 33 Removable turntable ...Write the model and serial numbers here: Model Serial Find these numbers on a label inside the oven. MFL38211612 49-40624 03-10 GE

Use and Care Manual
Page 40
...range of all the details, including your door. Schedule Service GEAppliances.com Expert GE repair service is still in this manual cover procedures to : General Manager, Customer Relations GE Appliances, Appliance Park Louisville, KY 40225 Register Your Appliance GEAppliances.com Register your... servicing generally should the need to qualified service personnel. Extended Warranties GEAppliances.com Purchase a GE extended warranty and learn about special discounts that can now download Owner's Manuals, order parts or even schedule service on -line anytime or call 800.TDD.GEAC (...
...range of all the details, including your door. Schedule Service GEAppliances.com Expert GE repair service is still in this manual cover procedures to : General Manager, Customer Relations GE Appliances, Appliance Park Louisville, KY 40225 Register Your Appliance GEAppliances.com Register your... servicing generally should the need to qualified service personnel. Extended Warranties GEAppliances.com Purchase a GE extended warranty and learn about special discounts that can now download Owner's Manuals, order parts or even schedule service on -line anytime or call 800.TDD.GEAC (...


