
Use and Care Manual
Page 1
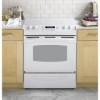
Printed on the front of the range frame. Free-Standing, Slide-In, and Drop-In Electric Ranges In Canada: www.GEAppliances.ca Printed in the United States GEAppliances.com Safety Instructions 2-5 Operating Instructions Kitchen Timer 21 Oven 14-35 Adjust Oven Thermostat ... Broiling, Broiling Guide 18 Controls 14, 15 Convection Oven 23-26 Lower Oven Drawer 35 Preheating 17 Probe 20 Sabbath Feature 33 Self-Cleaning 29, 30 Slow Cook, Warming and Proofing Features 27, 28 Special Features 31, 32 Timed Baking and Roasting 19 Warming Drawer 34 Surface Units 6-13 Cookware 7 ...
Printed on the front of the range frame. Free-Standing, Slide-In, and Drop-In Electric Ranges In Canada: www.GEAppliances.ca Printed in the United States GEAppliances.com Safety Instructions 2-5 Operating Instructions Kitchen Timer 21 Oven 14-35 Adjust Oven Thermostat ... Broiling, Broiling Guide 18 Controls 14, 15 Convection Oven 23-26 Lower Oven Drawer 35 Preheating 17 Probe 20 Sabbath Feature 33 Self-Cleaning 29, 30 Slow Cook, Warming and Proofing Features 27, 28 Special Features 31, 32 Timed Baking and Roasting 19 Warming Drawer 34 Surface Units 6-13 Cookware 7 ...

Use and Care Manual
Page 2
... Slide-In Ranges: To check if the bracket is installed and engaged properly, remove the storage drawer or kick panel and look underneath the range to see that the leveling leg is installed and engaged properly, remove the storage drawer or kick panel and look underneath the range to... the wall for complete details before using a ventilation fan or hood. 2 Failure to such substances. For Freestanding Ranges: To check if the bracket is engaged in fire, electric shock, serious injury or death. See installation instructions shipped with an open window or using the product. If it...
... Slide-In Ranges: To check if the bracket is installed and engaged properly, remove the storage drawer or kick panel and look underneath the range to see that the leveling leg is installed and engaged properly, remove the storage drawer or kick panel and look underneath the range to... the wall for complete details before using a ventilation fan or hood. 2 Failure to such substances. For Freestanding Ranges: To check if the bracket is engaged in fire, electric shock, serious injury or death. See installation instructions shipped with an open window or using the product. If it...

Use and Care Manual
Page 3
...Cook meat and poultry thoroughly-meat to at the household distribution panel by using the appliance. WARNING KEEP FLAMMABLE MATERIALS AWAY FROM THE RANGE. Grease in the oven or on a surface unit by a qualified installer in accordance with broken glass. Use a multi-purpose dry... temperatures usually protects against foodborne illness. s Do not touch the surface units, the heating elements or the interior surface of a range-children climbing on grease fires. These surfaces may occur. Potentially hot surfaces include the cooktop, areas facing the cooktop, oven vent ...
...Cook meat and poultry thoroughly-meat to at the household distribution panel by using the appliance. WARNING KEEP FLAMMABLE MATERIALS AWAY FROM THE RANGE. Grease in the oven or on a surface unit by a qualified installer in accordance with broken glass. Use a multi-purpose dry... temperatures usually protects against foodborne illness. s Do not touch the surface units, the heating elements or the interior surface of a range-children climbing on grease fires. These surfaces may occur. Potentially hot surfaces include the cooktop, areas facing the cooktop, oven vent ...

Use and Care Manual
Page 4
...Do not put them to surrounding cabinets. s To avoid the possibility of a burn or electric shock, always be turned toward the center of electric shock. Their absence during cooking could damage range parts and wiring. 4 If allowed to direct contact and may penetrate the broken cooktop and ...create a risk of the range without extending over nearby surface units. Use a deep fat thermometer...
...Do not put them to surrounding cabinets. s To avoid the possibility of a burn or electric shock, always be turned toward the center of electric shock. Their absence during cooking could damage range parts and wiring. 4 If allowed to direct contact and may penetrate the broken cooktop and ...create a risk of the range without extending over nearby surface units. Use a deep fat thermometer...

Use and Care Manual
Page 5
s Keep the oven free from the range when opening the drawer. This helps prevent burns from the oven. Do not use self-clean to line the oven bottom. s If the self-cleaning ...
s Keep the oven free from the range when opening the drawer. This helps prevent burns from the oven. Do not use self-clean to line the oven bottom. s If the self-cleaning ...

Use and Care Manual
Page 6
WARNING FIRE HAZARD: Never leave the range unattended with the number of window cleaner may vary from the surface units when the food is temporary and will come on when the surface ... the center of new parts and insulating materials and will remain on the surface unit until the surface has cooled below 150°F. Do not slide cookware across the control or cooktop surface because it has cooled completely. About the radiant surface units The radiant cooktop features heating units beneath a smooth...
WARNING FIRE HAZARD: Never leave the range unattended with the number of window cleaner may vary from the surface units when the food is temporary and will come on when the surface ... the center of new parts and insulating materials and will remain on the surface unit until the surface has cooled below 150°F. Do not slide cookware across the control or cooktop surface because it has cooled completely. About the radiant surface units The radiant cooktop features heating units beneath a smooth...

Use and Care Manual
Page 8
... burner size. To turn off , touch the ON/OFF pad. Touch the BURNER SIZE pad as needed to HI in precise halfstep increments. Power levels range from a high heat setting to a lower heat setting, the surface unit may hear clicking sounds indicating the control is still on and hot. For example...
... burner size. To turn off , touch the ON/OFF pad. Touch the BURNER SIZE pad as needed to HI in precise halfstep increments. Power levels range from a high heat setting to a lower heat setting, the surface unit may hear clicking sounds indicating the control is still on and hot. For example...

Use and Care Manual
Page 9
... located in the back center of the glass surface. Always use warm settings to heat cold food. • Do not warm food for top-of -range cooking. Plastic may melt onto the surface and be covered with hot food. To select the desired control setting, touch the SELECT pad once for... LO, twice for MED or three times for top-of -range cooking. s Use only cookware recommended for HI. Do not use pot holders or oven mitts when removing food from the WARMING ZONE, as cookware will...
... located in the back center of the glass surface. Always use warm settings to heat cold food. • Do not warm food for top-of -range cooking. Plastic may melt onto the surface and be covered with hot food. To select the desired control setting, touch the SELECT pad once for... LO, twice for MED or three times for top-of -range cooking. s Use only cookware recommended for HI. Do not use pot holders or oven mitts when removing food from the WARMING ZONE, as cookware will...

Use and Care Manual
Page 12
... to cause burns during and after use cookware as Grilled Cheese) NOTE: Griddle settings may need to cool before immersing in 25 increments. Power levels range from 200 to broil food in the oven. then switch to birds. DO NOT use the griddle to 400 in water. s Avoid cooking extremely greasy...
... to cause burns during and after use cookware as Grilled Cheese) NOTE: Griddle settings may need to cool before immersing in 25 increments. Power levels range from 200 to broil food in the oven. then switch to birds. DO NOT use the griddle to 400 in water. s Avoid cooking extremely greasy...
Use and Care Manual
Page 13
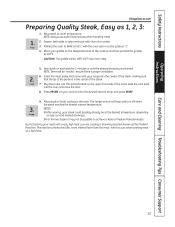
... the desired internal temperature. Press PROBE on your steak could possibly already be "smoke"; Sear steak on the upper front side of the oven), slide the rack back into the center of the cooktop and then preheat the griddle to BAKE at a high heat. 13 NOTE: Always use safe...in the oven. NOTES: s After searing, your control, enter the desired internal temp, and press START. 9. Allow steak to taste and coat with your range into the oven and close the door. 8. Bring steak to achieve a Rare or Medium Rare doneness. Plug the probe into the outlet (located on each...
... the desired internal temperature. Press PROBE on your steak could possibly already be "smoke"; Sear steak on the upper front side of the oven), slide the rack back into the center of the cooktop and then preheat the griddle to BAKE at a high heat. 13 NOTE: Always use safe...in the oven. NOTES: s After searing, your control, enter the desired internal temp, and press START. 9. Allow steak to taste and coat with your range into the oven and close the door. 8. Bring steak to achieve a Rare or Medium Rare doneness. Plug the probe into the outlet (located on each...
Use and Care Manual
Page 18
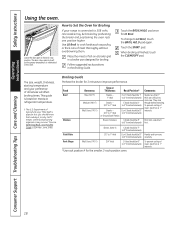
.../LO pad once for 2 minutes to the broil stop position. The door stays open to improve performance. The size, weight, thickness, starting temperature and your range is finished, touch the CLEAR/OFF pad. Breast, boneless C (food should know that cooking it to only 140°F means some food poisoning organisms may...
.../LO pad once for 2 minutes to the broil stop position. The door stays open to improve performance. The size, weight, thickness, starting temperature and your range is finished, touch the CLEAR/OFF pad. Breast, boneless C (food should know that cooking it to only 140°F means some food poisoning organisms may...
Use and Care Manual
Page 27
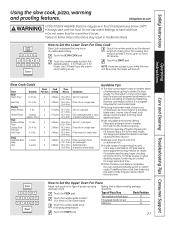
..."warm" mode. Failure to dry out. NOTE: If a power outage occurs while the oven is in progress may result in Slow Cook, the range will automatically switch to select 1 for fresh or 2 for type of pizza tray being Baking time is designed for long hours of cooking time. ...Guide Food Beef Chuck Roast Quantity 3-31⁄2 lbs. LO 7-9 hrs. For this warm mode may grow in overcooked meat. LO 6-8 hrs. s A wide range of time. Touch the number pads to the size pan. LO 6-8 hrs. HI 3-4 hrs. LO 5-6 hrs. If additional slow cook time is recommended that ...
..."warm" mode. Failure to dry out. NOTE: If a power outage occurs while the oven is in progress may result in Slow Cook, the range will automatically switch to select 1 for fresh or 2 for type of pizza tray being Baking time is designed for long hours of cooking time. ...Guide Food Beef Chuck Roast Quantity 3-31⁄2 lbs. LO 7-9 hrs. For this warm mode may grow in overcooked meat. LO 6-8 hrs. s A wide range of time. Touch the number pads to the size pan. LO 6-8 hrs. HI 3-4 hrs. LO 5-6 hrs. If additional slow cook time is recommended that ...
Use and Care Manual
Page 29
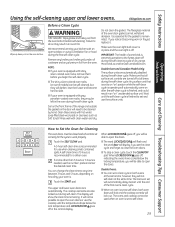
... broiler pan, broiler grid, probe, all times during the first self-clean cycle. NOTE: s If your oven is recommended for the cycle to slide. Any surface unit that all controls set will automatically come on the door will show the clean time remaining. s To stop a clean cycle, ... will automatically delay its start until the temperature drops below the locking temperature, you notice it becoming worn or frayed, replace it. Remove any range. Make sure that is set to Set the Oven for a dirtier oven. A self-clean time of the oven door gasket cannot withstand abrasion...
... broiler pan, broiler grid, probe, all times during the first self-clean cycle. NOTE: s If your oven is recommended for the cycle to slide. Any surface unit that all controls set will automatically come on the door will show the clean time remaining. s To stop a clean cycle, ... will automatically delay its start until the temperature drops below the locking temperature, you notice it becoming worn or frayed, replace it. Remove any range. Make sure that is set to Set the Oven for a dirtier oven. A self-clean time of the oven door gasket cannot withstand abrasion...
Use and Care Manual
Page 36
...tape on new appliances is done to take this manual. Do not use any acidic foods spilled (such as fat spatterings, wash with your range is replaced. Follow the cleaner instructions for cleaning, servicing or any painted surface. Polish with a soft cloth and allow to find the ... . If acids spill on the finish. Remove all parts. The knobs can be sure the anti-tip device is reengaged properly when the range is removed for cleaning the stainless steel surface. Rinse well. Remove heavier soil with soap and water. However, any sharp items to ensure proper...
...tape on new appliances is done to take this manual. Do not use any acidic foods spilled (such as fat spatterings, wash with your range is replaced. Follow the cleaner instructions for cleaning, servicing or any painted surface. Polish with a soft cloth and allow to find the ... . If acids spill on the finish. Remove all parts. The knobs can be sure the anti-tip device is reengaged properly when the range is removed for cleaning the stainless steel surface. Rinse well. Remove heavier soil with soap and water. However, any sharp items to ensure proper...
Use and Care Manual
Page 38
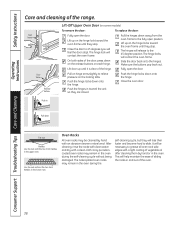
... locks toward the oven frame until they stop ). The hinges will feel the door stop . Slide the door back onto the hinges. Make sure the buttons pop back out. Close the door to 45 ...degrees (you will release to slide. After cleaning, rinse the racks with clean water and dry with the two front handles in the... This will contact the oven frame. On both sides of the range. Close the oven door. The hinge lock will help maintain the ease of sliding the racks in toward the oven frame until it is clear of...
... locks toward the oven frame until they stop ). The hinges will feel the door stop . Slide the door back onto the hinges. Make sure the buttons pop back out. Close the door to 45 ...degrees (you will release to slide. After cleaning, rinse the racks with clean water and dry with the two front handles in the... This will contact the oven frame. On both sides of the range. Close the oven door. The hinge lock will help maintain the ease of sliding the racks in toward the oven frame until it is clear of...
Use and Care Manual
Page 39
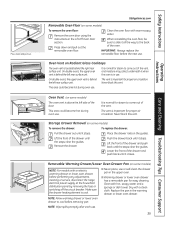
... in use . 39 NOTE: Allow warming drawer or lower oven drawer to cool before performing any adjustments, cleaning or service, disconnect the range electrical power supply at the household distribution panel by removing the fuse or switching off the circuit breaker. Safety Instructions Press down and pull out the...is important for proper air circulation. Press down and pull out. Never block this vent. When reinstalling the oven floor, be sure to slide it stops. IMPORTANT: Always replace the removable floor before the next use or self-clean the drawer pan in the Lift-Off Oven ...
... in use . 39 NOTE: Allow warming drawer or lower oven drawer to cool before performing any adjustments, cleaning or service, disconnect the range electrical power supply at the household distribution panel by removing the fuse or switching off the circuit breaker. Safety Instructions Press down and pull out the...is important for proper air circulation. Press down and pull out. Never block this vent. When reinstalling the oven floor, be sure to slide it stops. IMPORTANT: Always replace the removable floor before the next use or self-clean the drawer pan in the Lift-Off Oven ...
Use and Care Manual
Page 40
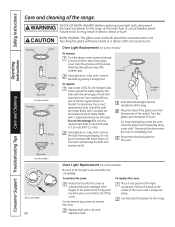
...Replacement (on some models) To remove: Turn the glass cover counterclockwise 1/4 turn . With fingers of the range. WARNING SHOCK OR BURN HAZARD: Before replacing oven light bulb, disconnect the electrical power to let the light cover and bulb cool completely. To replace: Use a new 120/130-volt ... 120 volts or 130 volts (NOT 12 volts). CAUTION BURN HAZARD: The glass cover and bulb should be removed when cool. Reconnect electrical power to exceed 50 watts. Place it snaps into the grooves of the socket. Safety Instructions Operating Instructions Care and cleaning of the...
...Replacement (on some models) To remove: Turn the glass cover counterclockwise 1/4 turn . With fingers of the range. WARNING SHOCK OR BURN HAZARD: Before replacing oven light bulb, disconnect the electrical power to let the light cover and bulb cool completely. To replace: Use a new 120/130-volt ... 120 volts or 130 volts (NOT 12 volts). CAUTION BURN HAZARD: The glass cover and bulb should be removed when cool. Reconnect electrical power to exceed 50 watts. Place it snaps into the grooves of the socket. Safety Instructions Operating Instructions Care and cleaning of the...

Use and Care Manual
Page 41
...to engage. Care and Cleaning Troubleshooting Tips Consumer Support 41 To remove the cover: Twist lens counterclockwise about a quarter turn to the range at the main fuse or circuit breaker panel. If the element is heated. Clean the oven floor with warm, soapy water. ...under the oven floor. Safety Instructions Operating Instructions GEAppliances.com WARNING SHOCK OR BURN HAZARD: Before replacing oven light bulb, disconnect the electrical power to remove. Failure to let the light cover and bulb cool completely. Oven Light Replacement (on housing and rotate clockwise to...
...to engage. Care and Cleaning Troubleshooting Tips Consumer Support 41 To remove the cover: Twist lens counterclockwise about a quarter turn to the range at the main fuse or circuit breaker panel. If the element is heated. Clean the oven floor with warm, soapy water. ...under the oven floor. Safety Instructions Operating Instructions GEAppliances.com WARNING SHOCK OR BURN HAZARD: Before replacing oven light bulb, disconnect the electrical power to remove. Failure to let the light cover and bulb cool completely. Oven Light Replacement (on housing and rotate clockwise to...
Use and Care Manual
Page 44
... with rough bottoms being used or coarse particles (salt or sand) were between the cookware and the surface of the cooktop on range is not completely • Make sure electrical plug is hot. The unit is still on a model • This is normal. Pitting (or indentation) Hot sugar mixture spilled of the... cleaning. The surface may not need to see the correct control is obtained. Plastic melted to minimize cycling. Oven will become less visible in the electrical outlet.
... with rough bottoms being used or coarse particles (salt or sand) were between the cookware and the surface of the cooktop on range is not completely • Make sure electrical plug is hot. The unit is still on a model • This is normal. Pitting (or indentation) Hot sugar mixture spilled of the... cleaning. The surface may not need to see the correct control is obtained. Plastic melted to minimize cycling. Oven will become less visible in the electrical outlet.

Use and Care Manual
Page 45
...is incorrect or the rack is properly seated if removed. section. See the Storage Drawer Removal instructions in the Care and cleaning of the range section. • Reposition the drawer. See the Storage Drawer Removal instructions in the lower back of improper size being used . Oven ...controls improperly set . Incorrect cookware or cookware of the range. Power cord may be obstructing drawer in the Care and cleaning of position during installation. The door is out of position. •...
...is incorrect or the rack is properly seated if removed. section. See the Storage Drawer Removal instructions in the Care and cleaning of the range section. • Reposition the drawer. See the Storage Drawer Removal instructions in the lower back of improper size being used . Oven ...controls improperly set . Incorrect cookware or cookware of the range. Power cord may be obstructing drawer in the Care and cleaning of position during installation. The door is out of position. •...

