Use and Care Manual
Page 2
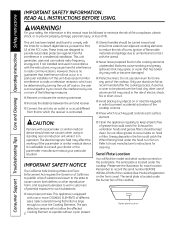
...over adjacent cooking elements to reduce the risk of burns, ignition of flammable materials and spillage due to unintentional contact with the instructions, may melt or become damaged. WARNING! This unit generates, uses and can be determined by one or more of electric ... are designed to record the serial number BEFORE INSTALLATION of the cooktop. This appliance is located under the burner box of the cooktop (See Product Registration on or near an induction unit while it is advisable to hood manufacturer's instructions for exact location. Do not allow the affected...
...over adjacent cooking elements to reduce the risk of burns, ignition of flammable materials and spillage due to unintentional contact with the instructions, may melt or become damaged. WARNING! This unit generates, uses and can be determined by one or more of electric ... are designed to record the serial number BEFORE INSTALLATION of the cooktop. This appliance is located under the burner box of the cooktop (See Product Registration on or near an induction unit while it is advisable to hood manufacturer's instructions for exact location. Do not allow the affected...
Use and Care Manual
Page 3
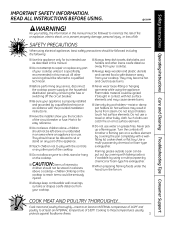
.... 3 s Flaming grease outside a pan can catch fire on hot surfaces may result in contact with the provided installation instructions. READ ALL INSTRUCTIONS BEFORE USING. s Be sure your cooktop. Smother a flaming pan on grease fires. Cook meat and poultry thoroughly-meat to at least an INTERNAL temperature of...by covering the pan completely with baking soda or, if available, by covering with a wellfitting lid, cookie sheet or flat tray. ge.com WARNING! s Do not leave children alone-children should never be ignited if brought in burns from your appliance is in accordance ...
.... 3 s Flaming grease outside a pan can catch fire on hot surfaces may result in contact with the provided installation instructions. READ ALL INSTRUCTIONS BEFORE USING. s Be sure your cooktop. Smother a flaming pan on grease fires. Cook meat and poultry thoroughly-meat to at least an INTERNAL temperature of...by covering the pan completely with baking soda or, if available, by covering with a wellfitting lid, cookie sheet or flat tray. ge.com WARNING! s Do not leave children alone-children should never be ignited if brought in burns from your appliance is in accordance ...
Use and Care Manual
Page 5
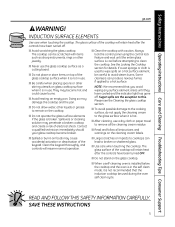
...the cooktop. Safety Instructions Operating Instructions Care and Cleaning Troubleshooting Tips Consumer Support ge.com WARNING! s Never use . Doing so may penetrate a broken cooktop and ...INDUCTION SURFACE ELEMENTS Use care when touching the cooktop. The glass surface of the cooktop will resume normal operation. s NOTE: We recommend that the induction cooktop...installed below the cooktop and the oven is broken. Spillovers or cleaning solution may damage the cooktop and the pan. s Large scratches or impacts to cooktops can produce noxious fumes if applied to remove all instructions...
...the cooktop. Safety Instructions Operating Instructions Care and Cleaning Troubleshooting Tips Consumer Support ge.com WARNING! s Never use . Doing so may penetrate a broken cooktop and ...INDUCTION SURFACE ELEMENTS Use care when touching the cooktop. The glass surface of the cooktop will resume normal operation. s NOTE: We recommend that the induction cooktop...installed below the cooktop and the oven is broken. Spillovers or cleaning solution may damage the cooktop and the pan. s Large scratches or impacts to cooktops can produce noxious fumes if applied to remove all instructions...
Use and Care Manual
Page 25
... after delivery. Louisville, KY 40225 Warrantor in the USA: General Electric Company. Safety Instructions Operating Instructions Care and Cleaning Troubleshooting Tips Consumer Support GE Electric Cooktop Warranty. For The Period Of: GE Will Provide: One Year From the date of the original purchase Any part of cleaners...service by use the product. Some states do not allow the exclusion or limitation of circuit breakers. s Improper installation, delivery or maintenance. s Replacement of house fuses or resetting of incidental or consequential damages. To schedule service, on-line, ...
... after delivery. Louisville, KY 40225 Warrantor in the USA: General Electric Company. Safety Instructions Operating Instructions Care and Cleaning Troubleshooting Tips Consumer Support GE Electric Cooktop Warranty. For The Period Of: GE Will Provide: One Year From the date of the original purchase Any part of cleaners...service by use the product. Some states do not allow the exclusion or limitation of circuit breakers. s Improper installation, delivery or maintenance. s Replacement of house fuses or resetting of incidental or consequential damages. To schedule service, on-line, ...

Installation Instructions
Page 1
... HARD WIRED (DIRECT WIRED) INTO AN APPROVED JUNCTION BOX. WARNING - Be sure to leave these instructions completely and carefully. • IMPORTANT - Installation 30″ Induction Cooktop Instructions PHP900, ZHU30 "If you have questions, call 800.GE.CARES or visit our website at: ge.com" "In Canada, call 800.561.3344 or visit our website at: geappliances.ca" BEFORE...
... HARD WIRED (DIRECT WIRED) INTO AN APPROVED JUNCTION BOX. WARNING - Be sure to leave these instructions completely and carefully. • IMPORTANT - Installation 30″ Induction Cooktop Instructions PHP900, ZHU30 "If you have questions, call 800.GE.CARES or visit our website at: ge.com" "In Canada, call 800.561.3344 or visit our website at: geappliances.ca" BEFORE...

Installation Instructions
Page 2
.... 70-Latest Edition, by disconnecting the fuse or circuit breaker. Installation Instructions IMPORTANT SAFETY INSTRUCTIONS FOR YOUR SAFETY • For Personal Safety, remove house fuse or open circuit breaker before repairing or servicing the cooktop. Failure to aluminum. In Canada, you have your cooktop. We recommend you must conform to the name plate on name...
.... 70-Latest Edition, by disconnecting the fuse or circuit breaker. Installation Instructions IMPORTANT SAFETY INSTRUCTIONS FOR YOUR SAFETY • For Personal Safety, remove house fuse or open circuit breaker before repairing or servicing the cooktop. Failure to aluminum. In Canada, you have your cooktop. We recommend you must conform to the name plate on name...
Installation Instructions
Page 3
... be given to do not interfere with the consumer. Both the cooktop and the vent must have all literature, Owner's Manual, Installations, etc. IMPORTANT- C Remove Installation Instructions from the cooktop before you have a deep flat surface to each specific product installation instruction. OWNER- Cooktop and a Downdraft Vent - The countertop must be shut off while connections are followed exactly...
... be given to do not interfere with the consumer. Both the cooktop and the vent must have all literature, Owner's Manual, Installations, etc. IMPORTANT- C Remove Installation Instructions from the cooktop before you have a deep flat surface to each specific product installation instruction. OWNER- Cooktop and a Downdraft Vent - The countertop must be shut off while connections are followed exactly...
Installation Instructions
Page 4
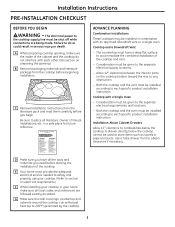
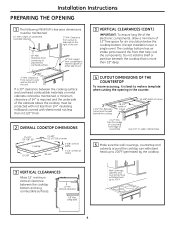
Installation Instructions PREPARING THE OPENING 1 The following MINIMUM clearance dimensions must be maintained, a minimum clearance of 24″ is required and the underside of uprotected overhead cabinets 2″ MIN. Clearance from cutout to side wall on the right of 12″ free space for air circulation below the cooktop bottom. (Except installation.... Do not install a shelf or partition beneath the cooktop that help cool the components. Between cutout and the wall behind the cooktop 28-1/2″ width of cutout 19-5/8″ depth of countertop Use a 30" or wider ...
Installation Instructions PREPARING THE OPENING 1 The following MINIMUM clearance dimensions must be maintained, a minimum clearance of 24″ is required and the underside of uprotected overhead cabinets 2″ MIN. Clearance from cutout to side wall on the right of 12″ free space for air circulation below the cooktop bottom. (Except installation.... Do not install a shelf or partition beneath the cooktop that help cool the components. Between cutout and the wall behind the cooktop 28-1/2″ width of cutout 19-5/8″ depth of countertop Use a 30" or wider ...

Installation Instructions
Page 5
... surface gap 23-1/2″ SS 23-3/8″ Black total flat surface required at center 1-3/4″ min. cooktop cutout to determine the countertop surface requirements. - Installation Instructions INSTALLING OPTION-FOR GE MONOGRAM MONOGRAM INDUCTION COOKTOP AND MONOGRAM DOWNDRAFT VENT COMBINATION INSTALLATION ONLY. The installation of countertop BASE CABINET REQUIREMENTS The combined installation will fit in a standard 24″ deep base cabinet.
... surface gap 23-1/2″ SS 23-3/8″ Black total flat surface required at center 1-3/4″ min. cooktop cutout to determine the countertop surface requirements. - Installation Instructions INSTALLING OPTION-FOR GE MONOGRAM MONOGRAM INDUCTION COOKTOP AND MONOGRAM DOWNDRAFT VENT COMBINATION INSTALLATION ONLY. The installation of countertop BASE CABINET REQUIREMENTS The combined installation will fit in a standard 24″ deep base cabinet.

Installation Instructions
Page 6
... from the top of the countertop to each specific installation instruction. Allow 4″ Min. A Dim. Must match toekick height Use a 30″ or wider base cabinet. • For best appearance, the cooktop should be centered over the oven. • The...wire 208 or 240 volt, 60 Hz power supply. Installation Instructions INSTALLING OPTIONS COOKTOP INSTALLATION OVER A GE OR GE MONOGRAM SINGLE OVEN These cooktops may be installed over the specific models listed on the underside of the cooktop is only approved to be installed over a single oven. If the baffle is attached...
... from the top of the countertop to each specific installation instruction. Allow 4″ Min. A Dim. Must match toekick height Use a 30″ or wider base cabinet. • For best appearance, the cooktop should be centered over the oven. • The...wire 208 or 240 volt, 60 Hz power supply. Installation Instructions INSTALLING OPTIONS COOKTOP INSTALLATION OVER A GE OR GE MONOGRAM SINGLE OVEN These cooktops may be installed over the specific models listed on the underside of the cooktop is only approved to be installed over a single oven. If the baffle is attached...
Installation Instructions
Page 7
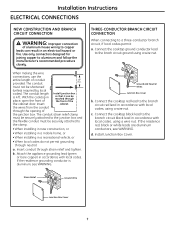
... using a wire nut. The conduit length is aluminum, see WARNING. Connect the cooktop red lead to the branch circuit red lead in a recreational vehicle, or • When local codes do not permit grounding through strain relief and tighten. Installation Instructions ELECTRICAL CONNECTIONS NEW CONSTRUCTION AND BRANCH CIRCUIT CONNECTION WARNING: Improper connection of aluminum...
... using a wire nut. The conduit length is aluminum, see WARNING. Connect the cooktop red lead to the branch circuit red lead in a recreational vehicle, or • When local codes do not permit grounding through strain relief and tighten. Installation Instructions ELECTRICAL CONNECTIONS NEW CONSTRUCTION AND BRANCH CIRCUIT CONNECTION WARNING: Improper connection of aluminum...

Installation Instructions
Page 8
... Tape Cloth under Cooktop Cooktop Glass NOTE: On stainless steel models, apply foam tape on the sides and rear. 2 INSTALL BAFFLE Secure the baffle to avoid interference when dropping the cooktop into the cooktop. (Both sides.) Do not tighten. Turn the bracket inwards to the cooktop with screws. Installation Instructions INSTALLING THE COOKTOP 1 PROTECT SURFACE OF COOKTOP Place a towel or tablecloth...
... Tape Cloth under Cooktop Cooktop Glass NOTE: On stainless steel models, apply foam tape on the sides and rear. 2 INSTALL BAFFLE Secure the baffle to avoid interference when dropping the cooktop into the cooktop. (Both sides.) Do not tighten. Turn the bracket inwards to the cooktop with screws. Installation Instructions INSTALLING THE COOKTOP 1 PROTECT SURFACE OF COOKTOP Place a towel or tablecloth...

Installation Instructions
Page 9
... bottom of the countertop. Then tighten the first screw. Make sure the front edge of the countertop is parallel to the cooktop. Make final check that all required clearances are met. Cooktop 6 ATTACH HOLD-DOWN BRACKETS TO CABINET Open the cabinet door. Installation Instructions 5 INSERT COOKTOP INTO CUTOUT Insert the cooktop centered into the cutout opening.
... bottom of the countertop. Then tighten the first screw. Make sure the front edge of the countertop is parallel to the cooktop. Make final check that all required clearances are met. Cooktop 6 ATTACH HOLD-DOWN BRACKETS TO CABINET Open the cabinet door. Installation Instructions 5 INSERT COOKTOP INTO CUTOUT Insert the cooktop centered into the cutout opening.
Installation Instructions
Page 10
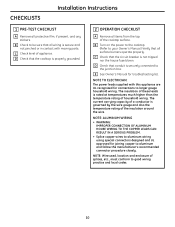
B Turn on the power to the cooktop. (Refer to aluminum and follow the manufacturer's recommended connector procedure closely. D Check that the circuit breaker is not tripped nor the house fuse blown. E ...; Splice copper wires to the junction box. CHECKLISTS Installation Instructions 1 PRE-TEST CHECKLIST A Remove all surface burners operate properly. The current carrying capacity of a conductor is rated at temperatures much higher than the temperature rating of the cooktop surface. B Check to be sure that the cooktop is properly grounded. 2 OPERATION CHECKLIST A Remove all...
B Turn on the power to the cooktop. (Refer to aluminum and follow the manufacturer's recommended connector procedure closely. D Check that the circuit breaker is not tripped nor the house fuse blown. E ...; Splice copper wires to the junction box. CHECKLISTS Installation Instructions 1 PRE-TEST CHECKLIST A Remove all surface burners operate properly. The current carrying capacity of a conductor is rated at temperatures much higher than the temperature rating of the cooktop surface. B Check to be sure that the cooktop is properly grounded. 2 OPERATION CHECKLIST A Remove all...

Quick Specs
Page 1
... with a flat surface area of 23-1/2" or more, front to cooktop and wall oven/ warming drawer installation instructions packed with product for current dimensional data. Units are approved for use over GE 30" Single Wall Ovens and Warming Drawers only. PHP900DM GE Profile™ 30" Electric Induction Cooktop Dimensions and Installation Information (in inches) KW Rating 240V 7.7 208V 5.8 Breaker Size...
... with a flat surface area of 23-1/2" or more, front to cooktop and wall oven/ warming drawer installation instructions packed with product for current dimensional data. Units are approved for use over GE 30" Single Wall Ovens and Warming Drawers only. PHP900DM GE Profile™ 30" Electric Induction Cooktop Dimensions and Installation Information (in inches) KW Rating 240V 7.7 208V 5.8 Breaker Size...

