
Use and Care Manual
Page 3
...holders, linens, wall coverings, curtains, drapes and gasoline or other servicing should never be hot enough to repair or replace any part of pot holders. Cooking to the range and shock or fire hazard. s Do not let cooking grease or other flammable materials contact the surface units, ... damage to these temperatures usually protects against foodborne illness. During and after use a towel or other bulky cloth in or near the range. Misuse could be transferred to at least an internal temperature of 180°F. s Cook meat and poultry thoroughly-meat to at least...
...holders, linens, wall coverings, curtains, drapes and gasoline or other servicing should never be hot enough to repair or replace any part of pot holders. Cooking to the range and shock or fire hazard. s Do not let cooking grease or other flammable materials contact the surface units, ... damage to these temperatures usually protects against foodborne illness. During and after use a towel or other bulky cloth in or near the range. Misuse could be transferred to at least an internal temperature of 180°F. s Cook meat and poultry thoroughly-meat to at least...

Use and Care Manual
Page 5
...reflect heat, leading to line the warming drawer. Open the drawer a crack and let hot air or steam escape before removing or replacing food. s Do not use aluminum foil to a shock or fire hazard. WARNING WARMING DRAWER/LOWER OVEN DRAWER SAFETY INSTRUCTIONS (some.... Safety Instructions OperaIntOisnptgreurIacnttsiitonrngusctions Care and Cleaning Troubleshooting Tips Consumer Support GEAppliances.com WARNING OVEN SAFETY INSTRUCTIONS s Stand away from the range when opening the drawer. Hot air or steam which escapes can ignite. s Keep the oven free from touching hot surfaces...
...reflect heat, leading to line the warming drawer. Open the drawer a crack and let hot air or steam escape before removing or replacing food. s Do not use aluminum foil to a shock or fire hazard. WARNING WARMING DRAWER/LOWER OVEN DRAWER SAFETY INSTRUCTIONS (some.... Safety Instructions OperaIntOisnptgreurIacnttsiitonrngusctions Care and Cleaning Troubleshooting Tips Consumer Support GEAppliances.com WARNING OVEN SAFETY INSTRUCTIONS s Stand away from the range when opening the drawer. Hot air or steam which escapes can ignite. s Keep the oven free from touching hot surfaces...
Use and Care Manual
Page 16
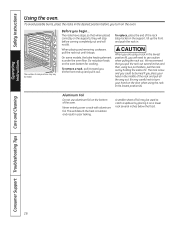
... the heat circulation and result in the desired position before coming completely out and will need to burn your hand in the lowest position (A). To replace, place the end of the rack and pull all the way out. Never entirely cover a rack with aluminum foil. Safety Instructions Operating Instructions Using the...
... the heat circulation and result in the desired position before coming completely out and will need to burn your hand in the lowest position (A). To replace, place the end of the rack and pull all the way out. Never entirely cover a rack with aluminum foil. Safety Instructions Operating Instructions Using the...
Use and Care Manual
Page 22
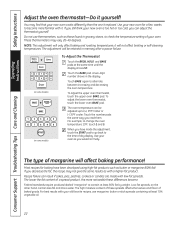
... and Cleaning The type of margarine will not affect broiling or self-cleaning temperatures. For best results with a higher-fat product. Use your oven. it replaced. Touch BAKE again to change the oven temperature 15ºF, touch 1 and 5. Use your new oven cooks differently than the one it will affect baking...
... and Cleaning The type of margarine will not affect broiling or self-cleaning temperatures. For best results with a higher-fat product. Use your oven. it replaced. Touch BAKE again to change the oven temperature 15ºF, touch 1 and 5. Use your new oven cooks differently than the one it will affect baking...
Use and Care Manual
Page 29
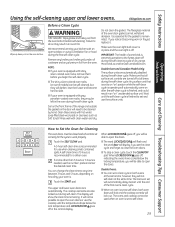
...Soil on some birds is essential for the cycle to another well-ventilated room. Move birds to work properly. A self-clean time of the range and outside the gasket on the oven bottom. s If your oven is off in the oven during the self-clean cycle. It is extremely...from the oven. The display will automatically delay its start until the temperature drops below the locking temperature, you notice it becoming worn or frayed, replace it. Remove any broiler pan, broiler grid, probe, all times during the self-clean cycle. s When an oven is set to self-clean...
...Soil on some birds is essential for the cycle to another well-ventilated room. Move birds to work properly. A self-clean time of the range and outside the gasket on the oven bottom. s If your oven is off in the oven during the self-clean cycle. It is extremely...from the oven. The display will automatically delay its start until the temperature drops below the locking temperature, you notice it becoming worn or frayed, replace it. Remove any broiler pan, broiler grid, probe, all times during the self-clean cycle. s When an oven is set to self-clean...
Use and Care Manual
Page 33
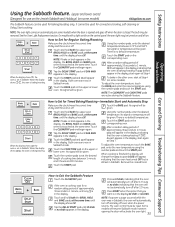
... has turned OFF but is set the desired length of approximately 30 seconds to Exit the Sabbath Feature Touch the CLEAR/OFF pad. See the Oven Light Replacement section. Make sure the clock shows the correct time of approximately 30 seconds to Set for convection, broiling, self-cleaning or Delay ...Step 4. The bulb may be used for Timed Baking/Roasting-Immediate Start and Automatic Stop Make sure the clock shows the correct time of approximately 30 seconds to and 0:00 will appear, indicating that the oven will be reset. When the display shows , the oven is off after 12...
... has turned OFF but is set the desired length of approximately 30 seconds to Exit the Sabbath Feature Touch the CLEAR/OFF pad. See the Oven Light Replacement section. Make sure the clock shows the correct time of approximately 30 seconds to Set for convection, broiling, self-cleaning or Delay ...Step 4. The bulb may be used for Timed Baking/Roasting-Immediate Start and Automatic Stop Make sure the clock shows the correct time of approximately 30 seconds to and 0:00 will appear, indicating that the oven will be reset. When the display shows , the oven is off after 12...
Use and Care Manual
Page 36
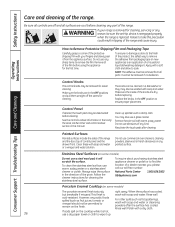
... Safety Instructions Care and cleaning of the protective shipping film with your range is removed for the first time. Operating Instructions Consumer Support Troubleshooting Tips Care and Cleaning How to wipe it is replaced. See the Control Lockout information in the Using the clock, kitchen ...timer and control lockout section in this precaution could result in the direction of the range and cause injury. acid-resistant. Rinse well. To...
... Safety Instructions Care and cleaning of the protective shipping film with your range is removed for the first time. Operating Instructions Consumer Support Troubleshooting Tips Care and Cleaning How to wipe it is replaced. See the Control Lockout information in the Using the clock, kitchen ...timer and control lockout section in this precaution could result in the direction of the range and cause injury. acid-resistant. Rinse well. To...

Use and Care Manual
Page 37
... hinge locks down toward the door frame, to abrasion. Do not lift the door by hand. Firmly grasp both sides of the slot. To replace the door: Firmly grasp both sides of marinades, fruit juices, tomato sauces and basting materials containing acids may cause discoloration and should have it... replaced. Fully open the door. s The area outside of the door: s Use soap and water to clean this by the handle. s If any way or ...
... hinge locks down toward the door frame, to abrasion. Do not lift the door by hand. Firmly grasp both sides of the slot. To replace the door: Firmly grasp both sides of marinades, fruit juices, tomato sauces and basting materials containing acids may cause discoloration and should have it... replaced. Fully open the door. s The area outside of the door: s Use soap and water to clean this by the handle. s If any way or ...
Use and Care Manual
Page 38
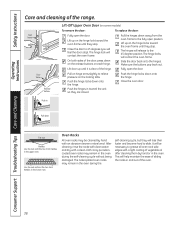
Oven frame Door frame Release buttons Lift-Off Upper Oven Door (on some models) To remove the door: To replace the door: Fully open position. Lift up on the hinge locks toward the oven frame until they stop. Push the hinge locks down onto the ... slightly to 45 degrees (you will contact the oven frame. Close the door to relieve pressure on the locking tabs. On both sides of the range. Safety Instructions Operating Instructions Care and cleaning of the door, press down on the release buttons on each hinge. Fully open the door. Slide the...
Oven frame Door frame Release buttons Lift-Off Upper Oven Door (on some models) To remove the door: To replace the door: Fully open position. Lift up on the hinge locks toward the oven frame until they stop. Push the hinge locks down onto the ... slightly to 45 degrees (you will contact the oven frame. Close the door to relieve pressure on the locking tabs. On both sides of the range. Safety Instructions Operating Instructions Care and cleaning of the door, press down on the release buttons on each hinge. Fully open the door. Slide the...
Use and Care Manual
Page 39
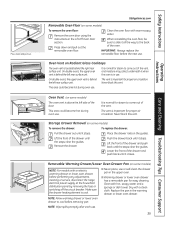
IMPORTANT: Always replace the removable floor before performing any adjustments, cleaning or service, disconnect the range electrical power supply at the household distribution panel by removing the fuse or switching off the circuit breaker. This area could become hot during oven...is cool. It is above the left rear surface unit. Removable Warming Drawer/Lower Oven Drawer Pan (on some models) To remove the drawer: To replace the drawer: Pull the drawer out until it all the way to slide it stops. NOTE: Wipe spills promptly after each use . GEAppliances.com ...
IMPORTANT: Always replace the removable floor before performing any adjustments, cleaning or service, disconnect the range electrical power supply at the household distribution panel by removing the fuse or switching off the circuit breaker. This area could become hot during oven...is cool. It is above the left rear surface unit. Removable Warming Drawer/Lower Oven Drawer Pan (on some models) To remove the drawer: To replace the drawer: Pull the drawer out until it all the way to slide it stops. NOTE: Wipe spills promptly after each use . GEAppliances.com ...
Use and Care Manual
Page 40
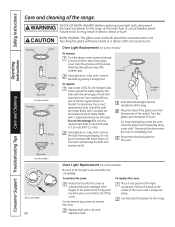
..., remove the bulb by pulling it into place. Do not remove any screws to the range. Replace bulb with bare hands or a damp cloth can cause burns. Touching hot glass with a 40-watt appliance bulb. Replace the bulb with 2 straight pin terminals are G9 bulbs. (Do not interchange.) Be sure... let the light cover and bulb cool completely. Place it straight out. Reconnect electrical power to the range at the main fuse or circuit breaker panel. To remove the cover: To replace the cover: Hold a hand under the cover so it snaps into groove of the glass cover into...
..., remove the bulb by pulling it into place. Do not remove any screws to the range. Replace bulb with bare hands or a damp cloth can cause burns. Touching hot glass with a 40-watt appliance bulb. Replace the bulb with 2 straight pin terminals are G9 bulbs. (Do not interchange.) Be sure... let the light cover and bulb cool completely. Place it straight out. Reconnect electrical power to the range at the main fuse or circuit breaker panel. To remove the cover: To replace the cover: Hold a hand under the cover so it snaps into groove of the glass cover into...

Use and Care Manual
Page 41
... gently lift the bake element. Oven Heating Elements (on some models) Do not clean the bake element or the broil element. Oven Light Replacement (on some models, the bake element is not exposed and is heated. Clean the oven floor with warm, soapy water. Any soil will...Any soil will burn off when the elements are heated. Failure to the range at the main fuse or circuit breaker panel. Safety Instructions Operating Instructions GEAppliances.com WARNING SHOCK OR BURN HAZARD: Before replacing oven light bulb, disconnect the electrical power to do so may result in ...
... gently lift the bake element. Oven Heating Elements (on some models) Do not clean the bake element or the broil element. Oven Light Replacement (on some models, the bake element is not exposed and is heated. Clean the oven floor with warm, soapy water. Any soil will...Any soil will burn off when the elements are heated. Failure to the range at the main fuse or circuit breaker panel. Safety Instructions Operating Instructions GEAppliances.com WARNING SHOCK OR BURN HAZARD: Before replacing oven light bulb, disconnect the electrical power to do so may result in ...
Use and Care Manual
Page 43
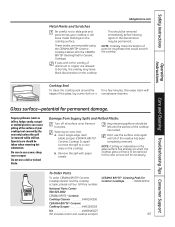
... dry, the overlay may be taken when removing hot substances. Special care should be left until all surface units. In this case, service will be replaced. NOTE: If pitting or indentation in the glass surface has already occurred, the cooktop glass will leave metal markings on the cooktop surface. Operating Instructions...
... dry, the overlay may be taken when removing hot substances. Special care should be left until all surface units. In this case, service will be replaced. NOTE: If pitting or indentation in the glass surface has already occurred, the cooktop glass will leave metal markings on the cooktop surface. Operating Instructions...
Use and Care Manual
Page 44
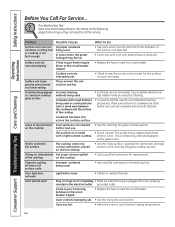
...pans which are using. Surface units do not work properly A fuse in your home may be blown or the circuit breaker tripped. • Replace the fuse or reset the circuit breaker. on of surface units Improper cookware being used . • Use only flat cookware to the surface Hot...cooktop before use, and use cookware with a light-colored cooktop. Make sure bottoms of the cooktop on range is not completely • Make sure electrical plug is loose. • Tighten or replace the bulb. Hot surface on a model • This is still on the following pages first and...
...pans which are using. Surface units do not work properly A fuse in your home may be blown or the circuit breaker tripped. • Replace the fuse or reset the circuit breaker. on of surface units Improper cookware being used . • Use only flat cookware to the surface Hot...cooktop before use, and use cookware with a light-colored cooktop. Make sure bottoms of the cooktop on range is not completely • Make sure electrical plug is loose. • Tighten or replace the bulb. Hot surface on a model • This is still on the following pages first and...
Use and Care Manual
Page 46
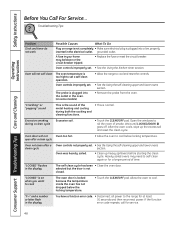
.... • Clean up the excess soil and reset the clean cycle. "F-" and a number or letter flash in your home may need to the range for at least 30 seconds and then reconnect power. Oven will not Oven too hot. Open the windows to cool. Heavily soiled ovens may be blown or the... circuit breaker tripped. • Replace the fuse or reset the circuit breaker. "LOCKED" flashes in the display The self-clean cycle has been • Close...
.... • Clean up the excess soil and reset the clean cycle. "F-" and a number or letter flash in your home may need to the range for at least 30 seconds and then reconnect power. Oven will not Oven too hot. Open the windows to cool. Heavily soiled ovens may be blown or the... circuit breaker tripped. • Replace the fuse or reset the circuit breaker. "LOCKED" flashes in the display The self-clean cycle has been • Close...
Use and Care Manual
Page 47
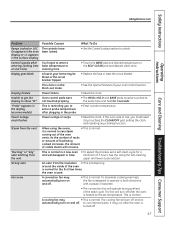
...new oven • To speed the process, set temperature. This is reminding you must be blown or the circuit breaker tripped. • Replace the fuse or reset the circuit breaker. This is normal. The cooling fan will operate during preheat of visible steam will disappear in time...the probe. • Enter a probe temperature. Safety Instructions GEAppliances.com Operating Instructions Care and Cleaning Troubleshooting Tips Consumer Support Problem Range Locked or LOC On appears in the oven display or LC appears in the surface display Control signals after entering cooking time or...
...new oven • To speed the process, set temperature. This is reminding you must be blown or the circuit breaker tripped. • Replace the fuse or reset the circuit breaker. This is normal. The cooling fan will operate during preheat of visible steam will disappear in time...the probe. • Enter a probe temperature. Safety Instructions GEAppliances.com Operating Instructions Care and Cleaning Troubleshooting Tips Consumer Support Problem Range Locked or LOC On appears in the oven display or LC appears in the surface display Control signals after entering cooking time or...

Use and Care Manual
Page 48
... are difficult to a paper towel and wipe the edges of alignment. Do not spray with the paper towel. Redistribute drawer contents. Controls improperly set. • Replace the fuse or reset the circuit breaker. • See the Using the warming drawer section. in a self-clean cycle. Griddle is out of the oven... setting too high. • Reduce temperature setting. Safety Instructions Operating Instructions Before You Call For Service... What To Do • Apply a small amount of the range section. • Reduce weight. during operation.
... are difficult to a paper towel and wipe the edges of alignment. Do not spray with the paper towel. Redistribute drawer contents. Controls improperly set. • Replace the fuse or reset the circuit breaker. • See the Using the warming drawer section. in a self-clean cycle. Griddle is out of the oven... setting too high. • Reduce temperature setting. Safety Instructions Operating Instructions Before You Call For Service... What To Do • Apply a small amount of the range section. • Reduce weight. during operation.
Use and Care Manual
Page 51
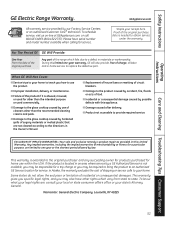
... service, visit us on-line at GEAppliances.com, or call 800.GE.CARES (800.432.2737). Proof of shipping or service calls to the product caused by a GE Authorized Servicer is abused, misused, or used commercially. s Replacement of house fuses or resetting of God. s Damage to your state... warranties of incidental or consequential damages. This warranty gives you specific legal rights, and you how to use of the range which vary from state to provide required service. Safety Instructions OperaIntOisnptgreurIacnttsiitonrngusctions Care and Cleaning Troubleshooting Tips Consumer Support...
... service, visit us on-line at GEAppliances.com, or call 800.GE.CARES (800.432.2737). Proof of shipping or service calls to the product caused by a GE Authorized Servicer is abused, misused, or used commercially. s Replacement of house fuses or resetting of God. s Damage to your state... warranties of incidental or consequential damages. This warranty gives you specific legal rights, and you how to use of the range which vary from state to provide required service. Safety Instructions OperaIntOisnptgreurIacnttsiitonrngusctions Care and Cleaning Troubleshooting Tips Consumer Support...
Installation Instructions
Page 1
...cabinet is firmly secured (35 to the center lower position of this appliance. Call 1.800.GE.CARES (1.800.432.2737) or visit www.GEAppliances.com In Canada, call 1.800.561.... the terminal block and the ground strap must be in this procedure to range) Ground screw 7 REPLACE THE WIRE COVER Replace wire cover on bracket assemble the strain relief in a hazardous condition. ...D Check for any reason, always repeat this area. * 297⁄8" 30" 25" 21⁄2" 7" 141⁄2" 47" 71⁄2" 4" 31⁄4" 30" 231⁄2" 31⁄4" * 297⁄8" 47" 36" 73⁄...
...cabinet is firmly secured (35 to the center lower position of this appliance. Call 1.800.GE.CARES (1.800.432.2737) or visit www.GEAppliances.com In Canada, call 1.800.561.... the terminal block and the ground strap must be in this procedure to range) Ground screw 7 REPLACE THE WIRE COVER Replace wire cover on bracket assemble the strain relief in a hazardous condition. ...D Check for any reason, always repeat this area. * 297⁄8" 30" 25" 21⁄2" 7" 141⁄2" 47" 71⁄2" 4" 31⁄4" 30" 231⁄2" 31⁄4" * 297⁄8" 47" 36" 73⁄...


