
Quick Specs
Page 1
.... Installation Information: Before installing, consult installation instructions packed with baking or warming drawers, electrical outlet must be in inches) KW Rating 240V 14.2 208V 10.7 Breaker Size 40 Amps† †Note: Check local codes for possible extended, highheat, no-load... PB969 and PHB925 and 27-3/4 on models PB750, PB900, PB910, PB920, PB969 and PHB925 All GE ranges are not accessible after range installation. PHB925SP GE Profile™ 30" Free-Standing Electric Range Dimensions and Installation Information (in this device is 46-7/8 on models JBP89/84/81 and 46-1/2...
.... Installation Information: Before installing, consult installation instructions packed with baking or warming drawers, electrical outlet must be in inches) KW Rating 240V 14.2 208V 10.7 Breaker Size 40 Amps† †Note: Check local codes for possible extended, highheat, no-load... PB969 and PHB925 and 27-3/4 on models PB750, PB900, PB910, PB920, PB969 and PHB925 All GE ranges are not accessible after range installation. PHB925SP GE Profile™ 30" Free-Standing Electric Range Dimensions and Installation Information (in this device is 46-7/8 on models JBP89/84/81 and 46-1/2...

Use and Care Manual
Page 8
... which size the surface unit is maintaining your desired setting. Surface Unit Cook Settings The cooktop offers 19 power levels. Power levels range from a high heat setting to select the desired burner size. NOTE: When changing from "L" to choose the desired power setting....indicates the additional half-step setting. Adjust using the (+)/(-) pad to a predetermined setting and "L" will automatically set to increase or decrease the simmer rate. For example: 1, 1-1/2, 2, 2-1/2 and up feature. The unit is cool when turned on a single surface unit: To use the Melt feature...
... which size the surface unit is maintaining your desired setting. Surface Unit Cook Settings The cooktop offers 19 power levels. Power levels range from a high heat setting to select the desired burner size. NOTE: When changing from "L" to choose the desired power setting....indicates the additional half-step setting. Adjust using the (+)/(-) pad to a predetermined setting and "L" will automatically set to increase or decrease the simmer rate. For example: 1, 1-1/2, 2, 2-1/2 and up feature. The unit is cool when turned on a single surface unit: To use the Melt feature...
Use and Care Manual
Page 40
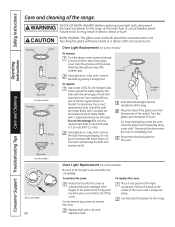
...socket. Using gloves or a dry cloth, remove the bulb by pulling it doesn't fall when released. This should be done when the oven is rated 120 volts or 130 volts (NOT 12 volts). Lift off the cover. Pull wire forward to remove the cover. Connect electrical power to the... bulb with the same type of the light receptacle. WARNING SHOCK OR BURN HAZARD: Before replacing oven light bulb, disconnect the electrical power to the range. Failure to the oven. Replace the bulb with bare fingers. Oil from its life. Reconnect electrical power to do so may offer a better grip...
...socket. Using gloves or a dry cloth, remove the bulb by pulling it doesn't fall when released. This should be done when the oven is rated 120 volts or 130 volts (NOT 12 volts). Lift off the cover. Pull wire forward to remove the cover. Connect electrical power to the... bulb with the same type of the light receptacle. WARNING SHOCK OR BURN HAZARD: Before replacing oven light bulb, disconnect the electrical power to the range. Failure to the oven. Replace the bulb with bare fingers. Oil from its life. Reconnect electrical power to do so may offer a better grip...
Installation Instructions
Page 1
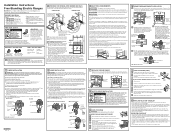
...replace the screws removed earlier. Use only a 3-conductor or a 4-conductor UL-listed range cord. Care should be rated for better fit. (appearance may vary) NOTE: Do not install the power cord without... block. Squeeze connector Conduit PROCEED TO STEP 5 OR 6. FOR POWER CORD INSTALLATION A. Call 1.800.GE.CARES (1.800.432.2737) or visit www.GEAppliances.com In Canada, call 1.800.626.8774 to ...into the power cord ground wire terminal ring, through each other . Allow 30" minimum clearance between the range frame and the ground plate (removed earlier) and secure it will not be...
...replace the screws removed earlier. Use only a 3-conductor or a 4-conductor UL-listed range cord. Care should be rated for better fit. (appearance may vary) NOTE: Do not install the power cord without... block. Squeeze connector Conduit PROCEED TO STEP 5 OR 6. FOR POWER CORD INSTALLATION A. Call 1.800.GE.CARES (1.800.432.2737) or visit www.GEAppliances.com In Canada, call 1.800.626.8774 to ...into the power cord ground wire terminal ring, through each other . Allow 30" minimum clearance between the range frame and the ground plate (removed earlier) and secure it will not be...

