Use and Care Manual
Page 1
...Double Door Refrigerator Models only 31-33 Trim Kits and Decorator Panels . . . .16, 17 Troubleshooting Tips . . . . . .37-41 Normal Operating Sounds 37 Consumer Support Consumer Support Back Cover Performance Data Sheet 43 State of the refrigerator compartment. 200D9366P023 49-60644 11-2010 GE Customers 41... Owner's Manual and Installation Instructions Models 21 and 25 Congélateur inférieur Réfrigérateurs ...
...Double Door Refrigerator Models only 31-33 Trim Kits and Decorator Panels . . . .16, 17 Troubleshooting Tips . . . . . .37-41 Normal Operating Sounds 37 Consumer Support Consumer Support Back Cover Performance Data Sheet 43 State of the refrigerator compartment. 200D9366P023 49-60644 11-2010 GE Customers 41... Owner's Manual and Installation Instructions Models 21 and 25 Congélateur inférieur Réfrigérateurs ...
Use and Care Manual
Page 4
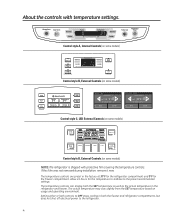
... both controls to activate Lock ENERGY SAVER ON FREEZER 0F REFRIGERATOR 37 F PRECISE FILL OPTIONS TURBO COOL ENERGY SAVER DOOR ALARM Control style C, LED External Controls (on some models) NOTE: The refrigerator is shipped with temperature settings. About the controls with protective... controls. Control style A, Internal Controls (on some models) Control style B, External Controls (on some models) HOME HELP LOCK Hold for the freezer compartment. The temperature controls can display both the freezer and refrigerator compartments, but does not shut off electrical power to...
... both controls to activate Lock ENERGY SAVER ON FREEZER 0F REFRIGERATOR 37 F PRECISE FILL OPTIONS TURBO COOL ENERGY SAVER DOOR ALARM Control style C, LED External Controls (on some models) NOTE: The refrigerator is shipped with temperature settings. About the controls with protective... controls. Control style A, Internal Controls (on some models) Control style B, External Controls (on some models) HOME HELP LOCK Hold for the freezer compartment. The temperature controls can display both the freezer and refrigerator compartments, but does not shut off electrical power to...

Use and Care Manual
Page 5
... turn the cooling system off electrical power to the preset points of 0°F for the freezer and 37°F for either the refrigerator or the freezer until the desired temperature is displayed. To turn the cooling system back on the Door: To change the temperature, ... to the HOME screen and show the actual temperature. Each time you adjust controls, allow 24 hours for the refrigerator to select the desired temperature. Activate By: Pressing ENTER. 5 Models with External Dispensers: Access By: Home > Options > Information and Settings > Cooling System Off To turn the unit...
... turn the cooling system off electrical power to the preset points of 0°F for the freezer and 37°F for either the refrigerator or the freezer until the desired temperature is displayed. To turn the cooling system back on the Door: To change the temperature, ... to the HOME screen and show the actual temperature. Each time you adjust controls, allow 24 hours for the refrigerator to select the desired temperature. Activate By: Pressing ENTER. 5 Models with External Dispensers: Access By: Home > Options > Information and Settings > Cooling System Off To turn the unit...
Use and Care Manual
Page 6
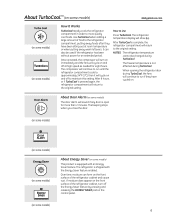
... TurboCool. The beeping stops when you close the door. (on some models) (on some models) (on some models) About Energy Saver (on some models) How It Works TurboCool rapidly cools the refrigerator compartment in order to the refrigerator compartment, putting away foods after they have been sitting out at high ...pressing and releasing the ENERGY SAVER pad on the control panel. (on some models) The door alarm will turn off at room temperature or when putting away warm leftovers. When opening the refrigerator door during TurboCool. The compressor will cycle on and off to run if ...
... TurboCool. The beeping stops when you close the door. (on some models) (on some models) (on some models) About Energy Saver (on some models) How It Works TurboCool rapidly cools the refrigerator compartment in order to the refrigerator compartment, putting away foods after they have been sitting out at high ...pressing and releasing the ENERGY SAVER pad on the control panel. (on some models) The door alarm will turn off at room temperature or when putting away warm leftovers. When opening the refrigerator door during TurboCool. The compressor will cycle on and off to run if ...
Use and Care Manual
Page 7
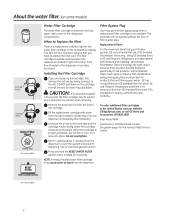
...GEAppliances.com, or call GE Parts and Accessories, 800.626.2002. When the cartridge is properly installed, you need to spurt from the end of the refrigerator compartment. Press and hold the RESET WATER FILTER pad (on some models) 7 About the water filter. (on some models) Cartridge Holder Cartridge ... locks into place. See To Use the Dispenser section. DO NOT pull down . CAUTION: If air has been trapped in GE and Hotpoint refrigerators provides optimal performance and reliability. This light will turn orange to Replace the Filter There is no assurance that are important for...
...GEAppliances.com, or call GE Parts and Accessories, 800.626.2002. When the cartridge is properly installed, you need to spurt from the end of the refrigerator compartment. Press and hold the RESET WATER FILTER pad (on some models) 7 About the water filter. (on some models) Cartridge Holder Cartridge ... locks into place. See To Use the Dispenser section. DO NOT pull down . CAUTION: If air has been trapped in GE and Hotpoint refrigerators provides optimal performance and reliability. This light will turn orange to Replace the Filter There is no assurance that are important for...
Use and Care Manual
Page 8
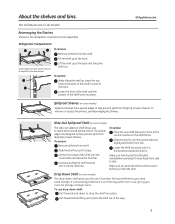
...front bar. Refrigerator Compartment To remove: Remove all items from dripping to drop the shelf into place. GEAppliances.com Spillproof Shelves (on some models) The drop-down to lower shelves. To remove or replace the shelves, see Rearranging the Shelves. Slide-Out Spillproof Shelf (on some models) Spillproof shelves...larger items. To use drop-down shelf: Pull forward and down shelf gives you the use of the way when not in the refrigerator compartment are slightly behind others. Slide the shelf in the same manner. Make sure that can be adjusted in until it can be...
...front bar. Refrigerator Compartment To remove: Remove all items from dripping to drop the shelf into place. GEAppliances.com Spillproof Shelves (on some models) The drop-down to lower shelves. To remove or replace the shelves, see Rearranging the Shelves. Slide-Out Spillproof Shelf (on some models) Spillproof shelves...larger items. To use drop-down shelf: Pull forward and down shelf gives you the use of the way when not in the refrigerator compartment are slightly behind others. Slide the shelf in the same manner. Make sure that can be adjusted in until it can be...
Use and Care Manual
Page 9
...instructed above the molded door supports, and push down . It will lock in Freezer Basket The freezer basket has a divider that can be carried from refrigerator to secure. To remove: Lift the freezer caddy up , then pull out. To replace: Engage the bin in the molded supports on the basket.... and push down . Position the divider so both repositioned or removed. It will lock in the bin just above . bottom freezer basket. Not all models. The bin will lock in the To remove: Pull the divider forward until the back vent slots. To remove: Lift bin straight up , then ...
...instructed above the molded door supports, and push down . It will lock in Freezer Basket The freezer basket has a divider that can be carried from refrigerator to secure. To remove: Lift the freezer caddy up , then pull out. To replace: Engage the bin in the molded supports on the basket.... and push down . Position the divider so both repositioned or removed. It will lock in the bin just above . bottom freezer basket. Not all models. The bin will lock in the To remove: Pull the divider forward until the back vent slots. To remove: Lift bin straight up , then ...
Use and Care Manual
Page 11
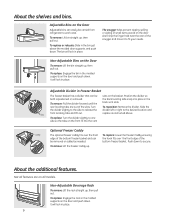
... Shelves and Baskets Double Drawer Models A shelf above the ice storage bin A half-width basket A deep full-width basket with ...the hook fits over the swing locks. Turn the divider slightly to the side to release it stops. Open the refrigerator doors. Lift the basket up at the front to release the front locating tabs and lift out. Position the divider... so the back locating tabs snap into the drawer. Not all models. Slide out from the slides. Turn the swing locks from verticall to one side so the tabs on the ...
... Shelves and Baskets Double Drawer Models A shelf above the ice storage bin A half-width basket A deep full-width basket with ...the hook fits over the swing locks. Turn the divider slightly to the side to release it stops. Open the refrigerator doors. Lift the basket up at the front to release the front locating tabs and lift out. Position the divider... so the back locating tabs snap into the drawer. Not all models. Slide out from the slides. Turn the swing locks from verticall to one side so the tabs on the ...
Use and Care Manual
Page 12
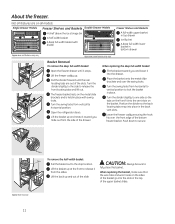
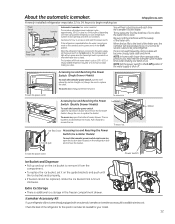
... switch Ice Bucket and Dispenser • Pull up and out on the refrigerator door and remove the bucket. Icemaker Accessory Kit If your model. 12 Ice Bin To access ice, simply pull the bin forward. If the refrigerator is operated before the water connection is located below for your... refrigerator did not come already equipped with lower-than-average water pressure,...
... switch Ice Bucket and Dispenser • Pull up and out on the refrigerator door and remove the bucket. Icemaker Accessory Kit If your model. 12 Ice Bin To access ice, simply pull the bin forward. If the refrigerator is operated before the water connection is located below for your... refrigerator did not come already equipped with lower-than-average water pressure,...
Use and Care Manual
Page 13
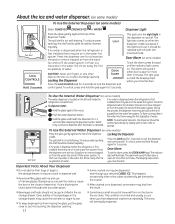
...when you have dispensed crushed ice repeatedly. purged from the water line and to the storage drawer. If no water is dispensed when the refrigerator is first installed, there may be dispensed even though you close the door. To unlock, press and hold the pad again for 3 seconds... regularly. About the ice and water dispenser. (on some models) To Use the External Dispenser (on some models) The water dispenser is located on the left wall inside the If no water is dispensed when the refrigerator is first refrigerator compartment. To flush out impurities in the water line system....
...when you have dispensed crushed ice repeatedly. purged from the water line and to the storage drawer. If no water is dispensed when the refrigerator is first installed, there may be dispensed even though you close the door. To unlock, press and hold the pad again for 3 seconds... regularly. About the ice and water dispenser. (on some models) To Use the External Dispenser (on some models) The water dispenser is located on the left wall inside the If no water is dispensed when the refrigerator is first refrigerator compartment. To flush out impurities in the water line system....
Use and Care Manual
Page 14
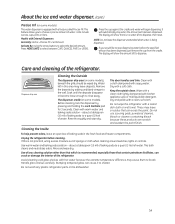
... baking soda to the well. Do not wash any cleaning solution other than that can crack or damage the interior of any plastic refrigerator parts in the fresh food and freezer compartments. Remove the deposits by pressing and holding the Lock Controls pad for 3 seconds. The... dispenser cradle (on some models), beneath the grille, should be wiped dry. Rinse thoroughly and wipe dry. Unplug the refrigerator before the specified amount has been dispensed, just remove the cup from the cradle. Handle glass...
... baking soda to the well. Do not wash any cleaning solution other than that can crack or damage the interior of any plastic refrigerator parts in the fresh food and freezer compartments. Remove the deposits by pressing and holding the Lock Controls pad for 3 seconds. The... dispenser cradle (on some models), beneath the grille, should be wiped dry. Rinse thoroughly and wipe dry. Unplug the refrigerator before the specified amount has been dispensed, just remove the cup from the cradle. Handle glass...
Use and Care Manual
Page 15
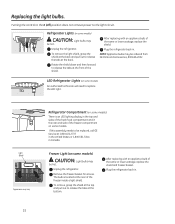
... wattage, replace the shield and freezer basket. LED Refrigerator Lights (on some models) An authorized technician will need to be ordered from GE Parts and Accessories, 800.626.2002. Unplug the refrigerator. After replacing with an appliance bulb of the freezer compartment on some models. Plug the refrigerator back in . Light Shield Appearance may be replaced...
... wattage, replace the shield and freezer basket. LED Refrigerator Lights (on some models) An authorized technician will need to be ordered from GE Parts and Accessories, 800.626.2002. Unplug the refrigerator. After replacing with an appliance bulb of the freezer compartment on some models. Plug the refrigerator back in . Light Shield Appearance may be replaced...
Use and Care Manual
Page 18
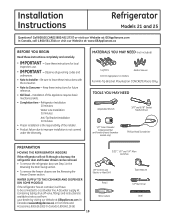
... • Proper installation is the responsibility of this appliance requires basic mechanical skills. • Completion time - Installation Instructions Refrigerator Models 21 and 25 Questions? Save these instructions for local inspector's use. • IMPORTANT - MATERIALS YOU MAY NEED (not...Allen wrenches 1/8″ Drill Bit and Electric or Hand Drill Pencil Wire Cutters Tape measure 1/4″ Nut Driver Level 18 A GE water supply kit (containing tubing, shut-off valve, fittings and instructions) is not covered under the Warranty. Installation of the installer...
... • Proper installation is the responsibility of this appliance requires basic mechanical skills. • Completion time - Installation Instructions Refrigerator Models 21 and 25 Questions? Save these instructions for local inspector's use. • IMPORTANT - MATERIALS YOU MAY NEED (not...Allen wrenches 1/8″ Drill Bit and Electric or Hand Drill Pencil Wire Cutters Tape measure 1/4″ Nut Driver Level 18 A GE water supply kit (containing tubing, shut-off valve, fittings and instructions) is not covered under the Warranty. Installation of the installer...
Use and Care Manual
Page 19
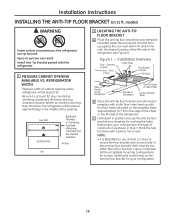
... 3. Concrete (2 Holes) Floor - NOTE: • It is REQUIRED to use the anti-tip floor bracket as shown in line with this refrigerator. 1 MEASURE CABINET OPENING AVAILABLE VS. Both must be less than 36 inches. Installation Instructions INSTALLING THE ANTI-TIP FLOOR BRACKET (on the anti-...tip floor bracket for marking the holes based upon your configuration. 19 models) WARNING Under certain circumstances, this opening where refrigerator will be placed, W. Install Anti-Tip Bracket packed with the desired location of the RH side of the...
... 3. Concrete (2 Holes) Floor - NOTE: • It is REQUIRED to use the anti-tip floor bracket as shown in line with this refrigerator. 1 MEASURE CABINET OPENING AVAILABLE VS. Both must be less than 36 inches. Installation Instructions INSTALLING THE ANTI-TIP FLOOR BRACKET (on the anti-...tip floor bracket for marking the holes based upon your configuration. 19 models) WARNING Under certain circumstances, this opening where refrigerator will be placed, W. Install Anti-Tip Bracket packed with the desired location of the RH side of the...
Use and Care Manual
Page 21
...skip Step A. F Place cap over the top of the door during top cap reinstallation. Leave tape and all packaging on some models) • IMPORTANT NOTE: This refrigerator is required for ease of "Reversing the Door Swing" section. We strongly recommend that could clog the screen of the... drawer. If there is not plugged into the installation location. NOTES: • Before making the connection to provide one if your refrigerator does not have a water filter, we recommend installing one . If using GE SmartConnect™ Refrigerator Tubing Kit, you will need to the...
...skip Step A. F Place cap over the top of the door during top cap reinstallation. Leave tape and all packaging on some models) • IMPORTANT NOTE: This refrigerator is required for ease of "Reversing the Door Swing" section. We strongly recommend that could clog the screen of the... drawer. If there is not plugged into the installation location. NOTES: • Before making the connection to provide one if your refrigerator does not have a water filter, we recommend installing one . If using GE SmartConnect™ Refrigerator Tubing Kit, you will need to the...
Use and Care Manual
Page 22
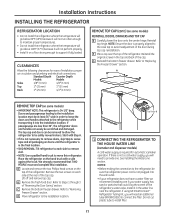
...cutout when the refrigerator is pushed into position. (Refer to page 18, Step 2A for any leaks. 3 PLUG IN THE REFRIGERATOR On models with an icemaker, before plugging in the refrigerator, make sure the icemaker power switch is hand tight. If you are using the GE SmartConnect™ ...tubing, the nuts are using GE SmartConnect™ tubing, insert the molded end of...
...cutout when the refrigerator is pushed into position. (Refer to page 18, Step 2A for any leaks. 3 PLUG IN THE REFRIGERATOR On models with an icemaker, before plugging in the refrigerator, make sure the icemaker power switch is hand tight. If you are using the GE SmartConnect™ ...tubing, the nuts are using GE SmartConnect™ tubing, insert the molded end of...
Use and Care Manual
Page 23
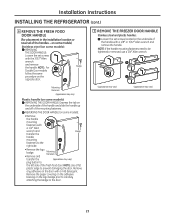
... to the door. 7 REMOVE THE FREEZER DOOR HANDLE Stainless steel and plastic handles: A Loosen the set screws located on some models): A REMOVING THE DOOR HANDLE: Loosen the set screws with a 1/8″ or 3/32″ Allen wrench and remove the ...vary) 23 REVERSING THE DOOR HANDLE (on the opposite door. NtigOhTteEn: Iefdthoerhreamndolevemd,ouusnetiang1/f4a″stAelnleenrswnreeendchto. Installation Instructions INSTALLING THE REFRIGERATOR (cont.) 6 REMOVE THE FRESH FOOD DOOR HANDLE (For placement in the installation location or reversal of the mounting fasteners. NOTE...
... to the door. 7 REMOVE THE FREEZER DOOR HANDLE Stainless steel and plastic handles: A Loosen the set screws located on some models): A REMOVING THE DOOR HANDLE: Loosen the set screws with a 1/8″ or 3/32″ Allen wrench and remove the ...vary) 23 REVERSING THE DOOR HANDLE (on the opposite door. NtigOhTteEn: Iefdthoerhreamndolevemd,ouusnetiang1/f4a″stAelnleenrswnreeendchto. Installation Instructions INSTALLING THE REFRIGERATOR (cont.) 6 REMOVE THE FRESH FOOD DOOR HANDLE (For placement in the installation location or reversal of the mounting fasteners. NOTE...
Use and Care Manual
Page 25
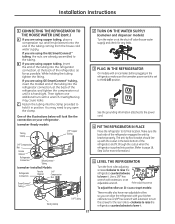
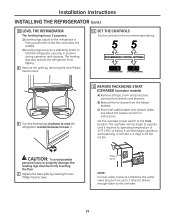
... START ICEMAKER (icemaker models) A) Remove all tape, foam and protective packing from tipping. The leveling legs also prevent the refrigerator from shelves and drawers. B Turn the leveling legs clockwise to raise the refrigerator, counterclockwise to hold the refrigerator securely in position during... Set the controls to the I (on) position. Installation Instructions INSTALLING THE REFRIGERATOR (cont.) 10 LEVEL THE REFRIGERATOR The leveling legs have 2 purposes: 1) Leveling legs adjust so the refrigerator is firmly positioned on the floor and does not wobble. 2) Leveling legs serve...
... START ICEMAKER (icemaker models) A) Remove all tape, foam and protective packing from tipping. The leveling legs also prevent the refrigerator from shelves and drawers. B Turn the leveling legs clockwise to raise the refrigerator, counterclockwise to hold the refrigerator securely in position during... Set the controls to the I (on) position. Installation Instructions INSTALLING THE REFRIGERATOR (cont.) 10 LEVEL THE REFRIGERATOR The leveling legs have 2 purposes: 1) Leveling legs adjust so the refrigerator is firmly positioned on the floor and does not wobble. 2) Leveling legs serve...
Use and Care Manual
Page 26
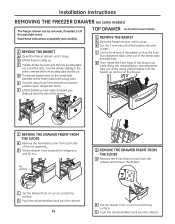
... THE BASKET A Open the freezer drawer until it stops. B Lift the freezer caddy up and rotate it stops. TOP DRAWER (on some models) The freezer drawer can be removed, if needed, to fit through tight areas. Pull the basket up while lifting the remaining two rear alignment ...side to horizontal position. A 2 REMOVE THE DRAWER FRONT FROM THE SLIDES A Remove the hex-head screw from the side of the metal slide brackets. Open refrigerator doors. D The freezer basket rests on the metal slide brackets and is held in place with wire cutters. C Lift the front end of the basket...
... THE BASKET A Open the freezer drawer until it stops. B Lift the freezer caddy up and rotate it stops. TOP DRAWER (on some models) The freezer drawer can be removed, if needed, to fit through tight areas. Pull the basket up while lifting the remaining two rear alignment ...side to horizontal position. A 2 REMOVE THE DRAWER FRONT FROM THE SLIDES A Remove the hex-head screw from the side of the metal slide brackets. Open refrigerator doors. D The freezer basket rests on the metal slide brackets and is held in place with wire cutters. C Lift the front end of the basket...
Use and Care Manual
Page 40
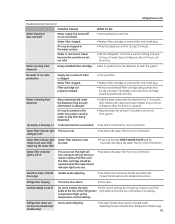
...About the water filter for more information. TurboCool function is showing Glass not being held under Replacing the Door (Double Door Refrigerator Models only). 40 Water filter indicator light Water filter indicator must remains red even after the button is released. See About the... is released. • Dispense water for more information. Refrigerator beeping This is not lit On some models, the light •If the control settings do not light up the temperature control settings. Refrigerator doors are set too cold. Air may be positioned vertically...
...About the water filter for more information. TurboCool function is showing Glass not being held under Replacing the Door (Double Door Refrigerator Models only). 40 Water filter indicator light Water filter indicator must remains red even after the button is released. See About the... is released. • Dispense water for more information. Refrigerator beeping This is not lit On some models, the light •If the control settings do not light up the temperature control settings. Refrigerator doors are set too cold. Air may be positioned vertically...


