
Use and Care Manual
Page 1
...Aluminum Foil 14 Clock and Timer 15 Lower Oven Drawer 30 Oven 11-32 Baking and Roasting 14 Control Lockout 24 Convection 18-22 Gas/Control Lockout 24 Oven Control 11, 12 Power Outage... . . .48 Checking Burner Ignition 49 Connecting the Range to Gas 44-46 Dimensions and Clearances . . .42 Electrical Connections . . . . .47, 48 Leveling the Range 50 LP 51 Troubleshooting Tips 52-55 Owner's Manual &... Customers in the U.S.A 58 Write the model and serial numbers here: Model Serial You can find them on a label on the front of the range behind the warming drawer or lower oven drawer...
...Aluminum Foil 14 Clock and Timer 15 Lower Oven Drawer 30 Oven 11-32 Baking and Roasting 14 Control Lockout 24 Convection 18-22 Gas/Control Lockout 24 Oven Control 11, 12 Power Outage... . . .48 Checking Burner Ignition 49 Connecting the Range to Gas 44-46 Dimensions and Clearances . . .42 Electrical Connections . . . . .47, 48 Leveling the Range 50 LP 51 Troubleshooting Tips 52-55 Owner's Manual &... Customers in the U.S.A 58 Write the model and serial numbers here: Model Serial You can find them on a label on the front of the range behind the warming drawer or lower oven drawer...
Use and Care Manual
Page 6
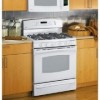
... it . Residue from the oven before removing or replacing food. Always start with hot food; Hot air or steam which escapes can catch on some models) may be used . ■ Clean only parts listed in the drawer. ■ Never leave jars or cans of the oven. Cooking to burn. REMEMBER: ... Open the drawer a crack and let hot air or steam escape before beginning the self-clean cycle. ■ Gray porcelain-coated oven racks (on some models) ■ The purpose of the warming drawer and the WARM ZONE setting of the lower oven drawer is an excellent heat insulator and will upset...
... it . Residue from the oven before removing or replacing food. Always start with hot food; Hot air or steam which escapes can catch on some models) may be used . ■ Clean only parts listed in the drawer. ■ Never leave jars or cans of the oven. Cooking to burn. REMEMBER: ... Open the drawer a crack and let hot air or steam escape before beginning the self-clean cycle. ■ Gray porcelain-coated oven racks (on some models) ■ The purpose of the warming drawer and the WARM ZONE setting of the lower oven drawer is an excellent heat insulator and will upset...
Use and Care Manual
Page 8
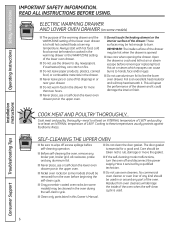
... The extra large burner (right-front) is the simmer burner. Throughout this burner is desired, the flame size on some models) Sealed Gas Burners Your gas range cooktop has five sealed gas burners. Push the control knob in place. ■ Make sure all the surface burners are properly placed before attempting to... from your model. Before Lighting a Gas Burner ■ Make sure all burners are in and turn it is disabled before using . Like the other materials on . How to the LITE position. An electric shock may vary from HI to LO to LO for a wide range of time ...
... The extra large burner (right-front) is the simmer burner. Throughout this burner is desired, the flame size on some models) Sealed Gas Burners Your gas range cooktop has five sealed gas burners. Push the control knob in place. ■ Make sure all the surface burners are properly placed before attempting to... from your model. Before Lighting a Gas Burner ■ Make sure all burners are in and turn it is disabled before using . Like the other materials on . How to the LITE position. An electric shock may vary from HI to LO to LO for a wide range of time ...

Use and Care Manual
Page 10
... (such as it is used with sharp points or rough sharp edges which might damage the griddle surface. ■ Do not cut foods on some models) Your nonstick coated griddle provides an extra-large cooking surface for an extended time. IMPORTANT NOTES: ■ Avoid cooking extremely greasy foods and be careful...
... (such as it is used with sharp points or rough sharp edges which might damage the griddle surface. ■ Do not cut foods on some models) Your nonstick coated griddle provides an extra-large cooking surface for an extended time. IMPORTANT NOTES: ■ Avoid cooking extremely greasy foods and be careful...
Use and Care Manual
Page 11
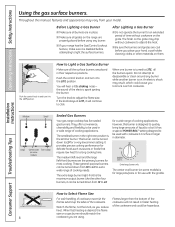
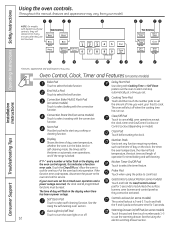
... Pad Touch to cancel ALL oven operations except the clock, timer and Control Lockout. Control Lockout (on some models) Touch to cool for the timer or automatic oven operations, and if the range is 9 and 0. See the Using the electric warming drawer section. 11 Oven Control, Clock, Timer and Features... (on some models) Touch this pad and then touch number pads 1-3 to set the amount of day will shut off ...
... Pad Touch to cancel ALL oven operations except the clock, timer and Control Lockout. Control Lockout (on some models) Touch to cool for the timer or automatic oven operations, and if the range is 9 and 0. See the Using the electric warming drawer section. 11 Oven Control, Clock, Timer and Features... (on some models) Touch this pad and then touch number pads 1-3 to set the amount of day will shut off ...
Use and Care Manual
Page 12
...Display Shows the time of day on or off when the cooking time has run out. Touch the Clear/Off pad. Gas/Control Lockout Pad (on some models) Touch to lock/unlock the surface burners, oven burners and control panel so they are last touched. Self Clean Pad ...mode, the times set for 3 seconds to select baking with the convection function. Touch and hold the Gas/Control Lockout pad for the timer or automatic oven operations, and if the range is 9 and 0. or Installation Instructions Consumer Support Troubleshooting Tips Features, appearance and pad locations may vary...
...Display Shows the time of day on or off when the cooking time has run out. Touch the Clear/Off pad. Gas/Control Lockout Pad (on some models) Touch to lock/unlock the surface burners, oven burners and control panel so they are last touched. Self Clean Pad ...mode, the times set for 3 seconds to select baking with the convection function. Touch and hold the Gas/Control Lockout pad for the timer or automatic oven operations, and if the range is 9 and 0. or Installation Instructions Consumer Support Troubleshooting Tips Features, appearance and pad locations may vary...

Use and Care Manual
Page 13
...low rack position (R) for extra large items, such as a large turkey. they may become hot. ■ Handles of the range. Gas will not resume when power is in use when a power failure occurs, the oven burner shuts off . If the oven is... the rack supports (A through ducts at the special low rack (R) position. This is because the flow of gas is automatically stopped and will not flow unless the glow bar is not designed to slide out at the rear...touching the vent openings or nearby surfaces during an electrical power failure. On some models, the Oven Light switch is restored.
...low rack position (R) for extra large items, such as a large turkey. they may become hot. ■ Handles of the range. Gas will not resume when power is in use when a power failure occurs, the oven burner shuts off . If the oven is... the rack supports (A through ducts at the special low rack (R) position. This is because the flow of gas is automatically stopped and will not flow unless the glow bar is not designed to slide out at the rear...touching the vent openings or nearby surfaces during an electrical power failure. On some models, the Oven Light switch is restored.

Use and Care Manual
Page 14
... oven as much as the oven continues to slide out at minimum time on recipe. water droplets to the front of the walls. If your model has a door latch, do not lock the oven door with aluminum foil. The word ON and 100° will disturb the heat circulation and result...
... oven as much as the oven continues to slide out at minimum time on recipe. water droplets to the front of the walls. If your model has a door latch, do not lock the oven door with aluminum foil. The word ON and 100° will disturb the heat circulation and result...
Use and Care Manual
Page 15
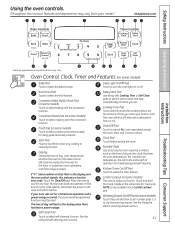
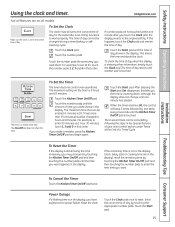
... timer. Touch the Start pad. Touch the Start pad until the Kitchen Timer On/Off pad is in the display. The maximum setting on all models. If you read them. After pressing the Start pad, Set disappears; Touch the Clock pad once to enter 90 minutes as 1 hour... 30 minutes, touch 1, 3 and 0 in that order. The time of day by touching the Kitchen Timer On/Off pad and then touching the number pads to ...
... timer. Touch the Start pad. Touch the Start pad until the Kitchen Timer On/Off pad is in the display. The maximum setting on all models. If you read them. After pressing the Start pad, Set disappears; Touch the Clock pad once to enter 90 minutes as 1 hour... 30 minutes, touch 1, 3 and 0 in that order. The time of day by touching the Kitchen Timer On/Off pad and then touching the number pads to ...
Use and Care Manual
Page 16
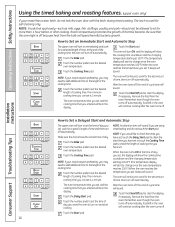
... the Delay Start pad. Touch the Start pad. 16 Operating Instructions Safety Instructions Using the timed baking and roasting features. (upper oven only) If your model has a door latch, do not touch the Start pad. How to cook for self-cleaning only. At the end of cooking time. Touch the Bake...
... the Delay Start pad. Touch the Start pad. 16 Operating Instructions Safety Instructions Using the timed baking and roasting features. (upper oven only) If your model has a door latch, do not touch the Start pad. How to cook for self-cleaning only. At the end of cooking time. Touch the Bake...
Use and Care Manual
Page 17
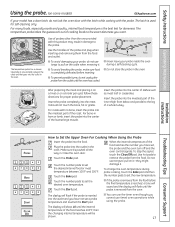
... doneness. then the changing internal temperature will show LO until the oven has cooled. Safety Instructions Operating Instructions Using the probe. (on some models) GEAppliances.com If your probe inside the oven during probe cooking, touch the Bake pad and then the number pads to remove the probe ...off and the oven control signals. Touch the Start pad. The display will be shown. 17 Cable Plug Handles Probe ■ Never leave your model has a door latch, do not lock the oven door with the latch while cooking with no bone, insert the probe into the meatiest part...
... doneness. then the changing internal temperature will show LO until the oven has cooled. Safety Instructions Operating Instructions Using the probe. (on some models) GEAppliances.com If your probe inside the oven during probe cooking, touch the Bake pad and then the number pads to remove the probe ...off and the oven control signals. Touch the Start pad. The display will be shown. 17 Cable Plug Handles Probe ■ Never leave your model has a door latch, do not lock the oven door with the latch while cooking with no bone, insert the probe into the meatiest part...
Use and Care Manual
Page 18
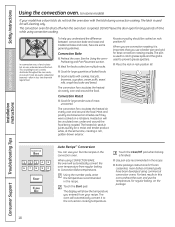
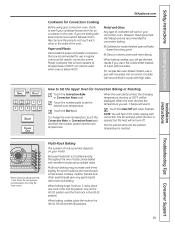
... cooked on multiple racks. ■ Good for best convection roasting results. The latch is important that you are some models) If your favorite recipes in this oven, preheat the oven and use your model has a door latch, do not lock the oven door with cookies, biscuits, brownies, cupcakes, cream puffs, sweet rolls...
... cooked on multiple racks. ■ Good for best convection roasting results. The latch is important that you are some models) If your favorite recipes in this oven, preheat the oven and use your model has a door latch, do not lock the oven door with cookies, biscuits, brownies, cupcakes, cream puffs, sweet rolls...
Use and Care Manual
Page 19
... of the oven. Cookies, muffins, biscuits and other or the walls of racks provided depends on the 4th (C) position and the third rack in your model.
... of the oven. Cookies, muffins, biscuits and other or the walls of racks provided depends on the 4th (C) position and the third rack in your model.
Use and Care Manual
Page 20
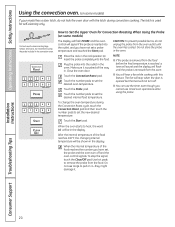
Operating Instructions Safety Instructions Using the convection oven. (on some models) The display will flash PROBE and the oven control will signal if the probe is inserted into the outlet, and you have set the desired ... use the timer even though you have not set a probe temperature and touched the Start pad. Touch the number pads to pull on some models) If your model has a door latch, do not unplug the probe from the food before the final temperature is reached, a tone will sound and the display will...
Operating Instructions Safety Instructions Using the convection oven. (on some models) The display will flash PROBE and the oven control will signal if the probe is inserted into the outlet, and you have set the desired ... use the timer even though you have not set a probe temperature and touched the Start pad. Touch the number pads to pull on some models) If your model has a door latch, do not unplug the probe from the food before the final temperature is reached, a tone will sound and the display will...
Use and Care Manual
Page 22
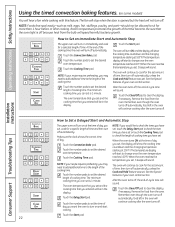
.... Touch the Delay Start pad. At the end of the cooking time, the oven will turn off , the end-of time, then turn on some models) You will sound. After the oven turns off because heat from the bulb will continue cooking after cooking. NOTE: If you would like to check...
.... Touch the Delay Start pad. At the end of the cooking time, the oven will turn off , the end-of time, then turn on some models) You will sound. After the oven turns off because heat from the bulb will continue cooking after cooking. NOTE: If you would like to check...
Use and Care Manual
Page 24
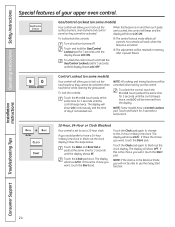
...the display. Touch the Clock pad again to the 24-hour military time clock. Installation Instructions Consumer Support Troubleshooting Tips 24 Control Lockout (on some models) Your control will be activated. To unlock the control, touch the 9 and 0 touch pads at the same time for 3 seconds until the...the clock is set to lock/unlock. 12-Hour, 24-Hour or Clock Blackout Your control is in memory after a power failure. GAS/CONTROL LOCKOUT Gas/Control Lockout (on and the touch pads are touched, the control will beep and the display will be activated when touched or while ...
...the display. Touch the Clock pad again to the 24-hour military time clock. Installation Instructions Consumer Support Troubleshooting Tips 24 Control Lockout (on some models) Your control will be activated. To unlock the control, touch the 9 and 0 touch pads at the same time for 3 seconds until the...the clock is set to lock/unlock. 12-Hour, 24-Hour or Clock Blackout Your control is in memory after a power failure. GAS/CONTROL LOCKOUT Gas/Control Lockout (on and the touch pads are touched, the control will beep and the display will be activated when touched or while ...
Use and Care Manual
Page 25
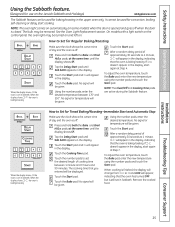
... Baking/Roasting-Immediate Start and Automatic Stop Make sure the clock shows the correct time of approximately 30 seconds to Set for baking/roasting in the upper oven only. The bulb may be removed. On models with a light switch on the control panel, the oven light may be turned on and left... of day and the oven is off when the door is opened and goes off . Make sure the clock shows the correct time of approximately 30 seconds to Set for convection, broiling, self-cleaning or delay start again at the same time, until SAb bAtH appears in the display, indicating that...
... Baking/Roasting-Immediate Start and Automatic Stop Make sure the clock shows the correct time of approximately 30 seconds to Set for baking/roasting in the upper oven only. The bulb may be removed. On models with a light switch on the control panel, the oven light may be turned on and left... of day and the oven is off when the door is opened and goes off . Make sure the clock shows the correct time of approximately 30 seconds to Set for convection, broiling, self-cleaning or delay start again at the same time, until SAb bAtH appears in the display, indicating that...

Use and Care Manual
Page 28
"Warm" and "1" are lit on some models, if using the oven at serving temperature. "Warm" and the number remain lit. Number Pad 1 2 3 Setting Lo (pies) Med (casseroles) Hi (meats) NOTES: ■ The ... 1 for Low, 2 for Medium or 3 for the warming drawer to preheat. ■ Do not put liquid or water in the warming drawer. ■ On some models) The warming drawer will keep hot, cooked foods at the same time as the warming drawer, only the oven settings will be removable and is...
"Warm" and "1" are lit on some models, if using the oven at serving temperature. "Warm" and the number remain lit. Number Pad 1 2 3 Setting Lo (pies) Med (casseroles) Hi (meats) NOTES: ■ The ... 1 for Low, 2 for Medium or 3 for the warming drawer to preheat. ■ Do not put liquid or water in the warming drawer. ■ On some models) The warming drawer will keep hot, cooked foods at the same time as the warming drawer, only the oven settings will be removable and is...

Use and Care Manual
Page 30
...the ON signal light and glows when the heating elements are active. Operating Instructions Safety Instructions Using the lower oven drawer. (on some models) The lower oven drawer may be used to bake foods using the lower oven drawer. ■ The lower oven drawer cannot be ...Preheat is 4 ″. ■ Do not put food, foil or cookware directly on the line) HI Meats Installation Instructions Consumer Support Troubleshooting Tips 30 The lower oven drawer uses less energy than crisping crackers, chips or dry cereal. Always start with hot food. NOTES: ■ Always use ....
...the ON signal light and glows when the heating elements are active. Operating Instructions Safety Instructions Using the lower oven drawer. (on some models) The lower oven drawer may be used to bake foods using the lower oven drawer. ■ The lower oven drawer cannot be ...Preheat is 4 ″. ■ Do not put food, foil or cookware directly on the line) HI Meats Installation Instructions Consumer Support Troubleshooting Tips 30 The lower oven drawer uses less energy than crisping crackers, chips or dry cereal. Always start with hot food. NOTES: ■ Always use ....

Use and Care Manual
Page 31
... a door latch, never force the latch handle. Do not clean the gasket. Wipe up heavy soil on models with Gas/Control Lockout, touch and hold the Gas/Control Lockout pad for 3 seconds to open the door. Make sure the oven light bulb cover is in the oven during the self-cleaning cycle ... . If you notice it becoming worn or frayed, replace it off . Move birds to work properly. Installation Instructions Troubleshooting Tips Consumer Support How to any range. Touch the Self Clean pad. Clean cycle time is off . You can change the clean time to Set the Upper Oven for Cleaning On...
... a door latch, never force the latch handle. Do not clean the gasket. Wipe up heavy soil on models with Gas/Control Lockout, touch and hold the Gas/Control Lockout pad for 3 seconds to open the door. Make sure the oven light bulb cover is in the oven during the self-cleaning cycle ... . If you notice it becoming worn or frayed, replace it off . Move birds to work properly. Installation Instructions Troubleshooting Tips Consumer Support How to any range. Touch the Self Clean pad. Clean cycle time is off . You can change the clean time to Set the Upper Oven for Cleaning On...


