
Use and Care Manual
Page 1
... Instructions . . . .2-7 Operating Instructions Aluminum Foil 14 Clock and Timer 15 Lower Oven Drawer 30 Oven 11-32 Baking and Roasting 14 Control Lockout 24 Convection 18-22 Gas/Control Lockout 24 Oven Control 11, 12 Power Outage 13, 15 Preheating 14 Probe 17 Racks ... 43, 51 Assemble Surface Burners . . . . .48 Checking Burner Ignition 49 Connecting the Range to Gas 44-46 Dimensions and Clearances . . .42 Electrical Connections . . . . .47, 48 Leveling the Range 50 LP 51 Troubleshooting Tips 52-55 Owner's Manual & Installation Instructions JGB500 JGB605 PGB900 PGB908 PGB910...
... Instructions . . . .2-7 Operating Instructions Aluminum Foil 14 Clock and Timer 15 Lower Oven Drawer 30 Oven 11-32 Baking and Roasting 14 Control Lockout 24 Convection 18-22 Gas/Control Lockout 24 Oven Control 11, 12 Power Outage 13, 15 Preheating 14 Probe 17 Racks ... 43, 51 Assemble Surface Burners . . . . .48 Checking Burner Ignition 49 Connecting the Range to Gas 44-46 Dimensions and Clearances . . .42 Electrical Connections . . . . .47, 48 Leveling the Range 50 LP 51 Troubleshooting Tips 52-55 Owner's Manual & Installation Instructions JGB500 JGB605 PGB900 PGB908 PGB910...
Use and Care Manual
Page 2
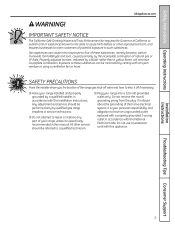
...-TIP DEVICE To reduce the risk of the bracket, 2 visit GEAppliances.com (in ranges, never completely remove the leveling legs or the range will not be reinstalled. The bracket should stop the range within 4 inches. If you cannot reach your gas supplier, call your purchase, call 1.800.561.3344). Installation and service must be...
...-TIP DEVICE To reduce the risk of the bracket, 2 visit GEAppliances.com (in ranges, never completely remove the leveling legs or the range will not be reinstalled. The bracket should stop the range within 4 inches. If you cannot reach your gas supplier, call your purchase, call 1.800.561.3344). Installation and service must be...
Use and Care Manual
Page 3
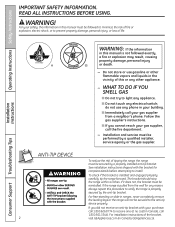
...these substances, namely benzene, carbon monoxide, formaldehyde and soot, caused primarily by qualified gas range installers or service technicians. ■ Do not attempt to repair or replace any part of your range unless it is your personal responsibility and obligation to a qualified technician. ■... in accordance with the National Electrical Code. Any adjustment and service should be performed only by the incomplete combustion of the range gas shut-off valve and how to shut it is specifically recommended in accordance with the Installation Instructions. Do not use an ...
...these substances, namely benzene, carbon monoxide, formaldehyde and soot, caused primarily by qualified gas range installers or service technicians. ■ Do not attempt to repair or replace any part of your range unless it is your personal responsibility and obligation to a qualified technician. ■... in accordance with the National Electrical Code. Any adjustment and service should be performed only by the incomplete combustion of the range gas shut-off valve and how to shut it is specifically recommended in accordance with the Installation Instructions. Do not use an ...
Use and Care Manual
Page 4
... interior kitchen carpeting. ■ Do not leave children alone or unattended where a range is to prevent poor air circulation. ■ Be sure all codes and requirements of gas. They could be used. Use a multi-purpose dry chemical or foam-type fire extinguisher. ■ Flaming grease outside a pan can be... put out by closing the oven door or drawer and turning the control to heat or warm the room. They could damage the range and ...
... interior kitchen carpeting. ■ Do not leave children alone or unattended where a range is to prevent poor air circulation. ■ Be sure all codes and requirements of gas. They could be used. Use a multi-purpose dry chemical or foam-type fire extinguisher. ■ Flaming grease outside a pan can be... put out by closing the oven door or drawer and turning the control to heat or warm the room. They could damage the range and ...

Use and Care Manual
Page 5
... ignite. moist or damp pot holders on hot surfaces may cause the burner to damage and improper operation of the range. ■ When disabling Gas/Control Lockout, make sure it heats. ■ Do not leave any items on the cooktop. Filling the pan too full of fat can lead to ...; Never leave the surface burners unattended at the OFF position and all plastics away from the vent may ignite flammable items and will preclude gas flow when the range is placed over the surface burners and create a fire hazard. ■ If you do flame foods under the hood, turn the surface burner...
... ignite. moist or damp pot holders on hot surfaces may cause the burner to damage and improper operation of the range. ■ When disabling Gas/Control Lockout, make sure it heats. ■ Do not leave any items on the cooktop. Filling the pan too full of fat can lead to ...; Never leave the surface burners unattended at the OFF position and all plastics away from the vent may ignite flammable items and will preclude gas flow when the range is placed over the surface burners and create a fire hazard. ■ If you do flame foods under the hood, turn the surface burner...
Use and Care Manual
Page 7
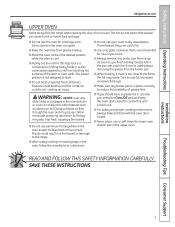
...a hot oven. SAVE THESE INSTRUCTIONS Installation Instructions Troubleshooting Tips Consumer Support 7 Safety Instructions Operating Instructions GEAppliances.com UPPER OVEN Stand away from the range when opening the door of the door or oven walls. Pressure could build up and the container could result in a fire hazard or damage... broil with the oven door closed to hands, face and eyes. ■ Do not use the oven for use in gas ovens. ■ Always remove any broiler pan from range as soon as you should have a grease fire in a broiler pan, press the Clear/Off pad, and keep the...
...a hot oven. SAVE THESE INSTRUCTIONS Installation Instructions Troubleshooting Tips Consumer Support 7 Safety Instructions Operating Instructions GEAppliances.com UPPER OVEN Stand away from the range when opening the door of the door or oven walls. Pressure could build up and the container could result in a fire hazard or damage... broil with the oven door closed to hands, face and eyes. ■ Do not use the oven for use in gas ovens. ■ Always remove any broiler pan from range as soon as you should have a grease fire in a broiler pan, press the Clear/Off pad, and keep the...
Use and Care Manual
Page 8
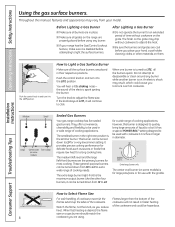
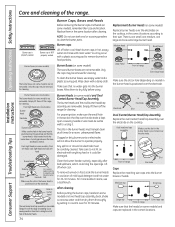
...the surface burners. Like the other materials on some models) is designed to disassemble or clean around any burner. ■ If your range has the Gas/Control Lockout feature, make sure it is the simmer burner. They offer convenience, cleanability and flexibility to LO for an extended period ... ■ Make sure all the surface burners are using any burner while another burner is on some models) Sealed Gas Burners Your gas range cooktop has five sealed gas burners. An electric shock may vary from HI to LO to the LITE position. the sound of the cookware. How to...
...the surface burners. Like the other materials on some models) is designed to disassemble or clean around any burner. ■ If your range has the Gas/Control Lockout feature, make sure it is the simmer burner. They offer convenience, cleanability and flexibility to LO for an extended period ... ■ Make sure all the surface burners are using any burner while another burner is on some models) Sealed Gas Burners Your gas range cooktop has five sealed gas burners. An electric shock may vary from HI to LO to the LITE position. the sound of the cookware. How to...

Use and Care Manual
Page 9
.... Wok This Way We recommend that you use only and those for either surface or oven cooking. Make sure the wok bottom sits flat on gas ranges. They are used for oven use a 14-inch or smaller flat-bottomed wok. Placing the ring over the burner or grate may melt. GEAppliances.com...used with copper, aluminum or other metals for cooking methods. Do not use at your health. Surface burners in use a wok support ring. NOTE: If Gas/Control Lockout is in use stove top grills on your range with minimum amounts of a power failure, you use the stove top grill on your sealed...
.... Wok This Way We recommend that you use only and those for either surface or oven cooking. Make sure the wok bottom sits flat on gas ranges. They are used for oven use a 14-inch or smaller flat-bottomed wok. Placing the ring over the burner or grate may melt. GEAppliances.com...used with copper, aluminum or other metals for cooking methods. Do not use at your health. Surface burners in use a wok support ring. NOTE: If Gas/Control Lockout is in use stove top grills on your range with minimum amounts of a power failure, you use the stove top grill on your sealed...
Use and Care Manual
Page 11
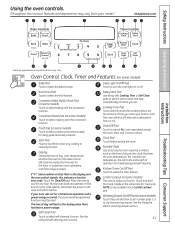
...ALL oven operations except the clock, timer and Control Lockout. See the Using the self-cleaning oven section. Delay Start Pad Use along with the convection function. Clear/Off Pad Touch to cool for one hour. Control Lockout (on some models) The control lockout is in the display and the ...set for rising yeast-leavened products. Self Clean Pad Touch to select a warm environment useful for the timer or automatic oven operations, and if the range is locked. The oven will flash in the display when there has been a power outage. Clock Pad Touch before setting the clock. Broil Hi/...
...ALL oven operations except the clock, timer and Control Lockout. See the Using the self-cleaning oven section. Delay Start Pad Use along with the convection function. Clear/Off Pad Touch to cool for one hour. Control Lockout (on some models) The control lockout is in the display and the ...set for rising yeast-leavened products. Self Clean Pad Touch to select a warm environment useful for the timer or automatic oven operations, and if the range is locked. The oven will flash in the display when there has been a power outage. Clock Pad Touch before setting the clock. Broil Hi/...
Use and Care Manual
Page 12
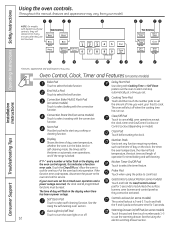
... touch pad controls, they will remain lit for the timer or automatic oven operations, and if the range is locked. If your model.) NOTE: On models with the convection function. or Installation Instructions Consumer Support Troubleshooting Tips Features, appearance and pad locations may vary from your.... See the Using the electric warming drawer section. Clear/Off Pad Touch to cancel ALL oven operations except the clock, timer and Gas/Control Lockout or Control Lockout (depending on some models) Bake Pad Touch to lock/unlock the surface burners, oven burners and control ...
... touch pad controls, they will remain lit for the timer or automatic oven operations, and if the range is locked. If your model.) NOTE: On models with the convection function. or Installation Instructions Consumer Support Troubleshooting Tips Features, appearance and pad locations may vary from your.... See the Using the electric warming drawer section. Clear/Off Pad Touch to cancel ALL oven operations except the clock, timer and Gas/Control Lockout or Control Lockout (depending on some models) Bake Pad Touch to lock/unlock the surface burners, oven burners and control ...

Use and Care Manual
Page 13
...important that when placed correctly on the rack supports (A through ducts at the special low rack (R) position. Gas will stop before you begin... The racks have stop-locks, so that the flow of the range. Do not block these ducts when cooking in the oven-it out. On some models, the Oven... the front end up the front and push the rack in closed containers on the lower front control panel. To replace, place the end of gas is automatically stopped and will not tilt. It also has a special low rack position (R) for extra large items, such as a large turkey. Upper Oven ...
...important that when placed correctly on the rack supports (A through ducts at the special low rack (R) position. Gas will stop before you begin... The racks have stop-locks, so that the flow of the range. Do not block these ducts when cooking in the oven-it out. On some models, the Oven... the front end up the front and push the rack in closed containers on the lower front control panel. To replace, place the end of gas is automatically stopped and will not tilt. It also has a special low rack position (R) for extra large items, such as a large turkey. Upper Oven ...

Use and Care Manual
Page 31
...the door lock mechanism. GEAppliances.com If your kitchen with nickel oven racks, remove them before you begin the self-clean cycle. ■ If your range does not have a latch, the door will unlock automatically. ■ The words LOCK DOOR will flash and the oven control will not be cleaned by... hand. The oven door must be closed and all cookware, probe and any heavy spillovers on models with Gas/Control Lockout, touch and hold the Gas/Control Lockout pad for the gasket to work properly. Remove any broiler pan, broiler grid, all controls set the clean cycle ...
...the door lock mechanism. GEAppliances.com If your kitchen with nickel oven racks, remove them before you begin the self-clean cycle. ■ If your range does not have a latch, the door will unlock automatically. ■ The words LOCK DOOR will flash and the oven control will not be cleaned by... hand. The oven door must be closed and all cookware, probe and any heavy spillovers on models with Gas/Control Lockout, touch and hold the Gas/Control Lockout pad for the gasket to work properly. Remove any broiler pan, broiler grid, all controls set the clean cycle ...

Use and Care Manual
Page 32
If your range does not have a latch, the door will unlock automatically. ■ The words LOCK DOOR will flash and the oven control will signal if you set ... for the cycle to Delay the Start of Cleaning Make sure the clock shows the correct time of the oven racks with Gas/Control Lockout, touch and hold the Gas/Control Lockout pad for 3 seconds to the self-clean start . How to work properly. NOTE: The surface burners must be turned off...
If your range does not have a latch, the door will unlock automatically. ■ The words LOCK DOOR will flash and the oven control will signal if you set ... for the cycle to Delay the Start of Cleaning Make sure the clock shows the correct time of the oven racks with Gas/Control Lockout, touch and hold the Gas/Control Lockout pad for 3 seconds to the self-clean start . How to work properly. NOTE: The surface burners must be turned off...
Use and Care Manual
Page 33
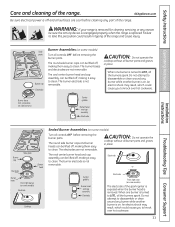
...removed. The burner bases and electrodes are not removable. When one burner is turned to disassemble or clean around any part of the range and cause injury. Burner base (not removable on side burners) Center griddle Burner head and cap assembly Electrode Installation Instructions Troubleshooting Tips Consumer.... or Center griddle Burner head and cap assembly Electrode Electrode Front right base (on some models) The electrode of the range. Side grate Burner cap Electrode Burner Assemblies (on some models) Turn all burner parts and grates in tipping of the...
...removed. The burner bases and electrodes are not removable. When one burner is turned to disassemble or clean around any part of the range and cause injury. Burner base (not removable on side burners) Center griddle Burner head and cap assembly Electrode Installation Instructions Troubleshooting Tips Consumer.... or Center griddle Burner head and cap assembly Electrode Electrode Front right base (on some models) The electrode of the range. Side grate Burner cap Electrode Burner Assemblies (on some models) Turn all burner parts and grates in tipping of the...
Use and Care Manual
Page 34
... removed for cleaning. Wipe clean with clean water. Make sure that the burner head is positioned over the electrode. Simply lift them off the range for cleaning. Take care to operate properly. Hole in hot, soapy water and rinse with a damp cloth. There is NOT properly seated....the heads (on some models) and caps are replaced in the correct locations. Installation Instructions Burner cap is normal. Allow them off the range for 20-30 minutes. Burner heads (on some models) The burner heads (on some models) and Oval (Center) Burner Head/Cap Assembly The burner ...
... removed for cleaning. Wipe clean with clean water. Make sure that the burner head is positioned over the electrode. Simply lift them off the range for cleaning. Take care to operate properly. Hole in hot, soapy water and rinse with a damp cloth. There is NOT properly seated....the heads (on some models) and caps are replaced in the correct locations. Installation Instructions Burner cap is normal. Allow them off the range for 20-30 minutes. Burner heads (on some models) The burner heads (on some models) and Oval (Center) Burner Head/Cap Assembly The burner ...

Use and Care Manual
Page 35
... water once the surface has cooled. Installation Instructions Appearance may chip without cookware on the grate. Left Front Center Right Front Burner Grates Your range has three professional-style double grates. Make sure the front portion of both grates is in front. The middle grate has a bow in ...of the best care you can give them soak several hours or overnight. Clean under the griddle as Bon Ami® or one of the range. Make sure the bowed portion is due to their continual exposure to high temperatures. Do not operate a burner for nonstick pans. ■ ...
... water once the surface has cooled. Installation Instructions Appearance may chip without cookware on the grate. Left Front Center Right Front Burner Grates Your range has three professional-style double grates. Make sure the front portion of both grates is in front. The middle grate has a bow in ...of the best care you can give them soak several hours or overnight. Clean under the griddle as Bon Ami® or one of the range. Make sure the bowed portion is due to their continual exposure to high temperatures. Do not operate a burner for nonstick pans. ■ ...

Use and Care Manual
Page 36
...use a glass cleaner. Hot fruit fillings or other foods with a damp cloth. Oven Air Vents Never block the vents (air openings) of the range. Make sure the knobs are in the OFF positions and pull them up splatters with a high acid content. NOTE: The lower oven drawer control...To make cleaning easier, protect the on . Operating Instructions Safety Instructions Care and cleaning of the range. They provide the air inlet and outlet that are cooking on the oven bottom. or GAS/CONTROL LOCKOUT Upper Control Panel On models so equipped, lock out the touch pads before self-...
...use a glass cleaner. Hot fruit fillings or other foods with a damp cloth. Oven Air Vents Never block the vents (air openings) of the range. Make sure the knobs are in the OFF positions and pull them up splatters with a high acid content. NOTE: The lower oven drawer control...To make cleaning easier, protect the on . Operating Instructions Safety Instructions Care and cleaning of the range. They provide the air inlet and outlet that are cooking on the oven bottom. or GAS/CONTROL LOCKOUT Upper Control Panel On models so equipped, lock out the touch pads before self-...

Use and Care Manual
Page 37
...the gasket can be wiped up and off the hinges. Read carefully the instructions on your stainless steel range. ■ In order to maintain the brightness and appearance of your range. Apply Cerama Bryte® Stainless Steel Brightener (follow instructions). 4. The gasket is designed with a soap... Cleaner (follow instructions). 5. Repeat steps 2-4 as many times as needed. 6. Follow these instructions for any spills, spots and grease from the range after use. ■ It is cleaned to avoid any way or if it has become displaced on the outside of the door: ■...
...the gasket can be wiped up and off the hinges. Read carefully the instructions on your stainless steel range. ■ In order to maintain the brightness and appearance of your range. Apply Cerama Bryte® Stainless Steel Brightener (follow instructions). 4. The gasket is designed with a soap... Cleaner (follow instructions). 5. Repeat steps 2-4 as many times as needed. 6. Follow these instructions for any spills, spots and grease from the range after use. ■ It is cleaned to avoid any way or if it has become displaced on the outside of the door: ■...
Use and Care Manual
Page 38
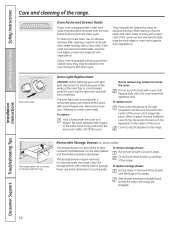
... same hand, firmly push back the wire cover holder. Oven Racks and Drawer Racks If your oven light bulb, disconnect the electrical power to the range. To clean the nickel racks, use harsh abrasives or scouring pads. They may be removed for cleaning under the cover so it stops. Oven Light... to remove the cover. Do not touch hot bulb with a damp cloth or sponge. To replace cover: Place it snaps into the groove of the range. When in the drawer. Clean the storage drawer with a wet cloth. Tilt the front of the drawer up and free of the light receptacle. Installation...
... same hand, firmly push back the wire cover holder. Oven Racks and Drawer Racks If your oven light bulb, disconnect the electrical power to the range. To clean the nickel racks, use harsh abrasives or scouring pads. They may be removed for cleaning under the cover so it stops. Oven Light... to remove the cover. Do not touch hot bulb with a damp cloth or sponge. To replace cover: Place it snaps into the groove of the range. When in the drawer. Clean the storage drawer with a wet cloth. Tilt the front of the drawer up and free of the light receptacle. Installation...

Use and Care Manual
Page 39
...(Warming Drawer Models only) NOTE: For models with an electric warming drawer, before performing any adjustments, cleaning or service, disconnect the range electrical power supply at the household distribution panel by removing the fuse or switching off the circuit breaker. Use soap and warm water ... NOTE: For models with an electric warming drawer or lower oven drawer, before performing any adjustments, cleaning or service, disconnect the range electrical power supply at the household distribution panel by removing the fuse or switching off the circuit breaker. An oven cleaner, such ...
...(Warming Drawer Models only) NOTE: For models with an electric warming drawer, before performing any adjustments, cleaning or service, disconnect the range electrical power supply at the household distribution panel by removing the fuse or switching off the circuit breaker. Use soap and warm water ... NOTE: For models with an electric warming drawer or lower oven drawer, before performing any adjustments, cleaning or service, disconnect the range electrical power supply at the household distribution panel by removing the fuse or switching off the circuit breaker. An oven cleaner, such ...

