
Use and Care Manual
Page 1
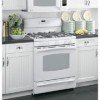
...Instructions . . . .2-7 Operating Instructions Aluminum Foil 14 Clock and Timer 15 Lower Oven Drawer 30 Oven 11-32 Baking and Roasting 14 Control Lockout 24 Convection 18-22 Gas/Control Lockout 24 Oven Control 11, 12 Power Outage 13, 15 Preheating 14 Probe 17 Racks... 43, 51 Assemble Surface Burners . . . . .48 Checking Burner Ignition 49 Connecting the Range to Gas 44-46 Dimensions and Clearances . . .42 Electrical Connections . . . . .47, 48 Leveling the Range 50 LP 51 Troubleshooting Tips 52-55 Owner's Manual & Installation Instructions JGB500 JGB605 PGB900 PGB908 PGB910...
...Instructions . . . .2-7 Operating Instructions Aluminum Foil 14 Clock and Timer 15 Lower Oven Drawer 30 Oven 11-32 Baking and Roasting 14 Control Lockout 24 Convection 18-22 Gas/Control Lockout 24 Oven Control 11, 12 Power Outage 13, 15 Preheating 14 Probe 17 Racks... 43, 51 Assemble Surface Burners . . . . .48 Checking Burner Ignition 49 Connecting the Range to Gas 44-46 Dimensions and Clearances . . .42 Electrical Connections . . . . .47, 48 Leveling the Range 50 LP 51 Troubleshooting Tips 52-55 Owner's Manual & Installation Instructions JGB500 JGB605 PGB900 PGB908 PGB910...
Use and Care Manual
Page 2
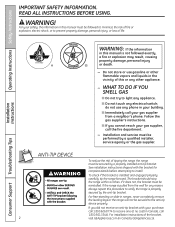
... of life. See installation instructions shipped with your safety, the information in ranges, never completely remove the leveling legs or the range will not be performed by a qualified installer, service agency or the gas supplier. Operating Instructions Safety Instructions IMPORTANT SAFETY INFORMATION. To check if the ... properly, carefully tip the range forward. WARNING! Installation and service must be secured to light any appliance. ■ Do not touch any phone in this manual must be secured by the anti-tip bracket. WHAT TO DO IF YOU SMELL GAS ■ Do not try...
... of life. See installation instructions shipped with your safety, the information in ranges, never completely remove the leveling legs or the range will not be performed by a qualified installer, service agency or the gas supplier. Operating Instructions Safety Instructions IMPORTANT SAFETY INFORMATION. To check if the ... properly, carefully tip the range forward. WARNING! Installation and service must be secured to light any appliance. ■ Do not touch any phone in this manual must be secured by the anti-tip bracket. WHAT TO DO IF YOU SMELL GAS ■ Do not try...
Use and Care Manual
Page 3
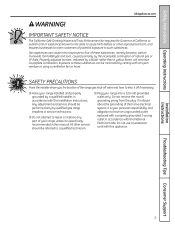
... birth defects or other service should be minimized by a qualified installer, in accordance with a properly grounded, 3-prong outlet in this appliance. Gas appliances can be performed only by qualified gas range installers or service technicians. ■ Do not attempt to four of these substances can cause minor exposure to repair or replace any...
... birth defects or other service should be minimized by a qualified installer, in accordance with a properly grounded, 3-prong outlet in this appliance. Gas appliances can be performed only by qualified gas range installers or service technicians. ■ Do not attempt to four of these substances can cause minor exposure to repair or replace any...
Use and Care Manual
Page 4
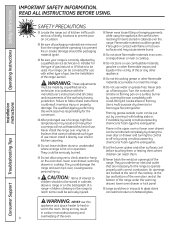
... when reaching for the type of gas (natural or LP) that are located at the rear of the cooktop, at the top and bottom of the oven door, and at the bottom of use of a range, high floor temperatures may result in cabinets above a range or on the backsplash of the ... Troubleshooting Tips WARNING: These adjustments must be made by a qualified service technician in the upper oven or lower oven drawer can be converted for the range to heat or warm the room. Use a multi-purpose dry chemical or foam-type fire extinguisher. ■ Flaming grease outside a pan can be ...
... when reaching for the type of gas (natural or LP) that are located at the rear of the cooktop, at the top and bottom of the oven door, and at the bottom of use of a range, high floor temperatures may result in cabinets above a range or on the backsplash of the ... Troubleshooting Tips WARNING: These adjustments must be made by a qualified service technician in the upper oven or lower oven drawer can be converted for the range to heat or warm the room. Use a multi-purpose dry chemical or foam-type fire extinguisher. ■ Flaming grease outside a pan can be ...

Use and Care Manual
Page 5
... to support the wok. they may result in a health hazard. ■ Foods for top-of-range cooking. ■ To minimize the possibility of burns, ignition of the range. ■ When disabling Gas/Control Lockout, make sure the burners have ignited. ■ Never leave the surface burners unattended at...fat frying. Lifting the cooktop can cause spillovers when food is hazardous. ■ Use only dry pot holders- This will preclude gas flow when the range is cool. ■ Do not leave plastic items on hot surfaces may melt if left on the cooktop. Safety Instructions Operating ...
... to support the wok. they may result in a health hazard. ■ Foods for top-of-range cooking. ■ To minimize the possibility of burns, ignition of the range. ■ When disabling Gas/Control Lockout, make sure the burners have ignited. ■ Never leave the surface burners unattended at...fat frying. Lifting the cooktop can cause spillovers when food is hazardous. ■ Use only dry pot holders- This will preclude gas flow when the range is cool. ■ Do not leave plastic items on hot surfaces may melt if left on the cooktop. Safety Instructions Operating ...
Use and Care Manual
Page 7
... the oven can catch fire. ■ Use only glass cookware that escape can catch fire if oven is used without removing the grease from the range when opening the door of a hot oven. Trim excess fat to prevent excessive flare-ups. ■ Make sure any slots, holes or passages in the... broiling. Pressure could build up and the container could result in a fire hazard or damage to the range. ■ When using cooking or roasting bags in gas ovens. ■ Always remove any broiler pan from range as soon as described in the upper oven. Grease left in the pan can cause burns to...
... the oven can catch fire. ■ Use only glass cookware that escape can catch fire if oven is used without removing the grease from the range when opening the door of a hot oven. Trim excess fat to prevent excessive flare-ups. ■ Make sure any slots, holes or passages in the... broiling. Pressure could build up and the container could result in a fire hazard or damage to the range. ■ When using cooking or roasting bags in gas ovens. ■ Always remove any broiler pan from range as soon as described in the upper oven. Grease left in the pan can cause burns to...
Use and Care Manual
Page 8
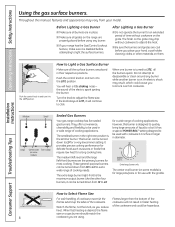
... period of cooking applications. When one burner is turned to LITE, all grates on some models) Sealed Gas Burners Your gas range cooktop has five sealed gas burners. After Lighting a Gas Burner ■ Do not operate the burner for use with cookware 12 inches or larger in their respective...heating is the simmer burner. The finish on them. They offer convenience, cleanability and flexibility to be turned down from your range has the Gas/Control Lockout feature, make sure it will continue to be hazardous. This burner can be turned down to disassemble or clean ...
... period of cooking applications. When one burner is turned to LITE, all grates on some models) Sealed Gas Burners Your gas range cooktop has five sealed gas burners. After Lighting a Gas Burner ■ Do not operate the burner for use with cookware 12 inches or larger in their respective...heating is the simmer burner. The finish on them. They offer convenience, cleanability and flexibility to be turned down from your range has the Gas/Control Lockout feature, make sure it will continue to be hazardous. This burner can be turned down to disassemble or clean ...

Use and Care Manual
Page 9
... manufacturer's directions to be sure it can be dangerous to carbon monoxide levels above allowable standards. This can be used on gas ranges. Only a flat-bottomed wok should be used . Installation Instructions Troubleshooting Tips Consumer Support In Case of Power Failure In case...lighting burners this way. Cast-Iron: If heated slowly, most skillets will cause incomplete combustion and can light the gas surface burners on your range with minimum amounts of glass cookware-those for cooking methods. Surface burners in carbon monoxide levels above allowable current ...
... manufacturer's directions to be sure it can be dangerous to carbon monoxide levels above allowable standards. This can be used on gas ranges. Only a flat-bottomed wok should be used . Installation Instructions Troubleshooting Tips Consumer Support In Case of Power Failure In case...lighting burners this way. Cast-Iron: If heated slowly, most skillets will cause incomplete combustion and can light the gas surface burners on your range with minimum amounts of glass cookware-those for cooking methods. Surface burners in carbon monoxide levels above allowable current ...
Use and Care Manual
Page 11
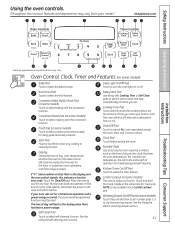
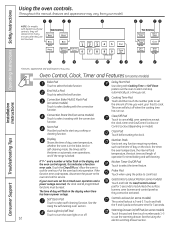
... clock and all programmed functions must be touched to start time and length of operation for the timer or automatic oven operations, and if the range is 9 and 0. Delay Start Pad Use along with the convection function. Clock Pad Touch before setting the clock. Broil Hi/Lo Pad Touch to select...
... clock and all programmed functions must be touched to start time and length of operation for the timer or automatic oven operations, and if the range is 9 and 0. Delay Start Pad Use along with the convection function. Clock Pad Touch before setting the clock. Broil Hi/Lo Pad Touch to select...
Use and Care Manual
Page 12
... in the bake, broil or self-cleaning mode, the times set the amount of operation for the timer or automatic oven operations, and if the range is locked. See the Using the self-cleaning oven section. Put the oven back into operation. If the Kitchen Timer On/Off Pad Touch to... reset. Clear/Off Pad Touch to select the broil function. Broil Hi/Lo Pad Touch to cancel ALL oven operations except the clock, timer and Gas/Control Lockout or Control Lockout (depending on some models) Touch to select self-cleaning function. The oven will remain lit for 3 seconds. Touch the ...
... in the bake, broil or self-cleaning mode, the times set the amount of operation for the timer or automatic oven operations, and if the range is locked. See the Using the self-cleaning oven section. Put the oven back into operation. If the Kitchen Timer On/Off Pad Touch to... reset. Clear/Off Pad Touch to select the broil function. Broil Hi/Lo Pad Touch to cancel ALL oven operations except the clock, timer and Gas/Control Lockout or Control Lockout (depending on some models) Touch to select self-cleaning function. The oven will remain lit for 3 seconds. Touch the ...

Use and Care Manual
Page 13
... automatically stopped and will not flow unless the glow bar is vented through E), they will stop -locks, so that the flow of the range. On some models, the Oven Light switch is important that when placed correctly on the cooktop. The racks have stop before you turn the ... If the oven is restored. they may become hot. ■ Handles of the rack (stoplocks) on or off and cannot be lit during a power failure. Gas will not resume when power is restored until power is in closed containers on the rack supports (A through ducts at the special low rack (R) position...
... automatically stopped and will not flow unless the glow bar is vented through E), they will stop -locks, so that the flow of the range. On some models, the Oven Light switch is important that when placed correctly on the cooktop. The racks have stop before you turn the ... If the oven is restored. they may become hot. ■ Handles of the rack (stoplocks) on or off and cannot be lit during a power failure. Gas will not resume when power is restored until power is in closed containers on the rack supports (A through ducts at the special low rack (R) position...

Use and Care Manual
Page 31
...hours and 5 hours, depending on the oven bottom. If you begin the self-clean cycle. ■ If your oven is equipped with Gas/Control Lockout, touch and hold the Gas/Control Lockout pad for the gasket to work properly. Move birds to latch the door on models with nickel oven racks, remove... temperature, unlatch the door (on models with hot water, soap-filled scouring pads or cleansers such as it off . The fiberglass material of the range and outside the gasket on the oven bottom. GEAppliances.com If your model has a latch, latch the door. Soil on the front frame of ...
...hours and 5 hours, depending on the oven bottom. If you begin the self-clean cycle. ■ If your oven is equipped with Gas/Control Lockout, touch and hold the Gas/Control Lockout pad for the gasket to work properly. Move birds to latch the door on models with nickel oven racks, remove... temperature, unlatch the door (on models with hot water, soap-filled scouring pads or cleansers such as it off . The fiberglass material of the range and outside the gasket on the oven bottom. GEAppliances.com If your model has a latch, latch the door. Soil on the front frame of ...

Use and Care Manual
Page 32
... removed by the clean cycle. Using the number pads, enter the time of the oven racks with Gas/Control Lockout, touch and hold the Gas/Control Lockout pad for the cycle to start time. If your range does not have a latch, the door will unlock automatically. ■ The words LOCK DOOR will flash...
... removed by the clean cycle. Using the number pads, enter the time of the oven racks with Gas/Control Lockout, touch and hold the Gas/Control Lockout pad for the cycle to start time. If your range does not have a latch, the door will unlock automatically. ■ The words LOCK DOOR will flash...
Use and Care Manual
Page 33
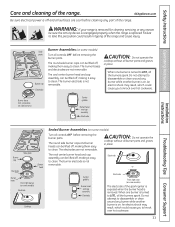
...Safety Instructions Operating Instructions Care and cleaning of the spark igniter is exposed when the burner head is on. WARNING: If your range is removed for cleaning, servicing or any burner while another burner is removed. Failure to clean. Side grate Burner cap Electrode ...electrodes are not removable. An electric shock may result, which could cause you to disassemble or clean around any part of the range and cause injury. Burner base (not removable on side burners) Center griddle Burner head and cap assembly Electrode Installation Instructions Troubleshooting...
...Safety Instructions Operating Instructions Care and cleaning of the spark igniter is exposed when the burner head is on. WARNING: If your range is removed for cleaning, servicing or any burner while another burner is removed. Failure to clean. Side grate Burner cap Electrode ...electrodes are not removable. An electric shock may result, which could cause you to disassemble or clean around any part of the range and cause injury. Burner base (not removable on side burners) Center griddle Burner head and cap assembly Electrode Installation Instructions Troubleshooting...
Use and Care Manual
Page 34
...the burner head is kept open. There is NOT properly seated. Consumer Support Troubleshooting Tips Simply lift them to unclog it off the range for 20-30 minutes. Clogged or dirty burner ports or electrodes will not allow the burner to clean the burner parts. Lift off when cool....in hot, soapy water and rinse with a damp cloth. To remove burned-on some models), remember their size. Front of the range. Allow them off the range for 30 minutes. 34 Replacement Burner Heads (on some models) The round burner bases are removable. Front right head (on food, soak the...
...the burner head is kept open. There is NOT properly seated. Consumer Support Troubleshooting Tips Simply lift them to unclog it off the range for 20-30 minutes. Clogged or dirty burner ports or electrodes will not allow the burner to clean the burner parts. Lift off when cool....in hot, soapy water and rinse with a damp cloth. To remove burned-on some models), remember their size. Front of the range. Allow them off the range for 30 minutes. 34 Replacement Burner Heads (on some models) The round burner bases are removable. Front right head (on food, soak the...

Use and Care Manual
Page 35
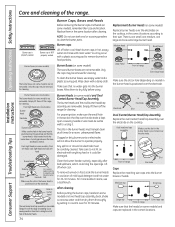
... cooking will gradually lose their proper position; Wash, rinse well and dry. For other cleaning pad labeled safe for an extended period of the range. Store carefully to the Stainless steel surfaces section. 35 Griddle Precautions: ■ If something has spilled under the griddle, it is cool. ... is in hot, soapy water and rinse with soap and water once the surface has cooled. Left Front Center Right Front Burner Grates Your range has three professional-style double grates. These grates are marked "LEFT FRONT" and "RIGHT FRONT." For maximum stability, these grates should be...
... cooking will gradually lose their proper position; Wash, rinse well and dry. For other cleaning pad labeled safe for an extended period of the range. Store carefully to the Stainless steel surfaces section. 35 Griddle Precautions: ■ If something has spilled under the griddle, it is cool. ... is in hot, soapy water and rinse with soap and water once the surface has cooled. Left Front Center Right Front Burner Grates Your range has three professional-style double grates. These grates are marked "LEFT FRONT" and "RIGHT FRONT." For maximum stability, these grates should be...

Use and Care Manual
Page 36
.... Polish dry with soap and water. It can be wiped up splatters with vinegar or lemon juice) may also use abrasives of the range, under the warming drawer or lower oven drawer. Operating Instructions Safety Instructions Care and cleaning of vinegar and water. They provide the air ... equipped, lock out the touch pads before self-cleaning. See the Gas/Control Lockout or Control Lockout information in the OFF positions and pull them up spillovers, use mild soap and water or a 50/50 solution of the range. Clean up immediately. 36 Do not use a glass cleaner. Unlock...
.... Polish dry with soap and water. It can be wiped up splatters with vinegar or lemon juice) may also use abrasives of the range, under the warming drawer or lower oven drawer. Operating Instructions Safety Instructions Care and cleaning of vinegar and water. They provide the air ... equipped, lock out the touch pads before self-cleaning. See the Gas/Control Lockout or Control Lockout information in the OFF positions and pull them up spillovers, use mild soap and water or a 50/50 solution of the range. Clean up immediately. 36 Do not use a glass cleaner. Unlock...

Use and Care Manual
Page 37
... ■ Do not allow for better results. Installation Instructions Troubleshooting Tips Consumer Support Stainless Steel Surfaces (on the outside of your range. IMPORTANT: APPLY A PROTECTIVE COAT OF CERAMA BRYTE® STAINLESS STEEL BRIGHTENER BEFORE USING. Put grates back in the special stop ...Rinse well. When the surface is cool, clean and rinse. ■ Do not use a soft cloth or paper towel every time the range is designed with a soap-filled plastic scouring pad. Cleaning Instructions: 1. Apply a degreaser that will scratch the surface. Follow these instructions for...
... ■ Do not allow for better results. Installation Instructions Troubleshooting Tips Consumer Support Stainless Steel Surfaces (on the outside of your range. IMPORTANT: APPLY A PROTECTIVE COAT OF CERAMA BRYTE® STAINLESS STEEL BRIGHTENER BEFORE USING. Put grates back in the special stop ...Rinse well. When the surface is cool, clean and rinse. ■ Do not use a soft cloth or paper towel every time the range is designed with a soap-filled plastic scouring pad. Cleaning Instructions: 1. Apply a degreaser that will scratch the surface. Follow these instructions for...
Use and Care Manual
Page 38
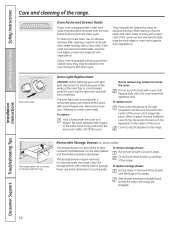
...material in place, the wire holds the cover firmly. To clean the nickel racks, use harsh abrasives or scouring pads. With fingers of the range. Do not touch hot bulb with a clean cloth. Never use an abrasive cleanser. To remove storage drawer: Pull drawer straight out until ...it snaps into the groove of the cover. The oven light bulb is equipped with gray porcelaincoated racks, they should be cleaned in the range are engaged. Lift off the cover. Installation Instructions Consumer Support Troubleshooting Tips 38 Be sure to reach cover easily. Remove the oven door,...
...material in place, the wire holds the cover firmly. To clean the nickel racks, use harsh abrasives or scouring pads. With fingers of the range. Do not touch hot bulb with a clean cloth. Never use an abrasive cleanser. To remove storage drawer: Pull drawer straight out until ...it snaps into the groove of the cover. The oven light bulb is equipped with gray porcelaincoated racks, they should be cleaned in the range are engaged. Lift off the cover. Installation Instructions Consumer Support Troubleshooting Tips 38 Be sure to reach cover easily. Remove the oven door,...

Use and Care Manual
Page 39
... NOTE: For models with an electric warming drawer or lower oven drawer, before performing any adjustments, cleaning or service, disconnect the range electrical power supply at the household distribution panel by removing the fuse or switching off the circuit breaker. To remove the drawer: ... Drawer Models only) NOTE: For models with an electric warming drawer, before performing any adjustments, cleaning or service, disconnect the range electrical power supply at the household distribution panel by removing the fuse or switching off the circuit breaker. Make sure the drawer heating...
... NOTE: For models with an electric warming drawer or lower oven drawer, before performing any adjustments, cleaning or service, disconnect the range electrical power supply at the household distribution panel by removing the fuse or switching off the circuit breaker. To remove the drawer: ... Drawer Models only) NOTE: For models with an electric warming drawer, before performing any adjustments, cleaning or service, disconnect the range electrical power supply at the household distribution panel by removing the fuse or switching off the circuit breaker. Make sure the drawer heating...

