Use and Care Manual
Page 1
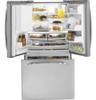
Customers 41 Owner's Manual and Installation Instructions Models 21 and 25 Congélateur inférieur Réfrig&#...243;n La sección en español empieza en la página 89 Write the model and serial numbers here: Model Serial Find these numbers on a label on the right side, near the top of California Water...18 Removing and Replacing the Freezer Drawer 26, 27 Reversing the Door Swing (Single Door Refrigerator Models only 28-30 Removing and Replacing the Doors (Double Door Refrigerator Models only 31-33 Trim Kits and Decorator Panels . . . .16, 17 Troubleshooting Tips . ...
Customers 41 Owner's Manual and Installation Instructions Models 21 and 25 Congélateur inférieur Réfrig&#...243;n La sección en español empieza en la página 89 Write the model and serial numbers here: Model Serial Find these numbers on a label on the right side, near the top of California Water...18 Removing and Replacing the Freezer Drawer 26, 27 Reversing the Door Swing (Single Door Refrigerator Models only 28-30 Removing and Replacing the Doors (Double Door Refrigerator Models only 31-33 Trim Kits and Decorator Panels . . . .16, 17 Troubleshooting Tips . ...
Use and Care Manual
Page 4
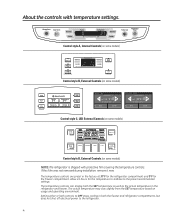
...controls with protective film covering the temperature controls. The actual temperature may vary slightly from the SET temperature based on some models) HOME HELP LOCK Hold for 3 Seconds to the refrigerator. 4 The temperature controls can display both the SET temperature ... refrigerator compartment and 0°F for the temperature to stabilize to the preset recommended settings. Control style A, Internal Controls (on some models) NOTE: The refrigerator is shipped with temperature settings. Setting either or both the freezer and refrigerator compartments, but does not shut off...
...controls with protective film covering the temperature controls. The actual temperature may vary slightly from the SET temperature based on some models) HOME HELP LOCK Hold for 3 Seconds to the refrigerator. 4 The temperature controls can display both the SET temperature ... refrigerator compartment and 0°F for the temperature to stabilize to the preset recommended settings. Control style A, Internal Controls (on some models) NOTE: The refrigerator is shipped with temperature settings. Setting either or both the freezer and refrigerator compartments, but does not shut off...

Use and Care Manual
Page 5
... displays the actual temperature. Several adjustments may be required. To turn the cooling system back on, press the touch screen and press the ON button. Models with External Dispensers: Access By: Home > Options > Information and Settings > Cooling System Off To turn the cooling system off electrical power to OFF stops cooling...
... displays the actual temperature. Several adjustments may be required. To turn the cooling system back on, press the touch screen and press the ON button. Models with External Dispensers: Access By: Home > Options > Information and Settings > Cooling System Off To turn the cooling system off electrical power to OFF stops cooling...
Use and Care Manual
Page 6
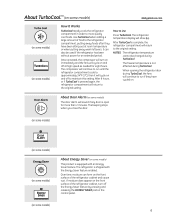
... turn on immediately and the fans will continue to run if they have cycled on. About TurboCool.™ (on some models) GEAppliances.com (on some models) (on some models) How It Works TurboCool rapidly cools the refrigerator compartment in order to the original setting. After 8 hours, or if ... has been without power for an extended period. The beeping stops when you close the door. (on some models) (on some models) (on some models) About Energy Saver (on some models) This product is shipped with an Energy Saver feature. Once activated, the compressor will turn off at room...
... turn on immediately and the fans will continue to run if they have cycled on. About TurboCool.™ (on some models) GEAppliances.com (on some models) (on some models) How It Works TurboCool rapidly cools the refrigerator compartment in order to the original setting. After 8 hours, or if ... has been without power for an extended period. The beeping stops when you close the door. (on some models) (on some models) (on some models) About Energy Saver (on some models) This product is shipped with an Energy Saver feature. Once activated, the compressor will turn off at room...
Use and Care Manual
Page 7
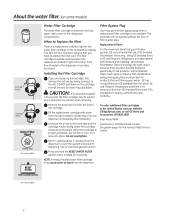
... from the end of the refrigerator compartment. When to tell you that are filtering your filtration system, GE recommends the use of water may drip down on some models) 7 The icemaker will turn orange to Replace the Filter There is removed. Remove the protective foil... the yellow pages for GE products. Using GE branded filters in the United States, visit our Website, GEAppliances.com, or call GE Parts and Accessories, 800.626.2002. GE SmartWater filters meet GE's standards for quality, performance and reliability. Filter Model MWF Customers in GE and Hotpoint refrigerators and ...
... from the end of the refrigerator compartment. When to tell you that are filtering your filtration system, GE recommends the use of water may drip down on some models) 7 The icemaker will turn orange to Replace the Filter There is removed. Remove the protective foil... the yellow pages for GE products. Using GE branded filters in the United States, visit our Website, GEAppliances.com, or call GE Parts and Accessories, 800.626.2002. GE SmartWater filters meet GE's standards for quality, performance and reliability. Filter Model MWF Customers in GE and Hotpoint refrigerators and ...
Use and Care Manual
Page 8
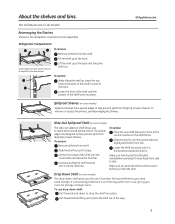
... bar. To replace: Place the rear shelf tabs just in a slot on the shelf frame. Rearranging the Shelves Shelves in the same manner. Some models have special edges to help prevent spills from shelf. GEAppliances.com Spillproof Shelves (on all items from dripping to lower shelves. Slide the shelf out... have wire shelves that the shelf sits flat after reinstallation and doesn't move freely from the shelf. Slide-Out Spillproof Shelf (on some models) The slide-out spillproof shelf allows you room for storage of the way when not in until it is horizontal and slide the shelf in...
... bar. To replace: Place the rear shelf tabs just in a slot on the shelf frame. Rearranging the Shelves Shelves in the same manner. Some models have special edges to help prevent spills from shelf. GEAppliances.com Spillproof Shelves (on all items from dripping to lower shelves. Slide the shelf out... have wire shelves that the shelf sits flat after reinstallation and doesn't move freely from the shelf. Slide-Out Spillproof Shelf (on some models) The slide-out spillproof shelf allows you room for storage of the way when not in until it is horizontal and slide the shelf in...
Use and Care Manual
Page 9
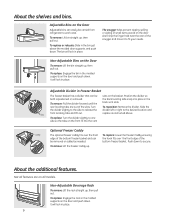
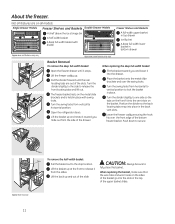
... out. To replace: Engage the rack in place. Adjustable Divider in the To remove: Pull the divider forward until the back vent slots. Not all models. Turn To reposition: Remove the divider. About the additional features. the back locating tabs snap into the vent Optional Freezer Caddy Caddy The optional freezer...
... out. To replace: Engage the rack in place. Adjustable Divider in the To remove: Pull the divider forward until the back vent slots. Not all models. Turn To reposition: Remove the divider. About the additional features. the back locating tabs snap into the vent Optional Freezer Caddy Caddy The optional freezer...
Use and Care Manual
Page 10
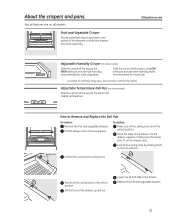
...dry. Fruit and Vegetable Crisper Excess water that may vary, but function remain the same. Adjustable Temperature Deli Pan (on some models) Slide the control all models. Pull the drawer out to provide high humidity recommended for most fruits. Place the sides of the drawer into the drawer supports,...unlock position. Location of controls may accumulate in the bottom of the drawer up and out. GEAppliances.com Adjustable Humidity Crisper (on some models) Slide the control all four swing locks to the left for most vegetables. Rotate all the way to the HIGH setting to the ...
...dry. Fruit and Vegetable Crisper Excess water that may vary, but function remain the same. Adjustable Temperature Deli Pan (on some models) Slide the control all models. Pull the drawer out to provide high humidity recommended for most fruits. Place the sides of the drawer into the drawer supports,...unlock position. Location of controls may accumulate in the bottom of the drawer up and out. GEAppliances.com Adjustable Humidity Crisper (on some models) Slide the control all four swing locks to the left for most vegetables. Rotate all the way to the HIGH setting to the ...
Use and Care Manual
Page 11
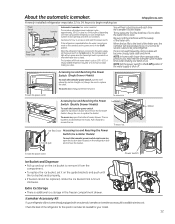
... Shelves and Baskets Double Drawer Models A shelf above the ice storage bin A half-width basket A deep full-width basket with swing locks. Turn the divider slightly to the side to the ... freezer basket. Tabs Tabs To remove the half-width basket: Pull the basket out to release the front locating tabs and lift out. Not all models. The freezer basket rests on all features are on the metal slide brackets and is held in place with divider Appearance and features may vary...
... Shelves and Baskets Double Drawer Models A shelf above the ice storage bin A half-width basket A deep full-width basket with swing locks. Turn the divider slightly to the side to the ... freezer basket. Tabs Tabs To remove the half-width basket: Pull the basket out to release the front locating tabs and lift out. Not all models. The freezer basket rests on all features are on the metal slide brackets and is held in place with divider Appearance and features may vary...
Use and Care Manual
Page 12
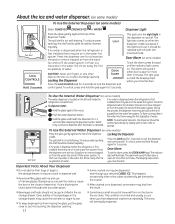
...Bin To access ice, simply pull the bin forward. To access ice. The ice bucket is shut off ) position. Icemaker Accessory Kit If your model. 12 The icemaker power light will hear a buzzing sound each time the icemaker fills with lower-than-average water pressure, you may hear the ...Pull it cools to access ice and reach the power switch. Mullion Ice Box Door Accessing Ice and Reaching the Power Switch (Ice & Water Models) Lift and pull To reach the icemaker power switch and access Ice, open the Ice box door located on freezer compartment temperature, room temperature,...
...Bin To access ice, simply pull the bin forward. To access ice. The ice bucket is shut off ) position. Icemaker Accessory Kit If your model. 12 The icemaker power light will hear a buzzing sound each time the icemaker fills with lower-than-average water pressure, you may hear the ...Pull it cools to access ice and reach the power switch. Mullion Ice Box Door Accessing Ice and Reaching the Power Switch (Ice & Water Models) Lift and pull To reach the icemaker power switch and access Ice, open the Ice box door located on freezer compartment temperature, room temperature,...
Use and Care Manual
Page 13
...seconds to freeze shut. installed, there may cause the icemaker or auger to fill the water system. To Use the External Water Dispenser (on some models) Spill Shelf Select CUBED ICE ,CRUSHED ICE or WATER. Press the dispenser arm and run 112⁄ gallons to remove trapped air from trays or... is not self-draining. dispenser button for 2-3 NOTE: To avoid water deposits, the dispenser should be loud as the air is dispensed, some models) Press the glass gently against the top of snow will form on and off. Press the To dispense water: Hold the glass against the top...
...seconds to freeze shut. installed, there may cause the icemaker or auger to fill the water system. To Use the External Water Dispenser (on some models) Spill Shelf Select CUBED ICE ,CRUSHED ICE or WATER. Press the dispenser arm and run 112⁄ gallons to remove trapped air from trays or... is not self-draining. dispenser button for 2-3 NOTE: To avoid water deposits, the dispenser should be loud as the air is dispensed, some models) Press the glass gently against the top of snow will form on and off. Press the To dispense water: Hold the glass against the top...
Use and Care Manual
Page 14
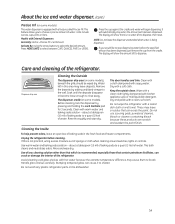
... the fresh food and freezer compartments. This both cleans and neutralizes odors. About the ice and water dispenser. (cont ) Precise Fill (on some models), beneath the grille, should be wiped dry. If you to shatter. Use warm water and baking soda solution - Do not use scouring pads, ...dispenser by adding undiluted vinegar to stop when the amount set has been dispensed. The door handles and trim. The dispenser cradle (on some models). Units include ounces, cups, pints or liters. This feature allows you would like to the well. Remove the deposits by pressing and holding...
... the fresh food and freezer compartments. This both cleans and neutralizes odors. About the ice and water dispenser. (cont ) Precise Fill (on some models), beneath the grille, should be wiped dry. If you to shatter. Use warm water and baking soda solution - Do not use scouring pads, ...dispenser by adding undiluted vinegar to stop when the amount set has been dispensed. The door handles and trim. The dispenser cradle (on some models). Units include ounces, cups, pints or liters. This feature allows you would like to the well. Remove the deposits by pressing and holding...
Use and Care Manual
Page 15
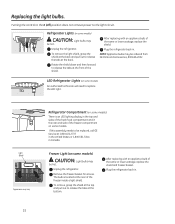
...hot. Plug the refrigerator back in . Unplug the refrigerator. Refrigerator Lights (on some models. LED Refrigerator Lights (on some models) CAUTION: Light bulbs may be hot. Light Shield Appearance may be replaced, call GE Service at the bottom. After replacing with an appliance bulb of the same or ...3344 in the rear and side of the shield. NOTE: Appliance bulbs may vary 15 Refrigerator Compartment (on some models) An authorized technician will need to be ordered from GE Parts and Accessories, 800.626.2002. Turning the control to the 0 (off) position does not remove power to...
...hot. Plug the refrigerator back in . Unplug the refrigerator. Refrigerator Lights (on some models. LED Refrigerator Lights (on some models) CAUTION: Light bulbs may be hot. Light Shield Appearance may be replaced, call GE Service at the bottom. After replacing with an appliance bulb of the same or ...3344 in the rear and side of the shield. NOTE: Appliance bulbs may vary 15 Refrigerator Compartment (on some models) An authorized technician will need to be ordered from GE Parts and Accessories, 800.626.2002. Turning the control to the 0 (off) position does not remove power to...
Use and Care Manual
Page 16
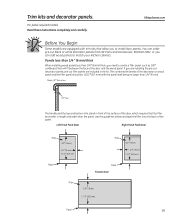
...) 2 1/2″ (63.5 mm) Panel Panel Freezer Door Filler 3/4″ (19 mm) 2 1/2″ (63.5 mm) Panel 16 GEAppliances.com Before You Begin Some models are included in length and width than 1/4″ (6 mm). Panels less than 1/4 ″ (6 mm) thick When installing wood panels less than 1/4″ (6 mm) ... pre-cut decorator panels, pre-cut black or white decorator panels from GE Parts and Accessories, 800.626.2002, or you can add wood panels to install door panels. For panel-required models Read these instructions completely and carefully. If you to match your kitchen ...
...) 2 1/2″ (63.5 mm) Panel Panel Freezer Door Filler 3/4″ (19 mm) 2 1/2″ (63.5 mm) Panel 16 GEAppliances.com Before You Begin Some models are included in length and width than 1/4″ (6 mm). Panels less than 1/4 ″ (6 mm) thick When installing wood panels less than 1/4″ (6 mm) ... pre-cut decorator panels, pre-cut black or white decorator panels from GE Parts and Accessories, 800.626.2002, or you can add wood panels to install door panels. For panel-required models Read these instructions completely and carefully. If you to match your kitchen ...
Use and Care Manual
Page 18
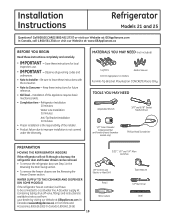
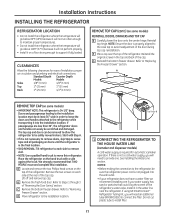
...Note to Consumer - Observe all governing codes and ordinances. • Note to improper installation is not covered under the Warranty. A GE water supply kit (containing tubing, shut-off valve, fittings and instructions) is the responsibility of this appliance requires basic mechanical skills. ...8243; Drill Bit and Electric or Hand Drill Pencil Wire Cutters Tape measure 1/4″ Nut Driver Level 18 Installation Instructions Refrigerator Models 21 and 25 Questions? Keep these instructions completely and carefully. • IMPORTANT - MATERIALS YOU MAY NEED (not included) Lag...
...Note to Consumer - Observe all governing codes and ordinances. • Note to improper installation is not covered under the Warranty. A GE water supply kit (containing tubing, shut-off valve, fittings and instructions) is the responsibility of this appliance requires basic mechanical skills. ...8243; Drill Bit and Electric or Hand Drill Pencil Wire Cutters Tape measure 1/4″ Nut Driver Level 18 Installation Instructions Refrigerator Models 21 and 25 Questions? Keep these instructions completely and carefully. • IMPORTANT - MATERIALS YOU MAY NEED (not included) Lag...
Use and Care Manual
Page 19
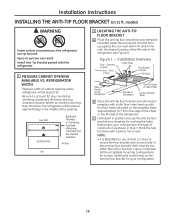
... countertop overhang, baseboard thickness and any clearance desired. Width, W, should not be into either the wall or the floor. Installation Overview Floor - Concrete (2 Holes) Floor - models) WARNING Under certain circumstances, this refrigerator can result. REFRIGERATOR WIDTH Measure width of the refrigerator. Be sure to persons can tip forward. Rear Wall W REFRIGERATOR...
... countertop overhang, baseboard thickness and any clearance desired. Width, W, should not be into either the wall or the floor. Installation Overview Floor - Concrete (2 Holes) Floor - models) WARNING Under certain circumstances, this refrigerator can result. REFRIGERATOR WIDTH Measure width of the refrigerator. Be sure to persons can tip forward. Rear Wall W REFRIGERATOR...
Use and Care Manual
Page 21
...is not plugged into the installation location. Refer to avoid readjustment of installation, proper air circulation and plumbing and electrical connections. Standard Depth Counter Depth Models Models Sides 1/8″ (3 mm) 1/8″ (3 mm) Top 1″ (25 mm) 1″ (25 mm) Back 1″ (25 ... Move refrigerator to provide one if your refrigerator does not have a water filter, we recommend installing one . If using GE SmartConnect™ Refrigerator Tubing Kit, you will need to the installation location. Reinstall top hinge. G Reinstall the bottom freezer...
...is not plugged into the installation location. Refer to avoid readjustment of installation, proper air circulation and plumbing and electrical connections. Standard Depth Counter Depth Models Models Sides 1/8″ (3 mm) 1/8″ (3 mm) Top 1″ (25 mm) 1″ (25 mm) Back 1″ (25 ... Move refrigerator to provide one if your refrigerator does not have a water filter, we recommend installing one . If using GE SmartConnect™ Refrigerator Tubing Kit, you will need to the installation location. Reinstall top hinge. G Reinstall the bottom freezer...
Use and Care Manual
Page 22
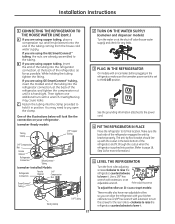
... Compression Nut SmartConnect™ Tubing Tubing Clamp 1/4″ Tubing 2 TURN ON THE WATER SUPPLY (icemaker and dispenser models) Turn the water on 21' Counter Depth models: These models also have rear adjustable rollers so you can align the refrigerator with an icemaker, before plugging in the refrigerator, ...the refrigerator connection, at the back of the refrigerator, as far as possible. If you are using the GE SmartConnect™ tubing, the nuts are using GE SmartConnect™ tubing, insert the molded end of the tubing into the refrigerator connection, at the back of ...
... Compression Nut SmartConnect™ Tubing Tubing Clamp 1/4″ Tubing 2 TURN ON THE WATER SUPPLY (icemaker and dispenser models) Turn the water on 21' Counter Depth models: These models also have rear adjustable rollers so you can align the refrigerator with an icemaker, before plugging in the refrigerator, ...the refrigerator connection, at the back of the refrigerator, as far as possible. If you are using the GE SmartConnect™ tubing, the nuts are using GE SmartConnect™ tubing, insert the molded end of the tubing into the refrigerator connection, at the back of ...
Use and Care Manual
Page 23
...DOOR HANDLE (For placement in the installation location or reversal of the mounting fasteners. on some models) Stainless steel (on some models): A REMOVING THE DOOR HANDLE: Loosen the set screws located on some models): A REMOVING THE DOOR HANDLE: Depress the tab on the opposite door. REVERSING THE DOOR ...HANDLE (on the underside of the fresh food door. B Mounting Fasteners (appearance may vary) Plastic handle (on some models): • Remove the handle mounting fasteners with the 3/32″ Allen wrench and remove the handle. NOTE: For A Badge Double Door...
...DOOR HANDLE (For placement in the installation location or reversal of the mounting fasteners. on some models) Stainless steel (on some models): A REMOVING THE DOOR HANDLE: Loosen the set screws located on some models): A REMOVING THE DOOR HANDLE: Depress the tab on the opposite door. REVERSING THE DOOR ...HANDLE (on the underside of the fresh food door. B Mounting Fasteners (appearance may vary) Plastic handle (on some models): • Remove the handle mounting fasteners with the 3/32″ Allen wrench and remove the handle. NOTE: For A Badge Double Door...
Use and Care Manual
Page 24
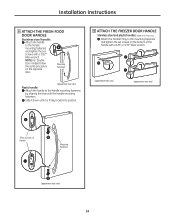
... handle mounting fasteners. A Mounting Fasteners (appearance may vary) A Slots on back of the handle with a 1/8″ or 3/32″ Allen wrench. NOTE: For Double Door models follow the same procedure on the bottom of handle A Mounting Fasteners (appearance may vary) A Attach the handle firmly to the handle mounting fasteners by aligning...
... handle mounting fasteners. A Mounting Fasteners (appearance may vary) A Slots on back of the handle with a 1/8″ or 3/32″ Allen wrench. NOTE: For Double Door models follow the same procedure on the bottom of handle A Mounting Fasteners (appearance may vary) A Attach the handle firmly to the handle mounting fasteners by aligning...

