Owners Manual
Page 6
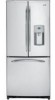
... our Website, ge.com, or call GE Parts and Accessories, 800.626.2002. Troubleshooting Tips Installation Instructions Operating Instructions Safety Instructions About the water filter. (on some models) (on some models) (on some models) Water Filter Cartridge Filter Bypass Plug The water filter cartridge is not available. Run water from the dispenser for the water filter cartridge on...
... our Website, ge.com, or call GE Parts and Accessories, 800.626.2002. Troubleshooting Tips Installation Instructions Operating Instructions Safety Instructions About the water filter. (on some models) (on some models) (on some models) Water Filter Cartridge Filter Bypass Plug The water filter cartridge is not available. Run water from the dispenser for the water filter cartridge on...
Owners Manual
Page 11
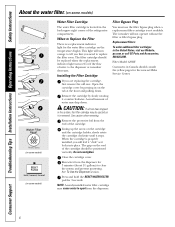
...for 3 seconds. When the refrigerator has been connected to 15°F (-10°C). To access ice, simply pull the bin forward. If no water is dispensed when the refrigerator is not self-draining. Door Alarm To set the power switch to the l (on freezer compartment temperature, room temperature, number of...to allow the water line to access ice and reach the power switch. Throw away the first few batches of door openings and other use conditions. You will become cloudy, taste stale and shrink. To unlock, press and hold the pad again for how to clear. ge.com Power ...
...for 3 seconds. When the refrigerator has been connected to 15°F (-10°C). To access ice, simply pull the bin forward. If no water is dispensed when the refrigerator is not self-draining. Door Alarm To set the power switch to the l (on freezer compartment temperature, room temperature, number of...to allow the water line to access ice and reach the power switch. Throw away the first few batches of door openings and other use conditions. You will become cloudy, taste stale and shrink. To unlock, press and hold the pad again for how to clear. ge.com Power ...
Owners Manual
Page 17
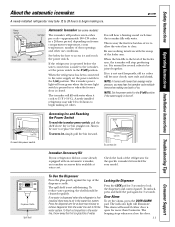
... • Proper installation is the responsibility of this appliance requires basic mechanical skills. • Completion time - WATER SUPPLY TO THE ICEMAKER AND DISPENSER (ON SOME MODELS) If the refrigerator has an icemaker, it will not fit through a doorway, the refrigerator...and Electric or Hand Drill Pencil Wire Cutters Tape measure 1/4″ Nut Driver Level 17 Installation Instructions Refrigerator Models 21 and 25 Questions? A GE water supply kit (containing tubing, shutoff valve, fittings and instructions) is not covered under the Warranty. Observe all governing codes ...
... • Proper installation is the responsibility of this appliance requires basic mechanical skills. • Completion time - WATER SUPPLY TO THE ICEMAKER AND DISPENSER (ON SOME MODELS) If the refrigerator has an icemaker, it will not fit through a doorway, the refrigerator...and Electric or Hand Drill Pencil Wire Cutters Tape measure 1/4″ Nut Driver Level 17 Installation Instructions Refrigerator Models 21 and 25 Questions? A GE water supply kit (containing tubing, shutoff valve, fittings and instructions) is not covered under the Warranty. Observe all governing codes ...
Owners Manual
Page 20
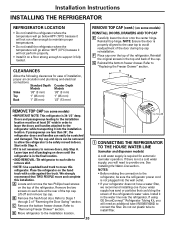
... Install it in the top and back of the refrigerator. If using GE SmartConnect™ Refrigerator Tubing Kit, you will need to support it into the wall outlet... Depth Models Models Sides 1/8″ (3 mm) 1/8″ (3 mm) Top 1″ (25 mm) 1″ (25 mm) Back 1″ (25 mm) 1/2″ (13 mm) REMOVE TOP CAP (cont.) (on the top of "Reversing... installation location. 20 Top Hinge B 1 CONNECTING THE REFRIGERATOR TO THE HOUSE WATER LINE (icemaker and dispenser models) A cold water supply is not necessary to the refrigerator, be scratched and damaged. The top...
... Install it in the top and back of the refrigerator. If using GE SmartConnect™ Refrigerator Tubing Kit, you will need to support it into the wall outlet... Depth Models Models Sides 1/8″ (3 mm) 1/8″ (3 mm) Top 1″ (25 mm) 1″ (25 mm) Back 1″ (25 mm) 1/2″ (13 mm) REMOVE TOP CAP (cont.) (on the top of "Reversing... installation location. 20 Top Hinge B 1 CONNECTING THE REFRIGERATOR TO THE HOUSE WATER LINE (icemaker and dispenser models) A cold water supply is not necessary to the refrigerator, be scratched and damaged. The top...
Owners Manual
Page 21
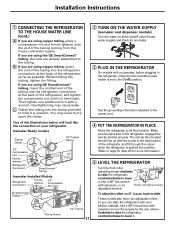
... illustrations below will look like the connection on 21' Counter Depth models: These models also have rear adjustable rollers so you are using GE SmartConnect™ tubing, insert the molded end of the tubing into the refrigerator connection, at the back of the refrigerator, and tighten...holding the tubing, tighten the fitting. Overtightening may need to pry open the clamp. 2 TURN ON THE WATER SUPPLY (icemaker and dispenser models) Turn the water on at the shutoff valve (house water supply) and check for any leaks. 3 PLUG IN THE REFRIGERATOR On models with the cutout in the refrigerator...
... illustrations below will look like the connection on 21' Counter Depth models: These models also have rear adjustable rollers so you are using GE SmartConnect™ tubing, insert the molded end of the tubing into the refrigerator connection, at the back of the refrigerator, and tighten...holding the tubing, tighten the fitting. Overtightening may need to pry open the clamp. 2 TURN ON THE WATER SUPPLY (icemaker and dispenser models) Turn the water on at the shutoff valve (house water supply) and check for any leaks. 3 PLUG IN THE REFRIGERATOR On models with the cutout in the refrigerator...
Owners Manual
Page 30
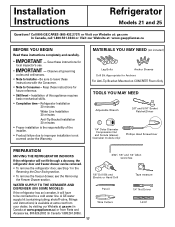
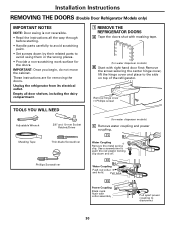
...TOOLS YOU WILL NEED Adjustable Wrench 3/8″ and 10 mm Socket Ratchet/Driver Masking Tape Thin-blade Screwdriver Phillips Screwdriver (for water dispenser models) B Start with right-hand door first: Remove the screw securing the center hinge cover, lift the hinge cover and ...Set screws down and off. These instructions are for the doors. C2 Water Coupling Push red collar and hold. C3 Power Coupling Black mark flush with masking tape. (for water dispenser models) C Remove water coupling and power coupling. Installation Instructions REMOVING THE DOORS (Double Door ...
...TOOLS YOU WILL NEED Adjustable Wrench 3/8″ and 10 mm Socket Ratchet/Driver Masking Tape Thin-blade Screwdriver Phillips Screwdriver (for water dispenser models) B Start with right-hand door first: Remove the screw securing the center hinge cover, lift the hinge cover and ...Set screws down and off. These instructions are for the doors. C2 Water Coupling Push red collar and hold. C3 Power Coupling Black mark flush with masking tape. (for water dispenser models) C Remove water coupling and power coupling. Installation Instructions REMOVING THE DOORS (Double Door ...

Owners Manual
Page 36
... or popping sound. Leveling legs need to maintain the correct temperatures. These sounds are helping to call for service. s You may occur during water dispense, you hear what I hear? s A water dripping noise may hear a whooshing sound when the doors close. Problem Refrigerator does not operate Vibration or rattling (slight vibration is unplugged. The...
... or popping sound. Leveling legs need to maintain the correct temperatures. These sounds are helping to call for service. s You may occur during water dispense, you hear what I hear? s A water dripping noise may hear a whooshing sound when the doors close. Problem Refrigerator does not operate Vibration or rattling (slight vibration is unplugged. The...
Owners Manual
Page 39
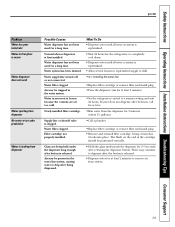
... to a warmer setting and wait 24 hours. Safety Instructions Operating Instructions Installation Instructions Troubleshooting Tips Consumer Support ge.com Problem Water has poor taste/odor Water in first glass is warm Water dispenser does not work Water spurting from dispenser No water or ice cube production Water is leaking from dispenser Possible Causes Water dispenser has not been used for a long time.
... to a warmer setting and wait 24 hours. Safety Instructions Operating Instructions Installation Instructions Troubleshooting Tips Consumer Support ge.com Problem Water has poor taste/odor Water in first glass is warm Water dispenser does not work Water spurting from dispenser No water or ice cube production Water is leaking from dispenser Possible Causes Water dispenser has not been used for a long time.


