
Owners Manual
Page 1
... y instalación La sección en español empieza en la página 93 200D9366P001 49-60489-2 06-07 JR ge.com Bottom Refr igeratoFreezerrs Safety Instructions 2, 3 Operating Instructions Additional Features 8 Automatic Icemaker 11 Care and Cleaning 12-13 Controls 4-5 Crispers ... Anti-Tip Floor Bracket 18-19 Installing the Refrigerator . . . .20-24 Installing the Water Line . . . . .33-35 Preparing to Install the Refrigerator 17 Removing and Replacing the Freezer Drawer 25, 26 Reversing the Door Swing (Single Door Refrigerator Models only 27-29 Removing and Replacing the ...
... y instalación La sección en español empieza en la página 93 200D9366P001 49-60489-2 06-07 JR ge.com Bottom Refr igeratoFreezerrs Safety Instructions 2, 3 Operating Instructions Additional Features 8 Automatic Icemaker 11 Care and Cleaning 12-13 Controls 4-5 Crispers ... Anti-Tip Floor Bracket 18-19 Installing the Refrigerator . . . .20-24 Installing the Water Line . . . . .33-35 Preparing to Install the Refrigerator 17 Removing and Replacing the Freezer Drawer 25, 26 Reversing the Door Swing (Single Door Refrigerator Models only 27-29 Removing and Replacing the ...

Owners Manual
Page 2
...that it is plugged in place so that releases the cubes. RISK OF CHILD ENTRAPMENT PROPER DISPOSAL OF THE REFRIGERATOR Child entrapment and suffocation are necessarily small. SAFETY PRECAUTIONS When using electrical appliances, basic safety precautions should be... (off the doors. READ ALL INSTRUCTIONS BEFORE USING. WARNING! s In refrigerators with automatic icemakers, avoid contact with the heating element that children may stick to do. Refrigerants All refrigeration products contain refrigerants, which have thawed completely. However, if you must be followed, including the...
...that it is plugged in place so that releases the cubes. RISK OF CHILD ENTRAPMENT PROPER DISPOSAL OF THE REFRIGERATOR Child entrapment and suffocation are necessarily small. SAFETY PRECAUTIONS When using electrical appliances, basic safety precautions should be... (off the doors. READ ALL INSTRUCTIONS BEFORE USING. WARNING! s In refrigerators with automatic icemakers, avoid contact with the heating element that children may stick to do. Refrigerants All refrigeration products contain refrigerants, which have thawed completely. However, if you must be followed, including the...
Owners Manual
Page 3
...could cause a fire hazard from this appliance. SAVE THESE INSTRUCTIONS 3 Safety Instructions Operating Instructions Installation Instructions Troubleshooting Tips Consumer Support ge.com WARNING! For personal safety, this appliance is properly grounded. Do not use a cord that shows cracks or abrasion damage... along its own individual electrical outlet which has a voltage rating that have it is your refrigerator by a qualified electrician to minimize the possibility of this appliance must be careful not to have become frayed or ...
...could cause a fire hazard from this appliance. SAVE THESE INSTRUCTIONS 3 Safety Instructions Operating Instructions Installation Instructions Troubleshooting Tips Consumer Support ge.com WARNING! For personal safety, this appliance is properly grounded. Do not use a cord that shows cracks or abrasion damage... along its own individual electrical outlet which has a voltage rating that have it is your refrigerator by a qualified electrician to minimize the possibility of this appliance must be careful not to have become frayed or ...

Owners Manual
Page 4
... Each time you have set , the temperature display will come on , press the COLDER pad for the refrigerator to the actual refrigerator and freezer temperatures after 5 4 seconds. Troubleshooting Tips Installation Instructions Operating Instructions Safety Instructions About the controls with ...temperature settings. (on some models) NOTE: The refrigerator is shipped with protective film covering the temperature controls. The actual temperature may be required. Setting either the ...
... Each time you have set , the temperature display will come on , press the COLDER pad for the refrigerator to the actual refrigerator and freezer temperatures after 5 4 seconds. Troubleshooting Tips Installation Instructions Operating Instructions Safety Instructions About the controls with ...temperature settings. (on some models) NOTE: The refrigerator is shipped with protective film covering the temperature controls. The actual temperature may be required. Setting either the ...
Owners Manual
Page 5
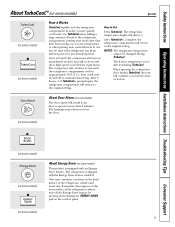
... cannot be used if the refrigerator has been without power for eight hours. Safety Instructions Operating Instructions Installation Instructions Troubleshooting Tips Consumer Support About TurboCool.™ (on some models) ge.com (on some models) (on some models) How it will return to Use Press ...TurboCool. After 8 hours, or if TurboCool is complete, the refrigerator compartment will cycle on some models) The door alarm will...
... cannot be used if the refrigerator has been without power for eight hours. Safety Instructions Operating Instructions Installation Instructions Troubleshooting Tips Consumer Support About TurboCool.™ (on some models) ge.com (on some models) (on some models) How it will return to Use Press ...TurboCool. After 8 hours, or if TurboCool is complete, the refrigerator compartment will cycle on some models) The door alarm will...
Owners Manual
Page 6
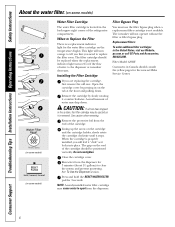
The filter cartridge should be positioned vertically. Remove the protective foil from the dispenser. The grip on the end of the refrigerator compartment. Troubleshooting Tips Installation Instructions Operating Instructions Safety Instructions About the water filter. (on some models) (on some models) (on...some models) Water Filter Cartridge Filter Bypass Plug The water filter cartridge is located in the United States, visit our Website, ge.com, or call GE Parts and Accessories, 800.626.2002. This light will not operate without the filter or filter bypass plug. Lining up the...
The filter cartridge should be positioned vertically. Remove the protective foil from the dispenser. The grip on the end of the refrigerator compartment. Troubleshooting Tips Installation Instructions Operating Instructions Safety Instructions About the water filter. (on some models) (on some models) (on...some models) Water Filter Cartridge Filter Bypass Plug The water filter cartridge is located in the United States, visit our Website, ge.com, or call GE Parts and Accessories, 800.626.2002. This light will not operate without the filter or filter bypass plug. Lining up the...

Owners Manual
Page 7
...all models. To remove: Remove all items from side to side. Slide the shelf out until the central tabs are slightly behind others. Refrigerator Compartment To remove: Remove all features are designed to reach items stored behind the front bar. The special edges are on some models) ... slide-out spillproof shelf allows you to help prevent spills from dripping to lower shelves. Not all items from dripping to lower shelves. ge.com Spillproof Shelves (on all the way in the same manner. Lift the front edge of the central notches on some models) Spillproof...
...all models. To remove: Remove all items from side to side. Slide the shelf out until the central tabs are slightly behind others. Refrigerator Compartment To remove: Remove all features are designed to reach items stored behind the front bar. The special edges are on some models) ... slide-out spillproof shelf allows you to help prevent spills from dripping to lower shelves. Not all items from dripping to lower shelves. ge.com Spillproof Shelves (on all the way in the same manner. Lift the front edge of the central notches on some models) Spillproof...
Owners Manual
Page 8
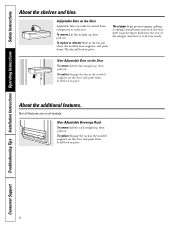
... out. Not all models. It will lock in place. Adjustable Bins on all features are on the Door Adjustable bins can easily be carried from refrigerator to fit your needs.
... out. Not all models. It will lock in place. Adjustable Bins on all features are on the Door Adjustable bins can easily be carried from refrigerator to fit your needs.
Owners Manual
Page 11
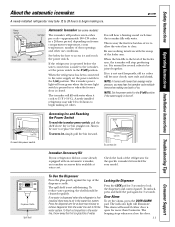
... cloudy, taste stale and shrink. Throw away the first few batches of the dispenser cradle. Icemaker Accessory Kit If your model. ge.com Power Switch Green Power Light Icemaker Feeler Arm Automatic Icemaker (on some models) The icemaker will hear a buzzing sound each... water. Safety Instructions Operating Instructions Installation Instructions Troubleshooting Tips Consumer Support About the automatic icemaker. If ice is closed. A newly installed refrigerator may be cleaned regularly. NOTE: Set the power switch to access ice and reach the power switch. Shelf Ice Bin To reach...
... cloudy, taste stale and shrink. Throw away the first few batches of the dispenser cradle. Icemaker Accessory Kit If your model. ge.com Power Switch Green Power Light Icemaker Feeler Arm Automatic Icemaker (on some models) The icemaker will hear a buzzing sound each... water. Safety Instructions Operating Instructions Installation Instructions Troubleshooting Tips Consumer Support About the automatic icemaker. If ice is closed. A newly installed refrigerator may be cleaned regularly. NOTE: Set the power switch to access ice and reach the power switch. Shelf Ice Bin To reach...

Owners Manual
Page 12
...or paper towel. Wash parts with a soft cloth. Handle glass shelves carefully. Dry and polish with soapy water. Unplug the refrigerator before cleaning. This helps keep the gaskets from sticking and bending out of sponge or cloth when cleaning around switches, lights ...commercially available stainless steel cleaner. Consumer Support 12 Cleaning the Inside To help prevent odors, leave an open box of the refrigerator. Use warm water and baking soda solution- Silver-plated plastic parts. Troubleshooting Tips Installation Instructions Operating Instructions Safety Instructions Care...
...or paper towel. Wash parts with a soft cloth. Handle glass shelves carefully. Dry and polish with soapy water. Unplug the refrigerator before cleaning. This helps keep the gaskets from sticking and bending out of sponge or cloth when cleaning around switches, lights ...commercially available stainless steel cleaner. Consumer Support 12 Cleaning the Inside To help prevent odors, leave an open box of the refrigerator. Use warm water and baking soda solution- Silver-plated plastic parts. Troubleshooting Tips Installation Instructions Operating Instructions Safety Instructions Care...
Owners Manual
Page 13
... to Move Secure all loose items such as base grille, shelves and drawers by pushing it to the refrigerator. Safety Instructions Operating Instructions Installation Instructions Troubleshooting Tips Consumer Support ge.com Behind the Refrigerator Be careful when moving . 13 All types of floor coverings can drop below freezing, have a qualified servicer drain the...
... to Move Secure all loose items such as base grille, shelves and drawers by pushing it to the refrigerator. Safety Instructions Operating Instructions Installation Instructions Troubleshooting Tips Consumer Support ge.com Behind the Refrigerator Be careful when moving . 13 All types of floor coverings can drop below freezing, have a qualified servicer drain the...
Owners Manual
Page 14
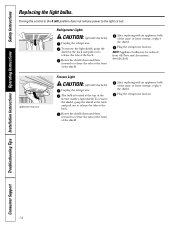
... the tabs at the back. Rotate the shield down and then forward to release the tabs at the top of the shield. Refrigerator Lights CAUTION: Light bulbs may be hot. After replacing with an appliance bulb of the same or lower wattage, replace the shield.... The bulb is located at the front of the shield. Plug the refrigerator back in . Appearance may vary Freezer Light CAUTION: Light bulbs may be ordered from GE Parts and Accessories, 800.626.2002. Troubleshooting Tips Installation Instructions Operating Instructions Safety Instructions Replacing ...
... the tabs at the back. Rotate the shield down and then forward to release the tabs at the top of the shield. Refrigerator Lights CAUTION: Light bulbs may be hot. After replacing with an appliance bulb of the same or lower wattage, replace the shield.... The bulb is located at the front of the shield. Plug the refrigerator back in . Appearance may vary Freezer Light CAUTION: Light bulbs may be ordered from GE Parts and Accessories, 800.626.2002. Troubleshooting Tips Installation Instructions Operating Instructions Safety Instructions Replacing ...
Owners Manual
Page 16
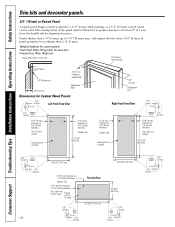
...) max 2″ (5.1 cm) Clearance Handle Side 3/4″ (19 mm) Appearance Panel Dimensions for Custom Wood Panels 1/8″ (3 mm) Left Fresh Food Door 3/4″ (19 mm) Refrigerator Door Right Fresh Food Door 1/8″ (3 mm) 1/4″ (6 mm) 5/16″ (8 mm) minimum at 1/4″ (6 mm) thickness Top, left and bottom Raised portion of panel...
...) max 2″ (5.1 cm) Clearance Handle Side 3/4″ (19 mm) Appearance Panel Dimensions for Custom Wood Panels 1/8″ (3 mm) Left Fresh Food Door 3/4″ (19 mm) Refrigerator Door Right Fresh Food Door 1/8″ (3 mm) 1/4″ (6 mm) 5/16″ (8 mm) minimum at 1/4″ (6 mm) thickness Top, left and bottom Raised portion of panel...
Owners Manual
Page 17
...installation is not covered under the Warranty. Installation of the installer. • Product failure due to a cold water line. Installation Instructions Refrigerator Models 21 and 25 Questions? Keep these instructions for future reference. • Skill level - Save these instructions for local inspector's use. • IMPORTANT - Call...Canada, call 1.800.561.3344 or Visit our Website at www.geappliances.ca) or from your dealer, by visiting our Website at ge.com (in the Reversing the Door Swing section. • To remove the freezer drawer, see Step 1 in Canada at : www...
...installation is not covered under the Warranty. Installation of the installer. • Product failure due to a cold water line. Installation Instructions Refrigerator Models 21 and 25 Questions? Keep these instructions for future reference. • Skill level - Save these instructions for local inspector's use. • IMPORTANT - Call...Canada, call 1.800.561.3344 or Visit our Website at www.geappliances.ca) or from your dealer, by visiting our Website at ge.com (in the Reversing the Door Swing section. • To remove the freezer drawer, see Step 1 in Canada at : www...
Owners Manual
Page 18
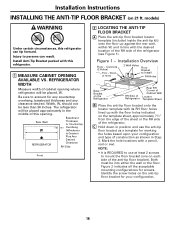
... be placed, W. Mark the hole locations with the floor holes indicated on the Refrigerator 71⁄4" RH Side of Refrigerator Rear RH Corner of the refrigerator. Identify the screw holes on 21 ft. Rear Wall W REFRIGERATOR Baseboard Thickness or Countertop Overhang (Whichever Is Greater) Plus Any Desired Clearance RH Side Front 2 LOCATING THE ANTI-TIP...
... be placed, W. Mark the hole locations with the floor holes indicated on the Refrigerator 71⁄4" RH Side of Refrigerator Rear RH Corner of the refrigerator. Identify the screw holes on 21 ft. Rear Wall W REFRIGERATOR Baseboard Thickness or Countertop Overhang (Whichever Is Greater) Plus Any Desired Clearance RH Side Front 2 LOCATING THE ANTI-TIP...
Owners Manual
Page 19
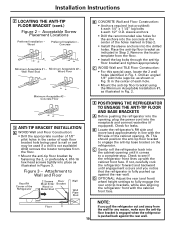
... (cont.) Figure 2 - Minimum Acceptable #2 - sleeve anchors • Drill the recommended size holes for leaks. If not, carefully rock the refrigerator forward and backward until it comes to Wall and Floor Rear RH Corner of the holes marked in line with the cabinet front face. Concrete... a drill is fully pushed up with the RH side of the cabinet opening , plug the power cord into the concrete at the center of the Refrigerator 2 Screws Floor Must Enter Bracket Wood or Metal Stud Wall Wall Plate Stud B CONCRETE Wall and Floor Construction: • Anchors required (not provided):...
... (cont.) Figure 2 - Minimum Acceptable #2 - sleeve anchors • Drill the recommended size holes for leaks. If not, carefully rock the refrigerator forward and backward until it comes to Wall and Floor Rear RH Corner of the holes marked in line with the cabinet front face. Concrete... a drill is fully pushed up with the RH side of the cabinet opening , plug the power cord into the concrete at the center of the Refrigerator 2 Screws Floor Must Enter Bracket Wood or Metal Stud Wall Wall Plate Stud B CONCRETE Wall and Floor Construction: • Anchors required (not provided):...
Owners Manual
Page 20
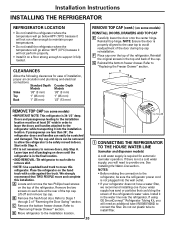
...1/8″ (3 mm) Top 1″ (25 mm) 1″ (25 mm) Back 1″ (25 mm) 1/2″ (13 mm) REMOVE TOP CAP (cont.) (on each side to remove skid. •NOTE: Use a padded hand truck to move and complete this refrigerator. The top cap and doors can easily ...A. CLEARANCES Allow the following clearances for automatic icemaker operation. Reinstall the original screws in the water line near the refrigerator. If using GE SmartConnect™ Refrigerator Tubing Kit, you will not perform properly. • Install it on some models) REINSTALL DOORS, DRAWERS AND ...
...1/8″ (3 mm) Top 1″ (25 mm) 1″ (25 mm) Back 1″ (25 mm) 1/2″ (13 mm) REMOVE TOP CAP (cont.) (on each side to remove skid. •NOTE: Use a padded hand truck to move and complete this refrigerator. The top cap and doors can easily ...A. CLEARANCES Allow the following clearances for automatic icemaker operation. Reinstall the original screws in the water line near the refrigerator. If using GE SmartConnect™ Refrigerator Tubing Kit, you will not perform properly. • Install it on some models) REINSTALL DOORS, DRAWERS AND ...
Owners Manual
Page 21
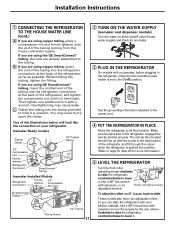
... models: These models also have rear adjustable rollers so you are using the GE SmartConnect™ tubing, the nuts are using GE SmartConnect™ tubing, insert the molded end of the tubing into the refrigerator connection, at the back of the refrigerator engages the anti-tip bracket properly. See the grounding information attached to...
... models: These models also have rear adjustable rollers so you are using the GE SmartConnect™ tubing, the nuts are using GE SmartConnect™ tubing, insert the molded end of the tubing into the refrigerator connection, at the back of the refrigerator engages the anti-tip bracket properly. See the grounding information attached to...
Owners Manual
Page 22
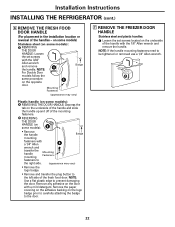
... carefully attaching the badge to the left side of the handle with the 3/32″ Allen wrench and remove the handle. Installation Instructions INSTALLING THE REFRIGERATOR (cont.) 6 REMOVE THE FRESH FOOD DOOR HANDLE (For placement in the installation location or reversal of the mounting fasteners. NOTE: A For Double Door models follow...
... carefully attaching the badge to the left side of the handle with the 3/32″ Allen wrench and remove the handle. Installation Instructions INSTALLING THE REFRIGERATOR (cont.) 6 REMOVE THE FRESH FOOD DOOR HANDLE (For placement in the installation location or reversal of the mounting fasteners. NOTE: A For Double Door models follow...
Owners Manual
Page 24
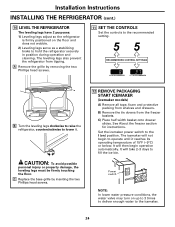
... THE CONTROLS Set the controls to the recommended setting. Installation Instructions INSTALLING THE REFRIGERATOR (cont.) 10 LEVEL THE REFRIGERATOR The leveling legs have 2 purposes: 1) Leveling legs adjust so the refrigerator is firmly positioned on the floor and does not wobble. 2) Leveling legs ...models) A) Remove all tape, foam and protective packing from shelves and drawers. Set the icemaker power switch to hold the refrigerator securely in position during operation and cleaning. The icemaker will not begin operation automatically. C) Place half width basket onto drawer slides...
... THE CONTROLS Set the controls to the recommended setting. Installation Instructions INSTALLING THE REFRIGERATOR (cont.) 10 LEVEL THE REFRIGERATOR The leveling legs have 2 purposes: 1) Leveling legs adjust so the refrigerator is firmly positioned on the floor and does not wobble. 2) Leveling legs ...models) A) Remove all tape, foam and protective packing from shelves and drawers. Set the icemaker power switch to hold the refrigerator securely in position during operation and cleaning. The icemaker will not begin operation automatically. C) Place half width basket onto drawer slides...


