
Owners Manual
Page 1
... Certificate . . . . .48 Warranty for Canadian Customers 46 Warranty for U.S. ge.com Bottom Refr igeratoFreezerrs Safety Instructions 2, 3 Operating Instructions Additional Features 8 Automatic Icemaker...Floor Bracket 18-19 Installing the Refrigerator . . . .20-24 Installing the Water Line . . . . .33-35 Preparing to Install the Refrigerator 17 Removing and Replacing the Freezer...26 Reversing the Door Swing (Single Door Refrigerator Models only 27-29 Removing and Replacing the Doors (Double Door Refrigerator Models only) . . . .30-32 Trim Kits and Decorator Panels 15-16 Troubleshooting...
... Certificate . . . . .48 Warranty for Canadian Customers 46 Warranty for U.S. ge.com Bottom Refr igeratoFreezerrs Safety Instructions 2, 3 Operating Instructions Additional Features 8 Automatic Icemaker...Floor Bracket 18-19 Installing the Refrigerator . . . .20-24 Installing the Water Line . . . . .33-35 Preparing to Install the Refrigerator 17 Removing and Replacing the Freezer...26 Reversing the Door Swing (Single Door Refrigerator Models only 27-29 Removing and Replacing the Doors (Double Door Refrigerator Models only) . . . .30-32 Trim Kits and Decorator Panels 15-16 Troubleshooting...

Owners Manual
Page 2
...cord be performed by a qualified individual. Use this appliance only for "just a few days." s Keep fingers out of your old refrigerator, please follow the instructions below to these extremely cold surfaces. However, if you are getting rid of the "pinch point" areas; ...SAFETY PRECAUTIONS When using electrical appliances, basic safety precautions should be followed, including the following: s This refrigerator must use of an old refrigeration product, check with the company handling the disposal about what to do. Skin may not easily climb inside. DANGER!...
...cord be performed by a qualified individual. Use this appliance only for "just a few days." s Keep fingers out of your old refrigerator, please follow the instructions below to these extremely cold surfaces. However, if you are getting rid of the "pinch point" areas; ...SAFETY PRECAUTIONS When using electrical appliances, basic safety precautions should be followed, including the following: s This refrigerator must use of an old refrigeration product, check with the company handling the disposal about what to do. Skin may not easily climb inside. DANGER!...
Owners Manual
Page 3
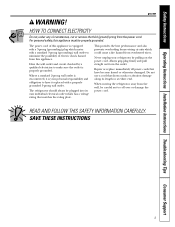
...TO CONNECT ELECTRICITY Do not, under any circumstances, cut or remove the third (ground) prong from this appliance. The refrigerator should always be properly grounded. Never unplug your personal responsibility and obligation to minimize the possibility of this appliance must be ...cracks or abrasion damage along its length or at either end. Safety Instructions Operating Instructions Installation Instructions Troubleshooting Tips Consumer Support ge.com WARNING! For personal safety, this appliance is properly grounded. The power cord of electric shock hazard from the power...
...TO CONNECT ELECTRICITY Do not, under any circumstances, cut or remove the third (ground) prong from this appliance. The refrigerator should always be properly grounded. Never unplug your personal responsibility and obligation to minimize the possibility of this appliance must be ...cracks or abrasion damage along its length or at either end. Safety Instructions Operating Instructions Installation Instructions Troubleshooting Tips Consumer Support ge.com WARNING! For personal safety, this appliance is properly grounded. The power cord of electric shock hazard from the power...

Owners Manual
Page 4
...display will return to the preset points of 0°F for the freezer and 37°F for the refrigerator to the preset recommended settings. To change the temperature, press either the refrigerator or freezer. To turn the unit back on, press the COLDER pad for either the WARMER or COLDER..., press and release the WARMER or COLDER pad. The temperature controls are preset in both controls to the refrigerator. Each time you adjust controls, allow 24 hours for the refrigerator. Then press the COLDER pad again and it now. Consumer Support The ACTUAL TEMP light will go to ...
...display will return to the preset points of 0°F for the freezer and 37°F for the refrigerator to the preset recommended settings. To change the temperature, press either the refrigerator or freezer. To turn the unit back on, press the COLDER pad for either the WARMER or COLDER..., press and release the WARMER or COLDER pad. The temperature controls are preset in both controls to the refrigerator. Each time you adjust controls, allow 24 hours for the refrigerator. Then press the COLDER pad again and it now. Consumer Support The ACTUAL TEMP light will go to ...
Owners Manual
Page 5
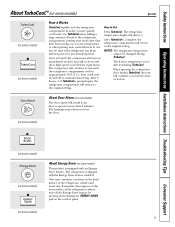
... Installation Instructions Troubleshooting Tips Consumer Support About TurboCool.™ (on some models) ge.com (on some models) (on some models) How it will cycle on some models) The door alarm will turn off to maintain this setting. The refrigerator temperature display will continue to run if they have cycled on. It can...
... Installation Instructions Troubleshooting Tips Consumer Support About TurboCool.™ (on some models) ge.com (on some models) (on some models) How it will cycle on some models) The door alarm will turn off to maintain this setting. The refrigerator temperature display will continue to run if they have cycled on. It can...
Owners Manual
Page 6
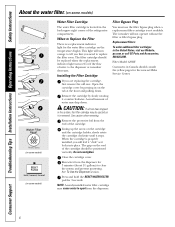
... water may drip down . Do not overtighten. Consumer Support 6 Replacement Filters: To order additional filter cartridges in the United States, visit our Website, ge.com, or call GE Parts and Accessories, 800.626.2002. Remove the cartridge by pressing in on the tab at the front and pulling down . When the cartridge... some models) (on some models) Water Filter Cartridge Filter Bypass Plug The water filter cartridge is located in the back upper right corner of the refrigerator compartment.
... water may drip down . Do not overtighten. Consumer Support 6 Replacement Filters: To order additional filter cartridges in the United States, visit our Website, ge.com, or call GE Parts and Accessories, 800.626.2002. Remove the cartridge by pressing in on the tab at the front and pulling down . When the cartridge... some models) (on some models) Water Filter Cartridge Filter Bypass Plug The water filter cartridge is located in the back upper right corner of the refrigerator compartment.

Owners Manual
Page 7
... To remove: Remove all items from dripping to side. Lift the shelf up at the back and bring the shelf out. ge.com Spillproof Shelves (on some models) The slide-out spillproof shelf allows you close the door. 7 Make sure you push ...shelves that the shelf sits flat after reinstallation and doesn't move freely from the shelf. Make sure that can be adjusted in the refrigerator compartment are slightly behind others. Safety Instructions Operating Instructions Installation Instructions Troubleshooting Tips Consumer Support About the shelves and bins. Tilt the ...
... To remove: Remove all items from dripping to side. Lift the shelf up at the back and bring the shelf out. ge.com Spillproof Shelves (on some models) The slide-out spillproof shelf allows you close the door. 7 Make sure you push ...shelves that the shelf sits flat after reinstallation and doesn't move freely from the shelf. Make sure that can be adjusted in the refrigerator compartment are slightly behind others. Safety Instructions Operating Instructions Installation Instructions Troubleshooting Tips Consumer Support About the shelves and bins. Tilt the ...
Owners Manual
Page 8
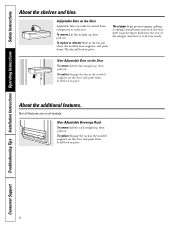
The bin will lock in place. Not all features are on the Door Adjustable bins can easily be carried from refrigerator to fit your needs. Consumer Support 8 Adjustable Bins on all models. It will lock in place. About the additional features. Troubleshooting Tips Installation Instructions Operating ...
The bin will lock in place. Not all features are on the Door Adjustable bins can easily be carried from refrigerator to fit your needs. Consumer Support 8 Adjustable Bins on all models. It will lock in place. About the additional features. Troubleshooting Tips Installation Instructions Operating ...
Owners Manual
Page 11
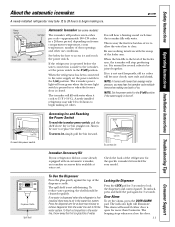
... to remove trapped air from the water line and to clear. ge.com Power Switch Green Power Light Icemaker Feeler Arm Automatic Icemaker (on ) position. The icemaker power light will stop producing ice. A newly installed refrigerator may be cleaned regularly. When the bin fills to the l ...on some models) The icemaker will illuminate. Dispenser Cradle Spill Shelf To Use the Dispenser Press the glass gently against the top of the refrigerator for the specific icemaker kit needed for 3 seconds. The spill shelf is shut off ) position. To reduce water spotting, the shelf ...
... to remove trapped air from the water line and to clear. ge.com Power Switch Green Power Light Icemaker Feeler Arm Automatic Icemaker (on ) position. The icemaker power light will stop producing ice. A newly installed refrigerator may be cleaned regularly. When the bin fills to the l ...on some models) The icemaker will illuminate. Dispenser Cradle Spill Shelf To Use the Dispenser Press the glass gently against the top of the refrigerator for the specific icemaker kit needed for 3 seconds. The spill shelf is shut off ) position. To reduce water spotting, the shelf ...

Owners Manual
Page 12
... parts. Consumer Support 12 If this is not practical, wring excess moisture out of shape. Do not wipe the refrigerator with a clean, soft cloth. Stainless steel (on the door handles and trim. Avoid cleaning cold glass shelves with soapy water. This helps keep the gaskets from sticking and bending out of sponge...
... parts. Consumer Support 12 If this is not practical, wring excess moisture out of shape. Do not wipe the refrigerator with a clean, soft cloth. Stainless steel (on the door handles and trim. Avoid cleaning cold glass shelves with soapy water. This helps keep the gaskets from sticking and bending out of sponge...
Owners Manual
Page 13
Safety Instructions Operating Instructions Installation Instructions Troubleshooting Tips Consumer Support ge.com Behind the Refrigerator Be careful when moving . 13 When pushing the refrigerator back, make sure you don't roll over the power cord or icemaker supply line (on some models) and ensure the anti-...open. Preparing to Move Secure all loose items such as base grille, shelves and drawers by pushing it to the refrigerator. When using a hand truck to move the refrigerator, do not rest the front or back of floor coverings can drop below freezing, have a qualified servicer drain ...
Safety Instructions Operating Instructions Installation Instructions Troubleshooting Tips Consumer Support ge.com Behind the Refrigerator Be careful when moving . 13 When pushing the refrigerator back, make sure you don't roll over the power cord or icemaker supply line (on some models) and ensure the anti-...open. Preparing to Move Secure all loose items such as base grille, shelves and drawers by pushing it to the refrigerator. When using a hand truck to move the refrigerator, do not rest the front or back of floor coverings can drop below freezing, have a qualified servicer drain ...
Owners Manual
Page 14
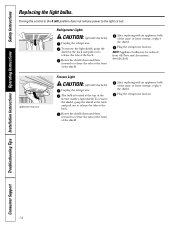
Refrigerator Lights CAUTION: Light bulbs may be ordered from GE Parts and Accessories, 800.626.2002. To remove the light shield, grasp the shield at the back and pull out to release the tabs at ... the tabs at the front of the freezer inside a light shield. Troubleshooting Tips Installation Instructions Operating Instructions Safety Instructions Replacing the light bulbs. Unplug the refrigerator. Rotate the shield down and then forward to release the tabs at the back. After replacing with an appliance bulb of the shield. Unplug the...
Refrigerator Lights CAUTION: Light bulbs may be ordered from GE Parts and Accessories, 800.626.2002. To remove the light shield, grasp the shield at the back and pull out to release the tabs at ... the tabs at the front of the freezer inside a light shield. Troubleshooting Tips Installation Instructions Operating Instructions Safety Instructions Replacing the light bulbs. Unplug the refrigerator. Rotate the shield down and then forward to release the tabs at the back. After replacing with an appliance bulb of the shield. Unplug the...
Owners Manual
Page 16
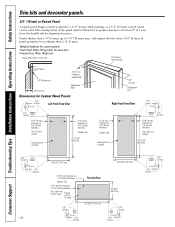
...) Clearance Handle Side 3/4″ (19 mm) Appearance Panel Dimensions for Custom Wood Panels 1/8″ (3 mm) Left Fresh Food Door 3/4″ (19 mm) Refrigerator Door Right Fresh Food Door 1/8″ (3 mm) 1/4″ (6 mm) 5/16″ (8 mm) minimum at 1/4″ (6 mm) thickness Top, left.... (8 kg) max. for custom panels: Fresh Food 10 lbs. (4.5 kg) max. Troubleshooting Tips Installation Instructions Operating Instructions Safety Instructions Trim kits and decorator panels. 3/4″ (19 mm) or Raised Panel A raised panel design screwed or glued to permit clearances of at ...
...) Clearance Handle Side 3/4″ (19 mm) Appearance Panel Dimensions for Custom Wood Panels 1/8″ (3 mm) Left Fresh Food Door 3/4″ (19 mm) Refrigerator Door Right Fresh Food Door 1/8″ (3 mm) 1/4″ (6 mm) 5/16″ (8 mm) minimum at 1/4″ (6 mm) thickness Top, left.... (8 kg) max. for custom panels: Fresh Food 10 lbs. (4.5 kg) max. Troubleshooting Tips Installation Instructions Operating Instructions Safety Instructions Trim kits and decorator panels. 3/4″ (19 mm) or Raised Panel A raised panel design screwed or glued to permit clearances of at ...
Owners Manual
Page 17
Refrigerator Installation 20 minutes Water Line Installation 30 minutes Anti-Tip Bracket Installation 20 minutes • Proper installation is the responsibility of this appliance requires basic mechanical skills. • Completion time - Save these ... Ferrule (sleeve) (icemaker models only) Phillips Head Screwdriver PREPARATION MOVING THE REFRIGERATOR INDOORS If the refrigerator will have to be removed. • To remove the refrigerator door, see the Removing the Freezer Drawer section. A GE water supply kit (containing tubing, shutoff valve, fittings and instructions) is...
Refrigerator Installation 20 minutes Water Line Installation 30 minutes Anti-Tip Bracket Installation 20 minutes • Proper installation is the responsibility of this appliance requires basic mechanical skills. • Completion time - Save these ... Ferrule (sleeve) (icemaker models only) Phillips Head Screwdriver PREPARATION MOVING THE REFRIGERATOR INDOORS If the refrigerator will have to be removed. • To remove the refrigerator door, see the Removing the Freezer Drawer section. A GE water supply kit (containing tubing, shutoff valve, fittings and instructions) is...
Owners Manual
Page 18
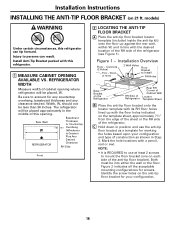
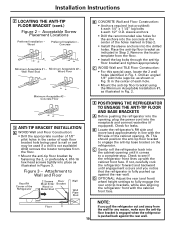
... rear wall, within W, and in line with the floor holes indicated on 21 ft. Install Anti-Tip Bracket packed with a pencil, nail or awl. Figure 1 - Figure 2 indicates all the acceptable mounting configurations for your configuration and type of the refrigerator. Both must be less than 36 inches. Width, W, should not be into...
... rear wall, within W, and in line with the floor holes indicated on 21 ft. Install Anti-Tip Bracket packed with a pencil, nail or awl. Figure 1 - Figure 2 indicates all the acceptable mounting configurations for your configuration and type of the refrigerator. Both must be less than 36 inches. Width, W, should not be into...
Owners Manual
Page 19
... nail or awl may be used if a drill is fully pushed up with the cabinet front face. Attachment to see if the refrigerator front lines up against the rear wall. 19 Installation Instructions 2 LOCATING THE ANTI-TIP FLOOR BRACKET (cont.) Figure 2 - Concrete...Floor 3 ANTI-TIP BRACKET INSTALLATION A WOOD Wall and Floor Construction: • Drill the appropriate number of 1/8" pilot holes in the center of the Refrigerator 2 Screws Floor Must Enter Bracket Wood or Metal Stud Wall Wall Plate Stud B CONCRETE Wall and Floor Construction: • Anchors required (not provided): ...
... nail or awl may be used if a drill is fully pushed up with the cabinet front face. Attachment to see if the refrigerator front lines up against the rear wall. 19 Installation Instructions 2 LOCATING THE ANTI-TIP FLOOR BRACKET (cont.) Figure 2 - Concrete...Floor 3 ANTI-TIP BRACKET INSTALLATION A WOOD Wall and Floor Construction: • Drill the appropriate number of 1/8" pilot holes in the center of the Refrigerator 2 Screws Floor Must Enter Bracket Wood or Metal Stud Wall Wall Plate Stud B CONCRETE Wall and Floor Construction: • Anchors required (not provided): ...
Owners Manual
Page 20
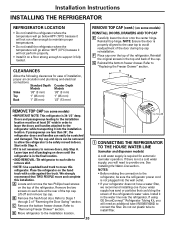
... on the hand truck with Step A. •If it into the wall outlet. • If your refrigerator does not have a water filter, we recommend installing one . Refer to the installation location. 20 Top Hinge B 1 CONNECTING THE REFRIGERATOR TO THE HOUSE WATER LINE (icemaker and dispenser models) A cold water supply is 34-1/2″ deep...) 1″ (25 mm) Back 1″ (25 mm) 1/2″ (13 mm) REMOVE TOP CAP (cont.) (on the top of "Reversing the Door Swing" section. If using GE SmartConnect™ Refrigerator Tubing Kit, you will need to the...
... on the hand truck with Step A. •If it into the wall outlet. • If your refrigerator does not have a water filter, we recommend installing one . Refer to the installation location. 20 Top Hinge B 1 CONNECTING THE REFRIGERATOR TO THE HOUSE WATER LINE (icemaker and dispenser models) A cold water supply is 34-1/2″ deep...) 1″ (25 mm) Back 1″ (25 mm) 1/2″ (13 mm) REMOVE TOP CAP (cont.) (on the top of "Reversing the Door Swing" section. If using GE SmartConnect™ Refrigerator Tubing Kit, you will need to the...
Owners Manual
Page 21
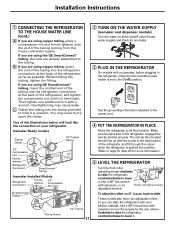
...is set to the O (off) position. You may cause leaks. Make sure the back side of the refrigerator, as far as possible. B If you are using GE SmartConnect™ tubing, insert the molded end of the illustrations below will look like the connection on 21' .... While holding the tubing, tighten the fitting. clockwise to raise the refrigerator, counterclockwise to lower it in position. Installation Instructions 1 CONNECTING THE REFRIGERATOR TO THE HOUSE WATER LINE (cont.) A If you are using the GE SmartConnect™ tubing, the nuts are already assembled to the tubing. ...
...is set to the O (off) position. You may cause leaks. Make sure the back side of the refrigerator, as far as possible. B If you are using GE SmartConnect™ tubing, insert the molded end of the illustrations below will look like the connection on 21' .... While holding the tubing, tighten the fitting. clockwise to raise the refrigerator, counterclockwise to lower it in position. Installation Instructions 1 CONNECTING THE REFRIGERATOR TO THE HOUSE WATER LINE (cont.) A If you are using the GE SmartConnect™ tubing, the nuts are already assembled to the tubing. ...
Owners Manual
Page 22
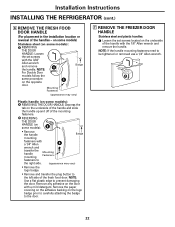
... logo badge prior to carefully attaching the badge to the right side. (appearance may vary) Plastic handle (on the opposite door. Installation Instructions INSTALLING THE REFRIGERATOR (cont.) 6 REMOVE THE FRESH FOOD DOOR HANDLE (For placement in the installation location or reversal of the handle with the 1/8″ Allen wrench and remove...
... logo badge prior to carefully attaching the badge to the right side. (appearance may vary) Plastic handle (on the opposite door. Installation Instructions INSTALLING THE REFRIGERATOR (cont.) 6 REMOVE THE FRESH FOOD DOOR HANDLE (For placement in the installation location or reversal of the handle with the 1/8″ Allen wrench and remove...
Owners Manual
Page 24
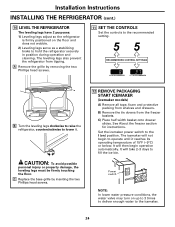
... valve may turn on ) position. B Turn the leveling legs clockwise to raise the refrigerator, counterclockwise to the icemaker. 24 Set the icemaker power switch to hold the refrigerator securely in position during operation and cleaning. See About the freezer section for instructions. ..., the leveling legs must be firmly touching the floor. Installation Instructions INSTALLING THE REFRIGERATOR (cont.) 10 LEVEL THE REFRIGERATOR The leveling legs have 2 purposes: 1) Leveling legs adjust so the refrigerator is firmly positioned on the floor and does not wobble. 2) Leveling legs serve...
... valve may turn on ) position. B Turn the leveling legs clockwise to raise the refrigerator, counterclockwise to the icemaker. 24 Set the icemaker power switch to hold the refrigerator securely in position during operation and cleaning. See About the freezer section for instructions. ..., the leveling legs must be firmly touching the floor. Installation Instructions INSTALLING THE REFRIGERATOR (cont.) 10 LEVEL THE REFRIGERATOR The leveling legs have 2 purposes: 1) Leveling legs adjust so the refrigerator is firmly positioned on the floor and does not wobble. 2) Leveling legs serve...


