
Owners Manual
Page 1
...Dispenser 11 Water Filter 6 Installation Instructions Installing the Anti-Tip Floor Bracket 18-19 Installing the Refrigerator 20-24 Installing the Water Line 33-35 Preparing to Install the Refrigerator 17 Removing and Replacing the Freezer Drawer 25, 26 Reversing the Door Swing (Single Door... . . . . . .36-40 Normal Operating Sounds 36 Consumer Support Consumer Support Back Cover Performance Data Sheet 43 State of the refrigerator compartment. 200D9366P008 49-60583 01-09 JR Customers 41 Owner's Manual and Installation Instructions Models 21 and 25 Congélateur inférieur...
...Dispenser 11 Water Filter 6 Installation Instructions Installing the Anti-Tip Floor Bracket 18-19 Installing the Refrigerator 20-24 Installing the Water Line 33-35 Preparing to Install the Refrigerator 17 Removing and Replacing the Freezer Drawer 25, 26 Reversing the Door Swing (Single Door... . . . . . .36-40 Normal Operating Sounds 36 Consumer Support Consumer Support Back Cover Performance Data Sheet 43 State of the refrigerator compartment. 200D9366P008 49-60583 01-09 JR Customers 41 Owner's Manual and Installation Instructions Models 21 and 25 Congélateur inférieur...

Owners Manual
Page 2
...in the freezer compartment when hands are not problems of this appliance only for "just a few days." I Unplug the refrigerator before it be removed prior to help prevent accidents. If you are getting rid of the cord be performed by a ...pinch point" areas; WARNING! I Setting either or both controls to do. Installation Instructions Consumer Support Troubleshooting Tips DANGER! Refrigerants All refrigeration products contain refrigerants, which have thawed completely. I Do not touch the cold surfaces in the area. NOTE: We strongly recommend that ...
...in the freezer compartment when hands are not problems of this appliance only for "just a few days." I Unplug the refrigerator before it be removed prior to help prevent accidents. If you are getting rid of the cord be performed by a ...pinch point" areas; WARNING! I Setting either or both controls to do. Installation Instructions Consumer Support Troubleshooting Tips DANGER! Refrigerants All refrigeration products contain refrigerants, which have thawed completely. I Do not touch the cold surfaces in the area. NOTE: We strongly recommend that ...
Owners Manual
Page 3
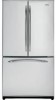
... remove the third (ground) prong from the outlet. Have the wall outlet and circuit checked by pulling on the power cord. The refrigerator should always be plugged into its own individual electrical outlet which has a voltage rating that shows cracks or abrasion damage along its length ...or at either end. Never unplug your refrigerator by a qualified electrician to make sure the outlet is your personal responsibility and obligation to roll over or damage the power cord. SAVE...
... remove the third (ground) prong from the outlet. Have the wall outlet and circuit checked by pulling on the power cord. The refrigerator should always be plugged into its own individual electrical outlet which has a voltage rating that shows cracks or abrasion damage along its length ...or at either end. Never unplug your refrigerator by a qualified electrician to make sure the outlet is your personal responsibility and obligation to roll over or damage the power cord. SAVE...

Owners Manual
Page 4
... the temperature controls. The temperature controls are preset in the factory at 37°F for the refrigerator compartment and 0°F for the refrigerator to the refrigerator. Setting either the WARMER or COLDER pad until the desired temperature is displayed. To change the temperature...the SET temperature based on and the display will go to the preset recommended settings. Allow 24 hours for either the refrigerator or the freezer until the desired temperature is shipped with temperature settings. (on some models) Installation Instructions Consumer Support Troubleshooting ...
... the temperature controls. The temperature controls are preset in the factory at 37°F for the refrigerator compartment and 0°F for the refrigerator to the refrigerator. Setting either the WARMER or COLDER pad until the desired temperature is displayed. To change the temperature...the SET temperature based on and the display will go to the preset recommended settings. Allow 24 hours for either the refrigerator or the freezer until the desired temperature is shipped with temperature settings. (on some models) Installation Instructions Consumer Support Troubleshooting ...

Owners Manual
Page 5
... with an Energy Saver feature. How to approximately 34°F (1°C), then it will show . After TurboCool is pressed again, the refrigerator compartment will turn off to maintain this setting. Over time, moisture can also be changed during TurboCool. Use TurboCool when adding a large amount...Saver feature enabled. Once activated, the compressor will return to the original setting. It can form on the front surface of the refrigerator cabinet, turn on immediately and the fans will sound if any door is not affected during TurboCool. The freezer temperature is open...
... with an Energy Saver feature. How to approximately 34°F (1°C), then it will show . After TurboCool is pressed again, the refrigerator compartment will turn off to maintain this setting. Over time, moisture can also be changed during TurboCool. Use TurboCool when adding a large amount...Saver feature enabled. Once activated, the compressor will return to the original setting. It can form on the front surface of the refrigerator cabinet, turn on immediately and the fans will sound if any door is not affected during TurboCool. The freezer temperature is open...

Owners Manual
Page 6
... it locks into place. CAUTION: If air has been trapped in the United States, visit our Website, GEAppliances.com, or call GE Parts and Accessories, 800.626.2002. Remove the protective foil from the dispenser. Installation Instructions Consumer Support Troubleshooting Tips 6 Use caution ...the temperature display. The filter cartridge should consult the yellow pages for 3 seconds. When to spurt from the end of the refrigerator compartment. Replacement Filters: To order additional filter cartridges in the system, the filter cartridge may be replaced when the replacement indicator...
... it locks into place. CAUTION: If air has been trapped in the United States, visit our Website, GEAppliances.com, or call GE Parts and Accessories, 800.626.2002. Remove the protective foil from the dispenser. Installation Instructions Consumer Support Troubleshooting Tips 6 Use caution ...the temperature display. The filter cartridge should consult the yellow pages for 3 seconds. When to spurt from the end of the refrigerator compartment. Replacement Filters: To order additional filter cartridges in the system, the filter cartridge may be replaced when the replacement indicator...
Owners Manual
Page 7
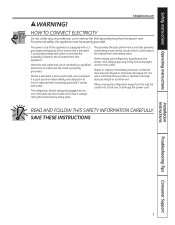
Refrigerator Compartment To remove: Remove all items from shelf. GEAppliances.com Spillproof Shelves (on some models) Spillproof shelves have wire shelves that the shelf sits flat ... Consumer Support 7 Slide-Out Spillproof Shelf (on some models) The slide-out spillproof shelf allows you to lower shelves. Not all the way in the refrigerator compartment are on the track. Rearranging the Shelves Shelves in before you push the shelves all features are adjustable.
Refrigerator Compartment To remove: Remove all items from shelf. GEAppliances.com Spillproof Shelves (on some models) Spillproof shelves have wire shelves that the shelf sits flat ... Consumer Support 7 Slide-Out Spillproof Shelf (on some models) The slide-out spillproof shelf allows you to lower shelves. Not all the way in the refrigerator compartment are on the track. Rearranging the Shelves Shelves in before you push the shelves all features are adjustable.

Owners Manual
Page 8
... the Door To remove: Lift the bin straight up, then pull out. Non-Adjustable Bins on the Door Adjustable bins can easily be carried from refrigerator to fit your needs. Installation Instructions Consumer Support Troubleshooting Tips 8 The bin will lock in place. About the additional features. Operating Instructions Safety Instructions About...
... the Door To remove: Lift the bin straight up, then pull out. Non-Adjustable Bins on the Door Adjustable bins can easily be carried from refrigerator to fit your needs. Installation Instructions Consumer Support Troubleshooting Tips 8 The bin will lock in place. About the additional features. Operating Instructions Safety Instructions About...

Owners Manual
Page 11
... turn green when the freezer light switch is released. Be sure nothing interferes with lower-than 2 minutes. Check the back of the refrigerator for the specific icemaker kit needed for 2-3 seconds after the button is pressed in the water line, throw away the first 6 glassfuls...other use conditions. GEAppliances.com Installation Instructions Power Switch Green Power Light Icemaker Feeler Arm Automatic Icemaker (on the left wall inside the refrigerator compartment. If ice is shut off ) position. The spill shelf is located on some models) Press the glass gently against the ...
... turn green when the freezer light switch is released. Be sure nothing interferes with lower-than 2 minutes. Check the back of the refrigerator for the specific icemaker kit needed for 2-3 seconds after the button is pressed in the water line, throw away the first 6 glassfuls...other use conditions. GEAppliances.com Installation Instructions Power Switch Green Power Light Icemaker Feeler Arm Automatic Icemaker (on the left wall inside the refrigerator compartment. If ice is shut off ) position. The spill shelf is located on some models) Press the glass gently against the ...
Owners Manual
Page 12
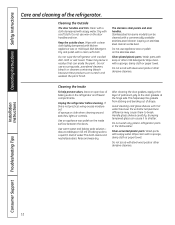
.... Silver-plated plastic parts. Do not scrub with a soft cloth. After cleaning the door gaskets, apply a thin layer of the refrigerator. Bumping tempered glass can be cleaned with a commercially available stainless steel cleaner. Wash parts with steel-wool pads or other mild detergents.... Do not scrub with soapy water. Installation Instructions Consumer Support Troubleshooting Tips 12 Do not wipe the refrigerator with a clean, soft cloth. The stainless steel panels and door handles. Use an appliance wax polish on stainless steel cleaner works...
.... Silver-plated plastic parts. Do not scrub with a soft cloth. After cleaning the door gaskets, apply a thin layer of the refrigerator. Bumping tempered glass can be cleaned with a commercially available stainless steel cleaner. Wash parts with steel-wool pads or other mild detergents.... Do not scrub with soapy water. Installation Instructions Consumer Support Troubleshooting Tips 12 Do not wipe the refrigerator with a clean, soft cloth. The stainless steel panels and door handles. Use an appliance wax polish on stainless steel cleaner works...

Owners Manual
Page 13
...to the O (off) position and shut off the water supply to one quart (1 liter) of the refrigerator. This could damage the refrigerator. Preparing to prevent damage. Be sure the refrigerator stays in place to Move Secure all loose items such as base grille, shelves and drawers by pushing it... to position by taping them securely in an upright position during moving the refrigerator away from the sides of water. Clean the interior with embossed surfaces. Handle only from the wall. If the temperature can be damaged...
...to the O (off) position and shut off the water supply to one quart (1 liter) of the refrigerator. This could damage the refrigerator. Preparing to prevent damage. Be sure the refrigerator stays in place to Move Secure all loose items such as base grille, shelves and drawers by pushing it... to position by taping them securely in an upright position during moving the refrigerator away from the sides of water. Clean the interior with embossed surfaces. Handle only from the wall. If the temperature can be damaged...

Owners Manual
Page 14
...front of the same or lower wattage, replace the shield. Plug the refrigerator back in . Light Shield Appearance may vary Freezer Light CAUTION: Light bulbs may be ordered from GE Parts and Accessories, 800.626.2002. To remove, grasp the shield at...: Appliance bulbs may be hot. Installation Instructions Consumer Support Troubleshooting Tips 14 Refrigerator Lights (on some models) CAUTION: Light bulbs may be hot. Plug the refrigerator back in . Unplug the refrigerator. Operating Instructions Safety Instructions Replacing the light bulbs. After replacing with an ...
...front of the same or lower wattage, replace the shield. Plug the refrigerator back in . Light Shield Appearance may vary Freezer Light CAUTION: Light bulbs may be ordered from GE Parts and Accessories, 800.626.2002. To remove, grasp the shield at...: Appliance bulbs may be hot. Installation Instructions Consumer Support Troubleshooting Tips 14 Refrigerator Lights (on some models) CAUTION: Light bulbs may be hot. Plug the refrigerator back in . Unplug the refrigerator. Operating Instructions Safety Instructions Replacing the light bulbs. After replacing with an ...
Owners Manual
Page 16
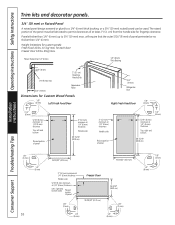
... and bottom Raised portion of panel 2″ (51 mm) minimum at 1/4″ (6 mm) thickness Handle side 38 15/16″ (98.9 cm) 3/4″ (19 mm) Refrigerator Door Right Fresh Food Door 1/8″ (3 mm) 2″ (51 mm) minimum at 1/4″ (6 mm) thickness Handle side Raised portion of panel 1/8″ (3 mm) Freezer Door...
... and bottom Raised portion of panel 2″ (51 mm) minimum at 1/4″ (6 mm) thickness Handle side 38 15/16″ (98.9 cm) 3/4″ (19 mm) Refrigerator Door Right Fresh Food Door 1/8″ (3 mm) 2″ (51 mm) minimum at 1/4″ (6 mm) thickness Handle side Raised portion of panel 1/8″ (3 mm) Freezer Door...

Owners Manual
Page 17
... models only) Phillips-Head Screwdriver PREPARATION MOVING THE REFRIGERATOR INDOORS If the refrigerator will have to improper installation is the responsibility of this appliance requires basic mechanical skills. • Completion time - A GE water supply kit (containing tubing, shut-off valve...8226; IMPORTANT - Refrigerator Installation 20 minutes Water Line Installation 30 minutes Anti-Tip Bracket Installation 20 minutes • Proper installation is not covered under the Warranty. Keep these instructions for future reference. • Skill level - Call 800.GE.CARES (800.432...
... models only) Phillips-Head Screwdriver PREPARATION MOVING THE REFRIGERATOR INDOORS If the refrigerator will have to improper installation is the responsibility of this appliance requires basic mechanical skills. • Completion time - A GE water supply kit (containing tubing, shut-off valve...8226; IMPORTANT - Refrigerator Installation 20 minutes Water Line Installation 30 minutes Anti-Tip Bracket Installation 20 minutes • Proper installation is not covered under the Warranty. Keep these instructions for future reference. • Skill level - Call 800.GE.CARES (800.432...
Owners Manual
Page 18
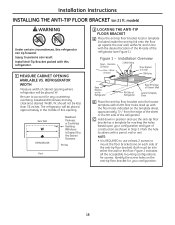
... screws to account for marking the holes based upon your configuration. 18 Be sure to mount the floor bracket (one on 21 ft. Rear Wall W REFRIGERATOR Baseboard Thickness or Countertop Overhang (Whichever Is Greater) Plus Any Desired Clearance RH Side Front 2 LOCATING THE ANTI-TIP FLOOR BRACKET ...floor bracket locator template (included inside the anti-tip kit) onto the floor up with the desired location of the RH side of this refrigerator. 1 MEASURE CABINET OPENING AVAILABLE VS. Install Anti-Tip Bracket packed with a pencil, nail or awl. Figure 2 indicates all the ...
... screws to account for marking the holes based upon your configuration. 18 Be sure to mount the floor bracket (one on 21 ft. Rear Wall W REFRIGERATOR Baseboard Thickness or Countertop Overhang (Whichever Is Greater) Plus Any Desired Clearance RH Side Front 2 LOCATING THE ANTI-TIP FLOOR BRACKET ...floor bracket locator template (included inside the anti-tip kit) onto the floor up with the desired location of the RH side of this refrigerator. 1 MEASURE CABINET OPENING AVAILABLE VS. Install Anti-Tip Bracket packed with a pencil, nail or awl. Figure 2 indicates all the ...
Owners Manual
Page 19
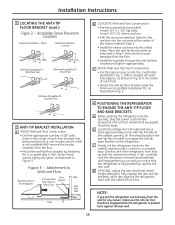
... Wood Preferred Installation - Wood Floor Minimum Acceptable #3 - Figure 3 - Attachment to fully engage the rear anti-tip brackets, while also aligning the refrigerator front with the RH side of each 1/2" O.D. Remove the locator template from the floor. • Mount the anti-tip floor bracket by fastening ...the 2, or preferably 4, #10-16 hex-head screws tightly into place as illustrated in the center of the Refrigerator 2 Screws Must Enter Wood or Metal Stud Floor Bracket Wall Wall Plate Stud Floor B CONCRETE Wall and Floor Construction: • ...
... Wood Preferred Installation - Wood Floor Minimum Acceptable #3 - Figure 3 - Attachment to fully engage the rear anti-tip brackets, while also aligning the refrigerator front with the RH side of each 1/2" O.D. Remove the locator template from the floor. • Mount the anti-tip floor bracket by fastening ...the 2, or preferably 4, #10-16 hex-head screws tightly into place as illustrated in the center of the Refrigerator 2 Screws Must Enter Wood or Metal Stud Floor Bracket Wall Wall Plate Stud Floor B CONCRETE Wall and Floor Construction: • ...

Owners Manual
Page 20
...REFRIGERATOR REFRIGERATOR LOCATION • Do not install the refrigerator...not install the refrigerator where the ...1 CONNECTING THE REFRIGERATOR TO THE HOUSE ... 3 of the refrigerator. Do not cut...refrigerator. If passageways are less than 36″, the refrigerator doors and handles can be removed to allow the refrigerator to the refrigerator...refrigerator to each side to remove skid. • NOTE: Use a padded hand truck to the installation location must be scratched and damaged. Lift off and remove top cap. B Remove the fresh-food door. If using GE SmartConnect™ Refrigerator...
...REFRIGERATOR REFRIGERATOR LOCATION • Do not install the refrigerator...not install the refrigerator where the ...1 CONNECTING THE REFRIGERATOR TO THE HOUSE ... 3 of the refrigerator. Do not cut...refrigerator. If passageways are less than 36″, the refrigerator doors and handles can be removed to allow the refrigerator to the refrigerator...refrigerator to each side to remove skid. • NOTE: Use a padded hand truck to the installation location must be scratched and damaged. Lift off and remove top cap. B Remove the fresh-food door. If using GE SmartConnect™ Refrigerator...

Owners Manual
Page 21
...21' Counter Depth models: These models also have rear adjustable rollers so you are using GE SmartConnect™ tubing, insert the molded end of the tubing into the refrigerator connection, at the back of the refrigerator, and tighten the compression nut until it is set to the O (off valve (... LINE (cont.) A If you are using copper tubing, insert the end of the tubing into the refrigerator connection, at the back of the refrigerator, as far as possible. B If you are using the GE SmartConnect™ tubing, the nuts are using copper tubing, place a compression nut and ferrule (sleeve) ...
...21' Counter Depth models: These models also have rear adjustable rollers so you are using GE SmartConnect™ tubing, insert the molded end of the tubing into the refrigerator connection, at the back of the refrigerator, and tighten the compression nut until it is set to the O (off valve (... LINE (cont.) A If you are using copper tubing, insert the end of the tubing into the refrigerator connection, at the back of the refrigerator, as far as possible. B If you are using the GE SmartConnect™ tubing, the nuts are using copper tubing, place a compression nut and ferrule (sleeve) ...
Owners Manual
Page 22
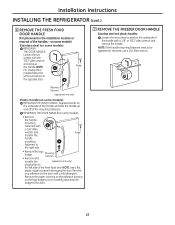
... screws located on the logo badge prior to carefully attaching the badge to the right side. • Remove the logo badge. Installation Instructions INSTALLING THE REFRIGERATOR (cont.) 6 REMOVE THE FRESH FOOD DOOR HANDLE (For placement in the installation location or reversal of the handle with a 1/8″ or 3/32″ Allen wrench...
... screws located on the logo badge prior to carefully attaching the badge to the right side. • Remove the logo badge. Installation Instructions INSTALLING THE REFRIGERATOR (cont.) 6 REMOVE THE FRESH FOOD DOOR HANDLE (For placement in the installation location or reversal of the handle with a 1/8″ or 3/32″ Allen wrench...
Owners Manual
Page 24
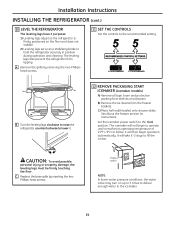
... the controls to lower it reaches its operating temperature of 15°F (-9°C) or below. B Turn the leveling legs clockwise to raise the refrigerator, counterclockwise to the recommended setting. Set the icemaker power switch to the I (on the floor and does not wobble. 2) Leveling legs serve...or property damage, the leveling legs must be firmly touching the floor. The leveling legs also prevent the refrigerator from tipping. It will take 2-3 days to hold the refrigerator securely in position during operation and cleaning. It will then begin to the icemaker. 24 Power switch NOTE...
... the controls to lower it reaches its operating temperature of 15°F (-9°C) or below. B Turn the leveling legs clockwise to raise the refrigerator, counterclockwise to the recommended setting. Set the icemaker power switch to the I (on the floor and does not wobble. 2) Leveling legs serve...or property damage, the leveling legs must be firmly touching the floor. The leveling legs also prevent the refrigerator from tipping. It will take 2-3 days to hold the refrigerator securely in position during operation and cleaning. It will then begin to the icemaker. 24 Power switch NOTE...


