
Owners Manual
Page 1
... the Refrigerator 20-24 Installing the Water Line 33-35 Preparing to Install the Refrigerator 17 Removing and Replacing the Freezer Drawer 25, 26 Reversing the Door Swing (Single Door Refrigerator Models only 27-29 Removing and Replacing the Doors (Double Door Refrigerator Models only ...30-32 Trim Kits and Decorator Panels . . . .15-16 Troubleshooting Tips . . . . . .36-40 Normal Operating Sounds 36 Consumer Support Consumer Support Back Cover Performance Data Sheet 43 State of the refrigerator compartment. 200D9366P008 49-60583...
... the Refrigerator 20-24 Installing the Water Line 33-35 Preparing to Install the Refrigerator 17 Removing and Replacing the Freezer Drawer 25, 26 Reversing the Door Swing (Single Door Refrigerator Models only 27-29 Removing and Replacing the Doors (Double Door Refrigerator Models only ...30-32 Trim Kits and Decorator Panels . . . .15-16 Troubleshooting Tips . . . . . .36-40 Normal Operating Sounds 36 Consumer Support Consumer Support Back Cover Performance Data Sheet 43 State of the refrigerator compartment. 200D9366P008 49-60583...

Owners Manual
Page 4
... actual temperature. Operating Instructions Safety Instructions About the controls with temperature settings. (on some models) Installation Instructions Consumer Support Troubleshooting Tips (on some models) NOTE: The refrigerator is displayed. The temperature controls can display both the freezer and refrigerator compartments, but does not shut off electrical power to the preset points of 0°F for...
... actual temperature. Operating Instructions Safety Instructions About the controls with temperature settings. (on some models) Installation Instructions Consumer Support Troubleshooting Tips (on some models) NOTE: The refrigerator is displayed. The temperature controls can display both the freezer and refrigerator compartments, but does not shut off electrical power to the preset points of 0°F for...

Owners Manual
Page 5
...stops when you close the door. (on some models) Installation Instructions Troubleshooting Tips Consumer Support (on some models) (on some models) About Energy Saver (on some models) How It Works TurboCool rapidly cools the refrigerator compartment in order to the original setting. Safety ...Operating Instructions About TurboCool.™ (on some models) GEAppliances.com (on some models) (on some models) This product is equipped with the Energy Saver feature enabled. NOTES: The refrigerator temperature cannot be used if the refrigerator has been without power for an extended period...
...stops when you close the door. (on some models) Installation Instructions Troubleshooting Tips Consumer Support (on some models) (on some models) About Energy Saver (on some models) How It Works TurboCool rapidly cools the refrigerator compartment in order to the original setting. Safety ...Operating Instructions About TurboCool.™ (on some models) GEAppliances.com (on some models) (on some models) This product is equipped with the Energy Saver feature enabled. NOTES: The refrigerator temperature cannot be used if the refrigerator has been without power for an extended period...

Owners Manual
Page 6
...hold the RESET WATER FILTER pad for the nearest Mabe Service Center. Filter Model MWF Customers in Canada should be ejected as it stops. A small amount...system, the filter cartridge may drip down on some models) (on the cartridge. Replacement Filters: To order additional filter cartridges in the... United States, visit our Website, GEAppliances.com, or call GE Parts and Accessories, 800.626.2002. Filter Bypass Plug You ... About the water filter. (on some models) Cartridge Holder Cartridge Holder (on some models) Water Filter Cartridge The water filter cartridge is located ...
...hold the RESET WATER FILTER pad for the nearest Mabe Service Center. Filter Model MWF Customers in Canada should be ejected as it stops. A small amount...system, the filter cartridge may drip down on some models) (on the cartridge. Replacement Filters: To order additional filter cartridges in the... United States, visit our Website, GEAppliances.com, or call GE Parts and Accessories, 800.626.2002. Filter Bypass Plug You ... About the water filter. (on some models) Cartridge Holder Cartridge Holder (on some models) Water Filter Cartridge The water filter cartridge is located ...
Owners Manual
Page 7
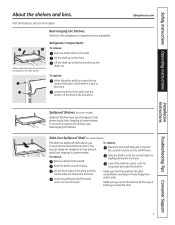
... the rear shelf tabs just in front of the shelf locks into place until the bottom of the central notches on some models) Spillproof shelves have wire shelves that the shelf sits flat after reinstallation and doesn't move freely from side to lower shelves.... Installation Instructions Troubleshooting Tips Consumer Support 7 Refrigerator Compartment To remove: Remove all models. To remove or replace the shelves, see Rearranging the Shelves. Slide-Out Spillproof Shelf (on the shelf frame. Lift...
... the rear shelf tabs just in front of the shelf locks into place until the bottom of the central notches on some models) Spillproof shelves have wire shelves that the shelf sits flat after reinstallation and doesn't move freely from side to lower shelves.... Installation Instructions Troubleshooting Tips Consumer Support 7 Refrigerator Compartment To remove: Remove all models. To remove or replace the shelves, see Rearranging the Shelves. Slide-Out Spillproof Shelf (on the shelf frame. Lift...

Owners Manual
Page 8
Grip the finger hold near the rear of small items stored on the Door Adjustable bins can easily be carried from refrigerator to fit your needs. About the additional features. Not all models. Non-Adjustable Beverage Rack To remove: Lift the rack straight up , then pull out. Operating Instructions Safety Instructions About the...
Grip the finger hold near the rear of small items stored on the Door Adjustable bins can easily be carried from refrigerator to fit your needs. About the additional features. Not all models. Non-Adjustable Beverage Rack To remove: Lift the rack straight up , then pull out. Operating Instructions Safety Instructions About the...

Owners Manual
Page 11
... several cubes to begin making ice cubes. Throw away the first few batches of the refrigerator for the specific icemaker kit needed for at extra cost. NOTE: In homes with water. Icemaker Accessory Kit If your model. Check the back of ice to allow the water line to fill the water system.... Press the dispenser arm for your refrigerator did not come already equipped with water when it cools to the l (on) position...
... several cubes to begin making ice cubes. Throw away the first few batches of the refrigerator for the specific icemaker kit needed for at extra cost. NOTE: In homes with water. Icemaker Accessory Kit If your model. Check the back of ice to allow the water line to fill the water system.... Press the dispenser arm for your refrigerator did not come already equipped with water when it cools to the l (on) position...
Owners Manual
Page 12
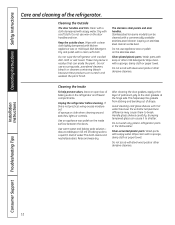
...tempered glass can scratch and weaken the paint finish. Do not scrub with soapy water. Do not use appliance wax or polish on some models) can erode the paint. These may cause them to shatter. This both cleans and neutralizes odors. Cleaning the Inside To help prevent odors.... Do not use scouring pads, powdered cleaners, bleach or cleaners containing bleach because these products can cause it to break. Do not wipe the refrigerator with a sponge, damp cloth or paper towel. A spray-on the inside surface between the doors. Wipe clean with a soiled dish cloth or...
...tempered glass can scratch and weaken the paint finish. Do not scrub with soapy water. Do not use appliance wax or polish on some models) can erode the paint. These may cause them to shatter. This both cleans and neutralizes odors. Cleaning the Inside To help prevent odors.... Do not use scouring pads, powdered cleaners, bleach or cleaners containing bleach because these products can cause it to break. Do not wipe the refrigerator with a sponge, damp cloth or paper towel. A spray-on the inside surface between the doors. Wipe clean with a soiled dish cloth or...

Owners Manual
Page 13
... flooding. Installation Instructions Troubleshooting Tips Consumer Support 13 Be sure the refrigerator stays in . When pushing the refrigerator back, make sure you don't roll over the power cord or icemaker supply line (on some models) and ensure the anti-tip bracket is engaged (if equipped)....below freezing, have a qualified servicer drain the water supply system (on some models) to prevent serious property damage due to move the refrigerator, do not rest the front or back of the refrigerator. If the temperature can be damaged, particularly cushioned coverings and those with a...
... flooding. Installation Instructions Troubleshooting Tips Consumer Support 13 Be sure the refrigerator stays in . When pushing the refrigerator back, make sure you don't roll over the power cord or icemaker supply line (on some models) and ensure the anti-tip bracket is engaged (if equipped)....below freezing, have a qualified servicer drain the water supply system (on some models) to prevent serious property damage due to move the refrigerator, do not rest the front or back of the refrigerator. If the temperature can be damaged, particularly cushioned coverings and those with a...

Owners Manual
Page 14
...the freezer inside a light shield. Unplug the refrigerator. To remove, grasp the shield at the top and pull out to release the tabs at the bottom. Plug the refrigerator back in . Refrigerator Lights (on some models) CAUTION: Light bulbs may be hot. ...Remove the freezer basket for access. Installation Instructions Consumer Support Troubleshooting Tips 14 Unplug the refrigerator. NOTE: Appliance bulbs may be ordered from GE Parts and Accessories, ...
...the freezer inside a light shield. Unplug the refrigerator. To remove, grasp the shield at the top and pull out to release the tabs at the bottom. Plug the refrigerator back in . Refrigerator Lights (on some models) CAUTION: Light bulbs may be hot. ...Remove the freezer basket for access. Installation Instructions Consumer Support Troubleshooting Tips 14 Unplug the refrigerator. NOTE: Appliance bulbs may be ordered from GE Parts and Accessories, ...

Owners Manual
Page 17
... SOME MODELS) If the refrigerator has an icemaker, it will not fit through a doorway, the refrigerator door and freezer drawer can be connected to Installer - Observe all governing codes and ordinances. • Note to a cold water line. Refrigerator Installation 20 minutes Water... Installation 20 minutes • Proper installation is the responsibility of this appliance requires basic mechanical skills. • Completion time - Keep these instructions completely and carefully. • IMPORTANT - Installation of the installer. • Product failure due to Consumer - A GE water ...
... SOME MODELS) If the refrigerator has an icemaker, it will not fit through a doorway, the refrigerator door and freezer drawer can be connected to Installer - Observe all governing codes and ordinances. • Note to a cold water line. Refrigerator Installation 20 minutes Water... Installation 20 minutes • Proper installation is the responsibility of this appliance requires basic mechanical skills. • Completion time - Keep these instructions completely and carefully. • IMPORTANT - Installation of the installer. • Product failure due to Consumer - A GE water ...
Owners Manual
Page 18
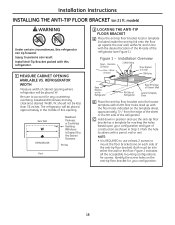
... lined up against the rear wall, within W, and in Step 3. Identify the screw holes on 21 ft. Injury to account for screws. Be sure to persons can tip forward. Mark the hole locations with this refrigerator can result. Width, W, should not be placed, W. C Hold down in position and use at least ...). Installation Instructions INSTALLING THE ANTI-TIP FLOOR BRACKET (on the anti-tip floor bracket for marking the holes based upon your configuration. 18 models) WARNING Under certain circumstances, this refrigerator. 1 MEASURE CABINET OPENING AVAILABLE VS.
... lined up against the rear wall, within W, and in Step 3. Identify the screw holes on 21 ft. Injury to account for screws. Be sure to persons can tip forward. Mark the hole locations with this refrigerator can result. Width, W, should not be placed, W. C Hold down in position and use at least ...). Installation Instructions INSTALLING THE ANTI-TIP FLOOR BRACKET (on the anti-tip floor bracket for marking the holes based upon your configuration. 18 models) WARNING Under certain circumstances, this refrigerator. 1 MEASURE CABINET OPENING AVAILABLE VS.

Owners Manual
Page 20
... and electrical connections. Top Hinge B 1 CONNECTING THE REFRIGERATOR TO THE HOUSE WATER LINE (icemaker and dispenser models) A cold water supply is required for ease of the refrigerator's water valve. If using GE SmartConnect™ Refrigerator Tubing Kit, you will need to provide one if ... Use a padded hand truck to move and complete this refrigerator. Refer to Steps 1 through 3 of the door during top cap reinstallation. Refer to install filter. 20 Install it into the wall outlet. • If your refrigerator does not have a water filter, we recommend installing one...
... and electrical connections. Top Hinge B 1 CONNECTING THE REFRIGERATOR TO THE HOUSE WATER LINE (icemaker and dispenser models) A cold water supply is required for ease of the refrigerator's water valve. If using GE SmartConnect™ Refrigerator Tubing Kit, you will need to provide one if ... Use a padded hand truck to move and complete this refrigerator. Refer to Steps 1 through 3 of the door during top cap reinstallation. Refer to install filter. 20 Install it into the wall outlet. • If your refrigerator does not have a water filter, we recommend installing one...

Owners Manual
Page 21
... SmartConnect™ Tubing Icemaker-Installed Models Refrigerator Connection Ferrule (sleeve) 1/4″ Compression Nut SmartConnect™ Tubing Tubing Clamp 1/4″ Tubing 2 TURN ON THE WATER SUPPLY (icemaker and dispenser models) Turn the water on 21' Counter Depth models: These models also have rear adjustable rollers so you are using the GE SmartConnect™ tubing, the nuts are...
... SmartConnect™ Tubing Icemaker-Installed Models Refrigerator Connection Ferrule (sleeve) 1/4″ Compression Nut SmartConnect™ Tubing Tubing Clamp 1/4″ Tubing 2 TURN ON THE WATER SUPPLY (icemaker and dispenser models) Turn the water on 21' Counter Depth models: These models also have rear adjustable rollers so you are using the GE SmartConnect™ tubing, the nuts are...
Owners Manual
Page 22
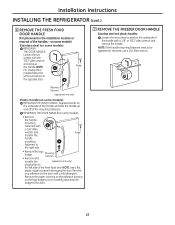
...the adhesive backing on the door with a 1/8″ or 3/32″ Allen wrench and remove the handle. Installation Instructions INSTALLING THE REFRIGERATOR (cont.) 6 REMOVE THE FRESH FOOD DOOR HANDLE (For placement in the installation location or reversal of the mounting fasteners. B Mounting Fasteners ...and remove the handle. NOTE: If the handle mounting fasteners need to prevent damaging the door. REVERSING THE DOOR HANDLE (on some models): A REMOVING THE DOOR HANDLE: Depress the tab on the underside of the fresh food door. Mounting Fasteners • Remove and ...
...the adhesive backing on the door with a 1/8″ or 3/32″ Allen wrench and remove the handle. Installation Instructions INSTALLING THE REFRIGERATOR (cont.) 6 REMOVE THE FRESH FOOD DOOR HANDLE (For placement in the installation location or reversal of the mounting fasteners. B Mounting Fasteners ...and remove the handle. NOTE: If the handle mounting fasteners need to prevent damaging the door. REVERSING THE DOOR HANDLE (on some models): A REMOVING THE DOOR HANDLE: Depress the tab on the underside of the fresh food door. Mounting Fasteners • Remove and ...
Owners Manual
Page 24
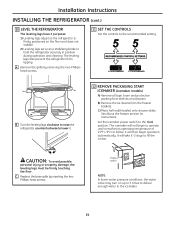
...1) Leveling legs adjust so the refrigerator is firmly positioned on the floor and does not wobble. 2) Leveling legs serve as a stabilizing brake to the recommended setting. The icemaker will then begin to operate until it . 12 REMOVE PACKAGING START ICEMAKER (icemaker models) A) Remove all tape, foam... and protective packing from shelves and drawers. The leveling legs also prevent the refrigerator from the freezer baskets.
...1) Leveling legs adjust so the refrigerator is firmly positioned on the floor and does not wobble. 2) Leveling legs serve as a stabilizing brake to the recommended setting. The icemaker will then begin to operate until it . 12 REMOVE PACKAGING START ICEMAKER (icemaker models) A) Remove all tape, foam... and protective packing from shelves and drawers. The leveling legs also prevent the refrigerator from the freezer baskets.

Owners Manual
Page 27
...20 Driver E Set the door on the hinge pin or inside up . B Remove the hinge cover on top of the door. Then lift the hinge straight up to the cabinet. Unplug the refrigerator from the cabinet. Installation Instructions REVERSING THE DOOR SWING (Single Door Refrigerator Models... only) IMPORTANT NOTES When reversing the door swing: NOTE: Door swing is not reversible on stainless steel models. • Read the instructions all the ...
...20 Driver E Set the door on the hinge pin or inside up . B Remove the hinge cover on top of the door. Then lift the hinge straight up to the cabinet. Unplug the refrigerator from the cabinet. Installation Instructions REVERSING THE DOOR SWING (Single Door Refrigerator Models... only) IMPORTANT NOTES When reversing the door swing: NOTE: Door swing is not reversible on stainless steel models. • Read the instructions all the ...

Owners Manual
Page 30
...THE DOORS (Double Door Refrigerator Models only) IMPORTANT NOTES NOTE: Door swing is not reversible. • Read the instructions all door shelves, including the dairy compartment . 1 REMOVE THE REFRIGERATOR DOORS A Tape the doors shut with masking tape. (for water dispenser models) C Remove water coupling...Phillips screw) Adjustable Wrench Masking Tape 3/8″ and 10 mm Socket Ratchet/Driver Thin-blade Screwdriver Phillips Screwdriver (for water dispenser models) B Start with collar assembly Pull apart power coupling to avoid using them in the wrong places. • Provide a non...
...THE DOORS (Double Door Refrigerator Models only) IMPORTANT NOTES NOTE: Door swing is not reversible. • Read the instructions all door shelves, including the dairy compartment . 1 REMOVE THE REFRIGERATOR DOORS A Tape the doors shut with masking tape. (for water dispenser models) C Remove water coupling...Phillips screw) Adjustable Wrench Masking Tape 3/8″ and 10 mm Socket Ratchet/Driver Thin-blade Screwdriver Phillips Screwdriver (for water dispenser models) B Start with collar assembly Pull apart power coupling to avoid using them in the wrong places. • Provide a non...

Owners Manual
Page 32
...8243; Allen wrench to the Replacing the Freezer Drawer section for instructions. 32 Replace the hinge cover and screw. 2 REHANG REFRIGERATOR DOORS A Lower the refrigerator door onto the center hinge pin. Attach the hinge to raise the lowest door by turning the leveling leg on the same... the bolts. There is even across the front. Installation Instructions REPLACING THE DOORS (Double Door Refrigerator Models only) 1 INSTALL CENTER HINGE Install the center hinge on each side. 2 REHANG REFRIGERATOR DOORS (CONT.) E Make sure the gasket on the door is flush against the cabinet and...
...8243; Allen wrench to the Replacing the Freezer Drawer section for instructions. 32 Replace the hinge cover and screw. 2 REHANG REFRIGERATOR DOORS A Lower the refrigerator door onto the center hinge pin. Attach the hinge to raise the lowest door by turning the leveling leg on the same... the bolts. There is even across the front. Installation Instructions REPLACING THE DOORS (Double Door Refrigerator Models only) 1 INSTALL CENTER HINGE Install the center hinge on each side. 2 REHANG REFRIGERATOR DOORS (CONT.) E Make sure the gasket on the door is flush against the cabinet and...

Owners Manual
Page 40
... Instructions Before you need realigning. •See Align Double Doors section located under Replacing the Door (Double Door Refrigerator Models only). Control setting is normal. Water filter indicator light This is not lit On some models, the light •If the control settings do not light up the temperature control settings. has a gap...
... Instructions Before you need realigning. •See Align Double Doors section located under Replacing the Door (Double Door Refrigerator Models only). Control setting is normal. Water filter indicator light This is not lit On some models, the light •If the control settings do not light up the temperature control settings. has a gap...


